|
|
|
|
|
|
Idle started hanging high, then slowly dropping back down. Got worse until it would drop any more. Typically, fast idle on Djet=vacuum leak. But I've been through the entire system, replaced all the seals and hoses, eliminated several (aar, decel valve, cold start valve, etc.), and problem persisted. Timing on. Checked the vacuum canister on the dizzy and found it would not pull a vacuum at all. So my theory is the canister was failing, which would cause it to not pull hard enough to promptly retard the timing at idle. But it would come down after a few seconds. Once it failed completely, it would never pull it down. So, got a good deal on a good vacuum canister, and refurbed the dizzy to make sure the advance/retard plates were working properly. Bottom line, it's all good now. Here are a few photos and notes from the dizzy cleanup... Removed the dizzy. Noted where the rotor was pointing, pulled it, noted where the notch was facing so I wouldn't risk putting it back 180 degrees off. Loosened the long timing adjustment nut so dizzy would rotate freely. Rotated CCW far enough to expose the hold-down nut (which was hiding under the vacuum canister). Removed nut and pulled dizzy out. Pay attention to the coil wires, positive and negative. My Pertronix wires are red and black / pos and neg, but with points note which terminal the green wire goes to. Removed vacuum canister (c-clip inside, screws on outside). Removed cap retainer clips. Now the plates can come out... work them around so the cutout in the plates clears the wires. Work up and out. A small flat screwdriver is hand for pushing and prying. Of course, paying attention where things go. It's not complicated, so don't sweat it. Just pay attention and it will go back together with no worries. The ground wire between the plates can be fragile. If yours is in good condition, don't put stress on it. Mine was shot, so I just cut it loose. At this point I would have just cleaned the plates, lubed with grease, and put everything back together. But my braided grounding wire between the plates was in bad shape. So, intermediate repair... Using dremel tool, cut the braided wire loose, and cleaned up the copper pads where it was soldered to the plates with a wire wheel on the dremel. For each plate, put it in a vise, heated the back side with a butane solder torch right behind that copper patch until solder would melt to it on the other side. This "tinning" process makes it easier to solder the wire to it later. I just used "solder wick" to replace that braided grounding wire. It's the same deal, flat braided copper wire. Using a high-power soldering iron with a flat tip that gets real hot, it was easy to get the new wire soldered back to the plates where I had tinned them. Note though, to get a good solder connection, it is important to use a soldering iron that gets hot enough to melt that solder patch. Anyway, back together and running well. Photos... Attached thumbnail(s) 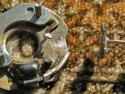 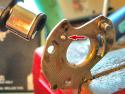  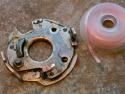 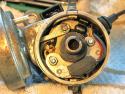
|


 Sep 11 2006, 04:22 PM