|
|
|
Porsche, and the Porsche crest are registered trademarks of Dr. Ing. h.c. F. Porsche AG.
This site is not affiliated with Porsche in any way. Its only purpose is to provide an online forum for car enthusiasts. All other trademarks are property of their respective owners. |
|
|

  |

| PeeGreen 914 |
 Jun 23 2007, 10:52 AM Jun 23 2007, 10:52 AM
Post
#41
|
|
Just when you think you're done...wait, there is more..lol  Group: Members Posts: 10,219 Joined: 21-September 06 From: Seattle, WA... actually Everett Member No.: 6,884 Region Association: Pacific Northwest |
That's awsome you found a good lady. My wife likes me making my 914 better. She wants me to win. Rather competitive woman;) Even when the kids come along I am sure you will have 914 time. You have to get away from the for sanity sake sometimes. I also have my 10 monthy old with me all day, and he likes making car noises.
On the belly, you have to be very folded up to sit in there. They had one at an air show near my house when I was 10, and when they found out my grandfather was killed in there they let my dad and I sit in it. I could fit as I was a little kid, but my dad was too tall at 5'6". I guess my grandfather was 5'6" as well but very thin. Sounds like a very creative way to propose. Nice work and congratulation. |
   |

 
|
| GS Guy |
Jun 25 2007, 07:34 PM
Post
#42
|
|
Member Group: Members Posts: 243 Joined: 8-July 04 From: Columbia, MD Member No.: 2,325 Region Association: North East States |
QUOTE(Amenson @ Jun 22 2007, 11:42 PM)  ... Modified the stock turbo flange for the 3" ss exhaust. ... Man - you've got to get one of these to to finish off that awesome turbo exhaust! 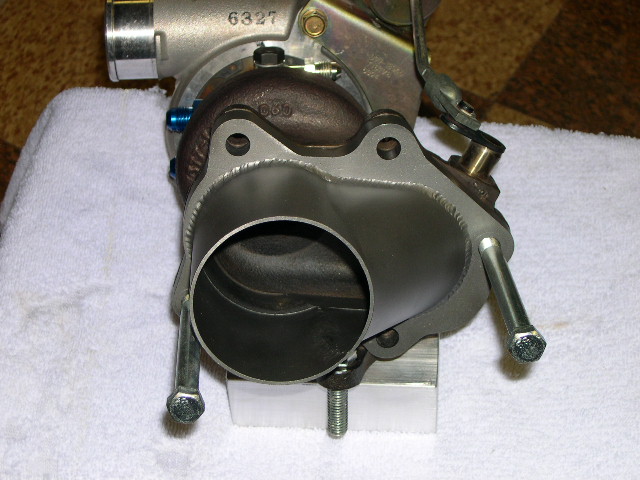 PM me for details. Conversion is looking good - can't wait to see how you plumb the intercooler. Jeff |
 |
|
| Amenson |
Jun 25 2007, 08:32 PM
Post
#43
|
|
That's opposite lock!! Group: Members Posts: 645 Joined: 27-May 05 From: Dublin, OH Member No.: 4,154 Region Association: None |
Very cool turbo outlet, I sent you a PM to find out where you got it.
I made a bit of progress this weekend. Finally got the turbo apart so that I could port the waste gate hole. It took a torch and a big soft hammer and then some very careful prying. The porting is necessary to avoid boost creep with a low back pressure exhaust. 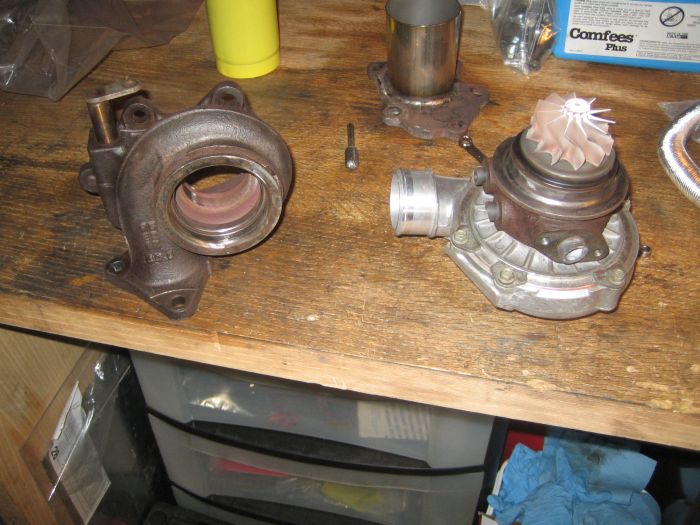 Made a frame to mount the fuel cell. Still need to weld it in and make some straps to hold the cell down to it.  I have the engine out so that I can cut the engine shelf out of the engine bay and fix some rust. Could not resist to pose the PorSti engine with my daily driver...'05 STi II. Hopefully I do not make this one into a donor car also. 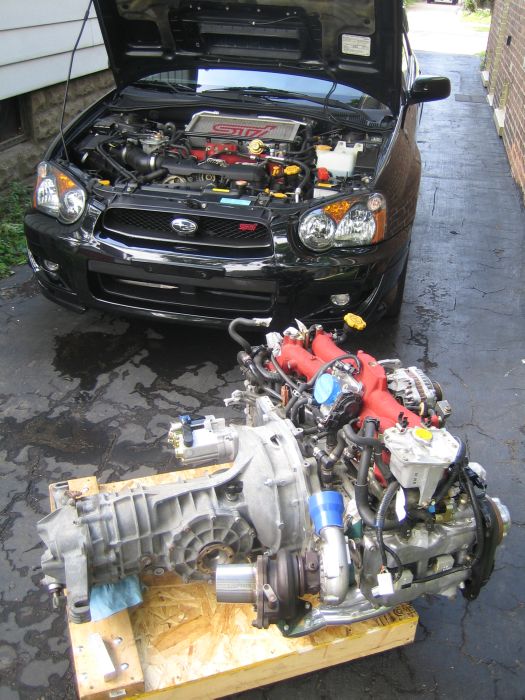 This pic shows the engine compartment w/o the engine shelf. I ordered some POR-15 and plan to seal everything up this week. 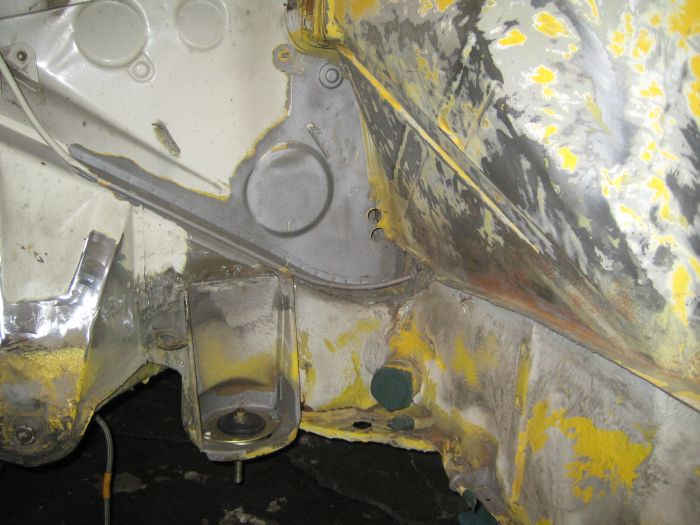 Scott |
|
|
|
| mrdezyne |
Jun 27 2007, 04:50 PM
Post
#44
|
|
Now on larger rolling jack stands! Group: Members Posts: 468 Joined: 31-July 05 From: Tulsa, OK Member No.: 4,510 |
Excellent work! Love the mount, much easier than what I had planned and it looks like it provides plenty of room for exhaust. One quick question.... I think the Renegade mount raises the motor and moves it forward so you can use the stock Suby oil pan, if you had not notched the Small Car mount do you think it would have raised the motor enough to keep from cutting the oil pan? Difference might be using the 2.5 NA as opposed to the 2.0 STI turbo model. Any insight would be appreciated. At this point I'm looking for ways to cut my build time down and get mine rolling again. Your mount looks straight forward enough it should save a ton of time.
|
|
|
|
| Amenson |
Jun 27 2007, 07:09 PM
Post
#45
|
|
That's opposite lock!! Group: Members Posts: 645 Joined: 27-May 05 From: Dublin, OH Member No.: 4,154 Region Association: None |
I mounted the engine so that the crank is parallel to the floor of the car, which turns out to be about as low as you can go and still use an oilpan. My STi engine is also an EJ25 although you may have a different oilpan as the late model engines have a different oil pan. Maybe your pan is shorter. It seams like you would have to raise the motor a whole lot to use the stock oil pan and not have it be the lowest part of the car. The Outback pan is only 4.25" deep and it is just barley above the bottom of the car.
This is the best picture that I could find that shows the position of the oilpan with respect to the cross bar and the bottom of the car. The cross bar is in the stock location. 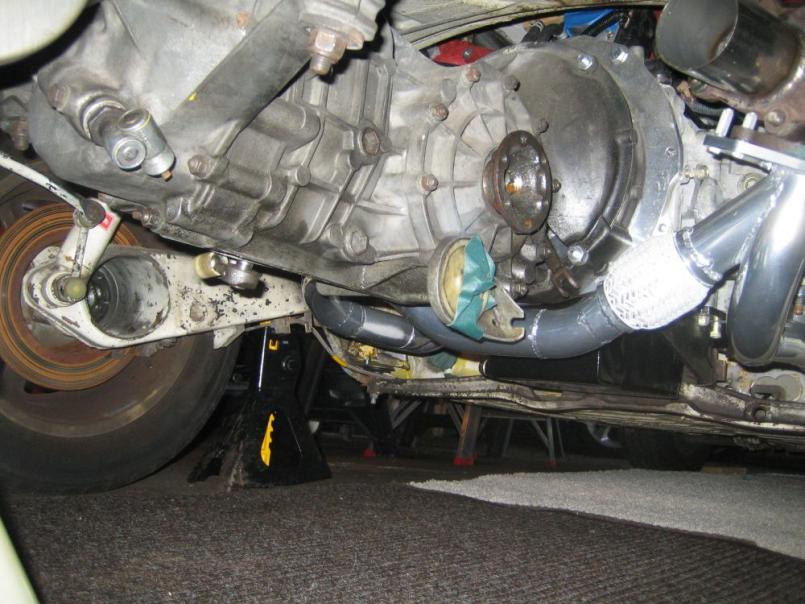 Scott |
|
|
|
| Amenson |
Jun 30 2007, 01:53 PM
Post
#46
|
|
That's opposite lock!! Group: Members Posts: 645 Joined: 27-May 05 From: Dublin, OH Member No.: 4,154 Region Association: None |
Made some more progress cleaning up the engine compartment. Man, does it take a long time to cleanly remove all of the extra brackets, etc. I would probably be done with the conversion by now had I not decided to do some extra cleanup and restoration work at the same time. Tis' the right thing to do though.
I finally built up the guts to cut out the hell hole rust. 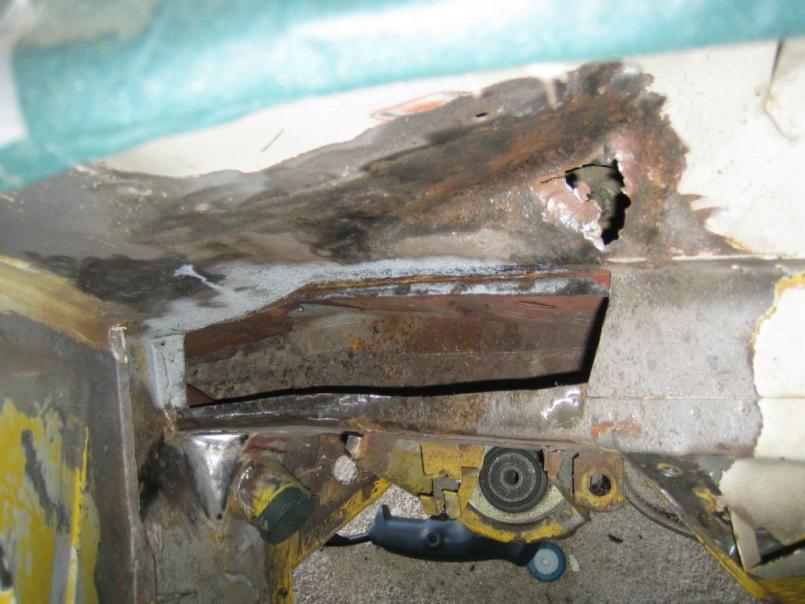 I also figured out how to hold down the fuel cell...use the stock fuel tank strap!! 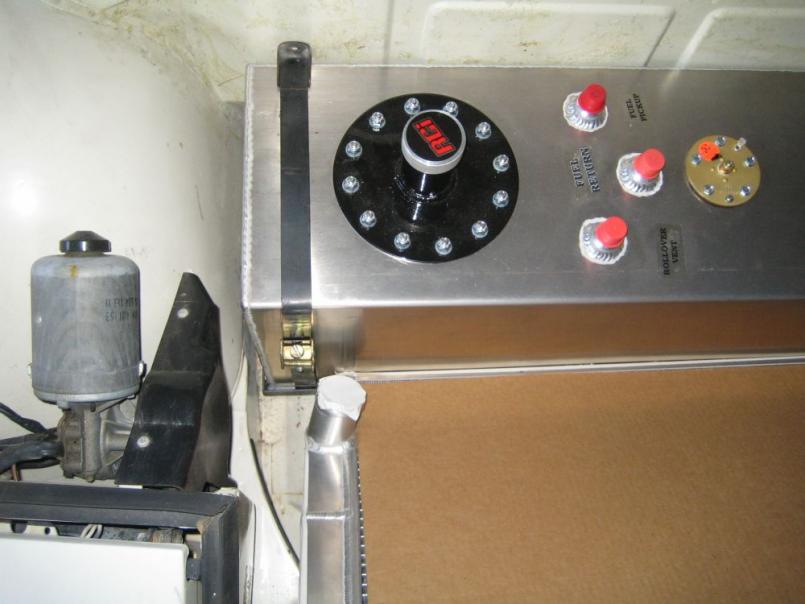 I will need another one for the other side. Anybody have an extra one lying around? Should make some serous progress this week because I took the entire week off of work (IMG:style_emoticons/default/mueba.gif) Won't get to spend all 9 days off on the car, I will be going up to Mackinac Island next weekend for a quick vacation. Scott |
|
|
|
| Amenson |
Jul 2 2007, 08:58 PM
Post
#47
|
|
That's opposite lock!! Group: Members Posts: 645 Joined: 27-May 05 From: Dublin, OH Member No.: 4,154 Region Association: None |
Made a couple patch panels today. I am really pleased with how they turned out. The large one fits better than it looks, I could not hold it in place and take the picture at the same time.
 Will weld them in tomorrow. I am going to Por15 the entire engine compartment tomorrow as well. Does anybody have any experience with por15 over paint. The instructions say that it is OK but warns that it adheres better to rough metal. I would prefer not to have to remove all of the paint but if the por15 is not going to stick I will have to. Scott |
|
|
|
| PeeGreen 914 |
Jul 2 2007, 11:49 PM
Post
#48
|
|
Just when you think you're done...wait, there is more..lol Group: Members Posts: 10,219 Joined: 21-September 06 From: Seattle, WA... actually Everett Member No.: 6,884 Region Association: Pacific Northwest |
Hey Scott
I would just rough up the paint. Paint adhears to a rough surface the best. Doesn't need to be barfe metal as long as it is rough. |
|
|
|
| Chris Pincetich |
Jul 3 2007, 12:44 AM
Post
#49
|
|
B-) Group: Members Posts: 2,082 Joined: 3-October 05 From: Point Reyes Station, CA Member No.: 4,907 Region Association: Northern California |
Nice photo of the side by side STIs (IMG:style_emoticons/default/beerchug.gif)
I also have a potential donor Suby as a daily driver. I really hope it never gets totaled, leaving me a free/salvaged EJ25 for my 80 HP 914 (IMG:style_emoticons/default/happy11.gif) |
|
|
|
| RoninEclipse2G |
Jul 3 2007, 10:18 AM
Post
#50
|
|
Suby Geek Group: Members Posts: 232 Joined: 28-April 07 From: Parker, Colorado Member No.: 7,701 Region Association: Rocky Mountains |
Awesome work!
this thread really makes me want another teener to do a suby swap in, I love the handeling of the creamsicle but I also love the power the WRX gives me. |
|
|
|
| TonyAKAVW |
Jul 3 2007, 11:05 AM
Post
#51
|
|
That's my ride. Group: Members Posts: 2,151 Joined: 17-January 03 From: Redondo Beach, CA Member No.: 166 Region Association: None |
Your pictures of the engine bay look nearly identical to mine. I sanded mine down to almost the identical level of remaining paint. Instead of POR15 I used ZeroRust. I ahve used both ZeroRust and POR15 now and I definitely prefer the ZeroRust over POR15. When using POR15 I have always prepped the surface properly and still have adhesion problems after a year+. By and large the POR15 sticks but there are spots where I've had to retouch it. (this is for the interior primarily)
I sprayed the engine bay (with a paint gun) with two coats of ZeroRust. First coat was black, and the second coat was grey. I purposefully used two different colors because it allowed me to really make sure that I had the right thickness. So far (going on 10 months of continuous use, most of that with an engine bay radiator and its associated dirt, etc.) the paint is holding up perfectly. You can buy ZeroRust in spray cans as well. -Tony |
|
|
|
| Brian Mifsud |
Jul 3 2007, 01:12 PM
Post
#52
|
|
Mechanical Engineer Group: Members Posts: 981 Joined: 3-March 03 From: Penngrove, CA Member No.: 384 Region Association: None |
Scott,
This is really nice work. Are you a fabricator by trade? I am planning on getting a stainless exhaust system ceramic coated.  It appears you had the flex coupling ceramic coated. Will that crack and break down the coating for interfere with the "accordian" pleats inside? How about on the braided stainless. Is the coating "bridging" the weave, or is it adhearing to individual 'wires'? This is part of my custom system for an non 914 vehicle, but the application is similar: (IMG:http://www.imagestation.com/picture/sraid225/p0376dd5f11c57be94da754a278a8a416/e9221c4a.jpg) |
|
|
|
| GTeener |
Jul 3 2007, 03:59 PM
Post
#53
|
|
914 Girl Group: Members Posts: 2,348 Joined: 25-June 04 From: SillyCon Valley Member No.: 2,249 Region Association: Northern California |
Attached image(s) 
|
|
|
|
| JPB |
Jul 3 2007, 05:20 PM
Post
#54
|
|
The Crimson Rocket smiles in your general direction. Group: Members Posts: 2,927 Joined: 12-November 05 From: Tapmahamock, Va. Member No.: 5,107 |
You are one sick and twisted individual!!!! How can I be like you? (IMG:style_emoticons/default/beer.gif)
|
|
|
|
| Amenson |
Jul 3 2007, 08:54 PM
Post
#55
|
|
That's opposite lock!! Group: Members Posts: 645 Joined: 27-May 05 From: Dublin, OH Member No.: 4,154 Region Association: None |
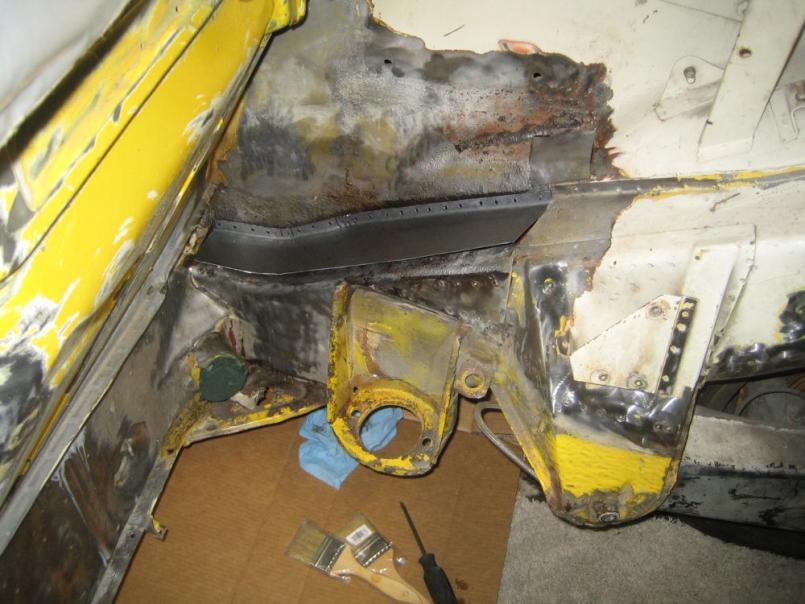
QUOTE(Brian Mifsud @ Jul 3 2007, 11:12 AM) Scott, This is really nice work. Are you a fabricator by trade? Nope, not a fabricator...I am electrical and mechanical engineer by training, currently managing software development for a living. I do almost all of the fab work, up to tacking parts together, myself and then have one of my friends do the finish welding. If you look closely at todays picture, you will see that my welding skills are not so great yet. I made some more progress today (need to take more days off of work to work on the project!). The hell hole is repaired and part of the engine compartment is painted. 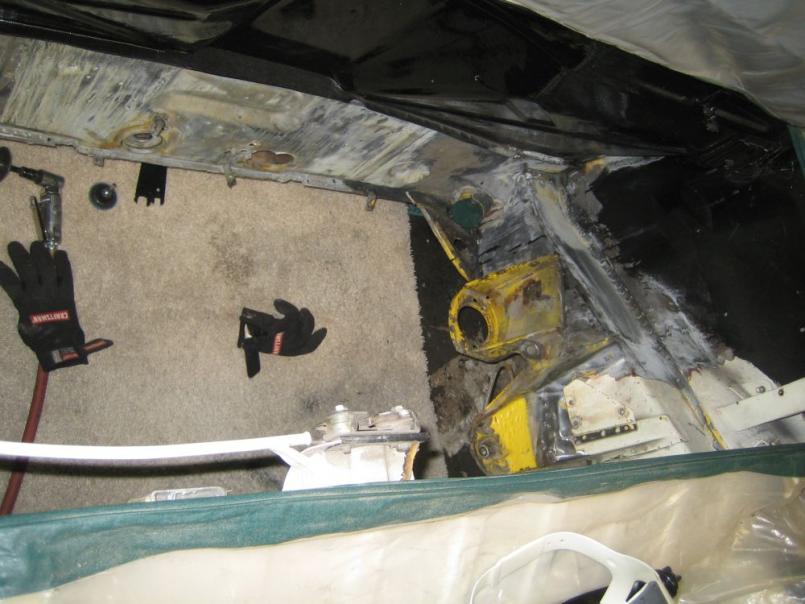 I did find some more rust by the driver's side jacking point. Will need to fix that...later. I have had enough rust repair for this week. The goal for tomorrow is to get the rest of the engine compartment painted and while that is drying, weld in the fuel cell bracket so that I can start working on the radiator mount. Scott |
|
|
|
| Amenson |
Jul 4 2007, 07:55 AM
Post
#56
|
|
That's opposite lock!! Group: Members Posts: 645 Joined: 27-May 05 From: Dublin, OH Member No.: 4,154 Region Association: None |
Sorry, forgot to answer this question...
QUOTE(Brian Mifsud @ Jul 3 2007, 11:12 AM) Scott, It appears you had the flex coupling ceramic coated. Will that crack and break down the coating for interfere with the "accordian" pleats inside? How about on the braided stainless. Is the coating "bridging" the weave, or is it adhearing to individual 'wires'? I am not sure how the coating on the flex joint is going to work out. The guys at the coating shop said that it will be OK...they have a very good reputation. For the most part each wire is coated and it still flexes fine. We will just have to wait and see. Scott |
|
|
|
| Amenson |
Jul 15 2007, 09:39 PM
Post
#57
|
|
That's opposite lock!! Group: Members Posts: 645 Joined: 27-May 05 From: Dublin, OH Member No.: 4,154 Region Association: None |
Took a big item off of the to do list this afternoon. Pretty much finished the exhaust!!
Here is a picture of it on the ground: 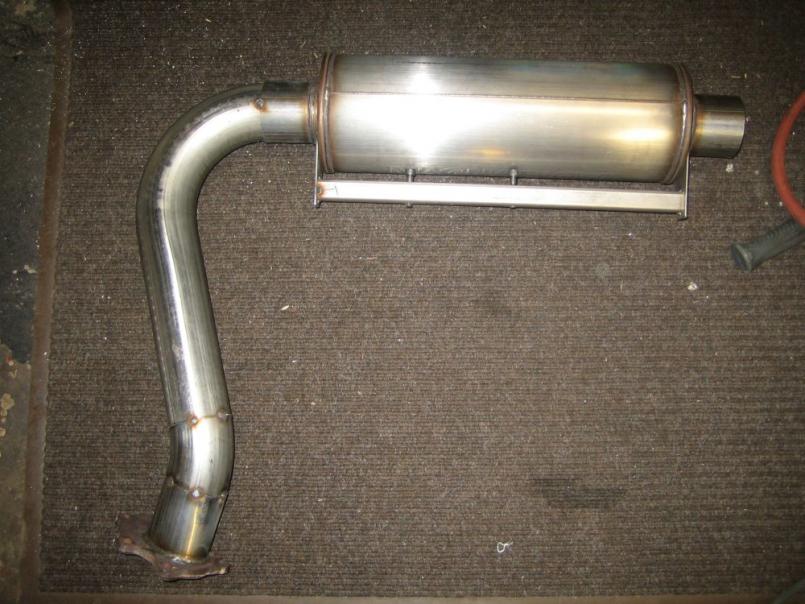 Installed!!!!! 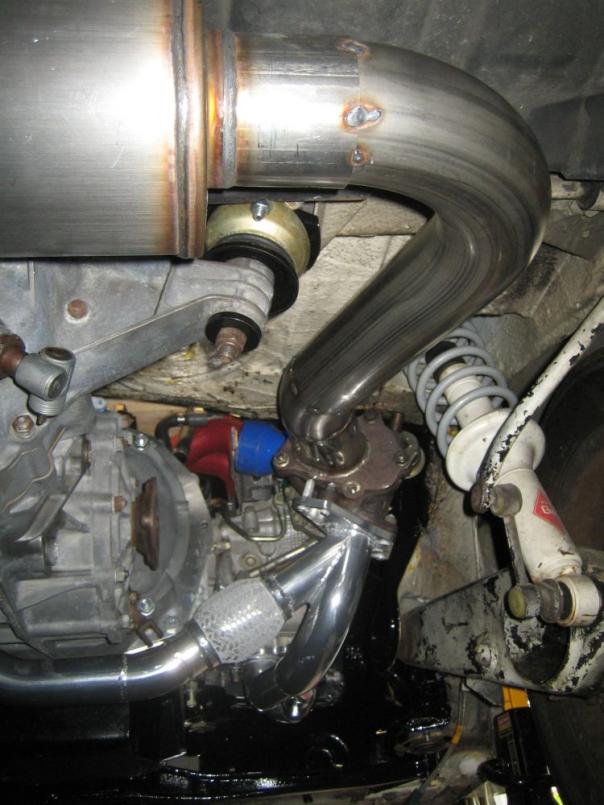 As always, I still need to have one of my buddies finish welding it. Scott |
|
|
|
| Amenson |
Jul 18 2007, 09:20 PM
Post
#58
|
|
That's opposite lock!! Group: Members Posts: 645 Joined: 27-May 05 From: Dublin, OH Member No.: 4,154 Region Association: None |
I fit the engine cover on tonight to make sure that the intercooler fits beneath it...it does!!!
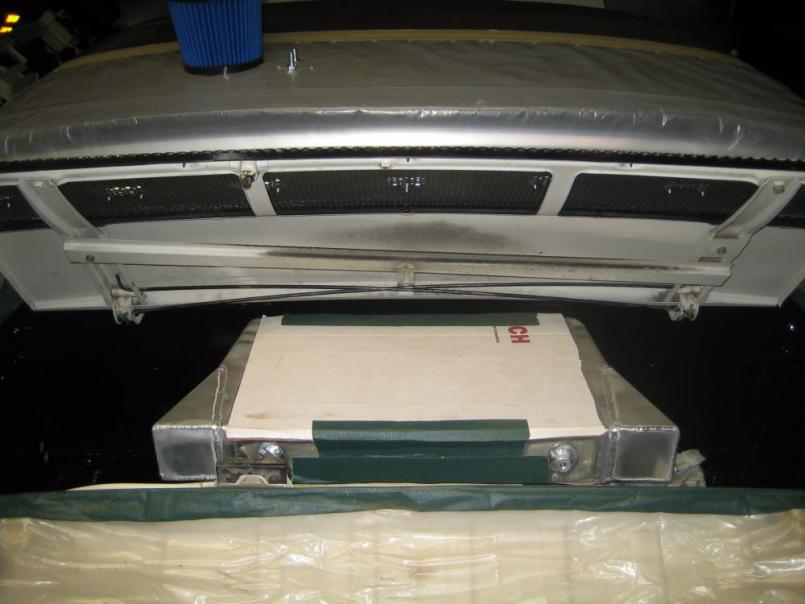 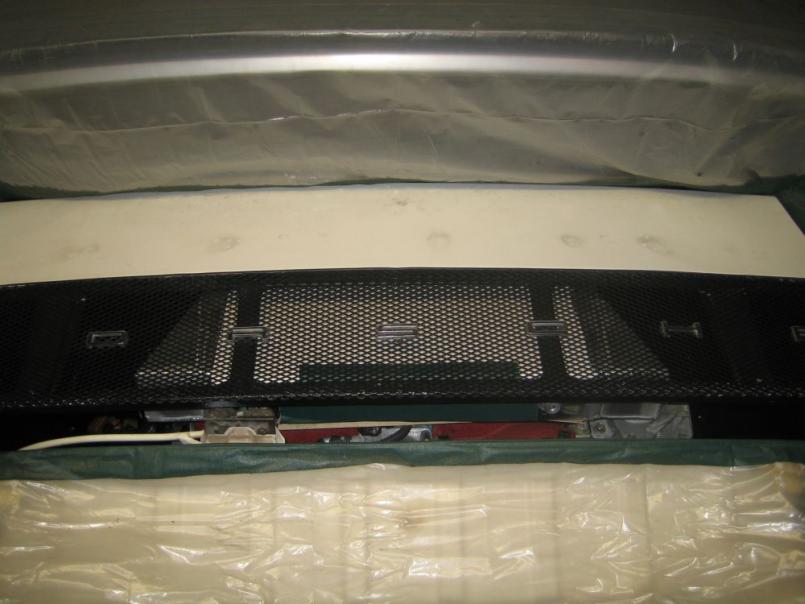 I am going to make a GT style, fully vented engine cover to allow the air to get through the intercooler a better. Is there a source (Grainger or somebody) for the expanded metal that matches the stock stuff? Scott |
|
|
|
| MrKona |
Jul 18 2007, 09:48 PM
Post
#59
|
|
Senior Member Group: Members Posts: 597 Joined: 25-July 05 From: Santa Rosa, CA Member No.: 4,469 Region Association: None |
Nice work, I'm really enjoying watching this thread. Maybe this topic from the classics by Eric Shea will help you with the GT-style lid.
GT Style lid |
|
|
|
| fat73 |
Jul 18 2007, 10:23 PM
Post
#60
|
|
W9R1 Group: Members Posts: 244 Joined: 7-May 05 From: tampa,fl Member No.: 4,043 Region Association: South East States |
Scott
Is this engine a "drive by wire" throttle body? Wondering why you swapped out the steering wheel? I'm building an '02 stock body also. Thinking of going twin turbo and moving the turbos back to the rear end similar to a 935. Ed aka W9R1 '73 914 w/2003 WRX EJ20 '06 Subaru Forester 2.5 XT |
|
|
|
|
2 User(s) are reading this topic (2 Guests and 0 Anonymous Users)
0 Members:

|
Lo-Fi Version | Time is now: 26th October 2025 - 08:27 AM |
Invision Power Board
v9.1.4 © 2025 IPS, Inc.