|
|
|
Porsche, and the Porsche crest are registered trademarks of Dr. Ing. h.c. F. Porsche AG.
This site is not affiliated with Porsche in any way. Its only purpose is to provide an online forum for car enthusiasts. All other trademarks are property of their respective owners. |
|
|

  |

| ThePaintedMan |
 Apr 28 2016, 06:27 PM Apr 28 2016, 06:27 PM
Post
#381
|
|
Advanced Member  Group: Members Posts: 3,887 Joined: 6-September 11 From: St. Petersburg, FL Member No.: 13,527 Region Association: South East States |
Uh ohh... look what I got back today! (IMG:style_emoticons/default/happy11.gif)
 I have a machine shop down the street from me that does incredible work - I've sent multiple things out to them and been impressed every time. In this case, both heads, even at 180k miles checked out perfect on the valve leak tests and the crack test. They did need to be milled .004 to get rid of surface pitting and a slight bow and they went ahead and installed the valve stem seals that I supplied, $220 out the door. Perfect! Especially since the Cometic MLS gaskets I ordered were .004 oversized (estimated ahead of time). I'm hoping to get the heads back on this weekend, however it'll still be some time before I start it. I've got more plans in the way of trap-doors in the oil pan, and I need to weld in a bung for the oil temp sensor. But finally making some progress. (IMG:style_emoticons/default/piratenanner.gif) |
   |

 
|
| carr914 |
Apr 28 2016, 08:07 PM
Post
#382
|
|
Racer from Birth Group: Members Posts: 131,949 Joined: 2-February 04 From: Tampa,FL Member No.: 1,623 Region Association: South East States |
purty!
|
|
|
|
| Chris H. |
Apr 29 2016, 08:24 AM
Post
#383
|
|
Senior Member Group: Members Posts: 4,079 Joined: 2-January 03 From: Chicago 'burbs Member No.: 73 Region Association: Upper MidWest |
Looking very good George. BTW I finally got to Bob's and picked up the 75 POUNDS worth of EG33 parts he was saving for me from an extra engine he had. In addition to all of the sensors I needed he gave me quite a few extra coils and injectors so let me know if you end up with any bad ones. Test all of your coils. They don't always throw a code and they are a huge PITA to take out when the engine is installed.
Are you sending your injectors out to be serviced? I might. Saw this place on a post recently: Mr Injector Looks like it would be worth it for me. My car has been sitting on and off for a while. |
|
|
|
| mepstein |
Apr 29 2016, 08:32 AM
Post
#384
|
|
914-6 GT in waiting Group: Members Posts: 20,580 Joined: 19-September 09 From: Landenberg, PA/Wilmington, DE Member No.: 10,825 Region Association: MidAtlantic Region |
We've sent mr injector at least 200 injectors. Super happy with their service.
Once I didn't get back about 50 injectors for a couple weeks. Little panicked since I thought they got lost in the mail. Turned out they had come back quickly and one of the guys threw them in the drawer. Would have been out a ton of money. Turn around was just so fast I didn't expect them back. |
 |
|
| Chris H. |
Apr 29 2016, 09:04 AM
Post
#385
|
|
Senior Member Group: Members Posts: 4,079 Joined: 2-January 03 From: Chicago 'burbs Member No.: 73 Region Association: Upper MidWest |
Oh thanks Mark. BTW that goes for you too. If anyone has a need for an extra whatever lemme know. The coils and stuff are stupid expensive new. Like 928 parts. I need to do something nice for Bob.
I MIGHT be a wiring expert soon. We'll see. Gonna re-do mine in May. Will ping you. |
|
|
|
| ThePaintedMan |
May 2 2016, 06:55 AM
Post
#386
|
|
Advanced Member Group: Members Posts: 3,887 Joined: 6-September 11 From: St. Petersburg, FL Member No.: 13,527 Region Association: South East States |
Hey Chris,
Wow, what a nice offer! I would for sure like to have at least 1, perhaps 2 spare coils, maybe an injector or two as well. That's one of the issues with running this motor at the track - none of that stuff is available in town at AutoZone. For now, I believe everything should work fine as-is, since it did when I pulled it all off. Might not be a bad idea to send the injectors in since they do have 180K on them. However I had a helluva time trying to pull one off the fuel rail already, even following the factory procedure. I just don't want to bust anything. I did get the heads back on it this weekend and the cams back on the RH side. (IMG:style_emoticons/default/piratenanner.gif) I'll post some pictures when I get home. Unfortunately my warranty from the machine shop is 90 days, but I doubt I'll have any way to fire this thing up before we reach that point. Still, it'll be nice to have the engine back together and get some of this stuff out of the bins. |
|
|
|
| ThePaintedMan |
May 6 2016, 03:32 PM
Post
#387
|
|
Advanced Member Group: Members Posts: 3,887 Joined: 6-September 11 From: St. Petersburg, FL Member No.: 13,527 Region Association: South East States |
Well I got a little ahead of myself and didn't take as many pictures as I had hoped, but the engine is almost back together. I should be getting the car back next month, at which point I will begin removing the 1.8 that's in there now so I can start mocking this one up in the car. I still need to do a few things like replace the injector o-rings, put manifold back on and start thinking about a way to run the sensors. Also, once the engine is in the car, I'll take some measurements as to how much room I have to modify the oil pan. These engines have issues with oil starvation at higher Gs, but other folks have successfully installed "trap doors" in the oil pan to eliminate that issue. It just requires some fabrication.
Here's what the Cometic gaskets look like. These are called "MLS", or Multi-Layered-Steel gaskets, and you can see why. There is a very thin (0.001) layer of viton rubber on the surface to help seal minor imperfections, but this is why the deck and block have to be so, very precisely machined. The heads I'm sure were done right, but only time will tell if my sandpaper block job on the deck is up to snuff. When I laid the bare, machined heads on the block there was no visible light seen through. And I decided to do one final pass with 800 grit sandpaper to make sure I was within the RA recommended by Cometic (50 RA or better). 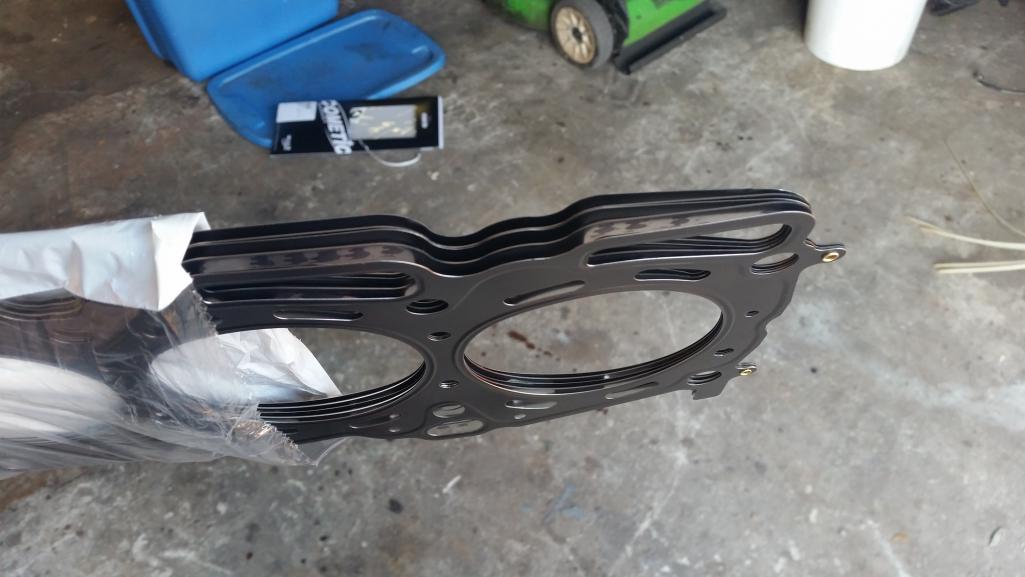 First I installed the dowel locating pins that I had popped out of the deck previously. Then I laid the heads on and torqued them to the Suby OEM procedure and specs. Sorry for the crappy picture. 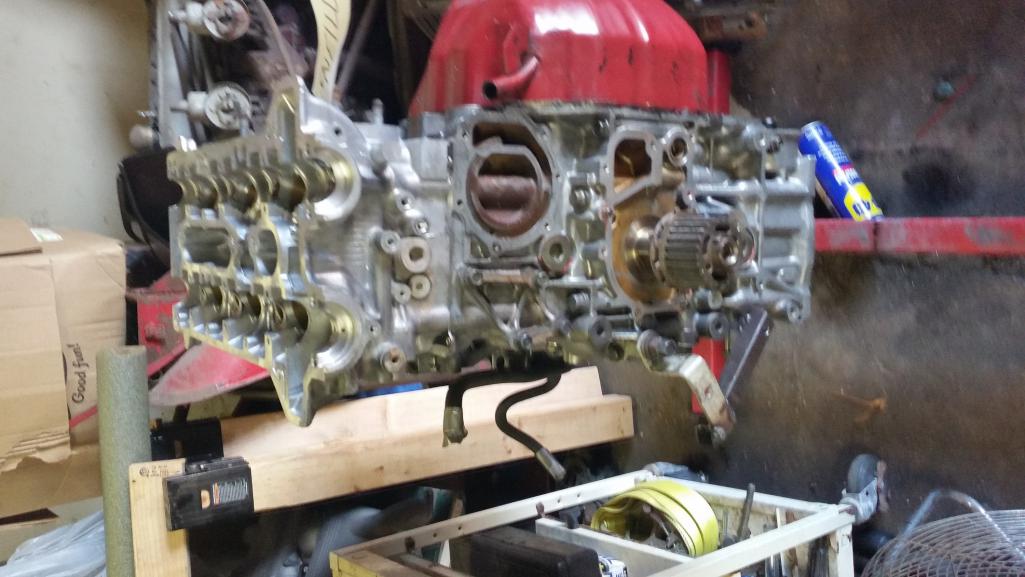 |
|
|
|
| ThePaintedMan |
May 6 2016, 03:37 PM
Post
#388
|
|
Advanced Member Group: Members Posts: 3,887 Joined: 6-September 11 From: St. Petersburg, FL Member No.: 13,527 Region Association: South East States |
In the Subaru procedure, everything gets torqued in sequence to 51 ft-lbs, in 2 steps. Then there is a very specific procedure outlined in the manual where the bolts are torqued to a spec, then torqued to an angle. This is a little bit unnerving for me, as this is typical with torque-to-yield fasteners. The SVX uses two sizes of head bolts, long for the inner 4 locations (marked on the bolt head itself - genius!) and short for the outers. Unfortunately the short bolts are NLA from any supplier I've found. However, the LONG bolts are still available. I had two long bolts which were rounded off at the tops of the triple squares, so I purchased new long bolts. Now, nowhere in the manual does Subaru state that new head bolts must be used, but that would be ideal. In my case, I had no choice to replace a couple of them and reuse the rest. At this point it'll either work or it won't.
Anyhow, here's a trick that I use for torquing based on an angle, as Subaru wants us to do. I simply mark the bolt heads with a sharpie and use that as my baseline. I've used one of those crappy torque angle gauges before and by the third bolt I was not sure how far I had actually turned it. So now, I do it this way. Subaru gives us a spec of 80-90 degrees on each turn, saying that we are not to exceed a total of 90 degrees at each step in the sequence. With my marks, I was able to make sure that I stayed within those guidelines, or close enough for my liking. So this is torqued to initial 33 ft-lbs, and marked perpendicular to the head in preparation to turn 90 degrees. As you can see, I also mark the torque sequence on the head itself for my own reference. BE SURE YOU ARE LOOKING AT THE MOTOR IN THE CORRECT ORIENTATION when you flip it over to do the other side. Almost got caught out on that one. 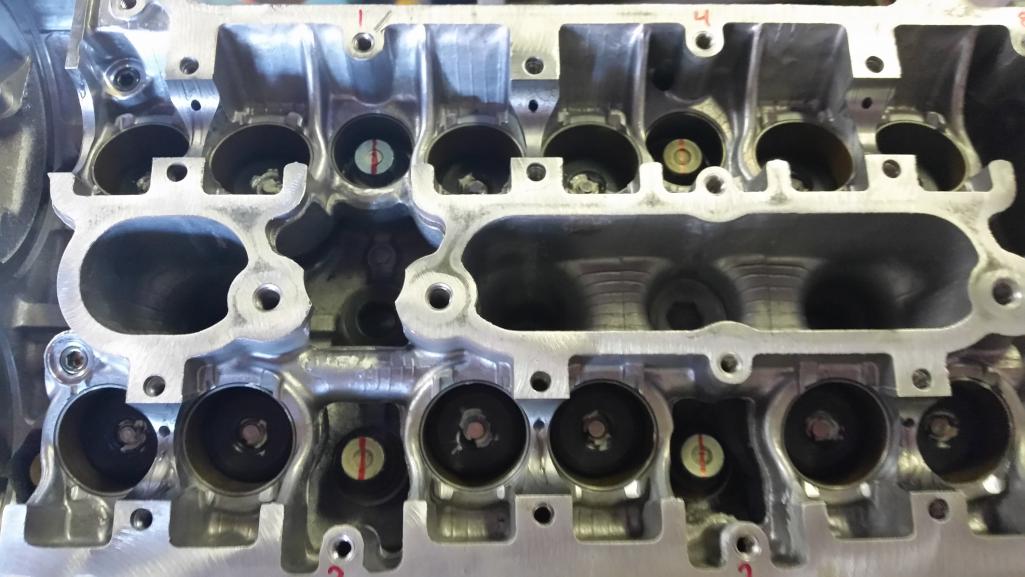 And this is after torquing 90 degrees on the inner bolts. Make sense? 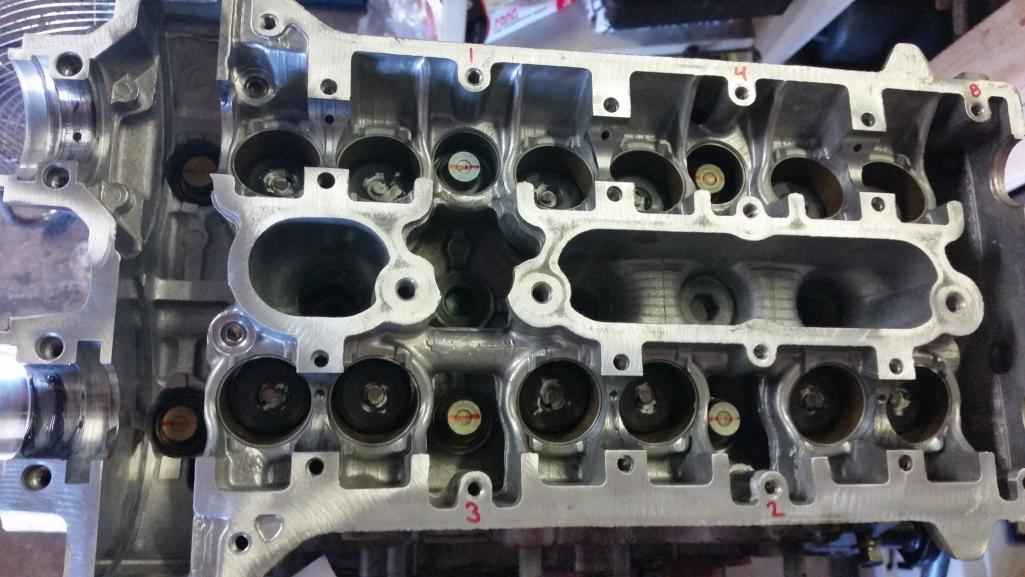 |
|
|
|
| ThePaintedMan |
May 6 2016, 03:53 PM
Post
#389
|
|
Advanced Member Group: Members Posts: 3,887 Joined: 6-September 11 From: St. Petersburg, FL Member No.: 13,527 Region Association: South East States |
That's pretty much it. The rest of the assembly is fairly straightforward... except two things.
1) The service manual has a typo in it that really sucks. On the LH camshaft, the notches in the end are faced directly downward on both the exhaust and intake cams. You lay the cam in the journals, then torque the cam caps in sequence. ON THE RH camshaft the manual says lay the cams in with the notches facing downwards. That should read upwards, as the picture directly below that shows. If you have them facing downwards, then you won't be able to lay the cam in flat and torque it correctly as several lobes will be in the open position and you can potentially damage the thrust surfaces on the head. 2) The Cometic gaskets come with rivets installed in them to hold all the layers together. I chose to go ahead and install them with the rivets attached. However, when the final assembly of the timing cover and gears happens, these rivets stick out too far on the RH head. After doing a lot of reading of similar problems on other applications, I chose to dremel these off after I had everything torque down (picture below). 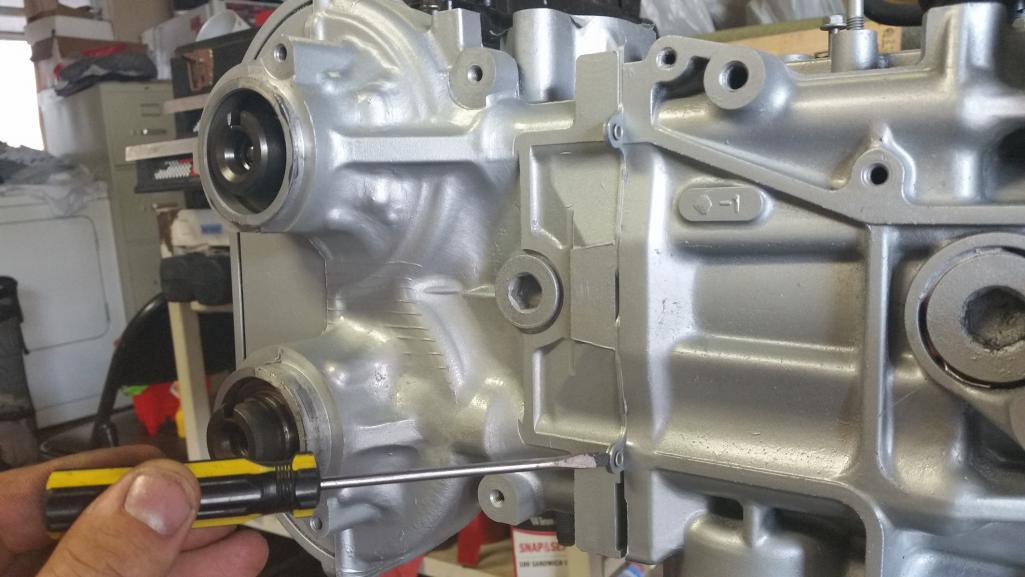 3) Finally, I also decided this was the time to install new water pump to heater pipe hoses. Once the timing covers are back on, it's a real pain to get at the spring clips that hold them on. I *could* have ordered these from RockAuto and saved 20 bucks had I thought about it ahead of time. But instead I wanted to get it back together and found them locally. They're just two simple 90 degree molded heater hoses, one is 1/2 and the other 5/8. The part numbers that you can cross-reference are Gates 28460 and 28566. |
|
|
|
| carr914 |
May 6 2016, 08:23 PM
Post
#390
|
|
Racer from Birth Group: Members Posts: 131,949 Joined: 2-February 04 From: Tampa,FL Member No.: 1,623 Region Association: South East States |
post some pictures of my carb rebuild to my 2.0 Thread please
|
|
|
|
| Jetsetsurfshop |
May 8 2016, 09:19 AM
Post
#391
|
|
Senior Member Group: Members Posts: 815 Joined: 7-April 11 From: Marco Island Florida Member No.: 12,907 Region Association: South East States |
At the rate your going you'll be ready for Sebring before me....
|
|
|
|
| FourBlades |
Nov 1 2018, 08:23 PM
Post
#392
|
|
From Wreck to Rockin Group: Members Posts: 2,056 Joined: 3-December 07 From: Brevard, FL Member No.: 8,414 Region Association: South East States |
George, what is going on with this build? This is such a cool motor, I want to see and hear it running. (IMG:style_emoticons/default/piratenanner.gif) John |
|
|
|
|
1 User(s) are reading this topic (1 Guests and 0 Anonymous Users)
0 Members:

|
Lo-Fi Version | Time is now: 31st March 2026 - 05:58 PM |
Invision Power Board
v9.1.4 © 2026 IPS, Inc.