|
|
|
Porsche, and the Porsche crest are registered trademarks of Dr. Ing. h.c. F. Porsche AG.
This site is not affiliated with Porsche in any way. Its only purpose is to provide an online forum for car enthusiasts. All other trademarks are property of their respective owners. |
|
|

  |

| Bleyseng |
 Jan 22 2004, 09:35 PM Jan 22 2004, 09:35 PM
Post
#41
|
|
Aircooled Baby!  Group: Members Posts: 13,035 Joined: 27-December 02 From: Seattle, Washington (for now) Member No.: 24 Region Association: Pacific Northwest |
Ok, I'll dig them out of the assortment box (pile of shit box) tomorrow.
|
   |

 
|
| maf914 |
Jan 23 2004, 08:03 AM
Post
#42
|
|
Not a Guru! Group: Members Posts: 3,049 Joined: 30-April 03 From: Central Florida Member No.: 632 Region Association: None |
QUOTE(Gint @ Jan 22 2004, 05:46 PM) QUOTE For the early fogs I used a blind nut which is the right size to accept the allen bolt. You drill the hole, in push it in and then tighten it up with this gizmo. I expands and locks into place just like the OEM one except its not welded in place. Geoff Whaaaa!?!?! Pics please. Thanks Geoff. Gint, I think these are also called Riv-Nuts, since they are inserted into a hole and then expand and lock into place when the bolt is screwed in. Sort of like a rivet. Mike |
|
|
|
| Bleyseng |
Jan 23 2004, 08:29 PM
Post
#43
|
|
Aircooled Baby! Group: Members Posts: 13,035 Joined: 27-December 02 From: Seattle, Washington (for now) Member No.: 24 Region Association: Pacific Northwest |
heres the pieces put together
Attached image(s) 
|
|
|
|
| Bleyseng |
Jan 23 2004, 08:30 PM
Post
#44
|
|
Aircooled Baby! Group: Members Posts: 13,035 Joined: 27-December 02 From: Seattle, Washington (for now) Member No.: 24 Region Association: Pacific Northwest |
here is the 3 pieces
Attached image(s) 
|
|
|
|
| Gint |
Jan 23 2004, 10:34 PM
Post
#45
|
|
Mike Ginter Group: Admin Posts: 16,076 Joined: 26-December 02 From: Denver CO. Member No.: 20 Region Association: Rocky Mountains |
Thanks Geoff. I've never seen those before.
|
|
|
|
| Neal |
Jan 24 2004, 12:28 AM
Post
#46
|
|
Member Group: Members Posts: 300 Joined: 23-April 03 From: Sammamish, Washington Member No.: 605 |
Geoff, were do we buy them ?
Neal |
|
|
|
| Bleyseng |
Jan 24 2004, 12:29 AM
Post
#47
|
|
Aircooled Baby! Group: Members Posts: 13,035 Joined: 27-December 02 From: Seattle, Washington (for now) Member No.: 24 Region Association: Pacific Northwest |
I found them at Hardwicks in Seattle but I am sure there must be a online nut and bolt supppy house that sells them.
Geoff |
|
|
|
| Neal |
Jan 26 2004, 09:45 AM
Post
#48
|
|
Member Group: Members Posts: 300 Joined: 23-April 03 From: Sammamish, Washington Member No.: 605 |
Now that I have the hardware what is the best wat to mark the location of the mounting holes ?. I have a 76
Neal |
|
|
|
| boxstr |
Jan 26 2004, 09:53 AM
Post
#49
|
|
MEMBER:PACIFIC NORTHWEST REGION Group: Members Posts: 7,522 Joined: 25-December 02 From: OREGON Member No.: 12 Region Association: Pacific Northwest |
Do you have the dogbones?? Those will give you the exact distance between the holes. ( top to bottom).
Look very closely at the area where the bumper holes are going to be drilled. You will find small indentations that are where the holes will go. Put one dogbone in that position and with a thin marker pen make your mark and double check by setting the bumper up to the area. When you drill the hole, and it you are using bolts, make the holes larger than the bolt, you need a little cheat room to move things around. Take pics and send back and show us your progress. CCLINBUMPERCARS |
|
|
|
| Neal |
Jan 26 2004, 10:05 AM
Post
#50
|
|
Member Group: Members Posts: 300 Joined: 23-April 03 From: Sammamish, Washington Member No.: 605 |
Craig, thanks very much for the reply, I do have dog bones and I was going to use studs in the bumpers so all I would have to do is put a washer and locknut on the backside of the stud, that seems like an easier way to hang the bumper.
Do you happen to know how long the factory bumper bolts are ? Neal |
|
|
|
| boxstr |
Jan 26 2004, 12:20 PM
Post
#51
|
|
MEMBER:PACIFIC NORTHWEST REGION Group: Members Posts: 7,522 Joined: 25-December 02 From: OREGON Member No.: 12 Region Association: Pacific Northwest |
Neal I like the stud idea. I would try that next time also.
I think that the bolts are 3-3.5" long. It won't matter if they are to long anywhere. Just a deeper socket will be needed. CCLINSTUDSTERKEL |
|
|
|
| D1A3 |
May 27 2006, 10:09 PM
Post
#52
|
|
Gruppe Neun Vierzehn Südosten Group: Members Posts: 362 Joined: 3-June 04 From: Atlanta, GA Member No.: 2,152 Region Association: South East States |
Can somebody post a pic of the inside of their trunk where the bolts go through? I am backdating this weekend and would appreciate the reference point.
Oh, regarding the "slight indentations" on the rear as noted above... I don't have them/can't see them. So far, just trying to line things up... Regarding the old bumper cover tabs, I just bent them back and then used a rubber mallet to poiund them flat with the body. Any concerns with that? New rear chrome bumper seems to align fine. |
|
|
|
| jd74914 |
May 28 2006, 09:02 AM
Post
#53
|
|
Its alive Group: Members Posts: 4,780 Joined: 16-February 04 From: CT Member No.: 1,659 Region Association: North East States |
QUOTE(D1A3 @ May 28 2006, 12:09 AM)  Can somebody post a pic of the inside of their trunk where the bolts go through? I am backdating this weekend and would appreciate the reference point. The bolts go into the fenderwells, not the trunks. On the front they are just about centered, and I don't remember what the rear looked like. |
|
|
|
| boxstr |
May 28 2006, 09:32 AM
Post
#54
|
|
MEMBER:PACIFIC NORTHWEST REGION Group: Members Posts: 7,522 Joined: 25-December 02 From: OREGON Member No.: 12 Region Association: Pacific Northwest |
If you have the dogbones they will give you the distance that you need for the holes that you will drill in the front and back.
The front holes exit out the back into the fender wells. The rears exit out in the engine bay or muffler area and the top hole exits into the rear trunk just below the tailights. I do not have a pic to post. You will need the dogbones and the early bumpers themselves to help give you a better idea as to where everything is drilled. I also highly recommend that yuo get studs and screw them into the front and rear bumpers, and then secure them on the car with washers and nuts, rather than using the bolts, it is MUCH MUCH easier. CCLINSTUDMUFFIN Attached image(s)  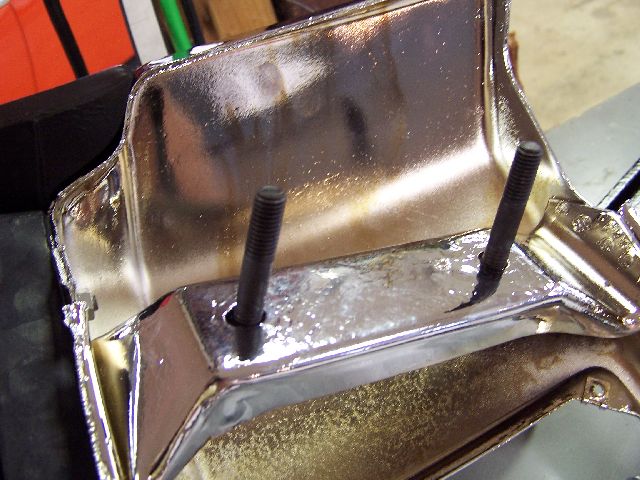
|
|
|
|
| Joe Bob |
May 28 2006, 09:33 AM
Post
#55
|
|
Retired admin, banned a few times Group: Members Posts: 17,427 Joined: 24-December 02 From: Boulder CO Member No.: 5 Region Association: None |
BTW...once you have the bolt holes drilled....tape the dogbones to the bracket....makes the install easier....
|
|
|
|
| boxstr |
May 29 2006, 05:12 PM
Post
#56
|
|
MEMBER:PACIFIC NORTHWEST REGION Group: Members Posts: 7,522 Joined: 25-December 02 From: OREGON Member No.: 12 Region Association: Pacific Northwest |
Here are some pics on the outside first the back then the front. also a pic of the inside of the rear trunk also a pic of the inside of the front wheel well.
Craig Attached image(s) 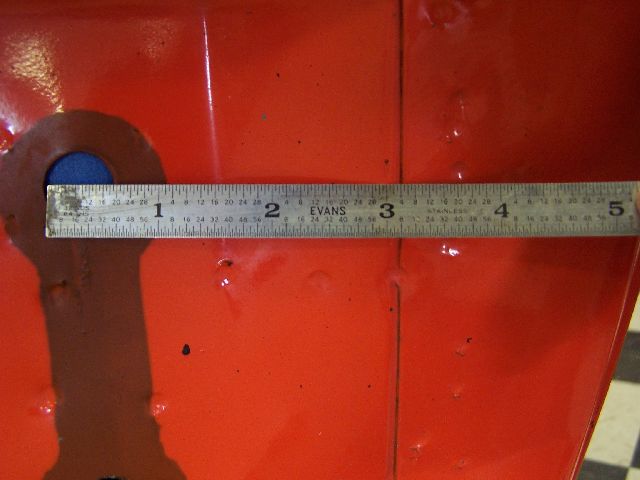 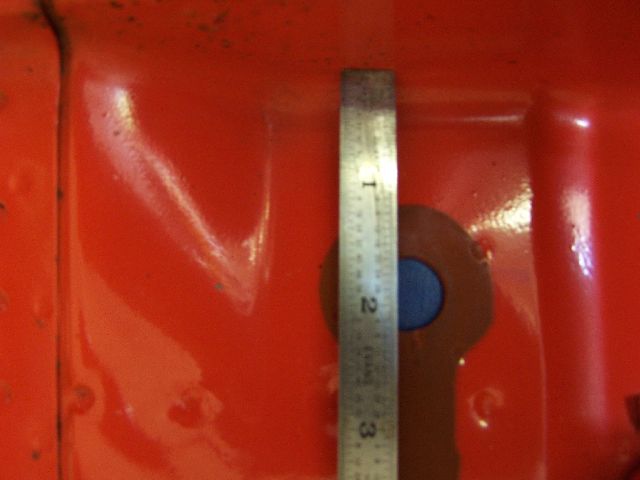 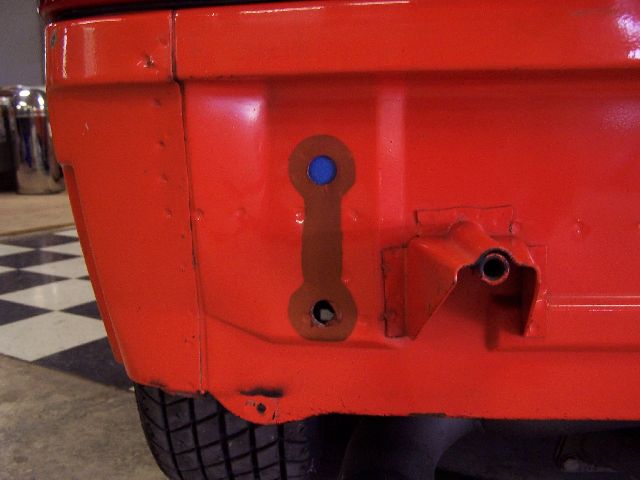 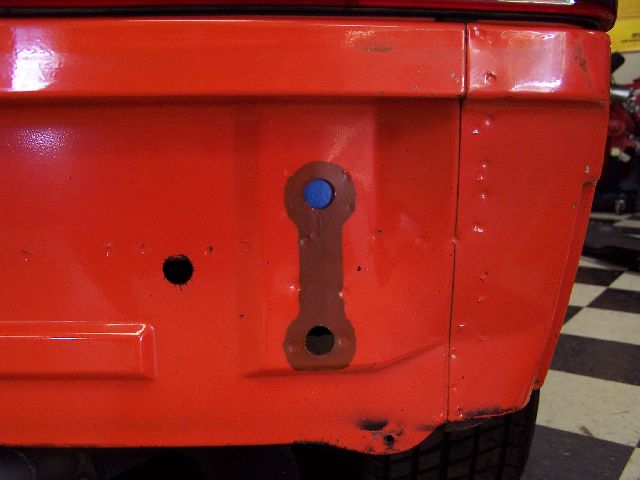 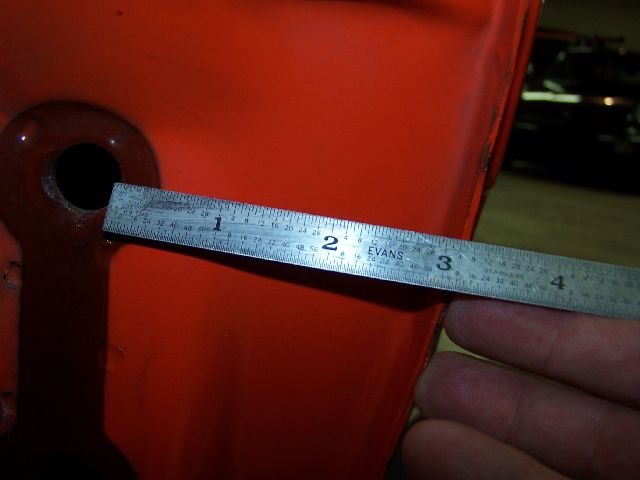  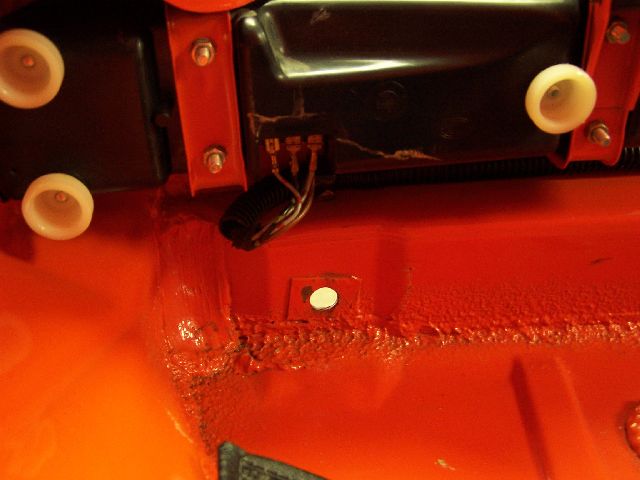 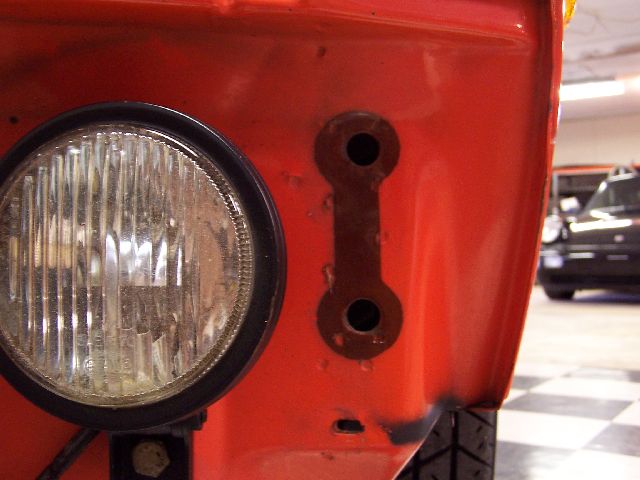
|
|
|
|
| boxstr |
May 29 2006, 05:14 PM
Post
#57
|
|
MEMBER:PACIFIC NORTHWEST REGION Group: Members Posts: 7,522 Joined: 25-December 02 From: OREGON Member No.: 12 Region Association: Pacific Northwest |
The final few...
Attached image(s) 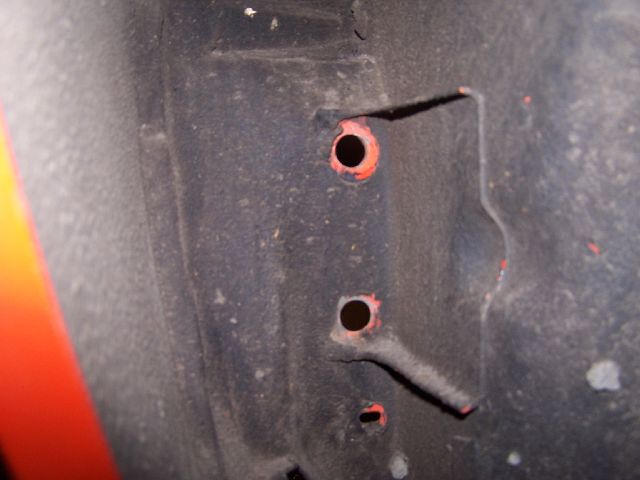 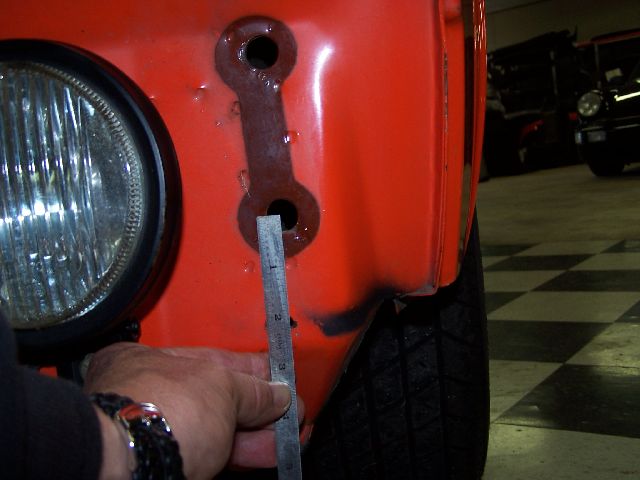 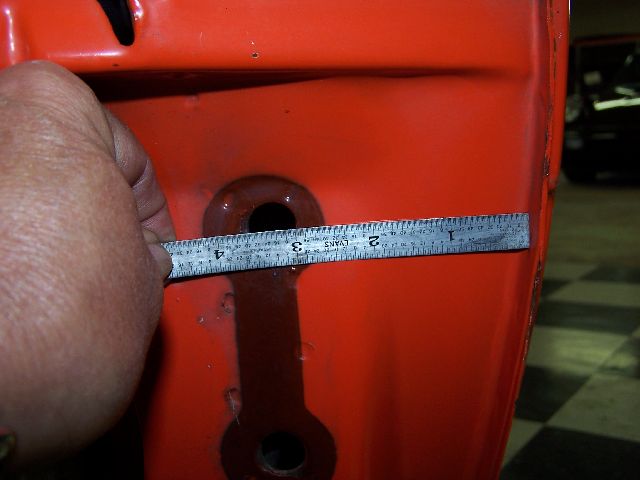
|
|
|
|
| maf914 |
May 30 2006, 11:47 AM
Post
#58
|
|
Not a Guru! Group: Members Posts: 3,049 Joined: 30-April 03 From: Central Florida Member No.: 632 Region Association: None |
Craig,
Thanks for the additional photos. This thread should go into the classics. Just for info, the 75-76 Euro cars came with big rubber bumpers but without the shock absorbers. The steel structure inside the rubber bumper covers bolted directly to the body using two bolts and a rubber dogbone on each end. The Haynes manual shows this setup. I guess that is why the indentations for the bumper bolts are present in the 75-76 US cars. |
|
|
|
| D1A3 |
Jun 4 2006, 07:59 PM
Post
#59
|
|
Gruppe Neun Vierzehn Südosten Group: Members Posts: 362 Joined: 3-June 04 From: Atlanta, GA Member No.: 2,152 Region Association: South East States |
Thanks all for the photos aqnd keeping this thread going. Got the bumpers on this afternoon and now are looking for the Blind Nuts to attach the fog lights.
Does anyone know of a web location that I can get these and in what size is best? I checked locally in Atlanta today and could not find any... |
|
|
|
| dhopkins |
Oct 28 2006, 09:39 PM
Post
#60
|
|
Member Group: Members Posts: 50 Joined: 7-July 04 From: Rydal, Pa Member No.: 2,315 |
This is a great thread. Anybody got more pictures for the
conversion process? Don ______________________________________________ 1969 911S 1976 914 2.0 1981 911SC |
|
|
|
|
1 User(s) are reading this topic (1 Guests and 0 Anonymous Users)
0 Members:

|
Lo-Fi Version | Time is now: 28th May 2024 - 05:02 PM |
Invision Power Board
v9.1.4 © 2024 IPS, Inc.