|
|
|
Porsche, and the Porsche crest are registered trademarks of Dr. Ing. h.c. F. Porsche AG.
This site is not affiliated with Porsche in any way. Its only purpose is to provide an online forum for car enthusiasts. All other trademarks are property of their respective owners. |
|
|

  |

| boxstr |
 Oct 28 2006, 11:47 PM Oct 28 2006, 11:47 PM
Post
#61
|
|
MEMBER:PACIFIC NORTHWEST REGION  Group: Members Posts: 7,522 Joined: 25-December 02 From: OREGON Member No.: 12 Region Association: Pacific Northwest |
Not sure how many more you could need.
CCL |
   |

 
|
| jim_hoyland |
May 17 2008, 06:54 PM
Post
#62
|
|
Get that VIN ? Group: Members Posts: 9,312 Joined: 1-May 03 From: Sunset Beach, CA Member No.: 643 Region Association: Southern California |
OK- a great set of pictures ! I'm about ready to proceed, got a question about the parts that you show being cut of---as it related to a '75
1. What will the rubber bumper tabs interfere with during the installation ? 2. What does the front piece in front interfere with ? |
 |
|
| messix |
May 17 2008, 08:13 PM
Post
#63
|
|
AKA "CLUTCH KILLER"! Group: Members Posts: 6,995 Joined: 14-April 05 From: between shit kickers and pinky lifters/ puget sound wa.north of Seattle south of Canada Member No.: 3,931 Region Association: Pacific Northwest |
QUOTE(jim_hoyland @ May 17 2008, 05:54 PM)  OK- a great set of pictures ! I'm about ready to proceed, got a question about the parts that you show being cut of---as it related to a '75 1. What will the rubber bumper tabs interfere with during the installation ? 2. What does the front piece in front interfere with ? # 1 the sides of the steel bumpers [bumper is narrower than the body with the bub [big ugly bumpers] tabs] #2 the steel bumper has a rubber pad on the top and this will make contact with the front bub channel |
|
|
|
| ConeDodger |
May 17 2008, 08:13 PM
Post
#64
|
|
Apex killer! Group: Members Posts: 23,602 Joined: 31-December 04 From: Tahoe Area Member No.: 3,380 Region Association: Northern California |
QUOTE(jim_hoyland @ May 17 2008, 05:54 PM) OK- a great set of pictures ! I'm about ready to proceed, got a question about the parts that you show being cut of---as it related to a '75 1. What will the rubber bumper tabs interfere with during the installation ? 2. What does the front piece in front interfere with ? The early bumpers hug the body a little too close to leave these mounting flanges for your late bumpers in place. I did it a little different than Craig in that instead of just using a cutoff wheel to remove them I used a spot weld bit and drilled them out. once you do that you can pretty much just peal them off. Be careful along the front to leave enough so that the front trunk seal has a place to live... |
|
|
|
| jim_hoyland |
May 17 2008, 09:38 PM
Post
#65
|
|
Get that VIN ? Group: Members Posts: 9,312 Joined: 1-May 03 From: Sunset Beach, CA Member No.: 643 Region Association: Southern California |
QUOTE(ConeDodger @ May 17 2008, 07:13 PM) QUOTE(jim_hoyland @ May 17 2008, 05:54 PM) OK- a great set of pictures ! I'm about ready to proceed, got a question about the parts that you show being cut of---as it related to a '75 1. What will the rubber bumper tabs interfere with during the installation ? 2. What does the front piece in front interfere with ? The early bumpers hug the body a little too close to leave these mounting flanges for your late bumpers in place. I did it a little different than Craig in that instead of just using a cutoff wheel to remove them I used a spot weld bit and drilled them out. once you do that you can pretty much just peal them off. Be careful along the front to leave enough so that the front trunk seal has a place to live... Thanks for both replys. Can you describe a spot weld bit for me |
|
|
|
| ConeDodger |
May 17 2008, 10:07 PM
Post
#66
|
|
Apex killer! Group: Members Posts: 23,602 Joined: 31-December 04 From: Tahoe Area Member No.: 3,380 Region Association: Northern California |
The end is intended to dig out the weld. I found them at an autobody supply shop. The came in two sizes as I recall. I want to say 7 and 9MM?
The hard part was getting the position correct. It can't be too hard. The guy who helped me proved to be a total idiot and mine turned out good. He did manage to destroy my stock motor though... |
|
|
|
| bdstone914 |
May 17 2008, 10:58 PM
Post
#67
|
|
bdstone914 Group: Members Posts: 4,528 Joined: 8-November 03 From: Riverside CA Member No.: 1,319 |
QUOTE(ConeDodger @ May 17 2008, 07:07 PM) The guy who helped me proved to be a total idiot and mine turned out good. He did manage to destroy my stock motor though... Whats the story on that? -Wes |
|
|
|
| computers4kids |
May 17 2008, 11:28 PM
Post
#68
|
|
Love these little cars! Group: Members Posts: 2,443 Joined: 11-June 05 From: Port Townsend, WA Member No.: 4,253 Region Association: None |
Jim,
If you have access to a air compressor and a harbor freight $10 cutting tool (or electric cutting tool), all those pieces are real easy to remove. Just by grinding the spot welds some, not all the way through, the metal brackets will snap off. You can then cleanup the spot welds with the cutting tool. If you decide to drill, be real careful...that metal on the front of the car near the lip is real thin and it would be real easy to drill through. I took all four bumper brackets and the hood lip off in less than an hour taking my time, including cleaning up the metal. Be prepared to really clean-up the metal under the lip by the front trunk...you will probably find some rust. |
|
|
|
| jim_hoyland |
May 18 2008, 01:26 PM
Post
#69
|
|
Get that VIN ? Group: Members Posts: 9,312 Joined: 1-May 03 From: Sunset Beach, CA Member No.: 643 Region Association: Southern California |
QUOTE(computers4kids @ May 17 2008, 10:28 PM) Jim, If you have access to a air compressor and a harbor freight $10 cutting tool (or electric cutting tool), all those pieces are real easy to remove. Just by grinding the spot welds some, not all the way through, the metal brackets will snap off. You can then cleanup the spot welds with the cutting tool. If you decide to drill, be real careful...that metal on the front of the car near the lip is real thin and it would be real easy to drill through. I took all four bumper brackets and the hood lip off in less than an hour taking my time, including cleaning up the metal. Be prepared to really clean-up the metal under the lip by the front trunk...you will probably find some rust. Would my dremel tool work ? Thanks for all the replys, I got a better feel for the job. |
|
|
|
| dlo914 |
Apr 6 2009, 10:18 PM
Post
#70
|
|
Whatchu' lookin' at?!?! Group: Members Posts: 3,432 Joined: 6-September 04 From: San Gabriel, CA Member No.: 2,697 |
QUOTE(jim_hoyland @ May 18 2008, 12:26 PM) QUOTE(computers4kids @ May 17 2008, 10:28 PM) Jim, If you have access to a air compressor and a harbor freight $10 cutting tool (or electric cutting tool), all those pieces are real easy to remove. Just by grinding the spot welds some, not all the way through, the metal brackets will snap off. You can then cleanup the spot welds with the cutting tool. If you decide to drill, be real careful...that metal on the front of the car near the lip is real thin and it would be real easy to drill through. I took all four bumper brackets and the hood lip off in less than an hour taking my time, including cleaning up the metal. Be prepared to really clean-up the metal under the lip by the front trunk...you will probably find some rust. Would my dremel tool work ? Thanks for all the replys, I got a better feel for the job. Jim, I found that using a hammer and chisel removed the tabs pretty well on our 75 project. It worked a lot better than using the angle grinder with a cutting disk. |
|
|
|
| jim_hoyland |
Apr 7 2009, 09:37 AM
Post
#71
|
|
Get that VIN ? Group: Members Posts: 9,312 Joined: 1-May 03 From: Sunset Beach, CA Member No.: 643 Region Association: Southern California |
QUOTE(dlo914 @ Apr 6 2009, 09:18 PM) QUOTE(jim_hoyland @ May 18 2008, 12:26 PM) QUOTE(computers4kids @ May 17 2008, 10:28 PM) Jim, If you have access to a air compressor and a harbor freight $10 cutting tool (or electric cutting tool), all those pieces are real easy to remove. Just by grinding the spot welds some, not all the way through, the metal brackets will snap off. You can then cleanup the spot welds with the cutting tool. If you decide to drill, be real careful...that metal on the front of the car near the lip is real thin and it would be real easy to drill through. I took all four bumper brackets and the hood lip off in less than an hour taking my time, including cleaning up the metal. Be prepared to really clean-up the metal under the lip by the front trunk...you will probably find some rust. Would my dremel tool work ? Thanks for all the replys, I got a better feel for the job Jim, I found that using a hammer and chisel removed the tabs pretty well on our 75 project. It worked a lot better than using the angle grinder with a cutting disk. Thanks, interesting. |
|
|
|
| charliew |
Apr 11 2009, 05:26 PM
Post
#72
|
|
Advanced Member Group: Members Posts: 2,363 Joined: 31-July 07 From: Crawford, TX. Member No.: 7,958 |
The nuts for the fog lights are like the nuts shops install mirrors on doors with. They are nuts that go in like pop rivets. I think they are called nutzerts. I bought a kit of several sizes including a installing tool. The one I have is made by marson, I got it at the auto paint store many years ago.
|
|
|
|
| Sleepin |
Aug 23 2009, 09:34 PM
Post
#73
|
|
Advanced Member Group: Members Posts: 3,647 Joined: 20-November 07 From: Grand Junction, Co. Member No.: 8,357 Region Association: Rocky Mountains |
I made aluminum block off plates to fill the shock holes in the front. These are the same size as the shock gasket retainer. To distribute the pressure a little better and to spread out the silicone sealant, I installed the shock gasket retainer as well. I did all of this to allow someone to return it to the stock bumpers someday if they wish.
Anyone see why this would not work? (IMG:http://i171.photobucket.com/albums/u307/Sleepin1974/102_0093.jpg) (IMG:http://i171.photobucket.com/albums/u307/Sleepin1974/102_0094.jpg) Also, be prepared for suprises. I found some unpainted bondo under an area that the BBB covered, but the chrome bumper won't. (IMG:http://i171.photobucket.com/albums/u307/Sleepin1974/102_0096.jpg) |
|
|
|
| Sleepin |
Aug 26 2009, 10:33 PM
Post
#74
|
|
Advanced Member Group: Members Posts: 3,647 Joined: 20-November 07 From: Grand Junction, Co. Member No.: 8,357 Region Association: Rocky Mountains |
Cutting or removing the tabs without the proper tools will only get you frustrated and is not worth it. A 4" die grinder for $27 and some cutting wheels makes this a breeze!
(IMG:http://i171.photobucket.com/albums/u307/Sleepin1974/102_0110-1.jpg) The mockup makes it soo worth it! (IMG:http://i171.photobucket.com/albums/u307/Sleepin1974/102_0118-2.jpg) |
|
|
|
| sixnotfour |
Aug 26 2009, 11:52 PM
Post
#75
|
|
914 Wizard Group: Members Posts: 10,433 Joined: 12-September 04 From: Life Elevated..planet UT. Member No.: 2,744 Region Association: Rocky Mountains |
I just unback dated my 76 and gave it back to my mom, the only thing I had cut was the side tabs, the front piece actually supported the fiberglass bumper I had previously installed. I wanted to use the CA bumper tits on a steel bumper too, but I installed them on the 76. Before and After:
Attached image(s) 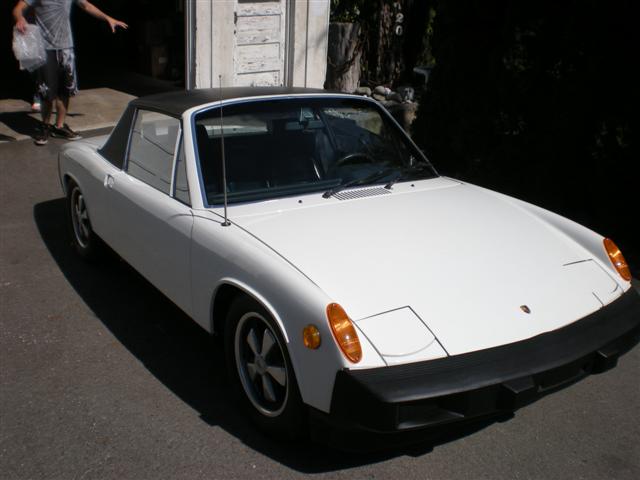 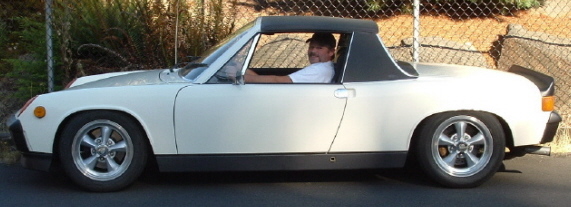
|
|
|
|
| jim_hoyland |
Jun 2 2010, 08:11 PM
Post
#76
|
|
Get that VIN ? Group: Members Posts: 9,312 Joined: 1-May 03 From: Sunset Beach, CA Member No.: 643 Region Association: Southern California |
|
|
|
|
| Harpo |
Jul 16 2012, 03:44 PM
Post
#77
|
|
Senior Member Group: Members Posts: 1,304 Joined: 21-August 11 From: Motor City aka Detroit Member No.: 13,469 Region Association: None |
On page 2 boxstr showed how to modify the frt end of a 76 or 75 to accept the earlier bumpers. It is unclear exactly what he is removing. Can anyone please elaborate. There is a "Z" channel that is spot welded on I can't tell if he is removing the whole thing or just part.
Thanks David |
|
|
|
| shelby/914 |
Jul 16 2012, 04:48 PM
Post
#78
|
|
Senior Member Group: Members Posts: 804 Joined: 24-August 05 From: Foxfield, Co Member No.: 4,655 Region Association: Rocky Mountains |
Take it back until only the channel for the trunk rubber remains, just as the picture shows. My body man friend cut the lip off my car when it was painted. Didn't really pay any attention that he left about a eighth inch or so of material beyond the channel and now that we are fitting the front bumper and top there is a finger width gap between the bumper top and the hood. Now I have to cut it off after the car is painted and home. will post a pix when I get back over to the garage where the car is stored.
Also look at the thread for mounting the fogs and my recent thread about the cheap trick we used to mount them called how to mount pilot lights on a '76. Dan |
|
|
|
| boxstr |
Jul 17 2012, 11:04 AM
Post
#79
|
|
MEMBER:PACIFIC NORTHWEST REGION Group: Members Posts: 7,522 Joined: 25-December 02 From: OREGON Member No.: 12 Region Association: Pacific Northwest |
Shelby, explained that very well. Leave just the channel to hold the rubber trunk seal in place.
Leave more, you can then test fit the bumper, and if not fitting correctly remove more.easier that than trying to add material after the fact. Harpo, if you need to call for a better explanation, call me at 503-799-5794 Craig at CAMP |
|
|
|
| jim_hoyland |
Aug 29 2020, 10:50 AM
Post
#80
|
|
Get that VIN ? Group: Members Posts: 9,312 Joined: 1-May 03 From: Sunset Beach, CA Member No.: 643 Region Association: Southern California |
Just dug this up out of the archive. The backdate was done at the Monarh Hotel parking lot at the WCR, back when
Some great pic of how-to; just don’t wear flip-flops when using a grinder... (IMG:style_emoticons/default/biggrin.gif) |
|
|
|
|
1 User(s) are reading this topic (1 Guests and 0 Anonymous Users)
0 Members:

|
Lo-Fi Version | Time is now: 28th May 2024 - 06:18 PM |
Invision Power Board
v9.1.4 © 2024 IPS, Inc.