|
|
|
Porsche, and the Porsche crest are registered trademarks of Dr. Ing. h.c. F. Porsche AG.
This site is not affiliated with Porsche in any way. Its only purpose is to provide an online forum for car enthusiasts. All other trademarks are property of their respective owners. |
|
|

  |

| jmill |
 Aug 1 2010, 06:42 PM Aug 1 2010, 06:42 PM
Post
#21
|
|
Green Hornet  Group: Members Posts: 2,449 Joined: 9-May 08 From: Racine, Wisconsin Member No.: 9,038 Region Association: Upper MidWest |
QUOTE(scotty b @ Aug 1 2010, 07:20 PM)  Look for a thread from me soon on proper bracing, this is getting out of hand (IMG:style_emoticons/default/sad.gif) That would be great Scotty. It would be an instant classic. |
   |

 
|
| skeates |
Aug 1 2010, 06:50 PM
Post
#22
|
|
Member Group: Members Posts: 218 Joined: 28-February 05 From: Sacramento, ca Member No.: 3,684 Region Association: Northern California |
I was hoping was hoping for a slightly less nihilistic response...despite what I now understand to be less than adequate bracing, the new piece fit in without any tweaks and all of the measurements I've done (though not extensive) have been within 1/32" of factory. Is a frame shop the only way out? Anyone know what it would cost to take this to a shop to have fixed?
|
|
|
|
| rick 918-S |
Aug 3 2010, 06:40 PM
Post
#23
|
|
Hey nice rack! -Celette Group: Members Posts: 20,492 Joined: 30-December 02 From: Now in Superior WI Member No.: 43 Region Association: Northstar Region |
QUOTE(skeates @ Aug 1 2010, 07:50 PM) I was hoping was hoping for a slightly less nihilistic response...despite what I now understand to be less than adequate bracing, the new piece fit in without any tweaks and all of the measurements I've done (though not extensive) have been within 1/32" of factory. Is a frame shop the only way out? Anyone know what it would cost to take this to a shop to have fixed? I read this post Sunday but had just had a chunk of steel removed from my eye and couldn't really stand the scratching stinging pain long enough to reply. I'm not sure you can get the gaps perfect but let me ask you some questions and see if we can work through this. Lets just start with what is good. It looks like you can align the right door to the fender. Cool, now remove the latch and check to see how the door closes without the latch. Q) with the door aligned to the fender in the closed position what is the gap like under the door? Is it even with the long or sagging and touching the long at the back of the door? Answer this and don't race ahead. |
|
|
|
| skeates |
Feb 7 2013, 12:44 AM
Post
#24
|
|
Member Group: Members Posts: 218 Joined: 28-February 05 From: Sacramento, ca Member No.: 3,684 Region Association: Northern California |
Hello all – I’ve been in lurking mode for a while (I guess two years is a while…) but have slowly made progress on my project. Thanks Rick for the response - I seem to have missed it until just now! When I ran into the door gap issues work essentially stopped until I got the car off of the rotisserie and down to Sac. I was very relieved to find that once the car was off the rotisserie the door gap problem disappeared! I even took it by a Porsche Restoration shop in West Sac and they took a loot at it for me. I know that without putting it onto a rack with the precise measurements I’ll never know how close (or far off I really am), but the door gaps are lining up now and every measurement I can take seems to be within spec and symmetric to within a couple 32nds of an inch…so, I’ve pressed onwards and hope to be a bit more diligent at posting my progress.
Since bringing the car down I have made some “upgrades” to the bracing on the car – again paying very close attention to the dimensions and all the measurements were symmetrical from driver to passenger side. Now I have a dolly that attaches at all of the suspension points and braces in each of the doors:  I’ve also made the following progress on the car: - Replaced passenger and driver floor pans (both rusted pretty bad) - Replaced the rear trunk floor pan - Disassembled rear suspension consoles - Got all suspension parts powder coated - Drilled holes for the front through body sway bar - Seam welded the rear suspension consoles - Decided to go the Suby motor + Transmission route - Removed rear trunk firewall section to weld inside seams and make room for Suby motor - Plumed the coolant lines through where the heater tubes used to be (more on this later) - Inspected the driver’s side long for rust (only surface stuff found!) - Ordered lots of parts…with many more left to be ordered. I've got pictures of everything listed above, but since my laptop battery is dying fast here I'll have to post them tomorrow. |
|
|
|
| Cairo94507 |
Feb 7 2013, 07:33 AM
Post
#25
|
|
Michael Group: Members Posts: 9,822 Joined: 1-November 08 From: Auburn, CA Member No.: 9,712 Region Association: Northern California |
Cool - Very nice to see this thread come back to life. Looking forward to seeing more pictures of the car as it moves along. Hopefully no more big nasty spiders in the car.
|
|
|
|
| skeates |
Mar 4 2013, 12:14 AM
Post
#26
|
|
Member Group: Members Posts: 218 Joined: 28-February 05 From: Sacramento, ca Member No.: 3,684 Region Association: Northern California |
So As promised, here are some pics of the progress I've made since bringing the car down to sactown. The First pic is one more shot of the dolly that I made (basically cannibalized the rotisserie). It attaches to the rear suspension consoles and then to where the front cross-member mounts. It has worked out very well...but does make it a bit harder to get to the stuff underneath. I can't seem to find any pictures of the passenger door jam reconstruction, but there is one of the rear quarter panel being made whole again. I realized in the process of putting together the door jam that some of the door sagging shown in the photos before was due to the pieces only being spot welded in place. Door opens and closes like a champ now! I know, I know, I got lucky - so I suppose I'm celebrating that too. (IMG:style_emoticons/default/smilie_pokal.gif)
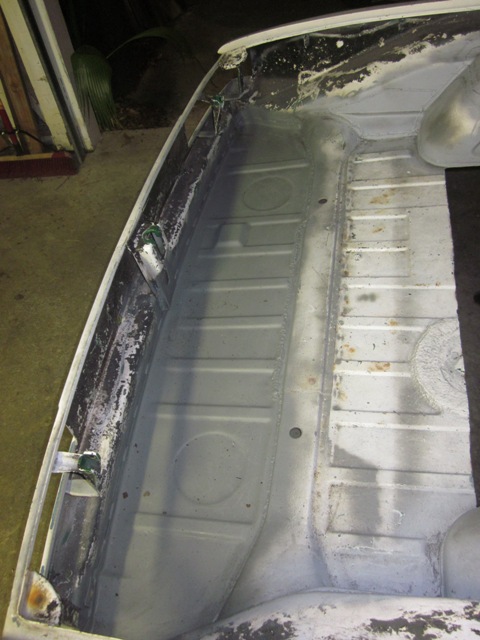
Next up was the rear trunk. Since I am going to be going the Subaru engine + Transmission route I figured I'd be proactive and make some space. I plan on creating an access panel that will screw in place to enable access to the motor/transmission for servicing and repair. While back there I seam welded the rear suspension consoles (including the inner firewall) and added a brace between the two towers to compensate for the missing metal. Also had to replace the rear panel in the trunk. 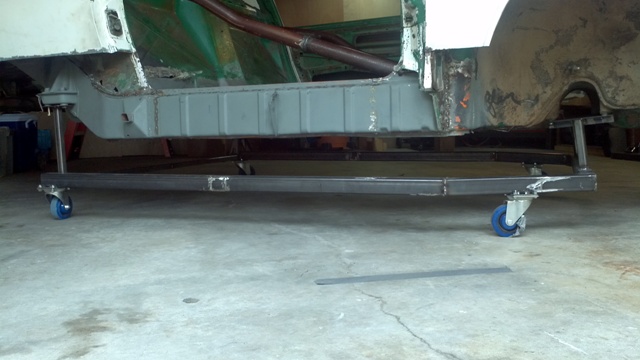  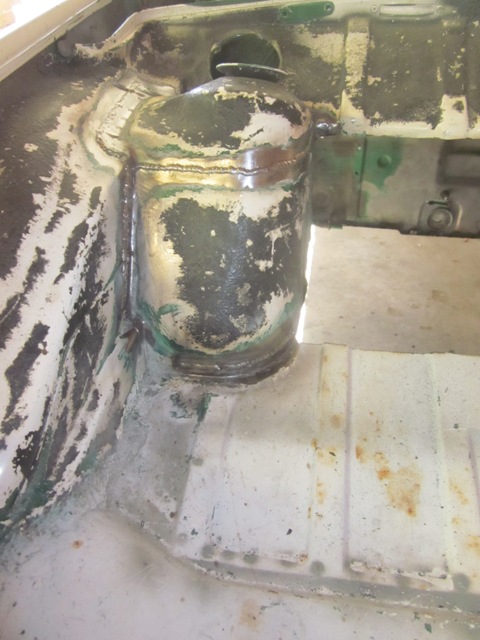 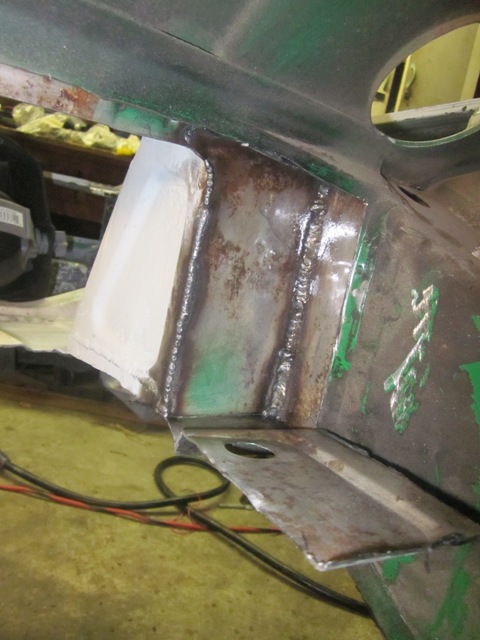  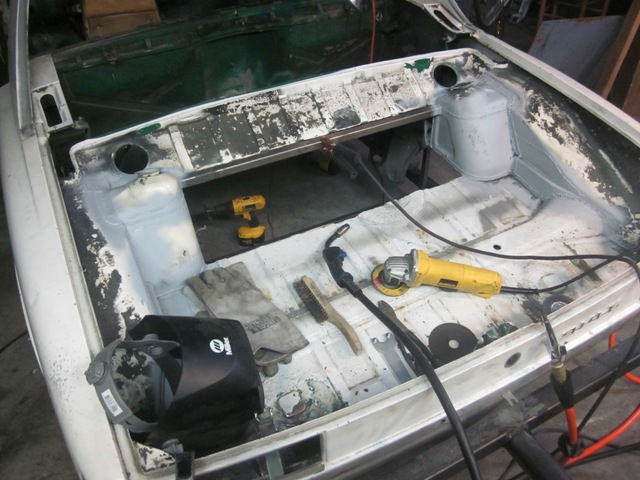 Attached image(s) 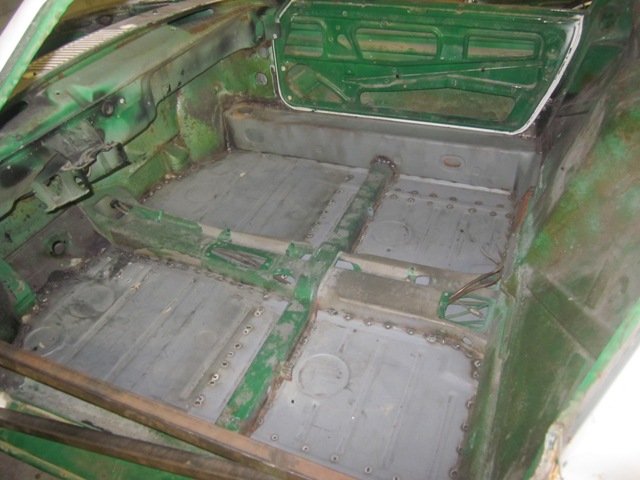
|
|
|
|
| skeates |
Mar 4 2013, 12:45 AM
Post
#27
|
|
Member Group: Members Posts: 218 Joined: 28-February 05 From: Sacramento, ca Member No.: 3,684 Region Association: Northern California |
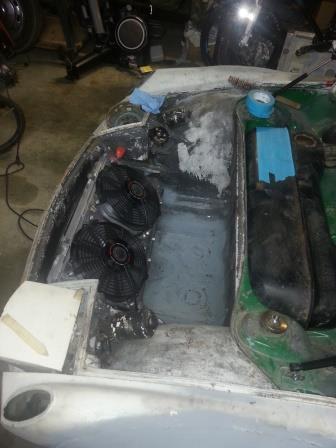
 With the rear trunk mods and rust repair finished (minus the cover panel) I focused my attention to pluming the coolant lines. For this I had the following criteria in mind: 1) Protect the hoses! 2) Keep the car nice and flat underneath 3) Limit heat from hoses to cabin 4) Enable easy future servicing 5) Limit number of connections (i.e. future leaks) 6) Hide the evidence I played around with some different ideas but finally came to the conclusion that routing the coolant lines through the longs made the most sense. In order to enable installation and removal of the hoses from the engine bay I knew I would need to run a chase down the tubes (FYI the original heater tubes had been chewed up long ago by mice). Ideally this chase would also be used to help insulate the cabin as well. In the end I went with PVC pipe for the chase (I know, it seems kinda hokey but I think it makes sense). The PVC was the only readily available rigid pipe material I could think of that could offer some insulation without absorbing moisture or trapping water against the metal. For the sections the route through the cabin I plan to "get my fiberglass on" and make some cover panels. I also plan on adding some foam insulation behind the panels. Also, a gratuitous picture of the new radiator and cooling shroud 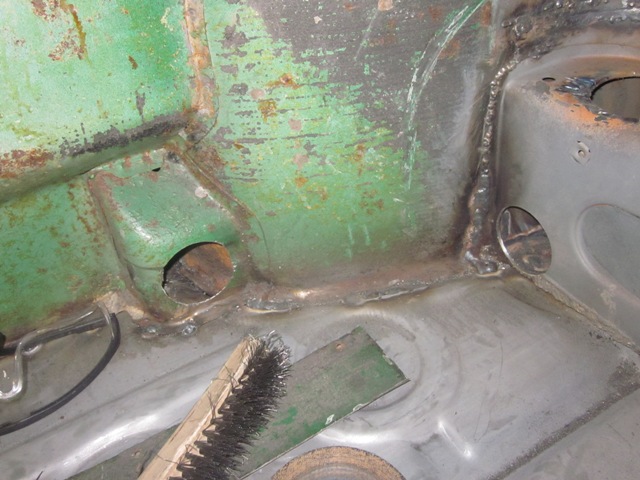 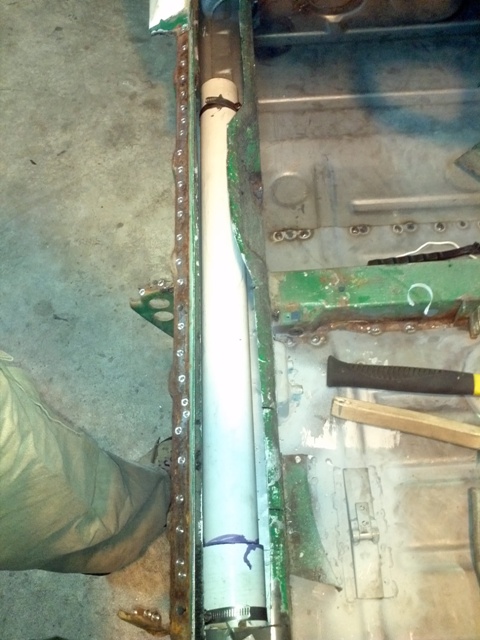 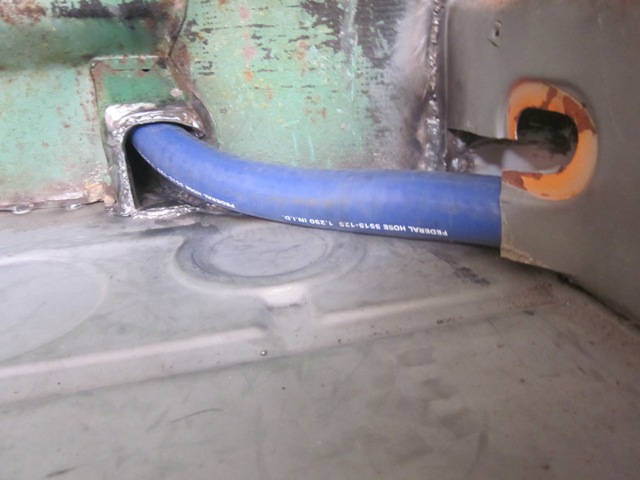 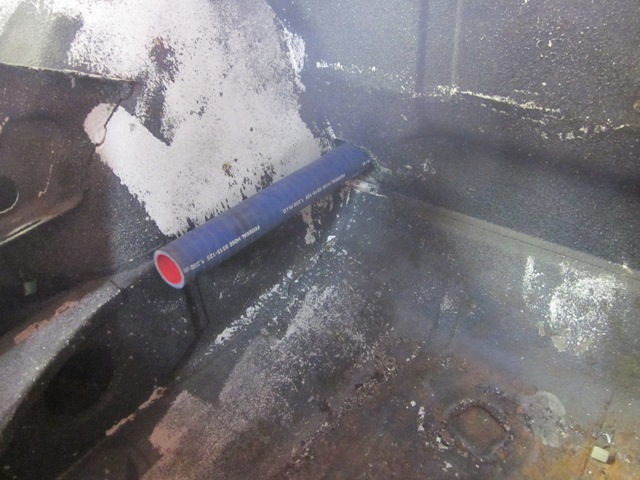 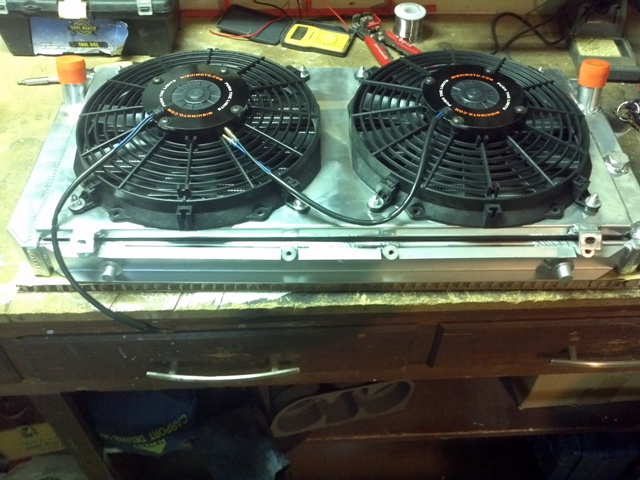 |
|
|
|
| skeates |
Mar 24 2013, 10:14 PM
Post
#28
|
|
Member Group: Members Posts: 218 Joined: 28-February 05 From: Sacramento, ca Member No.: 3,684 Region Association: Northern California |
Got some time in over the last couple of weeks on the teener. Sometimes I feel like I spend hours in the garage ticking-off a lots of "to-dos" and yet at the end of the day you'd have to know exactly where to look to notice any differences! The tub is almost ready to begin bolting all the new pretty parts to it. Here's the cliff notes version:
- Finished installing Elephant front bushings - Rebuilt pedal cluster - welded on a missing chunk of body panel - Picked up some autobody hammers & dollies (and started learning how to use them) - Ground down a bunch of welds to make room for long stiffening kit - Tacked in the long stiffening kit - Disassembled the steering rack for cleaning - Dry fitted front sway bar I've got flares and the rest of my suspension ordered and hopefully on their way soon. I'm hoping to have this thing back on wheels before June...that way I can still use my birthday as an excuse to buy the drivetrain (IMG:style_emoticons/default/birthday3.gif)  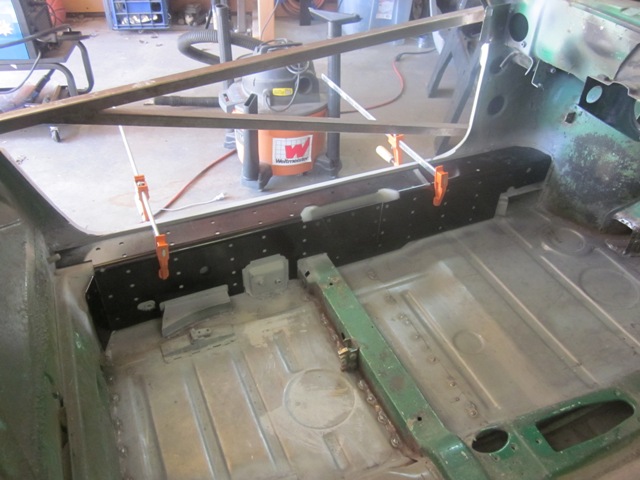  |
|
|
|
| skeates |
Mar 24 2013, 10:19 PM
Post
#29
|
|
Member Group: Members Posts: 218 Joined: 28-February 05 From: Sacramento, ca Member No.: 3,684 Region Association: Northern California |
Here are some picks at my first ever attempt to do body work. There's still a ways to go, but I was really excited to get it somewhat smooth in the hour I worked at it. The pic was taken after I had put a fresh spray of primer on it to check for high/low spots - so it probably makes the panel look better than it really is.
Before & After 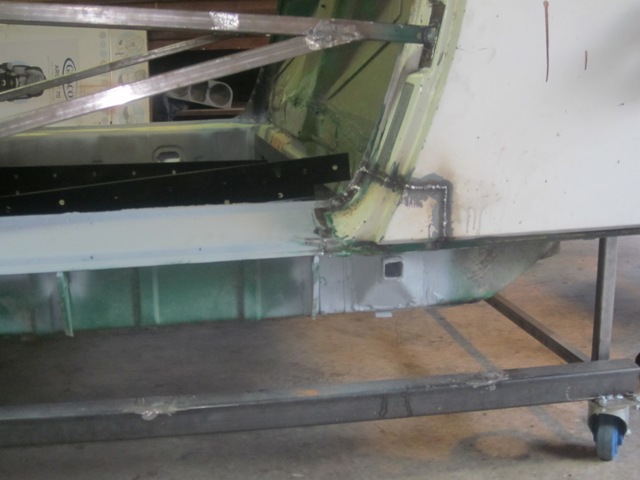 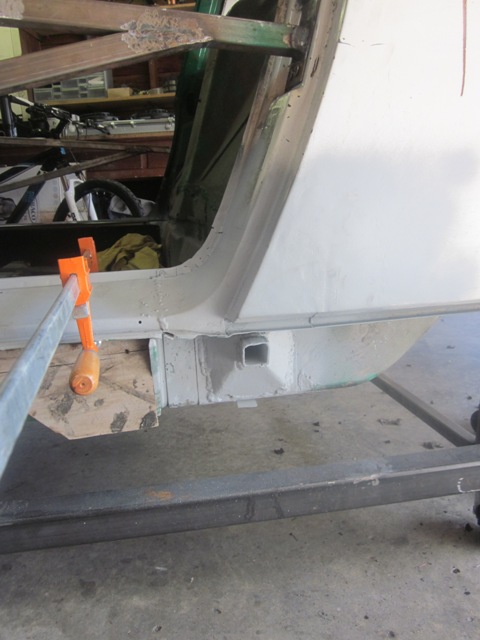 |
|
|
|
| skeates |
Apr 15 2013, 04:35 PM
Post
#30
|
|
Member Group: Members Posts: 218 Joined: 28-February 05 From: Sacramento, ca Member No.: 3,684 Region Association: Northern California |
A little more progress to report:
- Mocked-up the flares and stared at them for a while (haven't actually welded anything yet) - Built some scab plates to re-enforce the rear suspension pick-ups. - Took the car off of the dolly to start fitting new suspension components 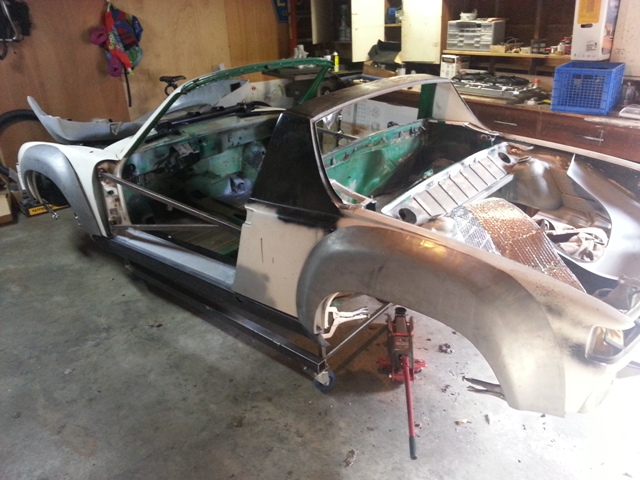 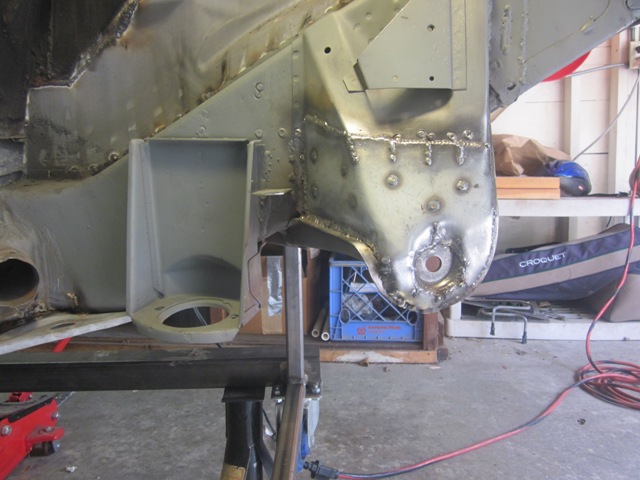 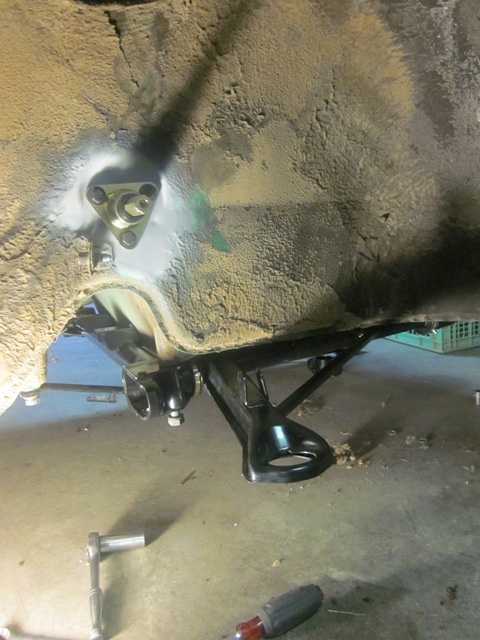 |
|
|
|
| skeates |
Apr 15 2013, 04:46 PM
Post
#31
|
|
Member Group: Members Posts: 218 Joined: 28-February 05 From: Sacramento, ca Member No.: 3,684 Region Association: Northern California |
When I was fitting the front A-arms I found some binding in their movement once all bolted down. I did some searches and this sounds like a pretty normal experience for folks who have gone to the bronze bushings. Does that sound right? Instead of purchasing the low-friction mounting kit (cause I'm a CSOB and also because I don't want to press out the bushings) I went ahead and ordered some self aligning washers from McMaster-Carr and will modify the rear mounts to accept them. Most of the mis-alignment looks to be in the vertical direction anyways.
Also - Today I received my 5-lug conversion parts from Eric! (IMG:style_emoticons/default/smilie_pokal.gif) So - hopefully by the end of the weekend I'll have my suspenders back together! Now I need to source some wheels to roll the thing around on. What have others been doing for this? Cheap 5-lug donuts? Looks like I'll be making my June deadline for a roller! |
|
|
|
| saigon71 |
Apr 15 2013, 07:34 PM
Post
#32
|
|
Advanced Member Group: Members Posts: 2,000 Joined: 1-June 09 From: Dillsburg, PA Member No.: 10,428 Region Association: MidAtlantic Region |
Great work man! (IMG:style_emoticons/default/beerchug.gif)
|
|
|
|
| skeates |
Oct 14 2013, 10:50 PM
Post
#33
|
|
Member Group: Members Posts: 218 Joined: 28-February 05 From: Sacramento, ca Member No.: 3,684 Region Association: Northern California |
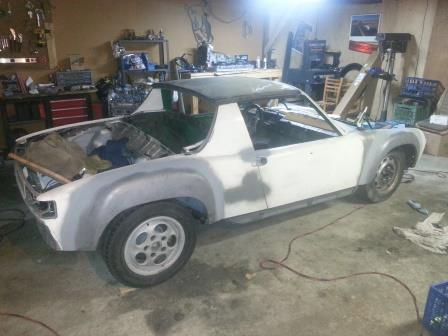
It's been a while since I've posted any progress on my project, but I have slowly been chipping away at it. Got the suspension and wheels back on in June and now it's finally starting to look like a car again! I've also managed to get the flares welded on and a radiator mount started. I just want to say how much respect I have for all you auto-body folks. It takes a whole lot of time and patience to weld in 4 silly little metal panels!
  I still have a lot of finish work to do on the flares but needed a break from body work so I've distracted myself lately with some new toys I picked up from a local wrecking yard. Since they had been on the lot for a while they actually very willing to negotiate on price. 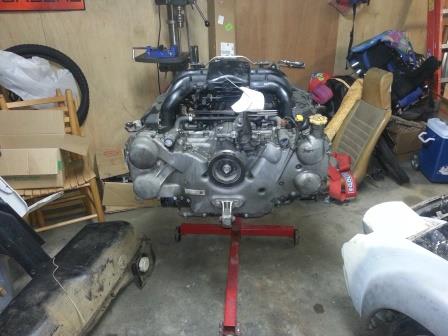 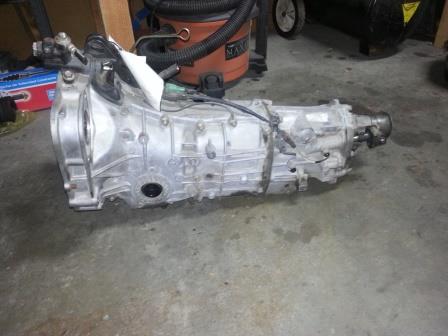 The engine is an EZ36 out of a 2010 Legacy. I debated between the EZ30R and EZ36 for a while but in the end I decided since I wasn't building it up or adding forced induction that the EZ36 is just an all around better engine. It also helps that I happened to have the Factory Service Manual for the engine (my other car is a 2010 outback). The tranny is out of a 2007 Legacy GT and has what I think are the best stock gear ratios out of the 5-speed suby boxes you can get (at least for use with the 6 cyl motor). BTW, If anyone wants some good info on Subaru transmissions let me know - I found some awesome threads on 'em! Engine with-out manifold and half cleaned 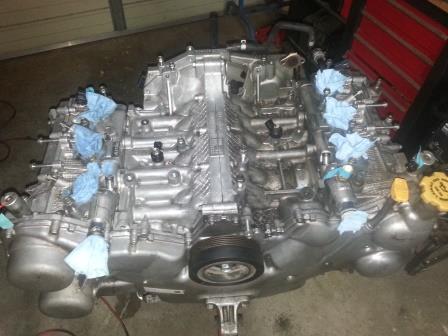 Engine Harness 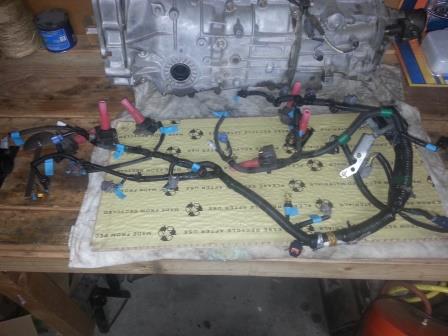 |
|
|
|
| arkitect |
Oct 14 2013, 11:22 PM
Post
#34
|
|
Senior Member Group: Members Posts: 617 Joined: 3-March 10 From: Stockton, CA Member No.: 11,426 Region Association: None |
Glad to see your back on track. I know the time these teeners take to be put back together. Looks like your doing an excellant job. Look forward to seeing the subaru engine in place.
Dave |
|
|
|
| OllieG |
Oct 15 2013, 04:52 AM
Post
#35
|
|
OllieG Group: Members Posts: 212 Joined: 6-July 11 From: UK Member No.: 13,282 Region Association: England |
Great thread and work!...I'm doing a VERY similar project although not as far ahead as you. Will be following with enthusiasm.
Ollie. |
|
|
|
| skeates |
Oct 15 2013, 06:34 AM
Post
#36
|
|
Member Group: Members Posts: 218 Joined: 28-February 05 From: Sacramento, ca Member No.: 3,684 Region Association: Northern California |
Thanks for the encouragement! Sometimes it's hard to keep the momentum going on these projects...especially when you've got two young kiddos nipping at your knees.
|
|
|
|
| Cairo94507 |
Oct 15 2013, 06:56 AM
Post
#37
|
|
Michael Group: Members Posts: 9,822 Joined: 1-November 08 From: Auburn, CA Member No.: 9,712 Region Association: Northern California |
Wow you have definitely been busy. That car is coming along quite nicely. I am jealous.
|
|
|
|
| skeates |
Oct 28 2013, 01:21 PM
Post
#38
|
|
Member Group: Members Posts: 218 Joined: 28-February 05 From: Sacramento, ca Member No.: 3,684 Region Association: Northern California |
Got some time this weekend to work on the car and managed to build my radiator mount. It would have been a whole lot easier (and less time consuming) if I had a sheet metal break. It would have also ended up looking better too. But I was able to get the job done with the tools at my disposal. It needs a few more "tweaks" but overall I'm happy with it. The next step is to get my fiberglass on and make a shroud.
Here's everything in place: 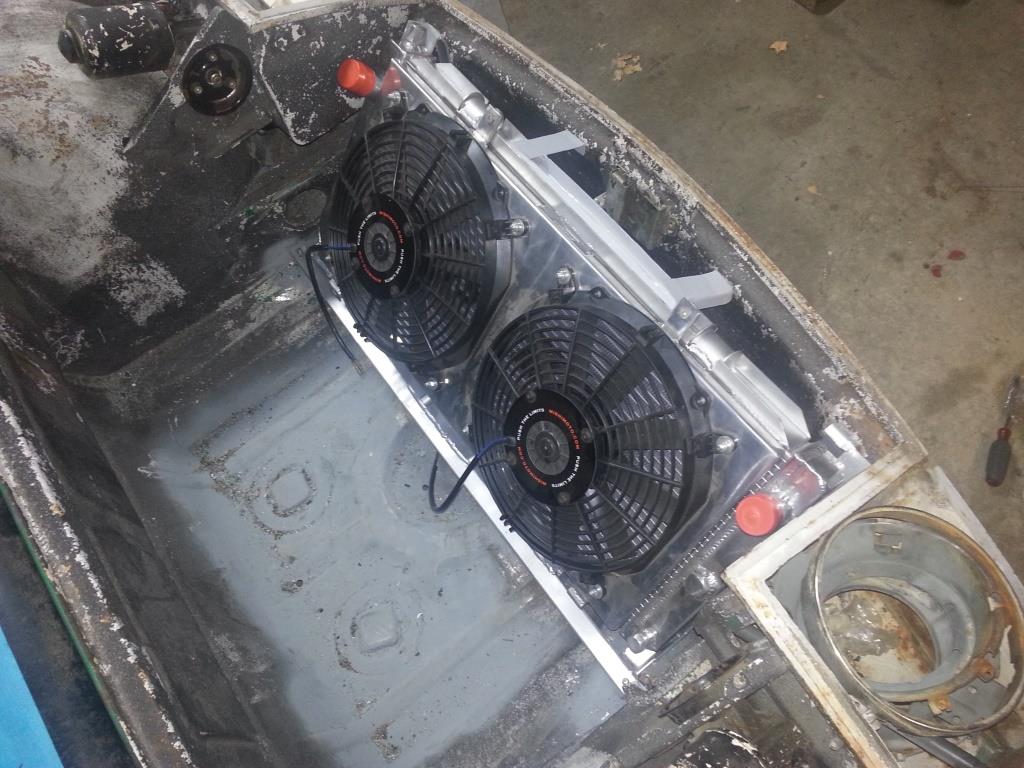 And with the radiator removed:  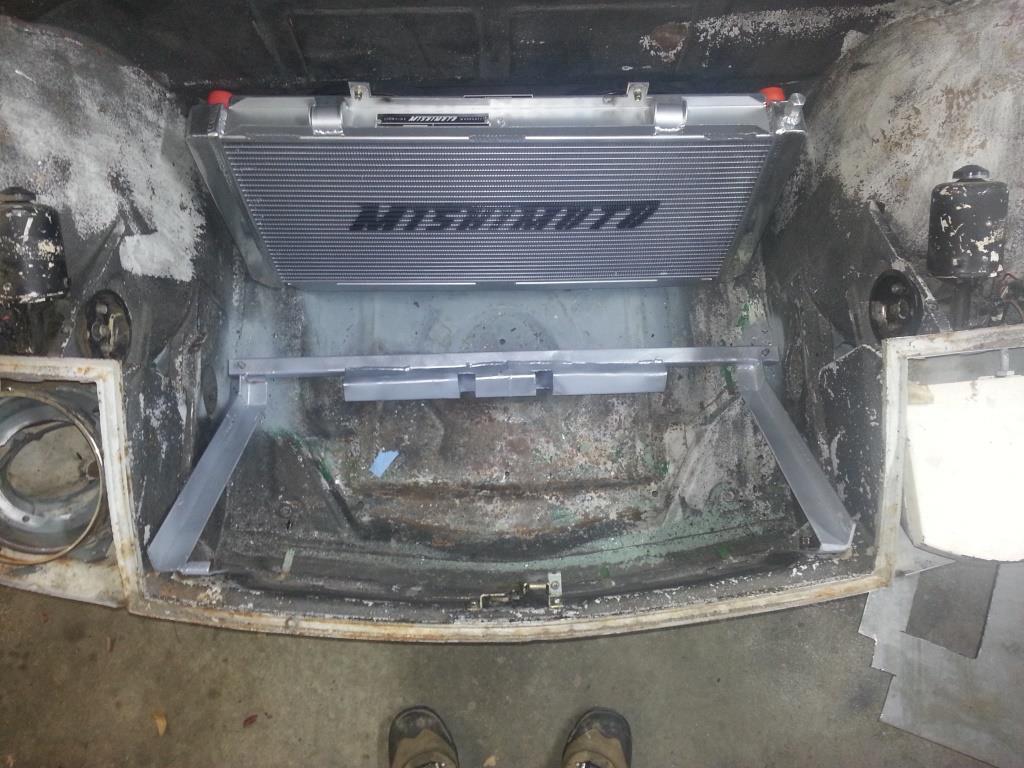 I also made it so that the whole assembly is removable: 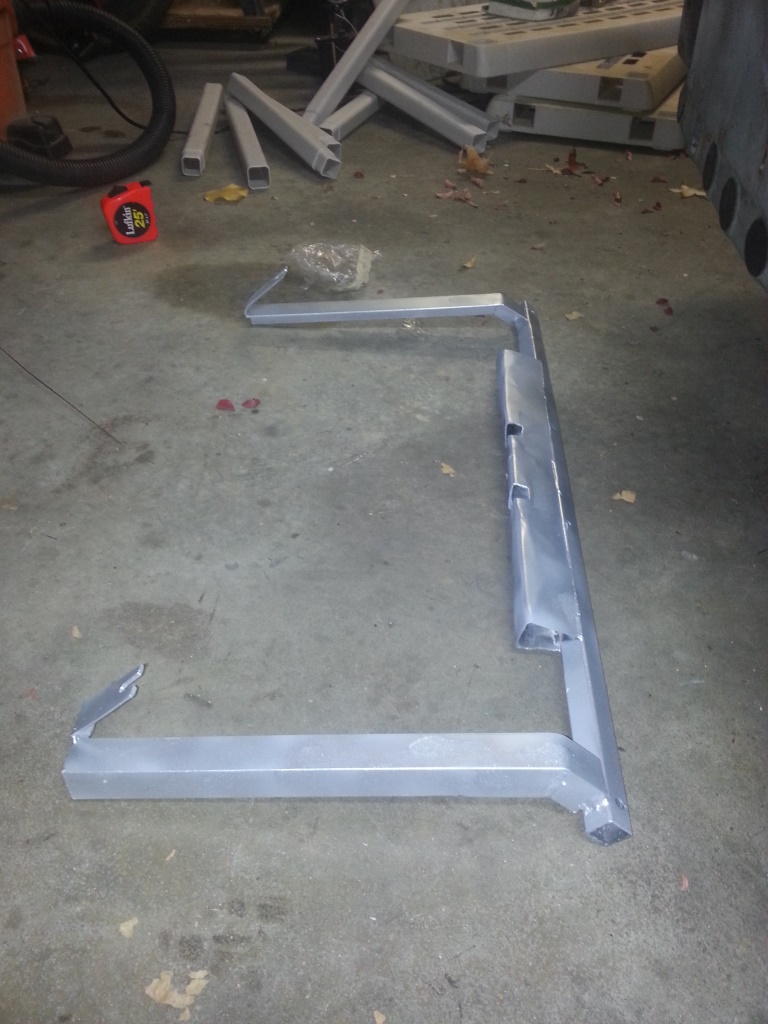 |
|
|
|
| skeates |
Oct 28 2013, 02:28 PM
Post
#39
|
|
Member Group: Members Posts: 218 Joined: 28-February 05 From: Sacramento, ca Member No.: 3,684 Region Association: Northern California |
I was also able to run some errands out at the parts yard and tear into the transmission a bit. When I went to return an engine core (for the subi motor I bought) I wrangled one of the mechanics there to babysit me while looking for some odds and ends. In the end I walked out of there with two front axles, two little stub axle deals for the early style DOJs, and a set of motor mounts for the engine! Paid $100 for parts that would have been closer to $400 anywhere else.
If anyone was wondering what a small-block V8 looks like in a VW bus here you go (IMG:style_emoticons/default/evilgrin.gif) : 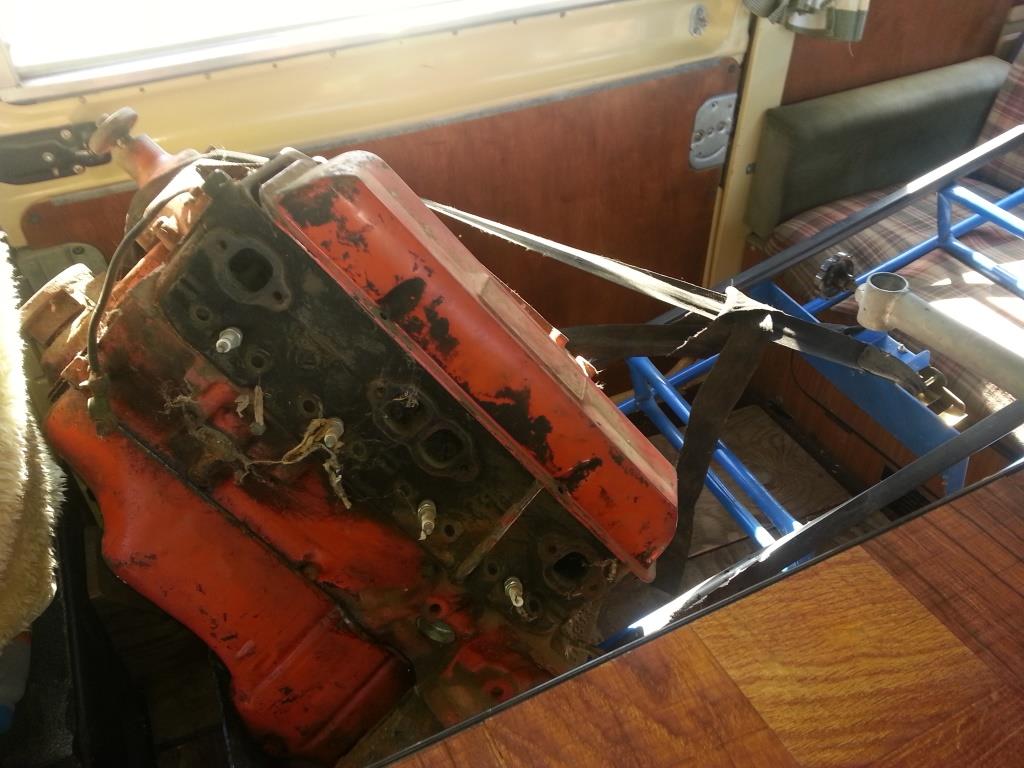 |
|
|
|
| Dr Evil |
Oct 28 2013, 02:34 PM
Post
#40
|
|
Send me your transmission! Group: Members Posts: 23,002 Joined: 21-November 03 From: Loveland, OH 45140 Member No.: 1,372 Region Association: MidAtlantic Region |
Dang, how have I missed this. You are doing exactly what I want to do. I agree with the EZ3.6 all the way. Keep it up!
|
|
|
|
|
1 User(s) are reading this topic (1 Guests and 0 Anonymous Users)
0 Members:

|
Lo-Fi Version | Time is now: 8th June 2024 - 04:23 PM |
Invision Power Board
v9.1.4 © 2024 IPS, Inc.