|
|
|
Porsche, and the Porsche crest are registered trademarks of Dr. Ing. h.c. F. Porsche AG.
This site is not affiliated with Porsche in any way. Its only purpose is to provide an online forum for car enthusiasts. All other trademarks are property of their respective owners. |
|
|

  |

| lmcchesney |
 Apr 20 2004, 05:23 PM Apr 20 2004, 05:23 PM
Post
#1
|
|
Member  Group: Members Posts: 488 Joined: 24-November 03 From: Ocala, Fl. Member No.: 1,381 Region Association: None |
I can't find a tech article on the replacing of rear wheel bearings and re packing of CV joints. Does anyone know of a tech article of the same. I replaced the front wheel bearings and while the 914 is up on stands, I might as well complete the project.
Thanks, L. McChesney |
   |

 
|
| Bleyseng |
Apr 20 2004, 06:25 PM
Post
#2
|
|
Aircooled Baby! Group: Members Posts: 13,036 Joined: 27-December 02 From: Seattle, Washington (for now) Member No.: 24 Region Association: Pacific Northwest |
PP has a tech article on the rear bearings install. To remove you need a BFH to get them out. (IMG:style_emoticons/default/smash.gif)
Check the Haynes manual for anything on the CV joints, it pretty simple but very messy. Geoff |
|
|
|
| lmcchesney |
Apr 20 2004, 06:53 PM
Post
#3
|
|
Member Group: Members Posts: 488 Joined: 24-November 03 From: Ocala, Fl. Member No.: 1,381 Region Association: None |
Thanks Geoff,
Dave clued me into the PP tech article listed under 5 lug conversion. Got the engine bay empty and a set of bearings arround. Might as well. Oh, by the way. I understand those SS brackets makes the car go faster (IMG:style_emoticons/default/biggrin.gif) As always, Thanks, L. McChesney |
|
|
|
| Bleyseng |
Apr 20 2004, 07:31 PM
Post
#4
|
|
Aircooled Baby! Group: Members Posts: 13,036 Joined: 27-December 02 From: Seattle, Washington (for now) Member No.: 24 Region Association: Pacific Northwest |
Yep, went in after work today and I noticed atleast 10 more hp!!! wow, its amazing! Now I'll have to add a side decal from MikeZ and get another 20hp from that. Man, I am into Jake territory now!!! Time to race !
Geoff (IMG:style_emoticons/default/rocking nana.gif) |
|
|
|
| lmcchesney |
Apr 20 2004, 07:54 PM
Post
#5
|
|
Member Group: Members Posts: 488 Joined: 24-November 03 From: Ocala, Fl. Member No.: 1,381 Region Association: None |
OOOhhhh. Don't get me started.
L. McChesney |
|
|
|
| 415PB |
Apr 20 2004, 09:16 PM
Post
#6
|
|
Member Group: Benefactors Posts: 498 Joined: 7-August 03 From: So Cal Member No.: 996 |
I just did this two weeks ago. I pounded with the BFH I could get my hands on for like two hours. I went borrowed my friends 5lb slide hammer and the hubs came with no more than two slides. Needless to say, I am purchasing a slide hammer.
|
|
|
|
| Jeffs9146 |
Apr 21 2004, 10:01 AM
Post
#7
|
|
Ski Bum Group: Members Posts: 4,062 Joined: 10-January 03 From: Discovery Bay, Ca Member No.: 128 |
I just finished assembling my trailing arms and I experienced a small problem with the edge of the hub when pulling it through the bearing on one side. It seems that the lip of the hub was catching on the bearing and wouldn't let it slide in strait. So, I took a small dremmel and smoothed out the lip of the hub and it slid in like butter!
The moral of the story is (if it don't look right....don't force it!) Jeff Attached image(s) 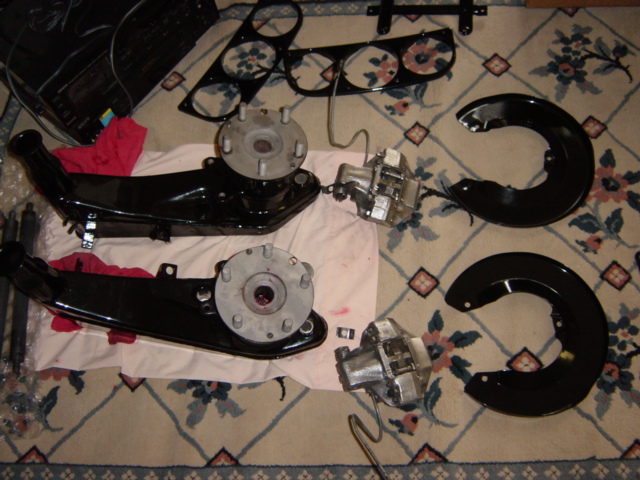
|
|
|
|
| Jeffs9146 |
Apr 21 2004, 10:04 AM
Post
#8
|
|
Ski Bum Group: Members Posts: 4,062 Joined: 10-January 03 From: Discovery Bay, Ca Member No.: 128 |
Attached image(s) 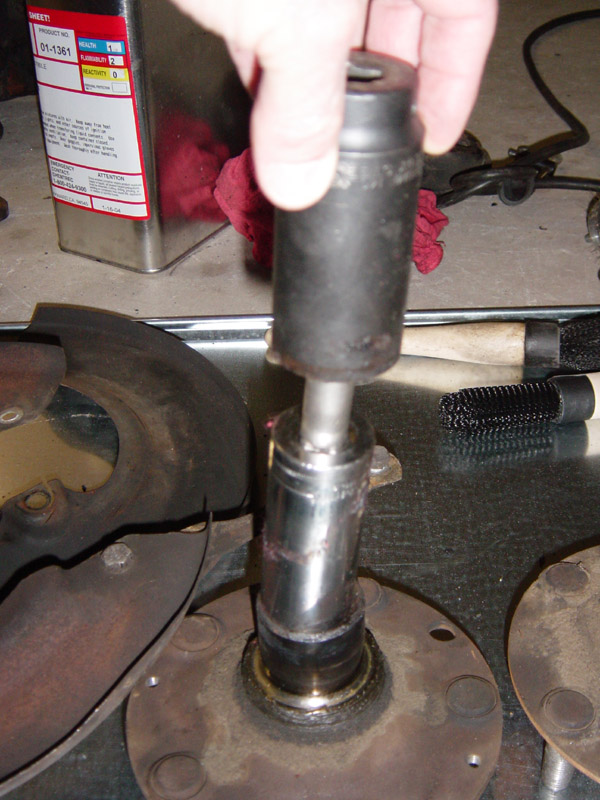
|
|
|
|
| Jeffs9146 |
Apr 21 2004, 10:05 AM
Post
#9
|
|
Ski Bum Group: Members Posts: 4,062 Joined: 10-January 03 From: Discovery Bay, Ca Member No.: 128 |
More tools!
Jeff Attached image(s) 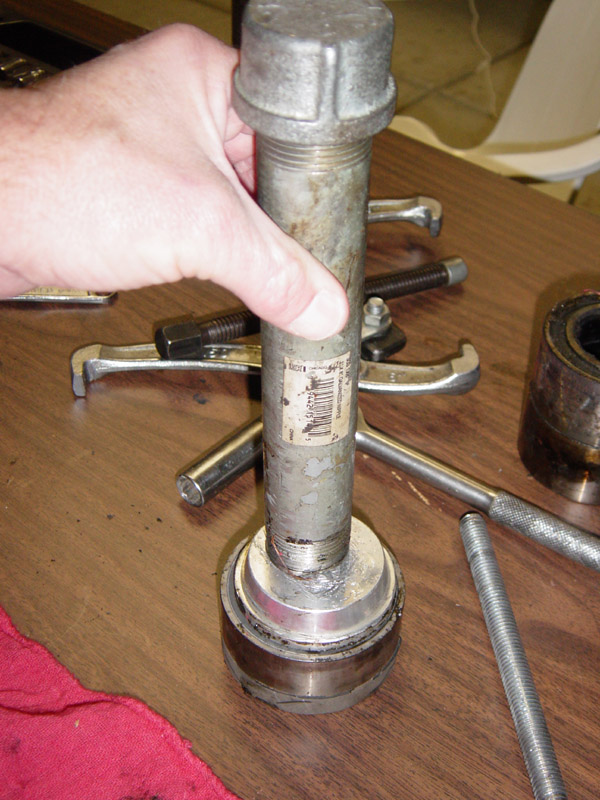
|
|
|
|
| maxwelj |
Apr 21 2004, 10:22 AM
Post
#10
|
|
rebuilt member Group: Benefactors Posts: 288 Joined: 8-January 04 From: Owasso, OK Member No.: 1,532 Region Association: None |
After you get done, how do you insure that the "Hats" are on straight? The first time I tried, I tightened down the little beveled screws and the disc bound on the caliper (W/o pads, even!) I then just spun and tightened, spun and tightened until I had clearance. Is that the proper way?
|
|
|
|
| Jeffs9146 |
Apr 21 2004, 05:54 PM
Post
#11
|
|
Ski Bum Group: Members Posts: 4,062 Joined: 10-January 03 From: Discovery Bay, Ca Member No.: 128 |
I put the drive shaft through and tighten it untill it seats properly then you put the rotors on! If you try to put the rotors on before properly seating the hubs then they will not line up with the calipers!
Jeff |
|
|
|
| 415PB |
Apr 21 2004, 06:09 PM
Post
#12
|
|
Member Group: Benefactors Posts: 498 Joined: 7-August 03 From: So Cal Member No.: 996 |
Jeff, that looks very clean. Good job!
|
|
|
|
| Jeffs9146 |
Apr 21 2004, 06:22 PM
Post
#13
|
|
Ski Bum Group: Members Posts: 4,062 Joined: 10-January 03 From: Discovery Bay, Ca Member No.: 128 |
QUOTE Jeff, that looks very clean. Good job! Thanks! It is a long slow process but it is very rewarding to look at!! I wish I could drive it! (IMG:style_emoticons/default/headbang.gif) Soon Grasshopper!! (IMG:style_emoticons/default/beerchug.gif) Jeff |
|
|
|
| lmcchesney |
Apr 22 2004, 09:24 AM
Post
#14
|
|
Member Group: Members Posts: 488 Joined: 24-November 03 From: Ocala, Fl. Member No.: 1,381 Region Association: None |
Thanks all,
Will have to put the beast back on jack stands and get started. Might as well attack the proportioning valve at the same time. L McChesney |
|
|
|
| neo914-6 |
Apr 24 2004, 06:03 PM
Post
#15
|
|
neo life Group: Members Posts: 5,086 Joined: 16-January 03 From: Willow Glen (San Jose) Member No.: 159 |
QUOTE I just finished assembling my trailing arms Jeff, I just got this setup and was wondering what calipers you are using and where you got them. If they are as tight as the seller says I will just POR15 the arms and install them. QUOTE 914 trailing arms with 5 lug 911 hubs, bigger driveshafts and cv joints. Perfect for v8 or race application. You will need to get the later, larger 901 transmission hubs or change the inner cv to stock 914 to make this work. Wheel hubs are not redrilled 914 hubs. All cvs and wheel bearing are tight and boots are good. Felix Attached image(s) 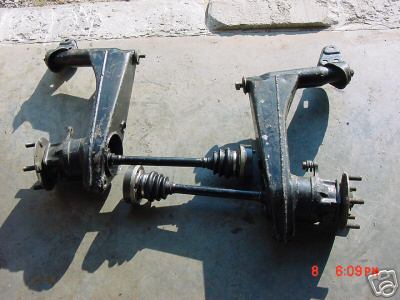
|
|
|
|
|
1 User(s) are reading this topic (1 Guests and 0 Anonymous Users)
0 Members:

|
Lo-Fi Version | Time is now: 17th December 2025 - 02:03 AM |
Invision Power Board
v9.1.4 © 2025 IPS, Inc.