|
|
|
Porsche, and the Porsche crest are registered trademarks of Dr. Ing. h.c. F. Porsche AG.
This site is not affiliated with Porsche in any way. Its only purpose is to provide an online forum for car enthusiasts. All other trademarks are property of their respective owners. |
|
|


| nick mironov |
 May 14 2007, 10:07 PM May 14 2007, 10:07 PM
Post
#1
|
|
nickm  Group: Members Posts: 204 Joined: 12-June 05 From: San Francisco, CA Member No.: 4,264 |
This shows how to re-upholster late model backpad and seats using pre-made kits.
This thread should nicely complement the excellent How to Restore Headrest, Tutorial with Pictures thread in the classics forum. My kits came from Autos International - ask for Auggie. Nice guy, very helpful, did extra research for me, sent samples, and used custom fabric and perforation. I also found kits at World Upholstry, but they did not want to deal with other than vinyl or leather fabric, and I wanterd the perforated suede. I think that there are other upholstery kits available as well. Basic costs are about $200 a seat and $200 for the backpad. Mine were a little more because of the perforated "suede" material from Miami Corp that I elected to use. At first I thought that I would try to sew the upholstery myself, using the existing pieces as templates. I finally decided against it and I am very glad that I did not attempt to sew. The only problem that I had was that the seat headrest fabric fit too loosely. Autos International would have fixed it, but I took care of it myself by re-stitching some of the seams. I am sure that they would have done it better than I did, but I did not want to send them the headrests and wait to get them back. If you choose Autos International, I recommend that you send them your headrests for proper fitting. After shooting a number of pictures, I found that my camera was starting to act up and finally failed. Many of the pictures were unfortunately not salvageable, so I only chose the best ones, and the presentation is not as detailed as I had hoped it would be. Mt 914 is a V8 conversion with 16" 4-lug Superlight wheels. Carpet kits are by Morph. Make sure that you have a good staple gun and get 2 large cans of spray-on adhesive (I used 3M Super 77) and two tubes of rubber cement (I used Barge Cement) Very important: Remove the fabric from only one piece or seat at a time, leaving the other intact for you to reference the details during the re-assembly process. Finished Interior: Attached image(s)  
|
   |

 
|
  |
Replies(20 - 39)
| nick mironov |
May 14 2007, 11:31 PM
Post
#21
|
|
nickm Group: Members Posts: 204 Joined: 12-June 05 From: San Francisco, CA Member No.: 4,264 |
Spray glue on the botton of the seat and on the fabric, let dry, and then stretch it into place, taking out any wrinkles.
Find and cut the holes for the rail attachement screws, and install the rails. Attached image(s) 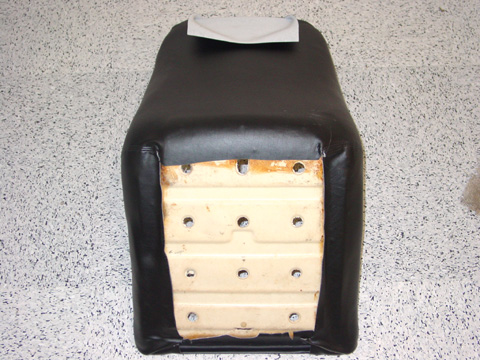
|
|
|
|
| nick mironov |
May 14 2007, 11:35 PM
Post
#22
|
|
nickm Group: Members Posts: 204 Joined: 12-June 05 From: San Francisco, CA Member No.: 4,264 |
Glue the "shoulders", stretching them as high as possible.
Attached image(s) 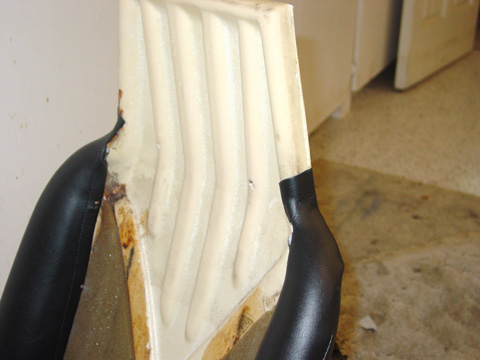
|
|
|
|
| nick mironov |
May 14 2007, 11:38 PM
Post
#23
|
|
nickm Group: Members Posts: 204 Joined: 12-June 05 From: San Francisco, CA Member No.: 4,264 |
Back to the backpad.
Install the new cover over the backpad foam padding. You will lots of spray-on glue here, and you may need to get some weight on it overnight while it cures. Install the metal hooks at the top of the fabric. I ended up adding some zip-ties to help shape the top better. Install the metal wire bead in the bottom pocket. Attached image(s) 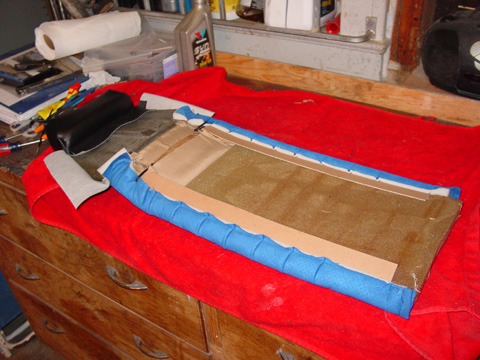 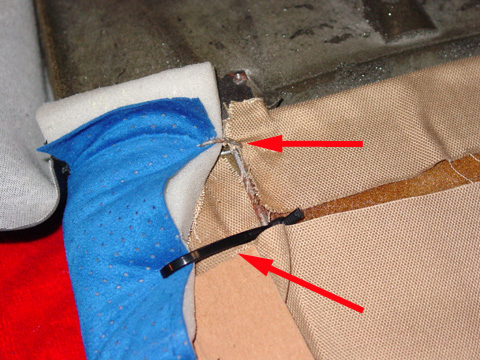
|
|
|
|
| nick mironov |
May 14 2007, 11:41 PM
Post
#24
|
|
nickm Group: Members Posts: 204 Joined: 12-June 05 From: San Francisco, CA Member No.: 4,264 |
Install the backpad over the seat.
Hook the headrest on over the lip on the top of the seat and then swing the bottom down. It should go on easy - no need to force it. Stretch the backpad down and pierce the fabric over the bottm bead with the three pointy hooks, and then bend the hooks down to secure it. Attached image(s) 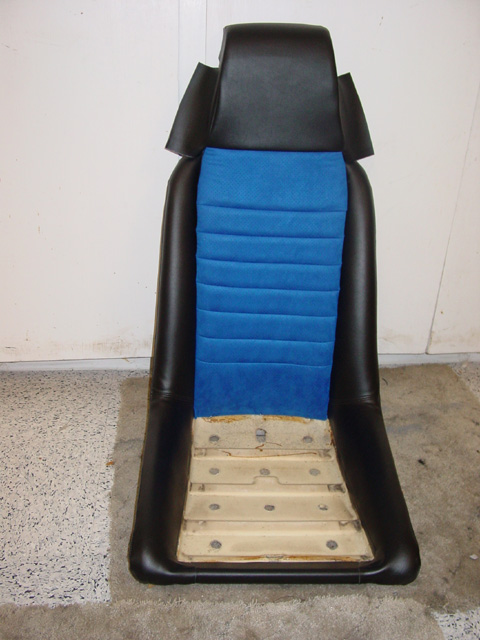 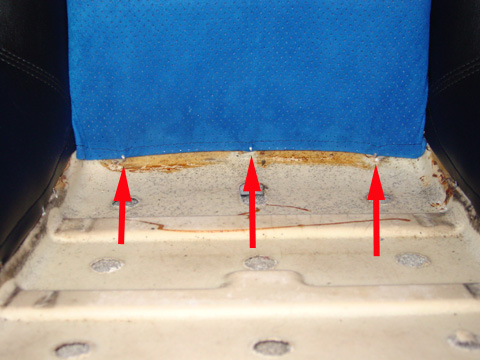
|
|
|
|
| nick mironov |
May 14 2007, 11:43 PM
Post
#25
|
|
nickm Group: Members Posts: 204 Joined: 12-June 05 From: San Francisco, CA Member No.: 4,264 |
Re-attach the interior screws to hold the headrest in place against the seat.
Attached image(s) 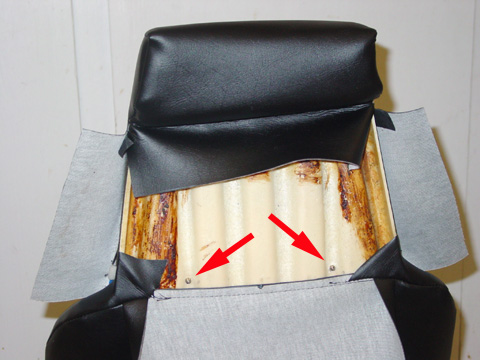
|
|
|
|
| nick mironov |
May 14 2007, 11:46 PM
Post
#26
|
|
nickm Group: Members Posts: 204 Joined: 12-June 05 From: San Francisco, CA Member No.: 4,264 |
Spray adhesive and glue in the backing into the cover flap.
Spray adhesive and glue in the loose pieces/flaps. Punch holes for the cover flap screws. Close the flap and install the screws that hold the flap in place. Attached image(s) 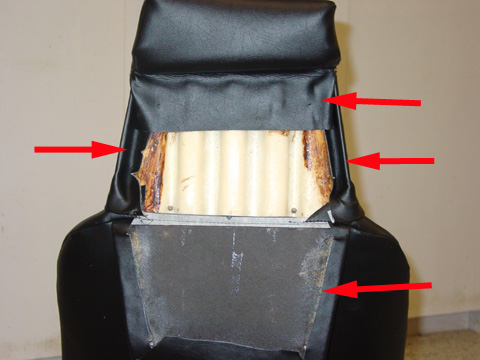
|
|
|
|
| nick mironov |
May 14 2007, 11:52 PM
Post
#27
|
|
nickm Group: Members Posts: 204 Joined: 12-June 05 From: San Francisco, CA Member No.: 4,264 |
Finally the seat cushions...
These are the easiest of all. Simply remove the staples the bottom, peel off the old fabric, stretch the new fabric over the foam padding, and re-staple everything. Install the cushion in the seat, and you are done with the re-upholstery! Note there there was a complicated string/bead tie-down system in the cushions that I decided not to re-install. There were originally meant to hold the top of the seat cushion down to keep it from bulging/doming in the center. There is no noticable difference without them. Attached image(s) 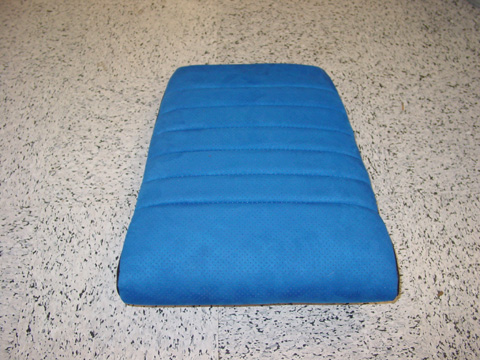 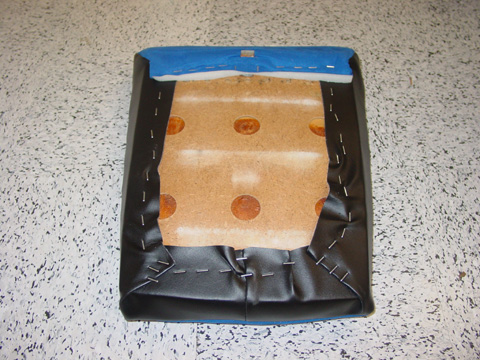
|
|
|
|
| nick mironov |
May 14 2007, 11:53 PM
Post
#28
|
|
nickm Group: Members Posts: 204 Joined: 12-June 05 From: San Francisco, CA Member No.: 4,264 |
And the finished product again...
Attached image(s) 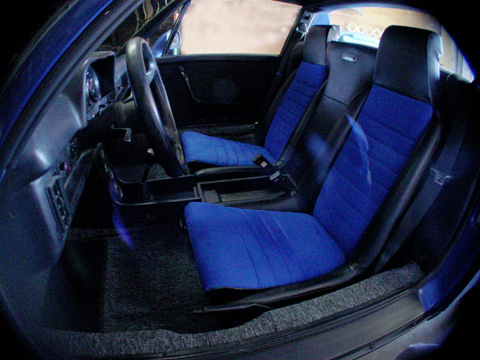 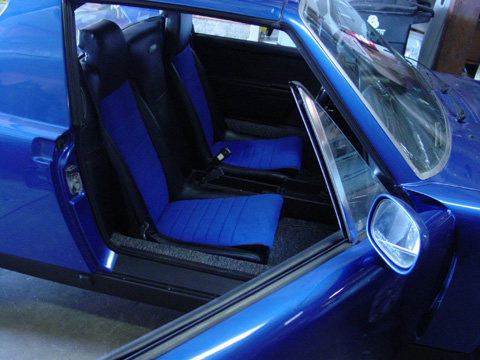
|
|
|
|
| MrKona |
May 15 2007, 12:42 AM
Post
#29
|
|
Senior Member Group: Members Posts: 597 Joined: 25-July 05 From: Santa Rosa, CA Member No.: 4,469 Region Association: None |
Let me be the first to say... NICE JOB! (IMG:style_emoticons/default/beerchug.gif)
|
|
|
|
| markb |
May 15 2007, 12:55 AM
Post
#30
|
|
914less :( Group: Members Posts: 5,449 Joined: 22-January 03 From: Nipomo, CA Member No.: 180 Region Association: Central California |
Yes indeed, nicely done.
You might go back & fix the typos, but otherwise, good job. |
|
|
|
| Jerry |
May 15 2007, 07:57 AM
Post
#31
|
|
Member Group: Members Posts: 413 Joined: 7-April 05 From: Conroe, Texas Member No.: 3,892 Region Association: None |
Wow, very nice!!!! I think this should go to the "Classics"...... so therefore, this thread is officially nominated !!!!!!!!!!!!!!!!!!
|
|
|
|
| johannes |
May 15 2007, 11:07 AM
Post
#32
|
|
Club Porsche 914 France President Group: Members Posts: 3,084 Joined: 13-January 06 From: France Member No.: 5,409 Region Association: France |
GREAT JOB !... I vote for the classics too.
After reading this thread, no one will be scared to do the job himself. |
|
|
|
| IronHillRestorations |
May 15 2007, 01:46 PM
Post
#33
|
|
I. I. R. C. Group: Members Posts: 6,726 Joined: 18-March 03 From: West TN Member No.: 439 Region Association: None |
I'll 2nd or 3rd the vote on making this a Classic! Great post Nick!!! Probably took as much time to shoot the photos and write it up as the upholstery work. Awesome job!
|
|
|
|
| Rotary'14 |
May 15 2007, 05:36 PM
Post
#34
|
|
Senior Member Group: Members Posts: 753 Joined: 24-April 05 From: Los Angeles Member No.: 3,977 |
(IMG:style_emoticons/default/agree.gif)
Great pics, good information. Insant classic!! Awesome job Nick!! (IMG:style_emoticons/default/beerchug.gif) -Rob |
|
|
|
| Joe Owensby |
May 15 2007, 06:50 PM
Post
#35
|
|
JoeO Group: Members Posts: 527 Joined: 7-January 06 From: Spartanburg, SC Member No.: 5,385 Region Association: South East States |
Nice job. thanks for sharing with us. Joe
|
|
|
|
| SGB |
May 15 2007, 10:49 PM
Post
#36
|
|
just visiting Group: Members Posts: 4,086 Joined: 8-March 03 From: Huntsville, AL Member No.: 404 Region Association: South East States |
love that blue fabric.
|
|
|
|
| bigkensteele |
May 16 2007, 12:35 AM
Post
#37
|
|
Major Member Group: Members Posts: 2,197 Joined: 30-August 04 From: Cincinnati, OH Member No.: 2,660 Region Association: South East States |
I can't get enough of these kinds of threads. Stuff that you think you couldn't possibly do properly laid out simply by another guy who has the guts to try it. THANKS!
|
|
|
|
| Gint |
May 16 2007, 07:29 AM
Post
#38
|
|
Mike Ginter Group: Admin Posts: 16,082 Joined: 26-December 02 From: Denver CO. Member No.: 20 Region Association: Rocky Mountains |
That looks fantastic Nick!
|
|
|
|
| smj |
May 16 2007, 05:15 PM
Post
#39
|
|
"Dude, Steve from Berkeley." Group: Members Posts: 591 Joined: 28-August 05 From: Berkeley, CA Member No.: 4,691 Region Association: Northern California |
Great job Nick, thanks for putting this together. Even with the difficulties you mentioned, the pictures are great.
QUOTE(bigkensteele @ May 15 2007, 11:35 PM)  I can't get enough of these kinds of threads. Stuff that you think you couldn't possibly do properly laid out simply by another guy who has the guts to try it. These kinds of procedures are essential because afterwards you know exactly what's involved. You may decide to try it, you may decide to write a check -- but you can make an informed decision one way or the other. |
|
|
|
| Eric_Shea |
May 16 2007, 05:25 PM
Post
#40
|
|
PMB Performance Group: Admin Posts: 19,278 Joined: 3-September 03 From: Salt Lake City, UT Member No.: 1,110 Region Association: Rocky Mountains |
This will be a "Classic" for sure.
Thanks for the excellent thread Nick. |
|
|
|
|
1 User(s) are reading this topic (1 Guests and 0 Anonymous Users)
0 Members:

|
Lo-Fi Version | Time is now: 4th June 2024 - 03:44 PM |
Invision Power Board
v9.1.4 © 2024 IPS, Inc.