|
|
|
Porsche, and the Porsche crest are registered trademarks of Dr. Ing. h.c. F. Porsche AG.
This site is not affiliated with Porsche in any way. Its only purpose is to provide an online forum for car enthusiasts. All other trademarks are property of their respective owners. |
|
|

  |

| watsonrx13 |
 Aug 18 2004, 05:52 PM Aug 18 2004, 05:52 PM
Post
#1
|
|
Advanced Member  Group: Members Posts: 2,735 Joined: 18-February 03 From: Plant City, FL Member No.: 312 Region Association: South East States |
Well, worked on the passenger's side of the engine compartment today. I removed the battery tray and started cleaning the hell hole. There's only a few small holes in the side wall and one small hole in the firewall.
Question: Should I cut out the side wall and replace with a patch panel, butt-welded or try to weld up the holes? BTW, the white showing through is a piece of paper taped on the back side so the holes would show up easier. Attached image(s) 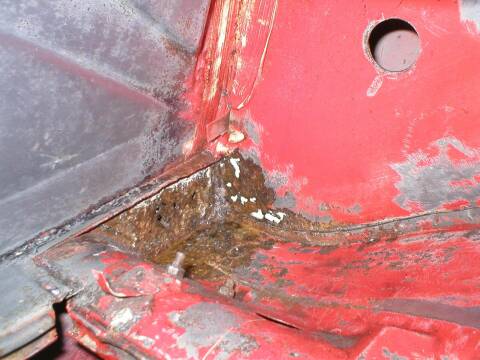
|
   |

 
|
| watsonrx13 |
Aug 18 2004, 05:54 PM
Post
#2
|
|
Advanced Member Group: Members Posts: 2,735 Joined: 18-February 03 From: Plant City, FL Member No.: 312 Region Association: South East States |
Here's a shot of the battery tray removed.
Should I completely strip the paint and seam sealer from this area also? Also, I have some minor repairs to do on the driver's side and the back of the engine compartment, is it necessary to remove the paint to bare metal, or can I just scuff up the paint and cover with primer? Attached image(s) 
|
|
|
|
| thomasotten |
Aug 18 2004, 07:14 PM
Post
#3
|
|
Senior Member Group: Members Posts: 1,547 Joined: 16-November 03 From: San Antonio, Texas Member No.: 1,349 |
Man, that is really minor. I would not cut out the side panel. Cut out the firewall and fix that. POR-15 the rest.
|
|
|
|
| SirAndy |
Aug 18 2004, 07:27 PM
Post
#4
|
|
Resident German Group: Admin Posts: 41,687 Joined: 21-January 03 From: Oakland, Kalifornia Member No.: 179 Region Association: Northern California |
cut out rusted area generously and replace with good metal ...
you got that far, why do it half-ass now? (IMG:style_emoticons/default/wink.gif) Andy |
 |
|
| Jeroen |
Aug 18 2004, 08:19 PM
Post
#5
|
|
914 Guru Group: Members Posts: 7,887 Joined: 24-December 02 From: The Netherlands Member No.: 3 Region Association: Europe |
QUOTE(SirAndy @ Aug 19 2004, 03:27 AM) you got that far, why do it half-ass now? (IMG:style_emoticons/default/agree.gif) Fixing crappy repairs later is an even bigger PITA and you'll (IMG:style_emoticons/default/headbang.gif) wondering why you didn't do it right the first time Don't become a DPO... |
|
|
|
| McMark |
Aug 18 2004, 08:59 PM
Post
#6
|
|
914 Freak! Group: Retired Admin Posts: 20,179 Joined: 13-March 03 From: Grand Rapids, MI Member No.: 419 Region Association: None |
Cut it out. It's a bad area to get to, but you can make a patch piece to fit exactly. That place is nice because it's flat. (IMG:style_emoticons/default/biggrin.gif)
|
|
|
|
| Gint |
Aug 18 2004, 09:22 PM
Post
#7
|
|
Mike Ginter Group: Admin Posts: 16,083 Joined: 26-December 02 From: Denver CO. Member No.: 20 Region Association: Rocky Mountains |
I've seen first hand what PO repairs to that area look like when all of the crap is removed.
Go ahead and fix it. You'll be happy you did (later that is). |
|
|
|
| BatAc |
Aug 18 2004, 11:58 PM
Post
#8
|
|
Member Group: Members Posts: 120 Joined: 9-July 04 From: seattle Member No.: 2,329 |
Where's the HellHole? (IMG:style_emoticons/default/happy11.gif)
|
|
|
|
| tdgray |
Aug 19 2004, 05:45 AM
Post
#9
|
|
Thank God Nemo is not here to see this Group: Members Posts: 9,705 Joined: 5-August 03 From: Akron, OH Member No.: 984 Region Association: None |
(IMG:style_emoticons/default/agree.gif) with all the above, cut it out and do it right.
On your other question, do you have to remove the paint. I look it this way. If you run a DA over it and it does not immediatley go down to bare metal then you probably have good adhesion. If this is the case then scuff it up, feather out the rough spots and put some good primer over it. If the paint looks flakey or chalky take it all down to bare metal and put a good self etching primer on it. Good luck. |
|
|
|
| datapace |
Aug 19 2004, 06:36 AM
Post
#10
|
|
Member Group: Members Posts: 133 Joined: 19-January 04 From: Atlanta, GA Member No.: 1,579 Region Association: South East States |
Not to create more work for you ... but while you're at it, maybe you should weld up the A/C hose holes if you don't plan to put A/C back in. You'll already be working in that area and might as well clean it up.
I *wish* my hellhole looked like that! (IMG:style_emoticons/default/happy11.gif) -datapace |
|
|
|
| applescotty |
Aug 19 2004, 07:01 AM
Post
#11
|
|
Newbie Group: Members Posts: 31 Joined: 18-March 03 From: Eudora, KS Member No.: 440 |
I'm still waiting for someone from California to chime in and suggest that you find a rust free roller to transfer everything to. (IMG:style_emoticons/default/biggrin.gif)
applescotty |
|
|
|
| 1bad914 |
Aug 19 2004, 07:20 AM
Post
#12
|
|
Senior Member Group: Members Posts: 618 Joined: 6-May 04 From: Battle Creek, MI Member No.: 2,028 |
Hell hole before
Attached image(s) 
|
|
|
|
| 1bad914 |
Aug 19 2004, 07:20 AM
Post
#13
|
|
Senior Member Group: Members Posts: 618 Joined: 6-May 04 From: Battle Creek, MI Member No.: 2,028 |
Hell hole cleaned up
Attached image(s) 
|
|
|
|
| 1bad914 |
Aug 19 2004, 07:21 AM
Post
#14
|
|
Senior Member Group: Members Posts: 618 Joined: 6-May 04 From: Battle Creek, MI Member No.: 2,028 |
Hell hole done! From Grassroots site! Do it right!!
Attached image(s) 
|
|
|
|
| watsonrx13 |
Aug 19 2004, 10:12 AM
Post
#15
|
|
Advanced Member Group: Members Posts: 2,735 Joined: 18-February 03 From: Plant City, FL Member No.: 312 Region Association: South East States |
Thanks for all of the responses.
Yea, I am going to do it right, the first time. I am planning to weld up the A/C holes also. Finally, I'm going to replace the right rear 'ear' and part of the engine shelf. I guess once I have these pieces out of the way, I should be able to fix the hell hole properly. Stay tuned for more fun and games..... (IMG:style_emoticons/default/aktion035.gif) BTW, for anyone else 'just cleaning up the car', WELCOME TO THE 914 GAME |
|
|
|
| Joe Ricard |
Aug 19 2004, 10:39 AM
Post
#16
|
|
CUMONIWANNARACEU Group: Members Posts: 6,811 Joined: 5-January 03 From: Gautier, MS Member No.: 92 |
Mine was as bad as the grass roots car. in fact almost exactly. Fixed it up with new plate and weld. Also deleted the battery box and the actual hell hole is now covered with and aditional piece of sheet metal plate to make a shelf vs. hole to catch water/dirt in.
BTW Rob, where's that Cam shaft. signed your engine builder. (IMG:style_emoticons/default/happy11.gif) |
|
|
|
| dmenche914 |
Aug 19 2004, 11:46 AM
Post
#17
|
|
Senior Member Group: Members Posts: 1,212 Joined: 27-February 03 From: California Member No.: 366 |
Lucky you, that is not all that bad of a hell hole. Mine even went as far as requiring the motor mount replacement! It appears you only have surface rust, and some pin holes. In this case, I would save all the original metal.
Clean all the rust, either blast, or chemically remove it (naval jelly works, put saran wrap over the jelly coated surface over night (so it will not dry out) it may require several applications, and scraping, but it does work) Then neutralize the remaining metal with a phosphoric acid treatment, followed by a primer, then fill the pin holes with filler, and paint. Should last a very long time if you killed the rust. (ie decade or more) I have used this technique on cars (non-cosmetic areas, like engine bays,and floors) It works very good if there is only little rust pitting, with a few pin holes. I would not use this method on a fender top, or anything that must be perfect. Other option is to cut and weld. If you do this, it will still not look factory without some filler, unless a very talented welder put lots of time into it (ie money) This is the "best method" but it depends what is best for you, what you want to spend, and use of the car (ie conours winning rare factory six 914 verse the daily driver four cylinder that you commute in. Now you could go for a less than invisable metal patch, but it is still more work than the clean and paint method, and may not last any longer, But in the case from what I could determine from your photo, a metal patch would be over kill for some small pin holes However if the rust is any worse, or covers a large area, or is rusting from behind the panel, then metal replacement is really the only way to go if you want the repair to last more than just a few years, or compromise strutural strength. Anyway, at least be thank full your rust is not like many others rust in this area. heck, a thick coat of paint might fill in the small pin holes so no filler is needed. If that is the case, bow down to the idle of the 914 and offer up a case of holy synthetic oil, for the idle of the 914 has smiled on you and given you near rust freeness. dave |
|
|
|
| Lou W |
Aug 19 2004, 12:50 PM
Post
#18
|
|
"Here Kitty Kitty" my ass...... Group: Members Posts: 4,109 Joined: 9-May 04 From: Roseburg, OR. Member No.: 2,039 Region Association: Spain |
You need to find a Rust Free California Car and trnsfer all your parts!!! Just Kidding (IMG:style_emoticons/default/smile.gif) Every thread needs a smartass. Actually, Mine looks worse than yours, I started to think mine may not be worth fixing. now I have some great inputs on how to fix mine. You guys are a great help. (IMG:style_emoticons/default/biggrin.gif)
|
|
|
|
| tracks914 |
Aug 19 2004, 08:07 PM
Post
#19
|
|
Canadian Member Group: Benefactors Posts: 2,083 Joined: 15-January 03 From: Timmins, Ontario, Canada Member No.: 153 Region Association: None |
That's not a hell hole...that's barely even a heck hole. Easy fix and do it right. You'll never regret it.
|
|
|
|
| BatAc |
Aug 19 2004, 08:31 PM
Post
#20
|
|
Member Group: Members Posts: 120 Joined: 9-July 04 From: seattle Member No.: 2,329 |
Hey if you replace the "ear" let me know how it goes. This I have to do but my engine isn't out yet. Every once in a while I look at 'n' wonder how that puppy is comin' out. Maybe without the engine in it becomes quite obvious. At any rate I'm still collecting parts 'n' my hellhole is a whole lot worse. The battery tray itself has only one inch in legnth. The battery had 'bout four bungee cords keeping it somewhat in place. (IMG:style_emoticons/default/barf.gif)
|
|
|
|
|
1 User(s) are reading this topic (1 Guests and 0 Anonymous Users)
0 Members:

|
Lo-Fi Version | Time is now: 14th June 2024 - 09:54 PM |
Invision Power Board
v9.1.4 © 2024 IPS, Inc.