|
|
|
Porsche, and the Porsche crest are registered trademarks of Dr. Ing. h.c. F. Porsche AG.
This site is not affiliated with Porsche in any way. Its only purpose is to provide an online forum for car enthusiasts. All other trademarks are property of their respective owners. |
|
|

  |

| TargaToy |
 Feb 5 2012, 08:16 PM Feb 5 2012, 08:16 PM
Post
#1
|
|
-NONSOLIS RADIOS SEDIOUIS FULMINA MITTO-  Group: Members Posts: 713 Joined: 26-March 10 From: DelMarVa Peninsula Member No.: 11,509 Region Association: MidAtlantic Region |
So once again I find myself going where the sun don't shine.
Eventually, I plan to post the receipt from where the body shop charged the interim owner for "replacing quarter panel"...but that's fun for another day. Here's my question: Am I correct that, from the factory, the little void in the point at the rear of the quarter panel (above the tail light) is left empty--or full of spray foam--and that there's a very large glob of seam sealer supposedly preventing tire-slung moisture from finding the foam? I had to open mine up all the way and I'm toying with actually welding in a custom baffle in front of that pointed tip so that I could seal it up tight from the front side of the baffle. I would do this as part of the process when I fit in the new fender section. What I want to do is make sure moisture can't get into that rear point and fester. Anybody who's reworked the rearmost part of the fender/light socket, what have you done??? 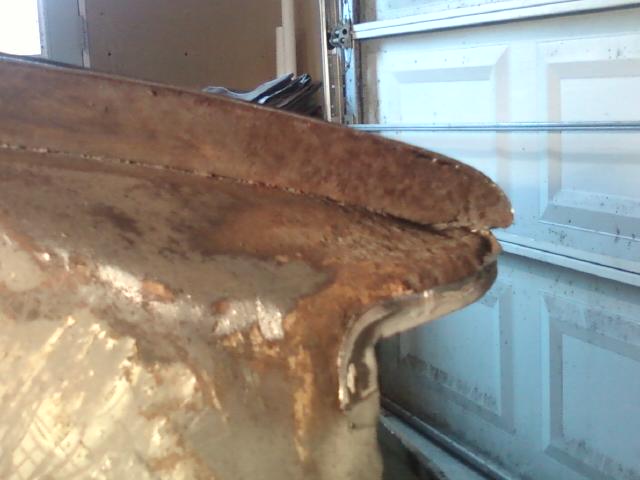  |
   |

 
|
| SirAndy |
Feb 5 2012, 08:37 PM
Post
#2
|
|
Resident German Group: Admin Posts: 42,258 Joined: 21-January 03 From: Oakland, Kalifornia Member No.: 179 Region Association: Northern California |
I have had very good results with leaving that area open instead of putting foam/sealer back in.
(IMG:style_emoticons/default/popcorn[1].gif) |
|
|
|
| rick 918-S |
Feb 5 2012, 09:01 PM
Post
#3
|
|
Hey nice rack! -Celette Group: Members Posts: 21,022 Joined: 30-December 02 From: Now in Superior WI Member No.: 43 Region Association: Northstar Region |
I'm of two minds here when it comes to that pocket. I could agree with sir Andy if I lived on the gold coast unless you drive near the beach and salt water. That is one of the most diffecult areas to clean out and derust without cutting it open like yours. The trouble is over time the calk will release and moisture gets between the calk and the panel. I think todays urothane seam sealers are far superior to what Porsche used in the early 70's. I would take all the proper steps to etch, seal and paint the inside and then reseal the pocket with modern seam sealer. But that's just me.
|
|
|
|
| TargaToy |
Feb 5 2012, 09:02 PM
Post
#4
|
|
-NONSOLIS RADIOS SEDIOUIS FULMINA MITTO- Group: Members Posts: 713 Joined: 26-March 10 From: DelMarVa Peninsula Member No.: 11,509 Region Association: MidAtlantic Region |
QUOTE(SirAndy @ Feb 5 2012, 09:37 PM)  I have had very good results with leaving that area open instead of putting foam/sealer back in. (IMG:style_emoticons/default/popcorn[1].gif) I thought about sealing/painting it up as best as I can and also leaving it open to the air. It seems to be a bit down-hill, though, and I thought water might settle in there. And then I thought a drain hole or two might not be a bad idea. |
|
|
|
| TargaToy |
Feb 5 2012, 09:19 PM
Post
#5
|
|
-NONSOLIS RADIOS SEDIOUIS FULMINA MITTO- Group: Members Posts: 713 Joined: 26-March 10 From: DelMarVa Peninsula Member No.: 11,509 Region Association: MidAtlantic Region |
QUOTE(rick 918-S @ Feb 5 2012, 10:01 PM) I'm of two minds here when it comes to that pocket. I could agree with sir Andy if I lived on the gold coast unless you drive near the beach and salt water. That is one of the most diffecult areas to clean out and derust without cutting it open like yours. The trouble is over time the calk will release and moisture gets between the calk and the panel. I think todays urothane seam sealers are far superior to what Porsche used in the early 70's. I would take all the proper steps to etch, seal and paint the inside and then reseal the pocket with modern seam sealer. But that's just me. The Ospho cured over night so the rust looks "halted" now. I can get some primer on it now but I'll be welding all around the general vicinity when the fender skin goes on--not good for sealer. Are you suggesting making the repairs, maybe some more Ospho, spraying primer/paint into the point, and then packing it back full with sealer? By the way, for this and for other areas like inside jack posts, does anybody sell a rattle can paint with a red tube like you get with starter fluid/WD-40?. I was thinking that if I had a small hole on the inside of the trunk, I could get some decent amounts of paint sprayed into the point where I couldn't reach otherwise. |
|
|
|
| kertwerks |
Feb 6 2012, 07:51 PM
Post
#6
|
|
Newbie Group: Members Posts: 9 Joined: 24-August 11 From: Las Vegas, NV Member No.: 13,489 Region Association: None |
By the way, for this and for other areas like inside jack posts, does anybody sell a rattle can paint with a red tube like you get with starter fluid/WD-40?. I was thinking that if I had a small hole on the inside of the trunk, I could get some decent amounts of paint sprayed into the point where I couldn't reach otherwise. Summit makes a paint for the inside of frame rails. Has a long tube that you can draw down the frame rail while spraying. Not available in CA I bought some here in NV and took it to my buddy for his Miata project. Kurt |
|
|
|
| TargaToy |
Feb 6 2012, 11:18 PM
Post
#7
|
|
-NONSOLIS RADIOS SEDIOUIS FULMINA MITTO- Group: Members Posts: 713 Joined: 26-March 10 From: DelMarVa Peninsula Member No.: 11,509 Region Association: MidAtlantic Region |
QUOTE(kertwerks @ Feb 6 2012, 08:51 PM) By the way, for this and for other areas like inside jack posts, does anybody sell a rattle can paint with a red tube like you get with starter fluid/WD-40?. I was thinking that if I had a small hole on the inside of the trunk, I could get some decent amounts of paint sprayed into the point where I couldn't reach otherwise. Summit makes a paint for the inside of frame rails. Has a long tube that you can draw down the frame rail while spraying. Not available in CA I bought some here in NV and took it to my buddy for his Miata project. Kurt Thanks for the tip. I'll check that out. |
|
|
|
| Eric_Shea |
Feb 6 2012, 11:33 PM
Post
#8
|
|
PMB Performance Group: Admin Posts: 19,304 Joined: 3-September 03 From: Salt Lake City, UT Member No.: 1,110 Region Association: Rocky Mountains |
(IMG:https://fbcdn-sphotos-a.akamaihd.net/hphotos-ak-ash4/319247_2451388329971_1409883264_2920453_1189956943_n.jpg)
(IMG:https://fbcdn-sphotos-a.akamaihd.net/hphotos-ak-ash4/321269_2451388609978_1409883264_2920454_1309828460_n.jpg) (IMG:https://fbcdn-sphotos-a.akamaihd.net/hphotos-ak-ash4/295854_2451389209993_1409883264_2920456_29285596_n.jpg) I can't project myself into the future to know if it works but, it really is a trick bottle/coating method. I did this to my 911 rear torsion tubes back in September |
|
|
|
| euro911 |
Feb 6 2012, 11:52 PM
Post
#9
|
|
Retired & living the dream. God help me if I wake up! Group: Members Posts: 8,912 Joined: 2-December 06 From: So.Cal. & No.AZ (USA) Member No.: 7,300 Region Association: Southern California |
Eric, is that a rust converter, or paint? That looks like the perfect tool for getting into those hard to get at areas like the center tunnel and inside the longs.
I've read that some rust converters need to have a 'stop bath', so to speak (with water), otherwise they keep 'eating' the metal. What IS the best rust converter to use in inaccessible areas, where you don't want to wash down with water? |
|
|
|
| Eric_Shea |
Feb 7 2012, 12:34 AM
Post
#10
|
|
PMB Performance Group: Admin Posts: 19,304 Joined: 3-September 03 From: Salt Lake City, UT Member No.: 1,110 Region Association: Rocky Mountains |
Hey Mark,
Check this out... http://www.eastwood.com/internal-frame-coa...ray-nozzle.html I've used the other stuff and this is really great... I hope! Lol |
|
|
|
| ThePaintedMan |
Feb 7 2012, 12:37 AM
Post
#11
|
|
Advanced Member Group: Members Posts: 3,887 Joined: 6-September 11 From: St. Petersburg, FL Member No.: 13,527 Region Association: South East States |
QUOTE(euro911 @ Feb 7 2012, 12:52 AM) Eric, is that a rust converter, or paint? That looks like the perfect tool for getting into those hard to get at areas like the center tunnel and inside the longs. I've read that some rust converters need to have a 'stop bath', so to speak (with water), otherwise they keep 'eating' the metal. What IS the best rust converter to use in inaccessible areas, where you don't want to wash down with water? I like Evapo-Rust. I got it from Autozone and the stuff is truly amazing. Like most converters, you have to keep it soaked for 30 min. But its also non-toxic and as far as I can tell, non-acid-based. No water necessary. |
|
|
|
| euro911 |
Feb 7 2012, 01:25 AM
Post
#12
|
|
Retired & living the dream. God help me if I wake up! Group: Members Posts: 8,912 Joined: 2-December 06 From: So.Cal. & No.AZ (USA) Member No.: 7,300 Region Association: Southern California |
I just checked out the Evapo-Rust site and watched the demonstration video. It appears to do a nice job, but they say you do need to wash down with water to remove carbon residue afterward.
That's OK where the item is a removable item that can be washed down and dried, but I'd be leery of using it in the longs or tunnel where I might not be able to get all the water out (IMG:style_emoticons/default/confused24.gif) Went to Eastwood's site too. Signed up for their newsletter to get free shipping on my next order (IMG:style_emoticons/default/piratenanner.gif) ... I think I'll spend a little more time at their site to see what other nifty rust eliminator products they have to offer before placing an order. Thanks for the tips! Now, back to the normal scheduled program. |
|
|
|
| ThePaintedMan |
Feb 7 2012, 01:45 AM
Post
#13
|
|
Advanced Member Group: Members Posts: 3,887 Joined: 6-September 11 From: St. Petersburg, FL Member No.: 13,527 Region Association: South East States |
Oops! My mistake Mark. What about the popular ones that are mentioned all the time here? Prep and Ready, Metal Ready or Ospho? They're all supposed to be wiped off before coating, but you could probably just spray over them with that Eastwood stuff. I forgot to wipe off one area where I used Prep and Ready and put POR directly on top of it. Didn't seem to make a difference. If you use a good product (I'm seriously leaning more towards Eastwood as I have had issues with POR in other areas in the past), you're going to encapsulate the rust and choke it off from O2 as well as water. I'm certainly not a chemist, but I would think this is the overall goal anyway.
Thanks for checking out the Evapo-Rust though. I was very impressed with it, though I used it on a pedal assembly, much different than what you're doing. Good luck! (IMG:style_emoticons/default/cheer.gif) QUOTE(euro911 @ Feb 7 2012, 02:25 AM) I just checked out the Evapo-Rust site and watched the demonstration video. It appears to do a nice job, but they say you do need to wash down with water to remove carbon residue afterward. That's OK where the item is a removable item that can be washed down and dried, but I'd be leery of using it in the longs or tunnel where I might not be able to get all the water out (IMG:style_emoticons/default/confused24.gif) Went to Eastwood's site too. Signed up for their newsletter to get free shipping on my next order (IMG:style_emoticons/default/piratenanner.gif) ... I think I'll spend a little more time at their site to see what other nifty rust eliminator products they have to offer before placing an order. Thanks for the tips! Now, back to the normal scheduled program. |
|
|
|
| TargaToy |
Feb 7 2012, 08:47 PM
Post
#14
|
|
-NONSOLIS RADIOS SEDIOUIS FULMINA MITTO- Group: Members Posts: 713 Joined: 26-March 10 From: DelMarVa Peninsula Member No.: 11,509 Region Association: MidAtlantic Region |
QUOTE(Eric_Shea @ Feb 7 2012, 12:33 AM) I can't project myself into the future to know if it works but, it really is a trick bottle/coating method. I did this to my 911 rear torsion tubes back in September Can the hose/nozzle be cleaned or is the rig toast after using it the first time? In other words, is this something I would save up and do all the troubled areas at once because the stuff will harden up in the tube and not be useful on day two? Can you clear it like a normal rattle can? |
|
|
|
| Eric_Shea |
Feb 7 2012, 09:14 PM
Post
#15
|
|
PMB Performance Group: Admin Posts: 19,304 Joined: 3-September 03 From: Salt Lake City, UT Member No.: 1,110 Region Association: Rocky Mountains |
QUOTE Can the hose/nozzle be cleaned or is the rig toast after using it the first time? Take a look at the first picture I posted. The hose assembly is in that bag. The round white part is the button/nozzle. Now look at the last picture. That's me spraying brake cleaner through it. You just pull the button/nozzle off the sealer can and put it on a solvent can and it's like new again. |
|
|
|
| TargaToy |
Feb 7 2012, 09:56 PM
Post
#16
|
|
-NONSOLIS RADIOS SEDIOUIS FULMINA MITTO- Group: Members Posts: 713 Joined: 26-March 10 From: DelMarVa Peninsula Member No.: 11,509 Region Association: MidAtlantic Region |
QUOTE(Eric_Shea @ Feb 7 2012, 10:14 PM) QUOTE Can the hose/nozzle be cleaned or is the rig toast after using it the first time? Take a look at the first picture...Now look at the last picture. That's me spraying brake cleaner through it. You just pull the button/nozzle off the sealer can and put it on a solvent can and it's like new again. I'm liking this a lot. |
|
|
|
| Socalandy |
Feb 7 2012, 10:07 PM
Post
#17
|
|
Its got to be Yellow!!! Group: Members Posts: 2,432 Joined: 29-August 09 From: Orange Member No.: 10,742 Region Association: Southern California |
I used it in my longs and everywhere I could feed the tube in on my current project. Works great and gets into all the nooks. Be careful using on a painted car as it travels like water.
Attached thumbnail(s)  
|
|
|
|
| euro911 |
Feb 8 2012, 12:01 AM
Post
#18
|
|
Retired & living the dream. God help me if I wake up! Group: Members Posts: 8,912 Joined: 2-December 06 From: So.Cal. & No.AZ (USA) Member No.: 7,300 Region Association: Southern California |
Hey Andy, in your last pic, did you spray the Eastwood ('green stuff') into the longs and then cut them open to do some patch work afterwards? ... and was it wet or dry when you took the pic ?
|
|
|
|
| burton73 |
Feb 8 2012, 06:35 PM
Post
#19
|
|
Senior member, and old dude Group: Members Posts: 3,858 Joined: 2-January 07 From: Los Angeles Member No.: 7,414 Region Association: Southern California |
I put the Eastwood stuff into the longs through the seat belt holes with my 914-6 on the rotisserie and painted the shit out of it and turned it. You can work it all around till it comes out of the holes in the bottom of the pan. I think I have gotten the longs sprayed well. I had no rust showing before and my jack posts looked great so this should just add extra protection.
I did my 74 V8 car in the same way. The long nozzle makes fast work of this job. I had some worry because of welding in steel and wanted to stops any rust from forming on the welds from the Engelmann long kits. I bought 6 cans and 2 cans went far on one car. Bob |
|
|
|
| Socalandy |
Feb 8 2012, 11:54 PM
Post
#20
|
|
Its got to be Yellow!!! Group: Members Posts: 2,432 Joined: 29-August 09 From: Orange Member No.: 10,742 Region Association: Southern California |
I used the repair opening to clean out and spray inside the longs, first pic is dry and second one of the long is still wet
|
|
|
|
|
1 User(s) are reading this topic (1 Guests and 0 Anonymous Users)
0 Members:

|
Lo-Fi Version | Time is now: 19th July 2025 - 05:52 AM |
Invision Power Board
v9.1.4 © 2025 IPS, Inc.