|
|
|
Porsche, and the Porsche crest are registered trademarks of Dr. Ing. h.c. F. Porsche AG.
This site is not affiliated with Porsche in any way. Its only purpose is to provide an online forum for car enthusiasts. All other trademarks are property of their respective owners. |
|
|

  |

| Jonnydaub |
 Aug 29 2015, 03:42 PM Aug 29 2015, 03:42 PM
Post
#1
|
|
Newbie  Group: Members Posts: 39 Joined: 27-August 15 From: Omaha, NE Member No.: 19,108 Region Association: Upper MidWest |
Just as the title says, I'm installing a new master cylinder on my 73 and the new one has a different plug in for the electrical line then the old one. Tell me what you guys did.
 |
   |

 
|
| Jonnydaub |
Aug 29 2015, 03:43 PM
Post
#2
|
|
Newbie Group: Members Posts: 39 Joined: 27-August 15 From: Omaha, NE Member No.: 19,108 Region Association: Upper MidWest |
 |
|
|
|
| Spoke |
Aug 29 2015, 05:48 PM
Post
#3
|
|
Jerry Group: Members Posts: 6,991 Joined: 29-October 04 From: Allentown, PA Member No.: 3,031 Region Association: None |
The old one looks damaged. The new one is correct. What does the wire connector look like? The wire should have a spade connector on it.
|
 |
|
| 914Sixer |
Aug 29 2015, 05:55 PM
Post
#4
|
|
914 Guru Group: Members Posts: 8,903 Joined: 17-January 05 From: San Angelo Texas Member No.: 3,457 Region Association: Southwest Region |
70-73 has 2 spade connector. 74-76 has single pole. I think you can leave the brown wire off and tape it back and it will still work. If not I have some NOS 2 pole switches.
|
|
|
|
| Jonnydaub |
Aug 29 2015, 08:38 PM
Post
#5
|
|
Newbie Group: Members Posts: 39 Joined: 27-August 15 From: Omaha, NE Member No.: 19,108 Region Association: Upper MidWest |
Ill check it out tomorrow and let you guys know. Thanks
|
|
|
|
| Dave_Darling |
Aug 29 2015, 09:29 PM
Post
#6
|
|
914 Idiot Group: Members Posts: 14,991 Joined: 9-January 03 From: Silicon Valley / Kailua-Kona Member No.: 121 Region Association: Northern California |
The switch did not occur at any specific point that I know of, but we do see both two-connector and one-connector switches.
The two-connector switches short the two connectors together when a pressure imbalance is detected. One connector goes to the brake warning light, and the other goes to brown through the standard brown wire. The one-connector switch grounds through its threads into the body of the master cylinder. If you have a one-connector switch, just tape the ground wire up out of the way. --DD |
|
|
|
| euro911 |
Aug 29 2015, 09:33 PM
Post
#7
|
|
Retired & living the dream. God help me if I wake up! Group: Members Posts: 8,851 Joined: 2-December 06 From: So.Cal. & No.AZ (USA) Member No.: 7,300 Region Association: Southern California |
My '75 has spade lug connectors, but there were so many things that weren't 'original' on the car when I acquired it. I'd just crimp on a new spade lug and be done with it (IMG:style_emoticons/default/confused24.gif) - All new M/Cs I've seen come with sensors that have the spade connection anyway.
Also, make sure to completely seat the plastic feed nipples (or whatever they're called) into the rubber grommets on the M/C. Some folks like to disconnect the feed lines from the reservoir and pull them downward a little so the nipples are easier to install (before bolting the M/C to the bulkhead), then pull the lines back up and reconnect to the reservoir (IMG:style_emoticons/default/aktion035.gif) |
|
|
|
| Jonnydaub |
Aug 30 2015, 04:28 PM
Post
#8
|
|
Newbie Group: Members Posts: 39 Joined: 27-August 15 From: Omaha, NE Member No.: 19,108 Region Association: Upper MidWest |
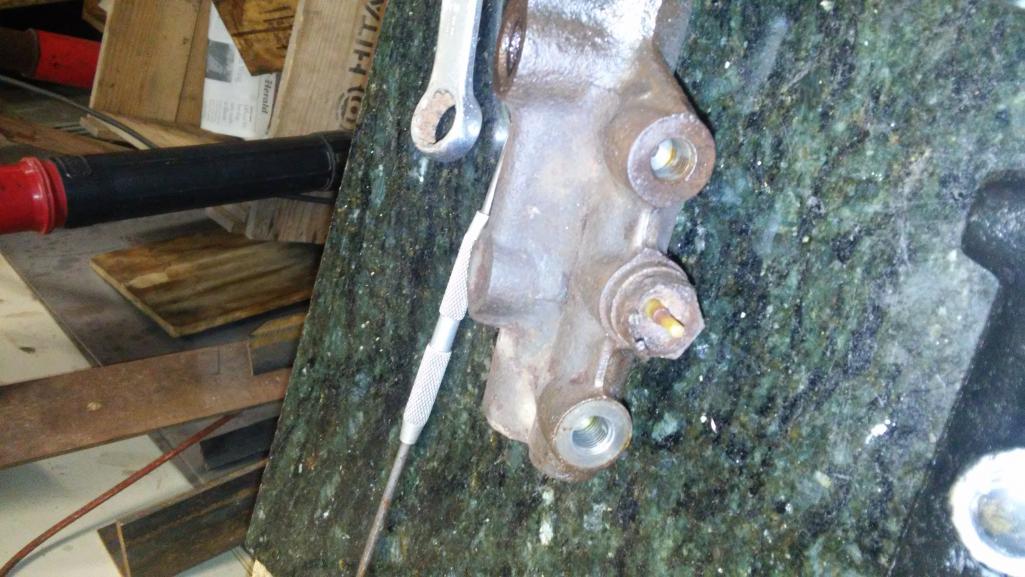
  This is what my plug in looks like |
|
|
|
| euro911 |
Aug 30 2015, 05:06 PM
Post
#9
|
|
Retired & living the dream. God help me if I wake up! Group: Members Posts: 8,851 Joined: 2-December 06 From: So.Cal. & No.AZ (USA) Member No.: 7,300 Region Association: Southern California |
I think you're due for a new one ... and from the looks of the surrounding areas, a whole new M/C. It looks like maybe you're doing that now?
|
|
|
|
| Jonnydaub |
Aug 30 2015, 05:28 PM
Post
#10
|
|
Newbie Group: Members Posts: 39 Joined: 27-August 15 From: Omaha, NE Member No.: 19,108 Region Association: Upper MidWest |
Yup got a brand new m/c shown in a pic above. Anyone have any extra connectors?
|
|
|
|
| era vulgaris |
Aug 30 2015, 05:39 PM
Post
#11
|
|
J is for Genius Group: Members Posts: 982 Joined: 10-November 13 From: Raleigh, NC Member No.: 16,629 Region Association: South East States |
It looks like your old switch broke in half when you removed it. Just pull the spade connectors off the broken half of your old switch that's dangling there. Tape the brown wire back, and plug the other wire into the new switch, as Dave mentioned above.
|
|
|
|
| Jonnydaub |
Aug 30 2015, 05:44 PM
Post
#12
|
|
Newbie Group: Members Posts: 39 Joined: 27-August 15 From: Omaha, NE Member No.: 19,108 Region Association: Upper MidWest |
QUOTE(era vulgaris @ Aug 30 2015, 06:39 PM)  It looks like your old switch broke in half when you removed it. Just pull the spade connectors off the broken half of your old switch that's dangling there. Tape the brown wire back, and plug the other wire into the new switch, as Dave mentioned above. Ok my question is will it act differntly if i tape that wire back? Like will it throw the brake light? |
|
|
|
| era vulgaris |
Aug 30 2015, 06:34 PM
Post
#13
|
|
J is for Genius Group: Members Posts: 982 Joined: 10-November 13 From: Raleigh, NC Member No.: 16,629 Region Association: South East States |
QUOTE(Jonnydaub @ Aug 30 2015, 07:44 PM) Ok my question is will it act differntly if i tape that wire back? Like will it throw the brake light? Here is your answer from earlier in the thread: QUOTE(Dave_Darling @ Aug 29 2015, 11:29 PM) The two-connector switches short the two connectors together when a pressure imbalance is detected. One connector goes to the brake warning light, and the other goes to ground through the standard brown wire. The one-connector switch grounds through its threads into the body of the master cylinder. If you have a one-connector switch, just tape the ground wire up out of the way. --DD The single connector switch grounds through the switch body. The two connector switch grounds through the brown wire. If you have the single connector switch, you don't need the brown wire, so leave it unconnected. Also, not sure if it was mentioned, but that switch is for the brake warning light on your dash. The actual brake lights are activated by an electrical switch on the pedal cluster. |
|
|
|
| euro911 |
Aug 30 2015, 06:45 PM
Post
#14
|
|
Retired & living the dream. God help me if I wake up! Group: Members Posts: 8,851 Joined: 2-December 06 From: So.Cal. & No.AZ (USA) Member No.: 7,300 Region Association: Southern California |
QUOTE(Jonnydaub @ Aug 30 2015, 04:28 PM) Yup got a brand new m/c shown in a pic above. Anyone have any extra connectors? You should be able to get them at your local automotive supply or hardware store. Buy a package of them (they're cheap) and a good crimp tool if you don't already have one. |
|
|
|
| Jonnydaub |
Aug 30 2015, 07:02 PM
Post
#15
|
|
Newbie Group: Members Posts: 39 Joined: 27-August 15 From: Omaha, NE Member No.: 19,108 Region Association: Upper MidWest |
Know what the part number is by chance?
|
|
|
|
| era vulgaris |
Aug 30 2015, 07:37 PM
Post
#16
|
|
J is for Genius Group: Members Posts: 982 Joined: 10-November 13 From: Raleigh, NC Member No.: 16,629 Region Association: South East States |
QUOTE(Jonnydaub @ Aug 30 2015, 09:02 PM) Know what the part number is by chance? They're called spade connectors. You can get them at FLAPS, Lowe's, Home Depot, Radioshack, etc. Pretty much anywhere that sells anything to do with electrical circuits sells them. Take the old one with you to compare size as they come in different sizes. |
|
|
|
| Spoke |
Aug 30 2015, 07:44 PM
Post
#17
|
|
Jerry Group: Members Posts: 6,991 Joined: 29-October 04 From: Allentown, PA Member No.: 3,031 Region Association: None |
Did the spade connector come off of the broken part of the switch? It looks from your pic that the spade connector is still connected to the broken part and still on the wire. You may not need to buy a spade connector. Best to use the existing spade if still attached and not hack into the wiring if possible.
|
|
|
|
| euro911 |
Aug 30 2015, 08:35 PM
Post
#18
|
|
Retired & living the dream. God help me if I wake up! Group: Members Posts: 8,851 Joined: 2-December 06 From: So.Cal. & No.AZ (USA) Member No.: 7,300 Region Association: Southern California |
It looks like one broke wire off, and with all the rust I see in the boot, the wire to spade connections probably have a lot of corrosion anyway.
Lowe's has them Click here for connectors (IMG:http://www.914world.com/bbs2/uploads_offsite/images.lowes.com-7300-1440988538.1.jpg) Harbor Freight is another place to get them ... and they sell a crimp tool for $4. (IMG:http://www.914world.com/bbs2/uploads_offsite/www.harborfreight.com-7300-1440988773.1.jpg) |
|
|
|
| Jonnydaub |
Aug 30 2015, 08:41 PM
Post
#19
|
|
Newbie Group: Members Posts: 39 Joined: 27-August 15 From: Omaha, NE Member No.: 19,108 Region Association: Upper MidWest |
Thanks for the input guys, can someone show me what its spose to look like so i have a better understanding. The switch that is
|
|
|
|
| 914Sixer |
Aug 30 2015, 08:49 PM
Post
#20
|
|
914 Guru Group: Members Posts: 8,903 Joined: 17-January 05 From: San Angelo Texas Member No.: 3,457 Region Association: Southwest Region |
Here is the new switch you PM me about. $20 shipped Priority Mail. Your remove the old two pole broken cap. Clean the ends of the wires with lemon juice and salt solution. It cleans the brass ends up nice.
Attached image(s)  
|
|
|
|
|
2 User(s) are reading this topic (2 Guests and 0 Anonymous Users)
0 Members:

|
Lo-Fi Version | Time is now: 7th June 2024 - 12:28 PM |
Invision Power Board
v9.1.4 © 2024 IPS, Inc.