|
|
|
Porsche, and the Porsche crest are registered trademarks of Dr. Ing. h.c. F. Porsche AG.
This site is not affiliated with Porsche in any way. Its only purpose is to provide an online forum for car enthusiasts. All other trademarks are property of their respective owners. |
|
|

  |

| bondo |
 Mar 12 2005, 09:03 PM Mar 12 2005, 09:03 PM
Post
#1
|
|
Practicing my perpendicular parking  Group: Members Posts: 4,277 Joined: 19-April 03 From: Los Osos, CA Member No.: 587 Region Association: Central California |
I started today with the intention of flaring the right rear fender to match the left rear. After I took the paint off, I removed the rocker panel.
There was a rusty spot. I poked it. It crumbled. I opened up the hole to get to good metal, and to access the inside. The funny thing is that the rest of the long is solid. If it's battery acid related I would expect a hole into the top, and then a hole out the bottom. No hole in the top, bottom or inside, but a hole in the outside. It's made of two layers, so my current theory is that water/battery acid seeped down between the two layers and rusted them simultaneously. So now I had a hole that had to be fixed. First I cleaned out the inside and put por-15 on everything I could reach in there. Then I made a cardboard template slightly larger than the hole. I decided that putting the patch on the outside wouldn't do because I could only weld to the outer layer of longituinal. The template was too big to go inside in one piece, so I cut it in half. Then I used the template to cut two peices of 10 ga. steel, which I bent to fit the shape of the long. I tack welded a bolt to each piece so I could pull the patches against the inside while I tacked them in place. After that it was a simple welding job. (IMG:http://www.914world.com/bbs2/html/emoticons/welder.gif) Attached image(s) 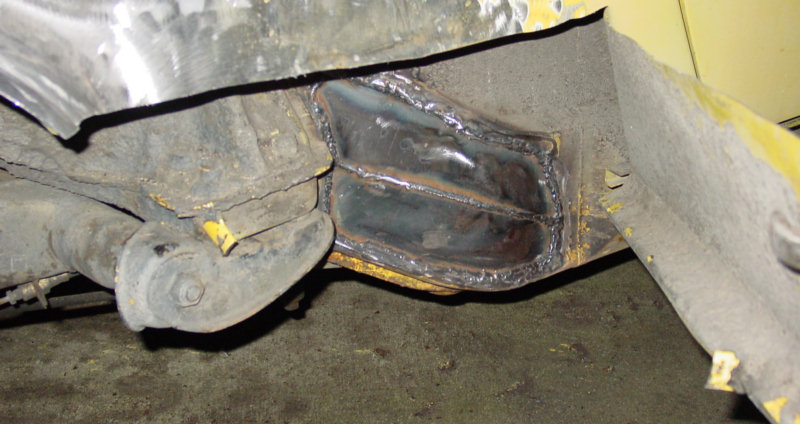
|
   |

 
|
| grasshopper |
Mar 12 2005, 09:12 PM
Post
#2
|
|
Advanced Member Group: Members Posts: 2,613 Joined: 10-December 04 From: Valdosta, GA Member No.: 3,258 Region Association: None |
looks good. I wish my welds looked that good (IMG:http://www.914world.com/bbs2/html/emoticons/blink.gif)
|
|
|
|
| SirAndy |
Mar 12 2005, 09:27 PM
Post
#3
|
||
|
Resident German Group: Admin Posts: 41,679 Joined: 21-January 03 From: Oakland, Kalifornia Member No.: 179 Region Association: Northern California |
naaaa, just invite HER over to clean them up for 'ya ... (IMG:http://www.914world.com/bbs2/html/emoticons/beer.gif) Andy Attached image(s) 
|
||
|
|
|
||
| scotty b |
Mar 12 2005, 09:52 PM
Post
#4
|
|
rust free you say ? Group: Members Posts: 16,375 Joined: 7-January 05 From: richmond, Va. Member No.: 3,419 Region Association: None |
Seems to me that ifin the two original layers are 18 & 20 gauge you should have used 1 layer of 38 gauge as your replacement?? (IMG:http://www.914world.com/bbs2/html/emoticons/confused24.gif)
(IMG:http://www.914world.com/bbs2/html/emoticons/finger.gif) It's a joke for cryin out loud! (IMG:http://www.914world.com/bbs2/html/emoticons/laugh.gif) |
|
|
|
| CptTripps |
Mar 12 2005, 10:28 PM
Post
#5
|
|
:: Punch and Pie :: Group: Members Posts: 3,584 Joined: 26-December 04 From: Mentor, OH Member No.: 3,342 Region Association: Upper MidWest |
I did that exact repair about a month ago.
Don't forget a seam sealer....just in case. VERY Nice job... |
|
|
|
|
1 User(s) are reading this topic (1 Guests and 0 Anonymous Users)
0 Members:

|
Lo-Fi Version | Time is now: 10th June 2024 - 05:57 AM |
Invision Power Board
v9.1.4 © 2024 IPS, Inc.