|
|
|
Porsche, and the Porsche crest are registered trademarks of Dr. Ing. h.c. F. Porsche AG.
This site is not affiliated with Porsche in any way. Its only purpose is to provide an online forum for car enthusiasts. All other trademarks are property of their respective owners. |
|
|

  |

| hndyhrr |
 Feb 6 2016, 02:40 PM Feb 6 2016, 02:40 PM
Post
#1
|
|
Senior Member  Group: Members Posts: 555 Joined: 1-September 13 From: central point,oregon Member No.: 16,332 Region Association: Pacific Northwest |
I am planning on replacing the Main Targa Seal this weekend also the one under it.
Any hints, do this, don't do it this way???? Thanks Renee |
   |

 
|
| Dave_Darling |
Feb 6 2016, 11:48 PM
Post
#2
|
|
914 Idiot Group: Members Posts: 14,991 Joined: 9-January 03 From: Silicon Valley / Kailua-Kona Member No.: 121 Region Association: Northern California |
Heat the seal up (possibly let it sit in the sun if you can?) so it is pliable. Start installing it in the middle; push firmly to seat it. Go out to the sides. Put the sides in by hooking one edge of the seal into the channel, then pushing the other end into the other part of the channel with a screwdriver or other flat-bladed tool.
When the seal is in place, put the top on. Pulling the top forward with the latches will push the seal even more firmly in place. --DD |
|
|
|
| Larmo63 |
Feb 6 2016, 11:58 PM
Post
#3
|
|
Advanced Member Group: Members Posts: 4,264 Joined: 3-March 14 From: San Clemente, Ca Member No.: 17,068 Region Association: Southern California |
(IMG:style_emoticons/default/agree.gif)
It needs to be centered around the block that centers the roof on the A-pillar. Your fingers will be a bit sore afterwards. |
|
|
|
| hndyhrr |
Feb 7 2016, 12:09 AM
Post
#4
|
|
Senior Member Group: Members Posts: 555 Joined: 1-September 13 From: central point,oregon Member No.: 16,332 Region Association: Pacific Northwest |
QUOTE(Dave_Darling @ Feb 6 2016, 09:48 PM)  Heat the seal up (possibly let it sit in the sun if you can?) so it is pliable. Start installing it in the middle; push firmly to seat it. Go out to the sides. Put the sides in by hooking one edge of the seal into the channel, then pushing the other end into the other part of the channel with a screwdriver or other flat-bladed tool. When the seal is in place, put the top on. Pulling the top forward with the latches will push the seal even more firmly in place. --DD thanks |
|
|
|
| hndyhrr |
Feb 7 2016, 12:11 AM
Post
#5
|
|
Senior Member Group: Members Posts: 555 Joined: 1-September 13 From: central point,oregon Member No.: 16,332 Region Association: Pacific Northwest |
QUOTE(Larmo63 @ Feb 6 2016, 09:58 PM) (IMG:style_emoticons/default/agree.gif) It needs to be centered around the block that centers the roof on thee A-pillar. Your fingers will be a bit sore afterwards. could not be as sore as after i re-upholstered the seats in the 65 fastback pony! |
|
|
|
| Garland |
Feb 7 2016, 08:46 AM
Post
#6
|
|
Restoration Fanatic Group: Members Posts: 1,329 Joined: 8-January 04 From: ......Michigan...... Member No.: 1,535 Region Association: Upper MidWest |
P-80 works great. I have used this to install brake line grommets into the master cylinder, and many tight fitting weather strips.
It a temporary rubber lubricant. This is a sample pack. And the link to the original post 2006 Installing weatherstip 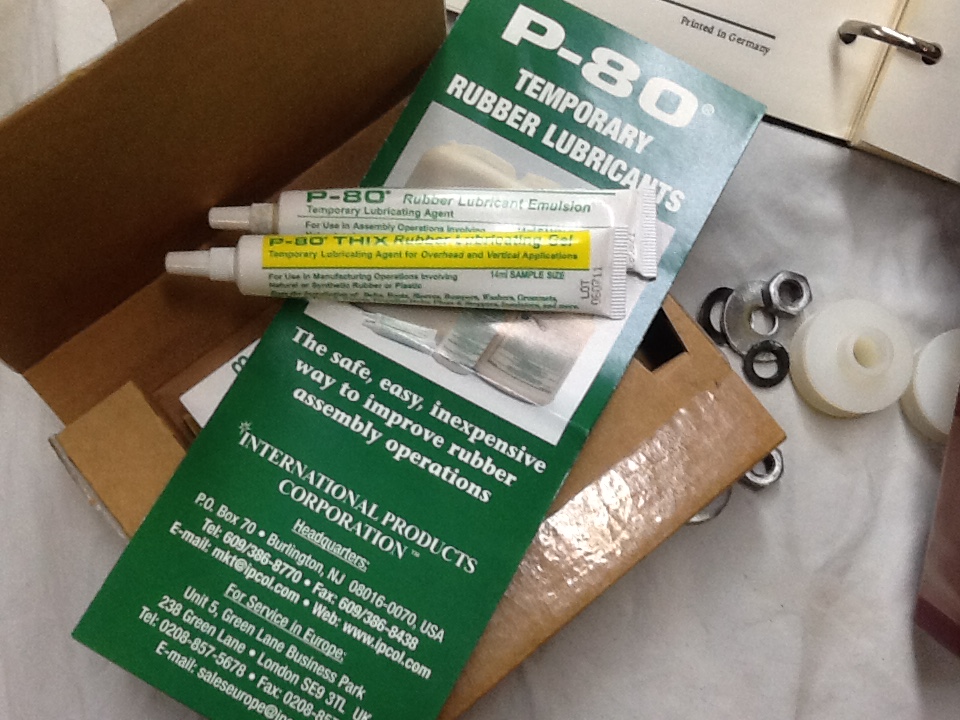 |
|
|
|
| Dave_Darling |
Feb 7 2016, 12:05 PM
Post
#7
|
|
914 Idiot Group: Members Posts: 14,991 Joined: 9-January 03 From: Silicon Valley / Kailua-Kona Member No.: 121 Region Association: Northern California |
You shouldn't really need to lube up the seal, but if you do I would use glycerine. I found it at Walgreen's. It not only is slippery, but it is actually good for rubber--unlike silicone!
--DD |
|
|
|
|
1 User(s) are reading this topic (1 Guests and 0 Anonymous Users)
0 Members:

|
Lo-Fi Version | Time is now: 1st June 2024 - 05:01 AM |
Invision Power Board
v9.1.4 © 2024 IPS, Inc.