|
|
|
Porsche, and the Porsche crest are registered trademarks of Dr. Ing. h.c. F. Porsche AG.
This site is not affiliated with Porsche in any way. Its only purpose is to provide an online forum for car enthusiasts. All other trademarks are property of their respective owners. |
|
|

  |

| bkrantz |
 Apr 14 2020, 07:55 PM Apr 14 2020, 07:55 PM
Post
#1
|
|
914 Guru  Group: Members Posts: 7,803 Joined: 3-August 19 From: SW Colorado Member No.: 23,343 Region Association: Rocky Mountains |
Anybody have ideas for mounting the muffler shield besides welding to the underside of the trunk floor? Any good reasons not to?
Attached thumbnail(s) 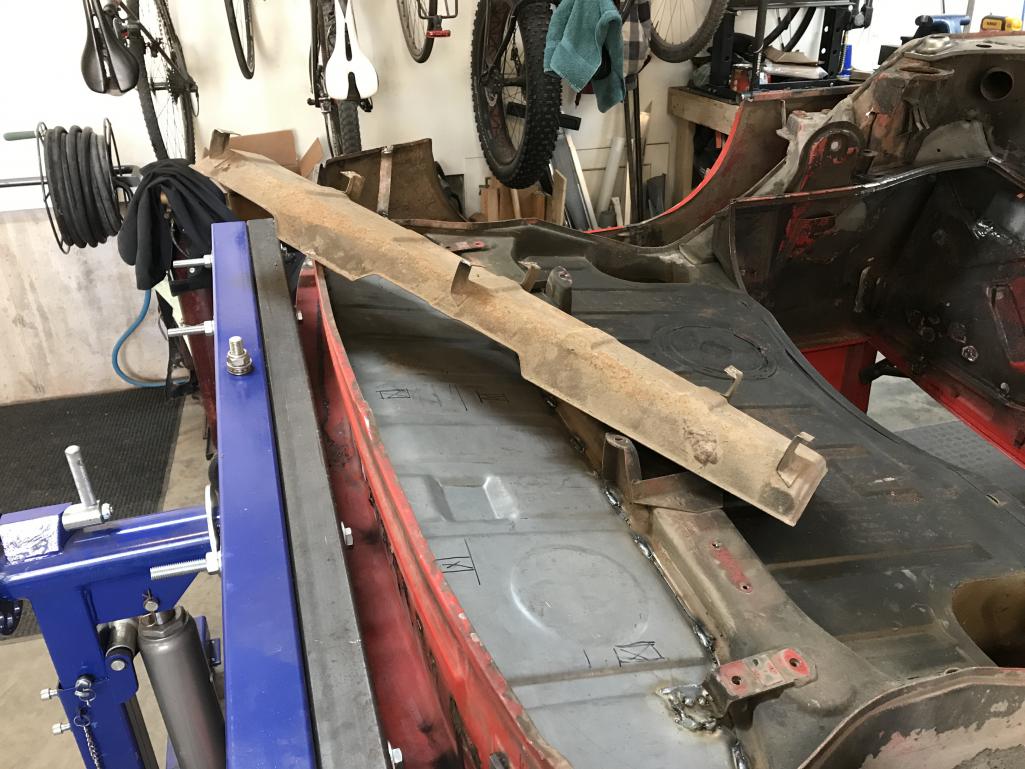
|
   |

 
|
| roblav1 |
Apr 14 2020, 08:04 PM
Post
#2
|
|
Senior Member Group: Members Posts: 528 Joined: 18-September 12 From: KY Member No.: 14,943 Region Association: MidAtlantic Region |
You sure can't glue it on! No way on drilling holes to bolt it in place either.
|
|
|
|
| PanelBilly |
Apr 14 2020, 08:06 PM
Post
#3
|
|
914 Guru Group: Members Posts: 5,817 Joined: 23-July 06 From: Kent, Wa Member No.: 6,488 Region Association: Pacific Northwest |
I left it off my muffler is in a different location anyways
|
|
|
|
| Bmw635 |
Apr 14 2020, 08:26 PM
Post
#4
|
|
Member Group: Members Posts: 66 Joined: 19-February 20 From: OC, CA Member No.: 23,943 Region Association: Southern California |
Weld 3 upside down U on the same side and weld a nut on the single side so you can slide on the 3 and bolt down the 1 so it can be removable.
|
|
|
|
| Spoke |
Apr 14 2020, 08:28 PM
Post
#5
|
|
Jerry Group: Members Posts: 6,991 Joined: 29-October 04 From: Allentown, PA Member No.: 3,031 Region Association: None |
I welded nuts to the hangers on the heat shield and drilled holes in the trunk floor. This way it's just a bolt on/off item.
Attached image(s) 
|
|
|
|
| davep |
Apr 14 2020, 09:25 PM
Post
#6
|
|
914 Historian Group: Benefactors Posts: 5,152 Joined: 13-October 03 From: Burford, ON, N0E 1A0 Member No.: 1,244 Region Association: Canada |
I believe that most of the 914/6 used screws.
|
|
|
|
| sixnotfour |
Apr 15 2020, 02:00 AM
Post
#7
|
|
914 Wizard Group: Members Posts: 10,436 Joined: 12-September 04 From: Life Elevated..planet UT. Member No.: 2,744 Region Association: Rocky Mountains |
AH The 70's (IMG:style_emoticons/default/piratenanner.gif)
Attached image(s) 
|
|
|
|
| falcor75 |
Apr 15 2020, 03:56 AM
Post
#8
|
|
Senior Member Group: Members Posts: 1,579 Joined: 22-November 12 From: Sweden Member No.: 15,176 Region Association: Scandinavia |
(IMG:http://www.914world.com/bbs2/uploads_offsite/matsgarage.com-15176-1586944575.1.jpg)
I made a new one in aluminium and used the rear swaybar holes and made little brackets that connect the rear lower edge to the holes that the rear valance mount too. |
|
|
|
| mb911 |
Apr 15 2020, 05:40 AM
Post
#9
|
|
914 Guru Group: Members Posts: 6,882 Joined: 2-January 09 From: Burlington wi Member No.: 9,892 Region Association: Upper MidWest |
I just used self taping stainless sheet metal screws from the trunk down into the shield
|
|
|
|
| rgalla9146 |
Apr 15 2020, 06:42 AM
Post
#10
|
|
Advanced Member Group: Members Posts: 4,569 Joined: 23-November 05 From: Paramus NJ Member No.: 5,176 Region Association: None |
QUOTE(falcor75 @ Apr 15 2020, 05:56 AM)  (IMG:http://www.914world.com/bbs2/uploads_offsite/matsgarage.com-15176-1586944575.1.jpg) I made a new one in aluminium and used the rear swaybar holes and made little brackets that connect the rear lower edge to the holes that the rear valance mount too. I like. I'm doing it a bit different though, using curved sheet to mimic the original. |
|
|
|
| Tdskip |
Apr 15 2020, 07:49 AM
Post
#11
|
|
Advanced Member Group: Members Posts: 3,686 Joined: 1-December 17 From: soCal Member No.: 21,666 Region Association: None |
Why not weld? Aren’t there mobile welders in your area if you don’t have the equipment?
Related question - is there a guide to correct positioning? |
|
|
|
| Retroracer |
Apr 15 2020, 09:45 AM
Post
#12
|
|
Senior Member Group: Members Posts: 616 Joined: 7-July 13 From: Bend OR Member No.: 16,100 Region Association: Pacific Northwest |
QUOTE(mb911 @ Apr 15 2020, 04:40 AM) I just used self taping stainless sheet metal screws from the trunk down into the shield (IMG:style_emoticons/default/agree.gif) I did the same. Pragmatic solution! - Tony |
|
|
|
| Tdskip |
Apr 15 2020, 09:47 AM
Post
#13
|
|
Advanced Member Group: Members Posts: 3,686 Joined: 1-December 17 From: soCal Member No.: 21,666 Region Association: None |
@mb911 - why not just hit those screw holes with spot welds?
|
|
|
|
| mb911 |
Apr 15 2020, 09:54 AM
Post
#14
|
|
914 Guru Group: Members Posts: 6,882 Joined: 2-January 09 From: Burlington wi Member No.: 9,892 Region Association: Upper MidWest |
|
|
|
|
| Tdskip |
Apr 15 2020, 09:56 AM
Post
#15
|
|
Advanced Member Group: Members Posts: 3,686 Joined: 1-December 17 From: soCal Member No.: 21,666 Region Association: None |
|
|
|
|
| barefoot |
Apr 15 2020, 12:43 PM
Post
#16
|
|
Senior Member Group: Members Posts: 1,281 Joined: 19-March 13 From: Charleston SC Member No.: 15,673 Region Association: South East States |
I used SS pop rivets which worked very well
Barefoot |
|
|
|
| Garland |
Apr 15 2020, 12:51 PM
Post
#17
|
|
Restoration Fanatic Group: Members Posts: 1,329 Joined: 8-January 04 From: ......Michigan...... Member No.: 1,535 Region Association: Upper MidWest |
Need to perform this task myself. After reading this thread I’m thinking epoxies, J&B weld since I don’t want to repaint the inner trunk, or add holes. It’s a light weight part.
|
|
|
|
| Mark Henry |
Apr 15 2020, 02:03 PM
Post
#18
|
|
that's what I do! Group: Members Posts: 20,065 Joined: 27-December 02 From: Port Hope, Ontario Member No.: 26 Region Association: Canada |
QUOTE(Garland @ Apr 15 2020, 02:51 PM) Need to perform this task myself. After reading this thread I’m thinking epoxies, J&B weld since I don’t want to repaint the inner trunk, or add holes. It’s a light weight part. Epoxy is great stuff but it depends on the app, for this it will hold for awhile but it will one day fail or it could just pull the paint right off. Pretty high vibration and high heat prone area and besides making epoxy work upside down is a PITA. |
|
|
|
| mb911 |
Apr 15 2020, 03:43 PM
Post
#19
|
|
914 Guru Group: Members Posts: 6,882 Joined: 2-January 09 From: Burlington wi Member No.: 9,892 Region Association: Upper MidWest |
Stainless self tapers really are the way to go..
|
|
|
|
| live free & drive |
Apr 15 2020, 08:48 PM
Post
#20
|
|
Member Group: Members Posts: 159 Joined: 29-June 16 From: New Hampshire Member No.: 20,159 Region Association: None |
|
|
|
|
|
1 User(s) are reading this topic (1 Guests and 0 Anonymous Users)
0 Members:

|
Lo-Fi Version | Time is now: 9th June 2024 - 03:41 AM |
Invision Power Board
v9.1.4 © 2024 IPS, Inc.