|
|
|
Porsche, and the Porsche crest are registered trademarks of Dr. Ing. h.c. F. Porsche AG.
This site is not affiliated with Porsche in any way. Its only purpose is to provide an online forum for car enthusiasts. All other trademarks are property of their respective owners. |
|
|

  |

| vitamin914 |
 Apr 22 2022, 08:41 PM Apr 22 2022, 08:41 PM
Post
#1
|
|
Member  Group: Members Posts: 202 Joined: 8-September 21 From: Toronto Canada Member No.: 25,893 Region Association: Canada |
I need some guidance with installing the rubber cord seal from 914Rubber on the tail lights.
The lenses and reflector housings are replacements from AA. The OEMs are too far gone with no reflector chrome and corrosion in the sockets. It seems the contour of the lens isn't a perfect match to reflector housing (even on the old OEM housing). There is a gap mid way at the top (see first photo). The gap sort of disappears if there is no rubber cord when the lens and housing nest together. Adding the rubber cord makes it worse as the lens does not seat as deeply. This also raises the question... Where does the rubber cord go? Does it go in the housing or does it go in the lens? (last two photos) I really want to stay away from using RTV silicone if I ever need to change a bulb. 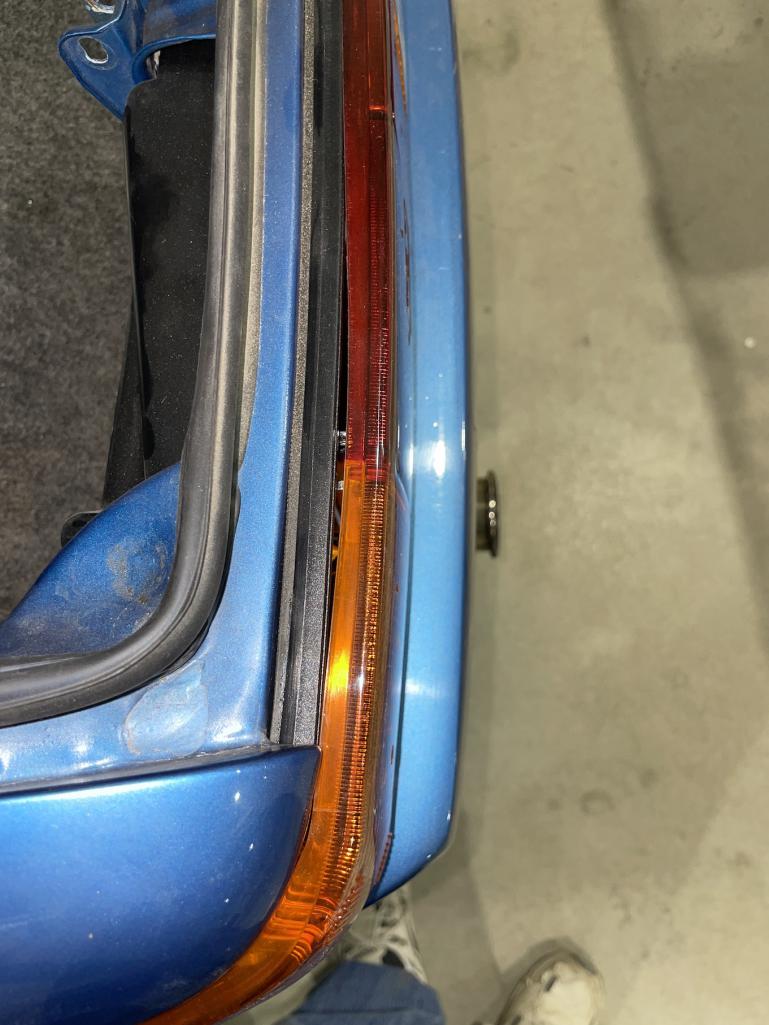 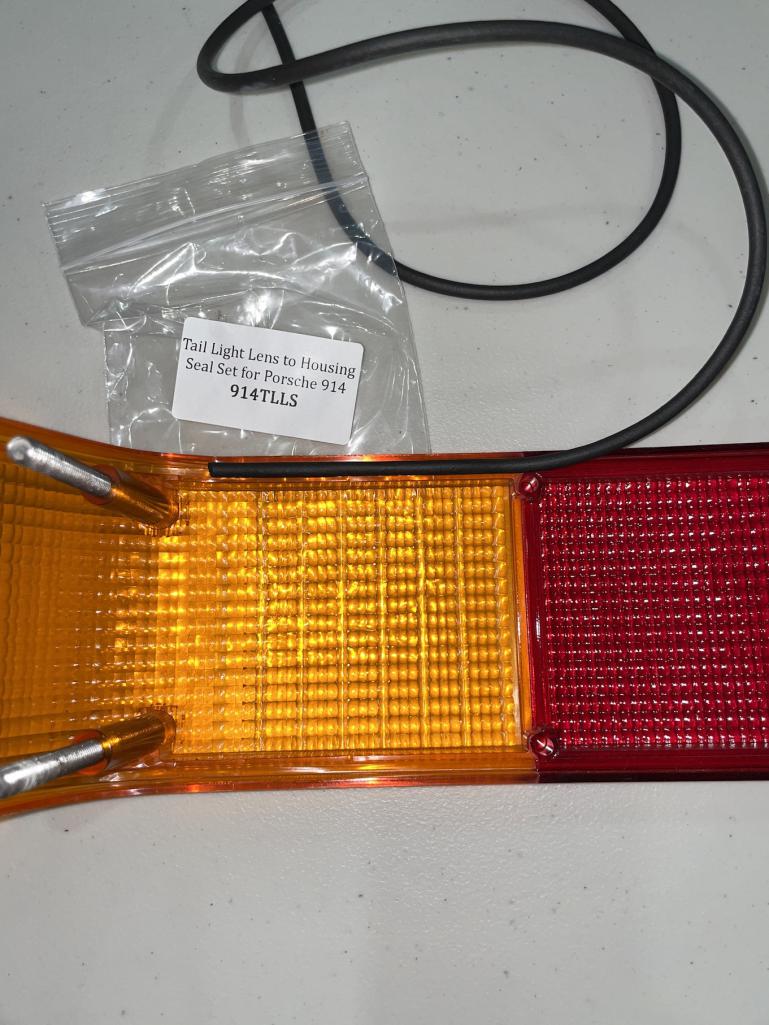  |
   |

 
|
| Jett |
Apr 22 2022, 08:52 PM
Post
#2
|
|
Senior Member Group: Members Posts: 1,641 Joined: 27-July 14 From: Seattle Member No.: 17,686 Region Association: Pacific Northwest |
QUOTE(vitamin914 @ Apr 22 2022, 07:41 PM)  I need some guidance with installing the rubber cord seal from 914Rubber on the tail lights. The lenses and reflector housings are replacements from AA. The OEMs are too far gone with no reflector chrome and corrosion in the sockets. It seems the contour of the lens isn't a perfect match to reflector housing (even on the old OEM housing). There is a gap mid way at the top (see first photo). The gap sort of disappears if there is no rubber cord when the lens and housing nest together. Adding the rubber cord makes it worse as the lens does not seat as deeply. This also raises the question... Where does the rubber cord go? Does it go in the housing or does it go in the lens? (last two photos) I really want to stay away from using RTV silicone if I ever need to change a bulb. The rubber seal goes on the lens side, but don’t over squeeze. |
|
|
|
| Front yard mechanic |
Apr 22 2022, 09:01 PM
Post
#3
|
|
Senior Member Group: Members Posts: 1,171 Joined: 23-July 15 From: New Mexico Member No.: 18,984 Region Association: None |
It took about three days in the hot sun for mine to tighten up just twist the knobs a little each day
|
 |
|
| raynekat |
Apr 22 2022, 11:22 PM
Post
#4
|
|
Advanced Member Group: Members Posts: 2,159 Joined: 30-December 14 From: Coeur d'Alene, Idaho Member No.: 18,263 Region Association: Pacific Northwest |
Doesn't look like the lens has the correct curvature.
Aftermarket? |
|
|
|
| 914sgofast2 |
Apr 22 2022, 11:25 PM
Post
#5
|
|
Senior Member Group: Members Posts: 623 Joined: 10-May 13 From: El Dorado Hills, CA Member No.: 15,855 Region Association: None |
I just replaced the seals on my car. I put the rubber rope seal in the plastic channel in the lens. I also had the same problem with a gap in the same place. I just put a piece of black electrical tape over the gap. My lenses were after market ones and did not conform to the shape of the OEM taillight housings.
|
|
|
|
| vitamin914 |
Apr 23 2022, 05:38 AM
Post
#6
|
|
Member Group: Members Posts: 202 Joined: 8-September 21 From: Toronto Canada Member No.: 25,893 Region Association: Canada |
QUOTE(raynekat @ Apr 23 2022, 01:22 AM) Doesn't look like the lens has the correct curvature. Aftermarket? Yes aftermarket. The problem with the curvature mismatch is that it the gap is at the farthest point away from the three screws holding down the lens. Very little force pulling them in at that location. I almost want to put the lens in the oven to warm up the plastic to see if that helps but that could be risky. I don't want to screw it up and need to buy another. |
|
|
|
| vitamin914 |
Apr 23 2022, 05:53 AM
Post
#7
|
|
Member Group: Members Posts: 202 Joined: 8-September 21 From: Toronto Canada Member No.: 25,893 Region Association: Canada |
QUOTE(Front yard mechanic @ Apr 22 2022, 11:01 PM) It took about three days in the hot sun for mine to tighten up just twist the knobs a little each day New Mexico does have hot sun. Where I am, it is 42 deg F outside and raining... had snow earlier in the week... Road trip? |
|
|
|
| Shivers |
Apr 23 2022, 08:54 AM
Post
#8
|
|
Senior Member Group: Members Posts: 2,419 Joined: 19-October 20 From: La Quinta, CA Member No.: 24,781 Region Association: Southern California |
My original lens had the cord stuck in the lens groove. Canada weather, maybe use a heat lamp bulb, keep it a safe distance away and add a clamp, tighten it a little everyday at that point and leave it for a while. It can be 120+ here in the summer and heat does work.
|
|
|
|
| Montreal914 |
Apr 23 2022, 09:36 AM
Post
#9
|
|
Senior Member Group: Members Posts: 1,583 Joined: 8-August 10 From: Claremont, CA Member No.: 12,023 Region Association: Southern California |
Don't mess with the lenses, send them back to Auto Atlanta ASAP. They should stand by the quality of their products! (IMG:style_emoticons/default/unsure.gif)
Even more so if you bought the whole package lens and housing. Totally unacceptable in my book. AA claims this in their "add" here on the World: "perfect fit tail lights and tail light bodies are here, we are happy to finally get them" http://www.914world.com/bbs2/index.php?showtopic=339636 (IMG:style_emoticons/default/popcorn[1].gif) |
|
|
|
| FlacaProductions |
Apr 23 2022, 09:52 AM
Post
#10
|
|
Senior Member Group: Members Posts: 1,615 Joined: 24-November 17 From: LA Member No.: 21,628 Region Association: Southern California |
heat gun?
|
|
|
|
| JamesJ |
Apr 23 2022, 10:51 AM
Post
#11
|
|
Member Group: Members Posts: 223 Joined: 30-April 20 From: Sunnyvale, CA Member No.: 24,202 Region Association: Northern California |
QUOTE(raynekat @ Apr 22 2022, 10:22 PM) Doesn't look like the lens has the correct curvature. Aftermarket? QUOTE(Montreal914 @ Apr 23 2022, 08:36 AM) Don't mess with the lenses, send them back to Auto Atlanta ASAP. They should stand by the quality of their products! (IMG:style_emoticons/default/unsure.gif) Even more so if you bought the whole package lens and housing. Totally unacceptable in my book. AA claims this in their "add" here on the World: "perfect fit tail lights and tail light bodies are here, we are happy to finally get them" http://www.914world.com/bbs2/index.php?showtopic=339636 (IMG:style_emoticons/default/popcorn[1].gif) BTDT...all the new aftermarket lenses that I have purchased have the "dog leg" curve. 914Rubber & SMC lenses are the same way, even if you purchase them with their new housings. They most likely get them from the same supplier. |
|
|
|
| JamesJ |
Apr 23 2022, 10:54 AM
Post
#12
|
|
Member Group: Members Posts: 223 Joined: 30-April 20 From: Sunnyvale, CA Member No.: 24,202 Region Association: Northern California |
QUOTE(914sgofast2 @ Apr 22 2022, 10:25 PM) I just replaced the seals on my car. I put the rubber rope seal in the plastic channel in the lens. I also had the same problem with a gap in the same place. I just put a piece of black electrical tape over the gap. My lenses were after market ones and did not conform to the shape of the OEM taillight housings. I did the same thing to mine, placed electrical tape on it. We shouldn't have to do this to a new part, nor should we have to leave the seal out, but they just don't make them like they used to. At least the tape keeps dirt and moisture out...just another reason not to wash your 914 with a hose. |
|
|
|
| Montreal914 |
Apr 23 2022, 11:32 AM
Post
#13
|
|
Senior Member Group: Members Posts: 1,583 Joined: 8-August 10 From: Claremont, CA Member No.: 12,023 Region Association: Southern California |
As a potential buyer for a set of these lenses, I think comments from the source would be beneficial to our community since they are advertised as "perfect fit" (per link previously shared).
@dr914@autoatlanta.com (IMG:style_emoticons/default/popcorn[1].gif) |
|
|
|
| StarBear |
Apr 23 2022, 01:43 PM
Post
#14
|
|
Senior Member Group: Members Posts: 1,909 Joined: 2-September 09 From: NJ Member No.: 10,753 Region Association: North East States |
Yep; been using a half-width strip of black electrical tape for several years. No one, even me, notices it and works simply. Then I replace it every 3-4 years to keep it “minty” fresh. (IMG:style_emoticons/default/biggrin.gif)
|
|
|
|
| wonkipop |
Apr 23 2022, 04:52 PM
Post
#15
|
|
Advanced Member Group: Members Posts: 4,397 Joined: 6-May 20 From: north antarctica Member No.: 24,231 Region Association: NineFourteenerVille |
wait for summer and then do the front yard mechanic trick? sounds like it works. you could try a hair dryer......but. i'd try a radiant heater out in garage and sit it nearby to duplicate f y m method. the nice thing about his trick is the sun gets to work on the plastic for hours. long term application of gentle pressure allows plastic to relieve stresses as it conforms to the shape. a radiant heater over a long enough period might do same. |
|
|
|
| wonkipop |
Apr 23 2022, 04:57 PM
Post
#16
|
|
Advanced Member Group: Members Posts: 4,397 Joined: 6-May 20 From: north antarctica Member No.: 24,231 Region Association: NineFourteenerVille |
ps
i don't want to sound like a goose here. (its 30 years since i put mine in or took them out). but .... there is no danger you have put the lhs one on the rhs? ie upside down. ??? |
|
|
|
| vitamin914 |
Apr 23 2022, 05:12 PM
Post
#17
|
|
Member Group: Members Posts: 202 Joined: 8-September 21 From: Toronto Canada Member No.: 25,893 Region Association: Canada |
QUOTE(wonkipop @ Apr 23 2022, 06:57 PM) ps i don't want to sound like a goose here. (its 30 years since i put mine in or took them out). but .... there is no danger you have put the lhs one on the rhs? ie upside down. ??? Definitely not. The shape of lens that wraps around to the side of the car would not allow that. The top of the side lens tapers inwards more than the bottom and will not insert. Blimey! ya did make me go and try that! (IMG:style_emoticons/default/beerchug.gif) |
|
|
|
| wonkipop |
Apr 23 2022, 05:38 PM
Post
#18
|
|
Advanced Member Group: Members Posts: 4,397 Joined: 6-May 20 From: north antarctica Member No.: 24,231 Region Association: NineFourteenerVille |
QUOTE(vitamin914 @ Apr 23 2022, 05:12 PM) QUOTE(wonkipop @ Apr 23 2022, 06:57 PM) ps i don't want to sound like a goose here. (its 30 years since i put mine in or took them out). but .... there is no danger you have put the lhs one on the rhs? ie upside down. ??? Definitely not. The shape of lens that wraps around to the side of the car would not allow that. The top of the side lens tapers inwards more than the bottom and will not insert. Blimey! ya did make me go and try that! (IMG:style_emoticons/default/beerchug.gif) sorry to spook you! (IMG:style_emoticons/default/smile.gif) (IMG:style_emoticons/default/smile.gif) i was just out there staring at mine wondering if it was possible. (IMG:style_emoticons/default/beerchug.gif) |
|
|
|
| vitamin914 |
Apr 23 2022, 06:31 PM
Post
#19
|
|
Member Group: Members Posts: 202 Joined: 8-September 21 From: Toronto Canada Member No.: 25,893 Region Association: Canada |
(IMG:style_emoticons/default/sheeplove.gif)
Nope. That didn't work very well. Took the aftermarket USA lens that came with the car (same gap) and set it up with a heat lamp. The light color rubber cord in the lens is from AA. I didn't want to use the 914Rubber seal cord because it was black and would absorb heat too fast. (I plan to use the 914Rubber neoprene cord as it is a bit smaller in diameter and is of a softer durometer). Set up the heat lamp to slowly heat the lens while continually monitoring it for temperature by touch. Heated the inside as that side would have to stretch to flatten. When it got to a temperature that I was still just able to hold, probably around 50-55 C (120-130 F), I took it to the car. If anything, the gap looked worse, but then again, the cord needed to be compressed. Pushing at the gap in the center while putting on the plastic nuts I heard and felt a pop. Looked at the lens and it had split in two... Good thing I didn't try this on my Euro lens. (IMG:style_emoticons/default/smile.gif) Unless there is a better idea somewhere, looks like black electrical tape is the answer! 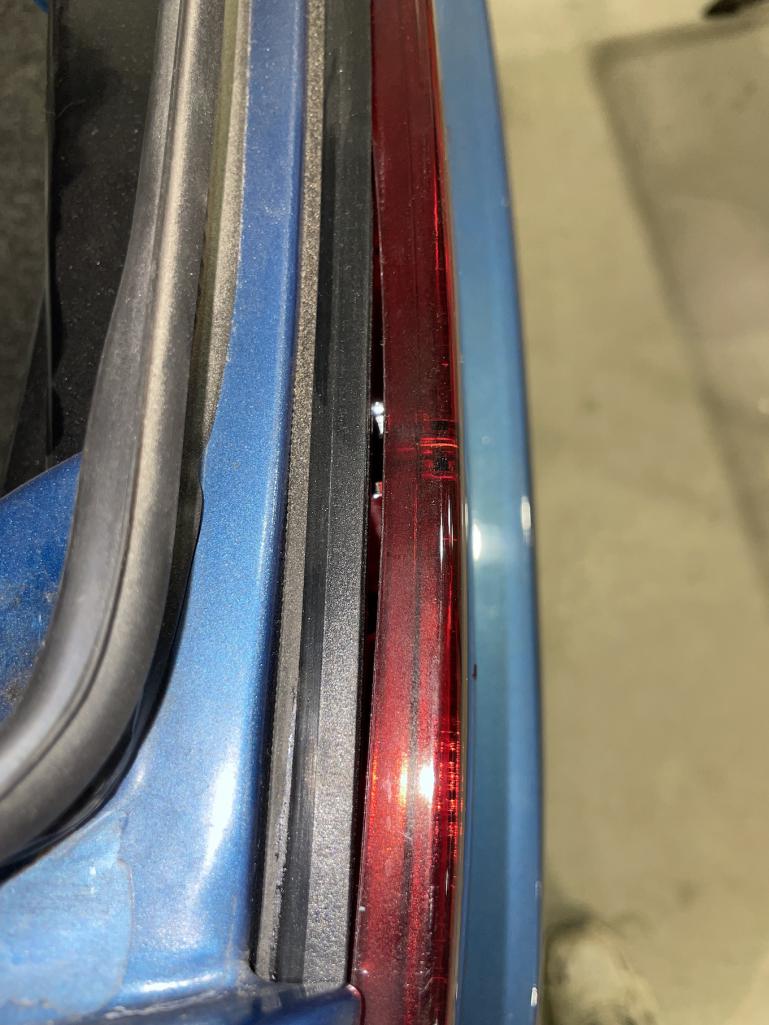 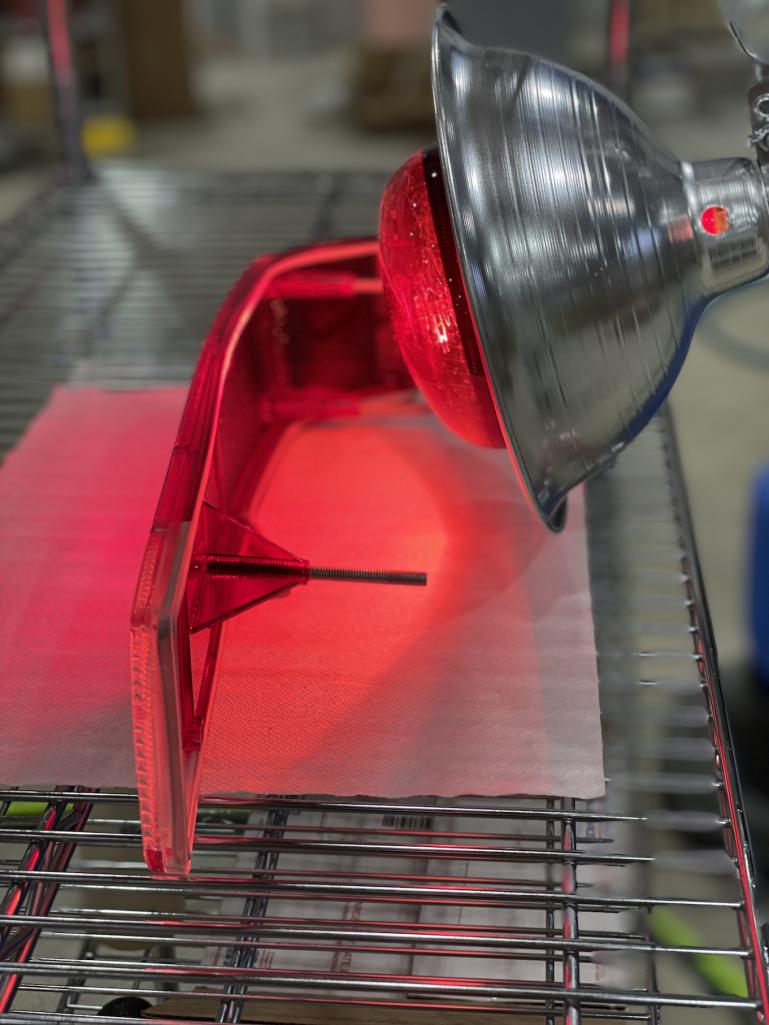 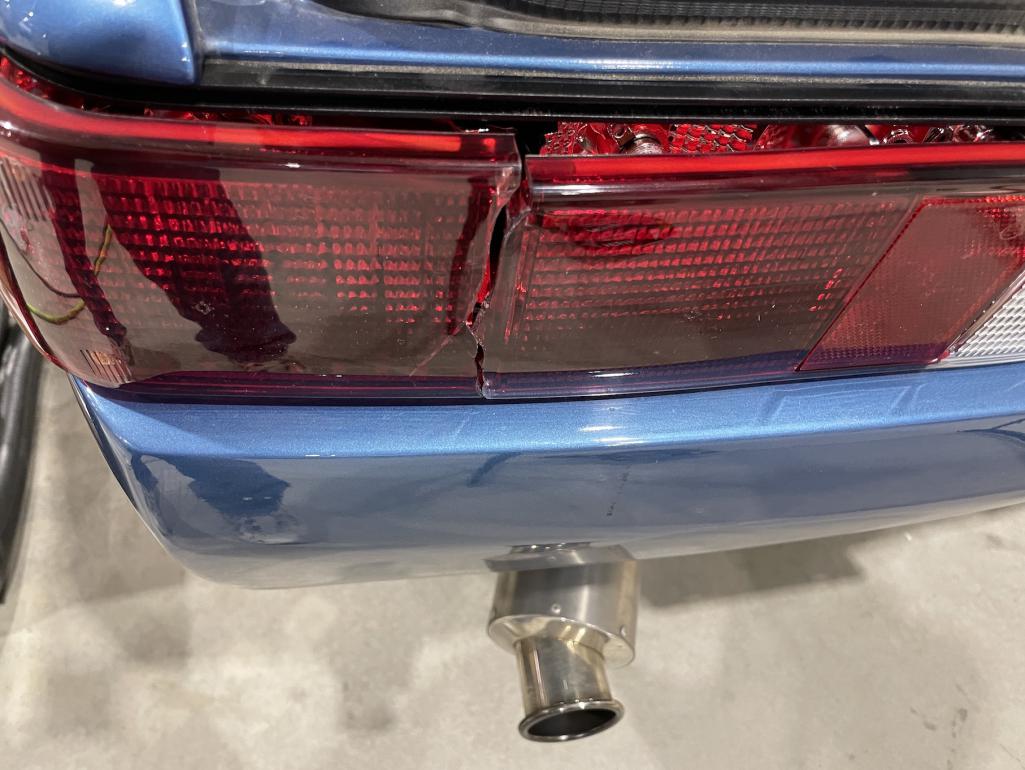 |
|
|
|
| vitamin914 |
Apr 23 2022, 06:46 PM
Post
#20
|
|
Member Group: Members Posts: 202 Joined: 8-September 21 From: Toronto Canada Member No.: 25,893 Region Association: Canada |
@mikey914
Mark, Do you have any expert tips on how to best insert the cord into the lens? Push it straight in? Allow it to stretch so that it inserts easier? Use a lubricant like glycerin? Flush to surface? Pushed in as deep as it can go to minimize the gap? Since the lens has a complex shape for the gasket to seal (plus that out of contour gap) and only three screws this thing needs a delicate touch to at least try to get a uniform sealing surface all around. I know now brute force on this is not an answer. |
|
|
|
|
1 User(s) are reading this topic (1 Guests and 0 Anonymous Users)
0 Members:

|
Lo-Fi Version | Time is now: 6th June 2024 - 08:30 PM |
Invision Power Board
v9.1.4 © 2024 IPS, Inc.