|
|
|
Porsche, and the Porsche crest are registered trademarks of Dr. Ing. h.c. F. Porsche AG.
This site is not affiliated with Porsche in any way. Its only purpose is to provide an online forum for car enthusiasts. All other trademarks are property of their respective owners. |
|
|

  |

| Robarabian |
 Oct 10 2022, 08:39 PM Oct 10 2022, 08:39 PM
Post
#1
|
|
914 A Roo  Group: Members Posts: 592 Joined: 11-February 19 From: Simi Valley, Kalifornia Member No.: 22,865 Region Association: Southern California |
So the engine is out..
I am attaching photos. The leak is coming from the front of the motor. It appears my main seal # 8 bearing is dry, but under it is wet. But it is wet above the Intermediate shaft cover. Fan blowing it all around and coming from there? Thoughts? Thank you. 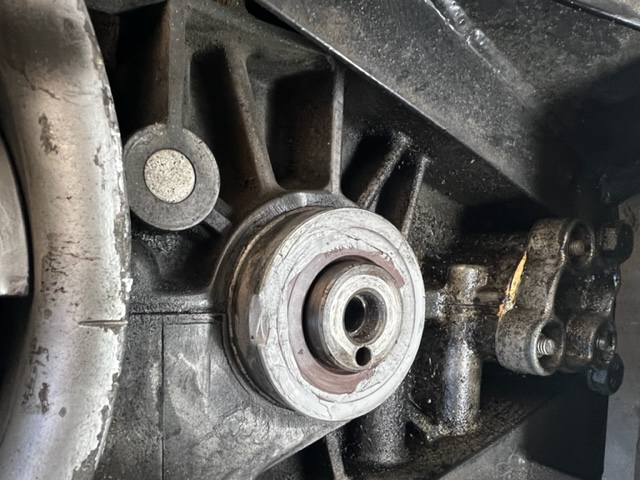 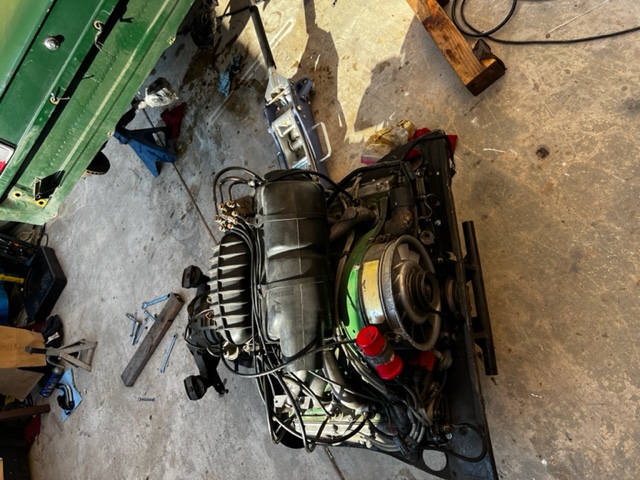  ___________________________________ Hi there, A question for the esteemed who know more than I do! I am tackling oil leaks on my 2.7 six conversion. Today I changed out the driver side axle flange seal which was leak #1. Tomorrow or Wednesday I will tackle the Oil return tube seals. (Thank you Bruce for the nice set of spare tubes I will be using). Leak # 3 is likely my front main seal, behind the pulley. I am hoping it is not a leaky #8 bearing and is just the seal, but the oil is coming from that area and I won't know more till I get it apart. The question is: Can it be done with the engine mounted, and not require a drop? I have a non factory mount, likely the Mad Dog style mount that pivots. I know it is "easier" if the motor is out, but that is a whole other adventure... Thank you all. Robert |
   |

 
|
| Mikey914 |
Oct 10 2022, 10:16 PM
Post
#2
|
|
The rubber man Group: Members Posts: 12,671 Joined: 27-December 04 From: Hillsboro, OR Member No.: 3,348 Region Association: None |
Maybe, but the sure path is to at least partially drop it.
|
|
|
|
| Robarabian |
Oct 11 2022, 07:40 AM
Post
#3
|
|
914 A Roo Group: Members Posts: 592 Joined: 11-February 19 From: Simi Valley, Kalifornia Member No.: 22,865 Region Association: Southern California |
Assuming that is the case, a few more q's:
1) I have quick jacks, is it high enough or better to hike the car up higher on large jack stands? the car is a CIS car so maybe not as high as triple webers. 2) Is everyone using a motorcycle jack, a jack with an engine plate ( I believe one similar to tangerine's exists for a 6) or a lift table for the drop? Thank you. |
|
|
|
| nditiz1 |
Oct 11 2022, 08:36 AM
Post
#4
|
|
Senior Member Group: Members Posts: 1,190 Joined: 26-May 15 From: Mount Airy, Maryland Member No.: 18,763 Region Association: MidAtlantic Region |
I'm not sure quick Jack's can get it high enough to take it out complete. Dual carbs actually sit lower than CIS. I dropped mine onto a lift table, but was using a maxjax. You may need to drop the engine to the floor, raise the car a little higher OR remove the CIS.
|
 |
|
| Superhawk996 |
Oct 11 2022, 08:37 AM
Post
#5
|
|
914 Guru Group: Members Posts: 5,869 Joined: 25-August 18 From: Woods of N. Idaho Member No.: 22,428 Region Association: Galt's Gulch |
QUOTE(Robarabian @ Oct 10 2022, 10:39 PM)  I know it is "easier" if the motor is out, but that is a whole other adventure... Robert Do the right thing. Drop engine. So much extra effort is expended on mid engine cars trying to avoid dropping the engine. Engine out for major work is the nature of the beast for mid engine cars. Doesn’t matter if it’s a Ferrari or a 914. When you have engine out, then you can easily adjust valves. Inspection and repair of oil tubes will be easier. There is just so much risk of collateral damage or not getting the seal(s) installed properly when trying to work in limited space with engine in the car. Did I mention safety? Working under the car comes with its own risks (minimal) but if I can work somewhere else besides under a car on jack stands that is my preference. |
|
|
|
| Robarabian |
Oct 11 2022, 08:52 AM
Post
#6
|
|
914 A Roo Group: Members Posts: 592 Joined: 11-February 19 From: Simi Valley, Kalifornia Member No.: 22,865 Region Association: Southern California |
That was insight I needed, I didn't think they would clear with a furniture dolly or a lift table....The lift Tables add the wheel height which is about 4 valuable inches of space.
I am most interested in whether anyone has used the 911 engine plate from Pelican, since Tangerine's only works for a 914-4. @superhawk996 yes I agree. Valves were adjusted recently so I don't have alot to do other than the oil tubes and the front seal. I removed the headers already so there is easy room without much prying for the tubes, it is the front seal that I need access to... but I digress... easy access is easy access and you are spot on with safety concerns. In CA, we never know when the next 7.0 earthquake will hit and we are well past due. QUOTE(nditiz1 @ Oct 11 2022, 07:36 AM) I'm not sure quick Jack's can get it high enough to take it out complete. Dual carbs actually sit lower than CIS. I dropped mine onto a lift table, but was using a maxjax. You may need to drop the engine to the floor, raise the car a little higher OR remove the CIS. |
|
|
|
| Superhawk996 |
Oct 11 2022, 09:00 AM
Post
#7
|
|
914 Guru Group: Members Posts: 5,869 Joined: 25-August 18 From: Woods of N. Idaho Member No.: 22,428 Region Association: Galt's Gulch |
QUOTE(Robarabian @ Oct 11 2022, 10:52 AM) In CA, we never know when the next 7.0 earthquake will hit and we are well past due. (IMG:style_emoticons/default/yikes.gif) I hadn’t even imagined that scenario - CA hazard (IMG:style_emoticons/default/lol-2.gif) |
|
|
|
| mb911 |
Oct 11 2022, 04:49 PM
Post
#8
|
|
914 Guru Group: Members Posts: 6,867 Joined: 2-January 09 From: Burlington wi Member No.: 9,892 Region Association: Upper MidWest |
As everyone already said it’s not worth it. I am dropping mine this winter for some seals etc
|
|
|
|
| Robarabian |
Oct 13 2022, 08:10 PM
Post
#9
|
|
914 A Roo Group: Members Posts: 592 Joined: 11-February 19 From: Simi Valley, Kalifornia Member No.: 22,865 Region Association: Southern California |
Please look at the new photos and tell me where you think the leak is?
Thank you! |
|
|
|
| Krieger |
Oct 13 2022, 11:10 PM
Post
#10
|
|
Advanced Member Group: Members Posts: 4,722 Joined: 24-May 04 From: Santa Rosa CA Member No.: 2,104 Region Association: None |
The intermediate shaft cover looks like a problem and the gasket is easy to do. Sand it flat on a piece of glass. Use good quality gasket like Vitor Reinz. New aluminum washers and new nylock nuts. Clean case well. Toque to spec. I'd change the crank gasket too. I believe these gaskets should be installed dry. ( not 100% sure). Your crank gasket looks like it has something on it like antiseize?
|
|
|
|
| mb911 |
Oct 14 2022, 05:20 AM
Post
#11
|
|
914 Guru Group: Members Posts: 6,867 Joined: 2-January 09 From: Burlington wi Member No.: 9,892 Region Association: Upper MidWest |
99% sure it’s the number 8 o ring internal to the case and going down the seam. There was a retro fit kit that existed to repair that without splitting the case.
|
|
|
|
| Cairo94507 |
Oct 14 2022, 06:39 AM
Post
#12
|
|
Michael Group: Members Posts: 9,796 Joined: 1-November 08 From: Auburn, CA Member No.: 9,712 Region Association: Northern California |
I am glad you decided to drop the motor to handle the repair.
We are dropping my motor/transaxle this winter for regular maintenance and to reseal the transaxle and check all of the components. Much easier to do a valve adjustment, etc. and repair leaks out of the car. Also great time to clean up the engine bay a bit. |
|
|
|
| Robarabian |
Oct 14 2022, 07:41 AM
Post
#13
|
|
914 A Roo Group: Members Posts: 592 Joined: 11-February 19 From: Simi Valley, Kalifornia Member No.: 22,865 Region Association: Southern California |
I did purchase Tom Amon's kit anticipating that, I just expected the main seal to be wet too and more of a mess. I am hesitant to pull a perfectly dry front seal that was clearly replaced when this motor was apart in it's life already. If it was oily etc, I'd yank it.
I didn't want to clean anything till I had some opinions on what I was looking at. I will investigate the "seam" under the seal a bit more and will for sure be pulling the intermediate shaft cover and cleaning, ensuring flatness and sealing it back up. I watched Kurt from Klassic Automotive training assemble a motor, he installs that seal dry with just the gasket. Mine is clearly sealed with a sealant, unknown if a Yamalube type that stays soft or a more solid one. Any builders out there know, install it dry or use a sealant such as aircraft Permatex? QUOTE(mb911 @ Oct 14 2022, 04:20 AM) 99% sure it’s the number 8 o ring internal to the case and going down the seam. There was a retro fit kit that existed to repair that without splitting the case. |
|
|
|
| Krieger |
Oct 14 2022, 01:16 PM
Post
#14
|
|
Advanced Member Group: Members Posts: 4,722 Joined: 24-May 04 From: Santa Rosa CA Member No.: 2,104 Region Association: None |
From Jerry Woods/Bruce Anderson's 911 overhaul class
 |
|
|
|
| rudedude |
Oct 14 2022, 03:20 PM
Post
#15
|
|
Senior Member Group: Members Posts: 510 Joined: 1-January 05 From: minneapolis, mn Member No.: 3,387 Region Association: Upper MidWest |
I would read the ultimate 911 engine sealing thread on pelicans website done by Henry at super tech performance. I have 5 motors sealed in that fashion that show no leakage. It will give you ideas for how to fix the #8 main bearing leak when you ultimately split the case if you truly want it dry.
|
|
|
|
| Robarabian |
Oct 14 2022, 03:54 PM
Post
#16
|
|
914 A Roo Group: Members Posts: 592 Joined: 11-February 19 From: Simi Valley, Kalifornia Member No.: 22,865 Region Association: Southern California |
Thank you Sir!
QUOTE(Krieger @ Oct 14 2022, 12:16 PM) From Jerry Woods/Bruce Anderson's 911 overhaul class |
|
|
|
| Robarabian |
Oct 14 2022, 03:55 PM
Post
#17
|
|
914 A Roo Group: Members Posts: 592 Joined: 11-February 19 From: Simi Valley, Kalifornia Member No.: 22,865 Region Association: Southern California |
Looking it up now!! Thank you!
QUOTE(rudedude @ Oct 14 2022, 02:20 PM) I would read the ultimate 911 engine sealing thread on pelicans website done by Henry at super tech performance. I have 5 motors sealed in that fashion that show no leakage. It will give you ideas for how to fix the #8 main bearing leak when you ultimately split the case if you truly want it dry. |
|
|
|
| targa72e |
Oct 14 2022, 10:29 PM
Post
#18
|
|
Member Group: Members Posts: 263 Joined: 11-September 16 From: colorado Member No.: 20,392 Region Association: None |
+1 on ultimate 911 engine sealing thread on Pelican. I have done 5 motors that way with almost no leaks. The one that leaked was squished out gasket at intermediate shaft cover. Probably my fault.
john |
|
|
|
| mb911 |
Oct 15 2022, 06:45 AM
Post
#19
|
|
914 Guru Group: Members Posts: 6,867 Joined: 2-January 09 From: Burlington wi Member No.: 9,892 Region Association: Upper MidWest |
QUOTE(Robarabian @ Oct 14 2022, 05:41 AM) I did purchase Tom Amon's kit anticipating that, I just expected the main seal to be wet too and more of a mess. I am hesitant to pull a perfectly dry front seal that was clearly replaced when this motor was apart in it's life already. If it was oily etc, I'd yank it. I didn't want to clean anything till I had some opinions on what I was looking at. I will investigate the "seam" under the seal a bit more and will for sure be pulling the intermediate shaft cover and cleaning, ensuring flatness and sealing it back up. I watched Kurt from Klassic Automotive training assemble a motor, he installs that seal dry with just the gasket. Mine is clearly sealed with a sealant, unknown if a Yamalube type that stays soft or a more solid one. Any builders out there know, install it dry or use a sealant such as aircraft Permatex? QUOTE(mb911 @ Oct 14 2022, 04:20 AM) 99% sure it’s the number 8 o ring internal to the case and going down the seam. There was a retro fit kit that existed to repair that without splitting the case. It clearly is coming from the internal o-ring within the case and wicking down to the intermediate shaft cover. The oil typically doesn’t travel upwards like your picture shows. As to what sealants used I prefer threebond over 574 or permatex aviation sealants and I use dow Corning 111 on all seals. That is part of my training in a former life of mine where I was trained by the Austrians for their aviation engine rebuilds. |
|
|
|
| Superhawk996 |
Oct 15 2022, 07:13 AM
Post
#20
|
|
914 Guru Group: Members Posts: 5,869 Joined: 25-August 18 From: Woods of N. Idaho Member No.: 22,428 Region Association: Galt's Gulch |
(IMG:style_emoticons/default/headbang.gif)
Dreaded #8 leak. This is why you pulled the motor - pretty straight forward to split the case at this point to fix it properly. |
|
|
|
|
1 User(s) are reading this topic (1 Guests and 0 Anonymous Users)
0 Members:

|
Lo-Fi Version | Time is now: 29th May 2024 - 06:05 AM |
Invision Power Board
v9.1.4 © 2024 IPS, Inc.