|
|
|
Porsche, and the Porsche crest are registered trademarks of Dr. Ing. h.c. F. Porsche AG.
This site is not affiliated with Porsche in any way. Its only purpose is to provide an online forum for car enthusiasts. All other trademarks are property of their respective owners. |
|
|

  |

| Garland |
 Aug 24 2024, 08:47 AM Aug 24 2024, 08:47 AM
Post
#1
|
|
Restoration Fanatic  Group: Members Posts: 1,431 Joined: 8-January 04 From: ......Michigan...... Member No.: 1,535 Region Association: Upper MidWest |
I wanted to set of speakers in the factory pods, without hacking anything up, hoping for a little better sound than the 50-year-old paper, torn speakers.
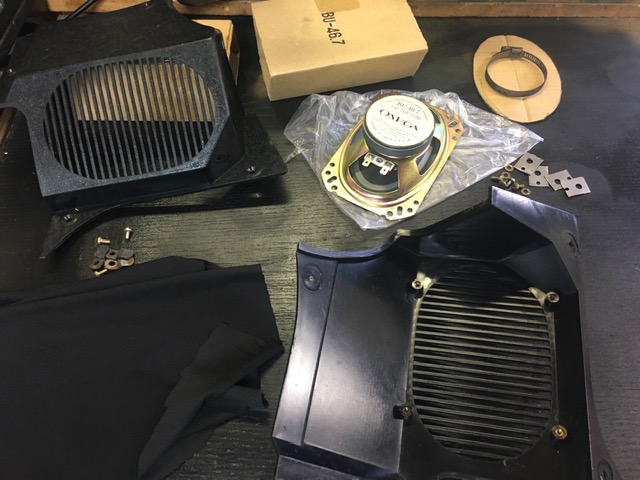 Omega 4 x 6 dual cone BU-46.7 my local speaker store says you can still order them, if they’re out of stock. 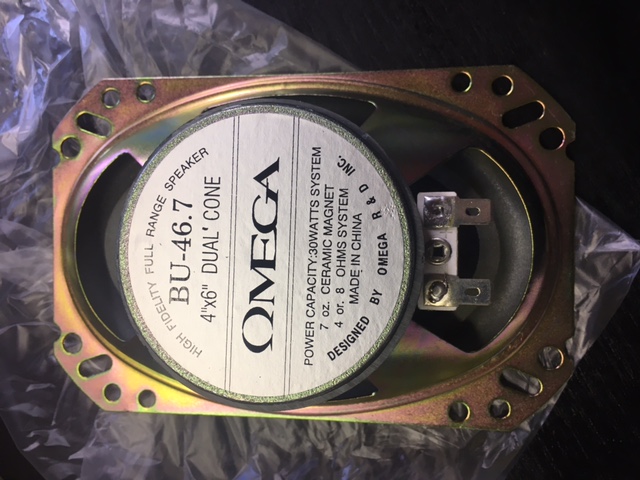 They look good except for the bright gold medal that will be seen through the grill 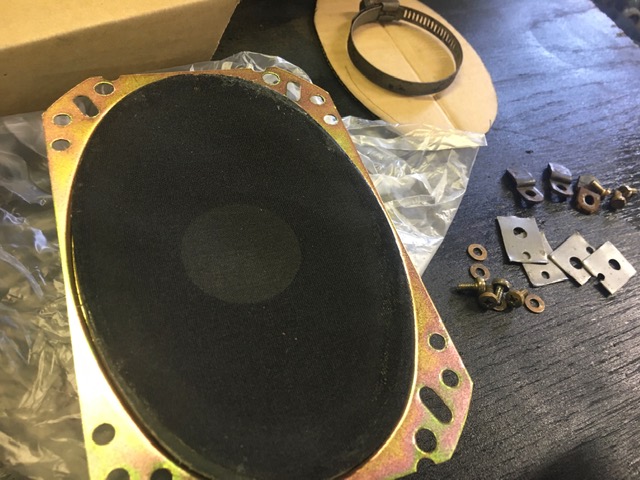 Also, they ride too high in the housing due to not clearing the factory mounts 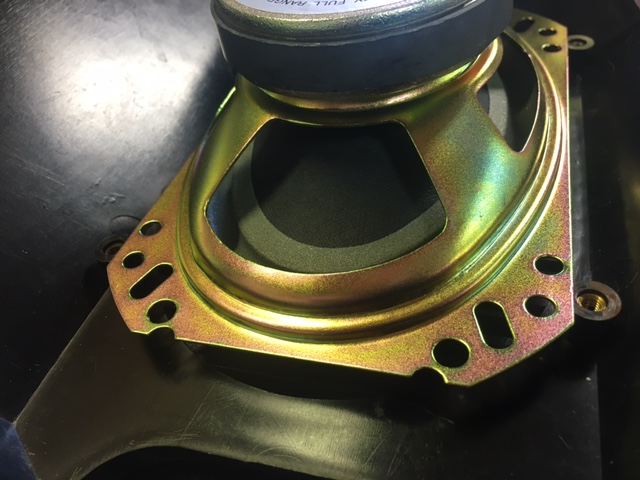 I marked, the speaker where they need to be trimmed, and with some help from the clippers, done. 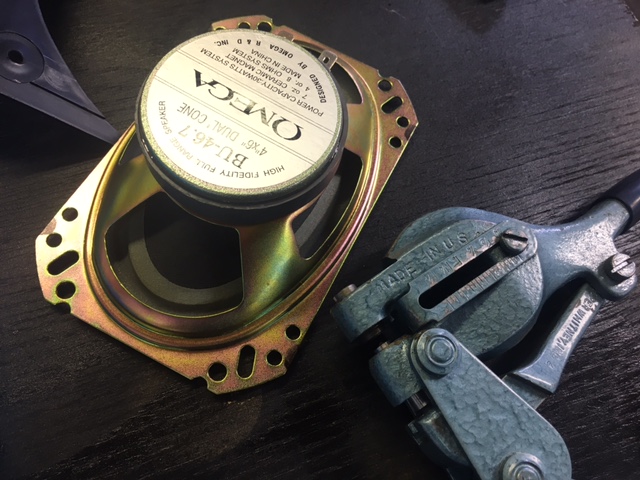 Now they clear the posts, and Mount flush.  Here’s the view from the front side, that doesn’t look that great 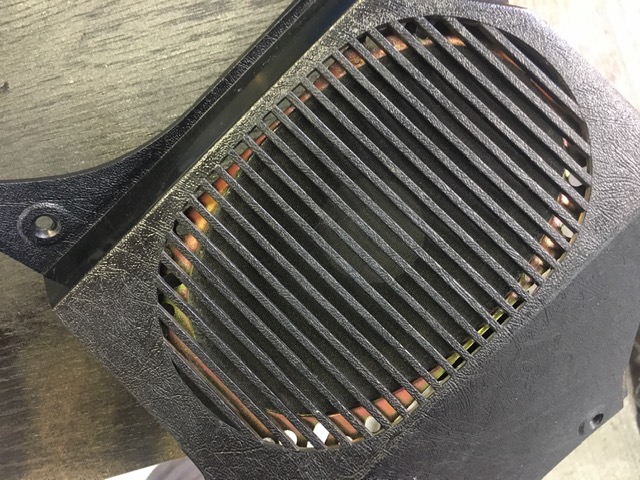 So after cleaning the metal well, so paint will adhere. 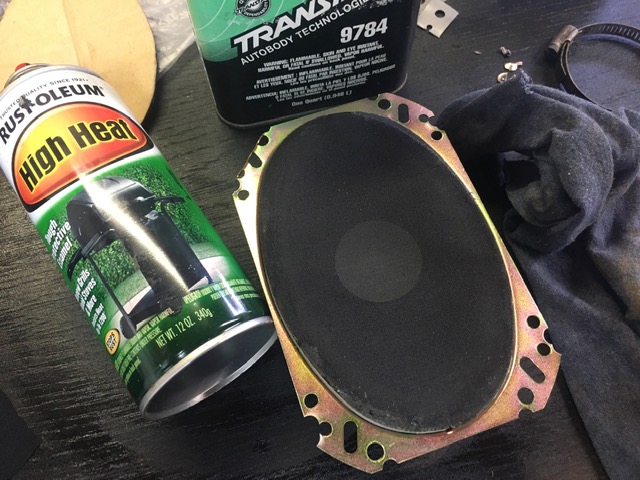 |
   |

 
|
| Garland |
Aug 24 2024, 08:54 AM
Post
#2
|
|
Restoration Fanatic Group: Members Posts: 1,431 Joined: 8-January 04 From: ......Michigan...... Member No.: 1,535 Region Association: Upper MidWest |
Time to do a little masking, with a piece of cardboard and a hose clamp to hold it in place
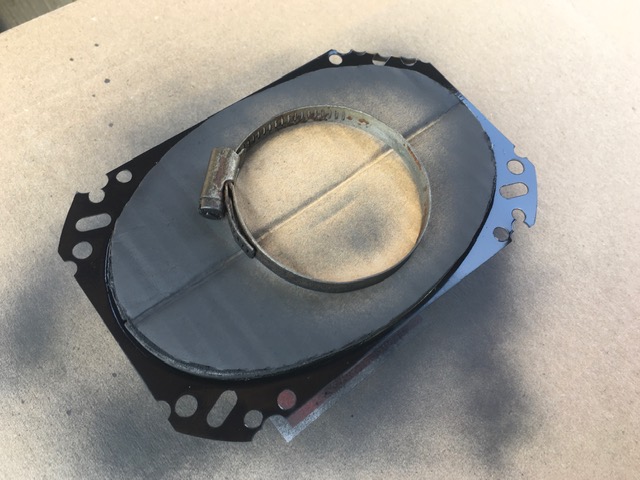 First coat of paint on, then second coat 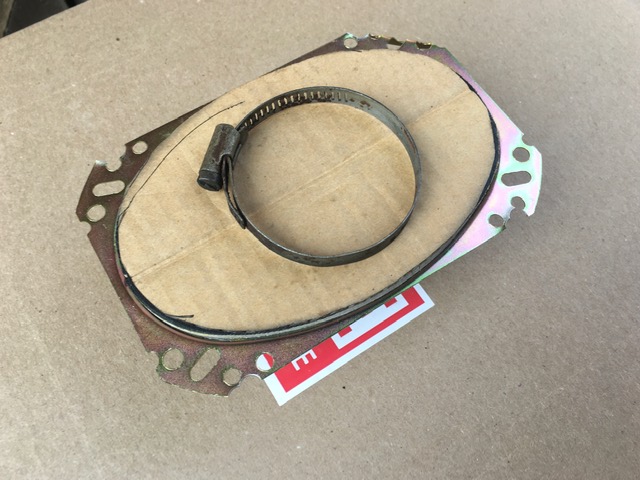 Once dry very flat in finish. 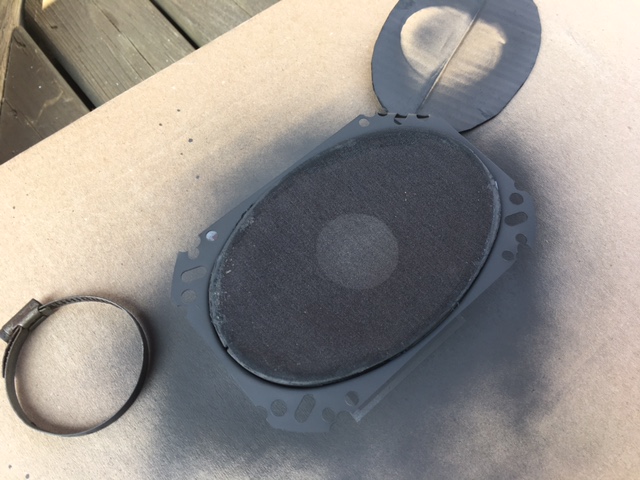 Then using some very thin, almost stretchy material. 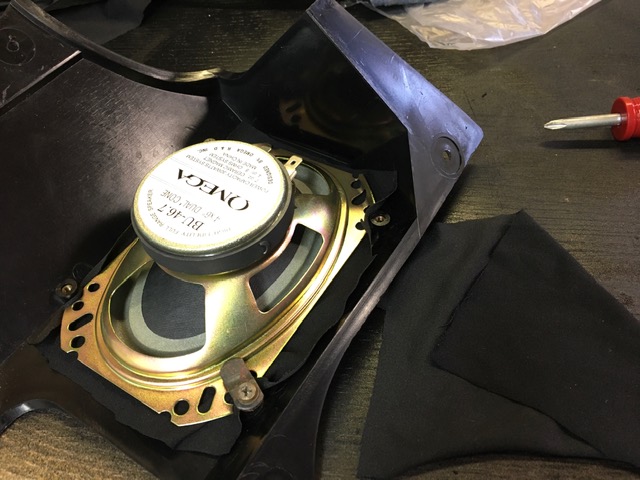 I set it in the housing using the more reflective side of the material. I used the original clips to hold the speakers in place. If the ones you have don’t work, you can bend some strap steel, and add a hole to it for the screw. 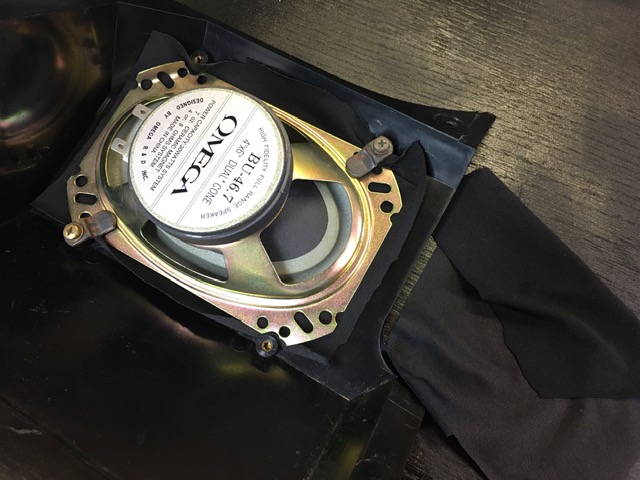 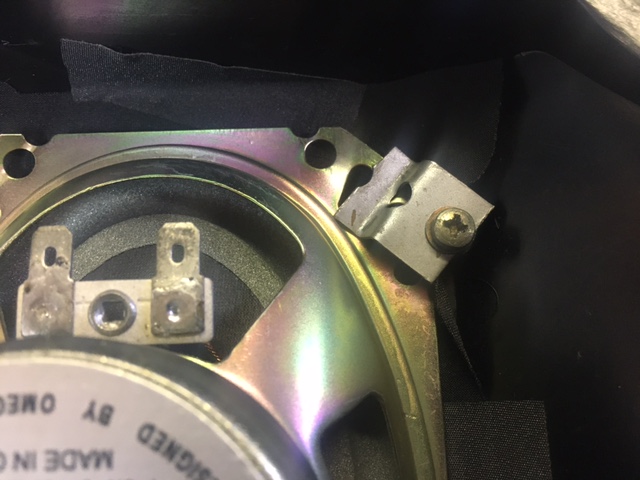 A little black cloth tape to hold it in place 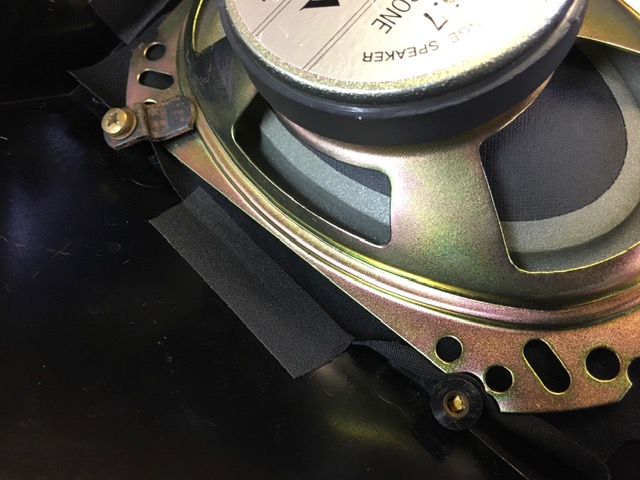 And they look, and believe it or not, even sound very good. I’m using a vintage blaupunkt head unit, pushing a big 7 watts. 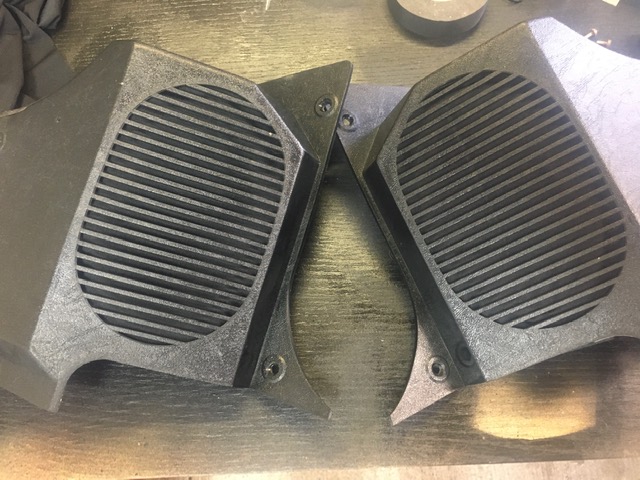 |
|
|
|
| Literati914 |
Aug 24 2024, 10:47 PM
Post
#3
|
|
Advanced Member Group: Members Posts: 2,329 Joined: 16-November 06 From: Dallas, TX Member No.: 7,222 Region Association: Southwest Region |
Nice work. I like the cloth trick. Were those speakers a recommendation or just something you decided to pick up and try? Also, can you provide their measured depth? (I know you've already installed them - maybe it's on the box?)
|
|
|
|
| chmillman |
Aug 25 2024, 03:25 AM
Post
#4
|
|
Member Group: Members Posts: 372 Joined: 15-June 24 From: Switzerland Member No.: 28,183 Region Association: Europe |
I used a slightly different approach to mounting some speakers in the original housings.
First off, I had ordered 914Rubber’s speaker pods, thinking I would use a pair of Rockford-Fosgate 5 1/2's that I already had from another project that didn’t work out. Unfortunately, I was very disappointed when the speaker pods arrived to see how poor quality they were… Sorry 914Rubber guys, but the shiny, highly textured outer surface (Samsonite suitcase material) just does not do it for me; the indentations for the indicated hole placements are “somewhat approximate”. The pictures I saw before ordering don’t show that. Perhaps at some point I will try to clean them up, sand off the texture and repaint them with a matte, lightly textured finish, but that remains a project “for later”. So, as my original housings are still in good shape and I just wanted to get some reasonable sound going in the car now, I decided to adapt a pair of 4x6’s. I settled on JBL Club 4622’s which were inexpensive (around $60) and available here quickly – the Infinity Kappas aren’t - but also because they had good CAD data available online so I could see how they would fit. Once mounted, they’re only about 1/4" deeper than the factory originals. 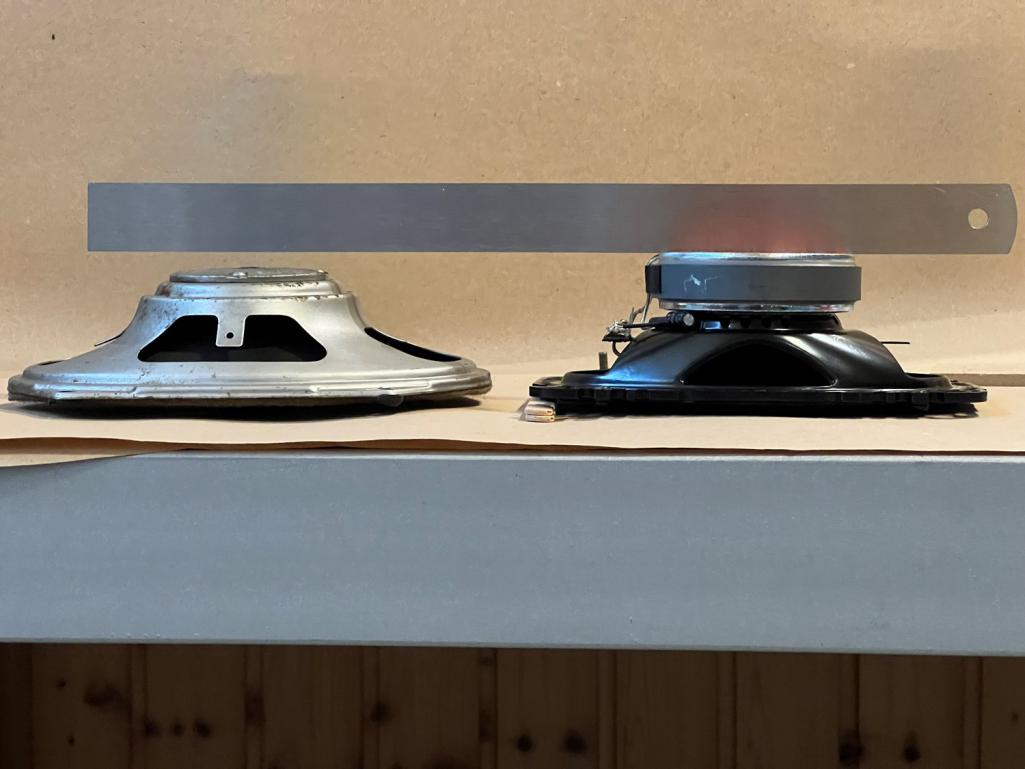 While it was possible to bolt them in directly diagonally, I didn’t like that solution having them just hanging in the air... 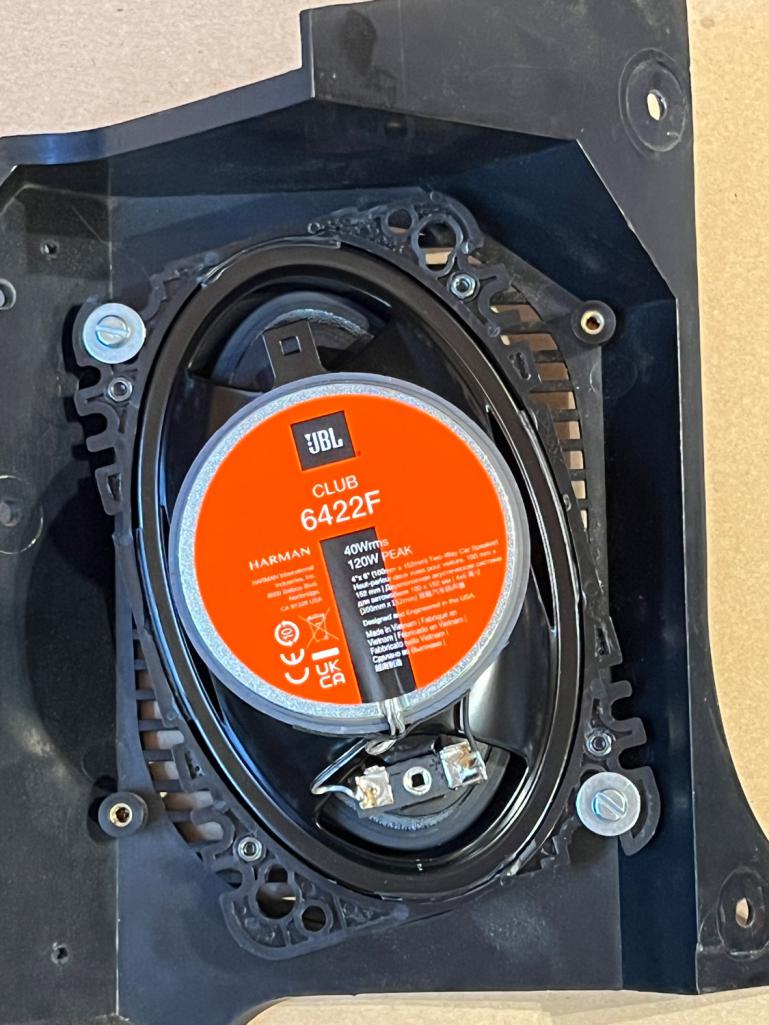 So I made my own custom adapter plates – laser cut MDF/painted black – and mounted them vertically solidly to the housings. Briefly, I took a quick iPhone photo of the inside plus some basic measurements, brought that into my CAD software and adjusted stuff so I had a perfect scale outline of the inside of the front surface. I then printed some paper templates and stuck them on some MDF and made a quick "proof-of-concept" mockup using band saw/drill press/sanding. I could have just made a second hand-built one for the other side, but being a nut for precision and having access to a laser cutter, I cut out new parts in 3mm MDF and glued them up, painted them black.  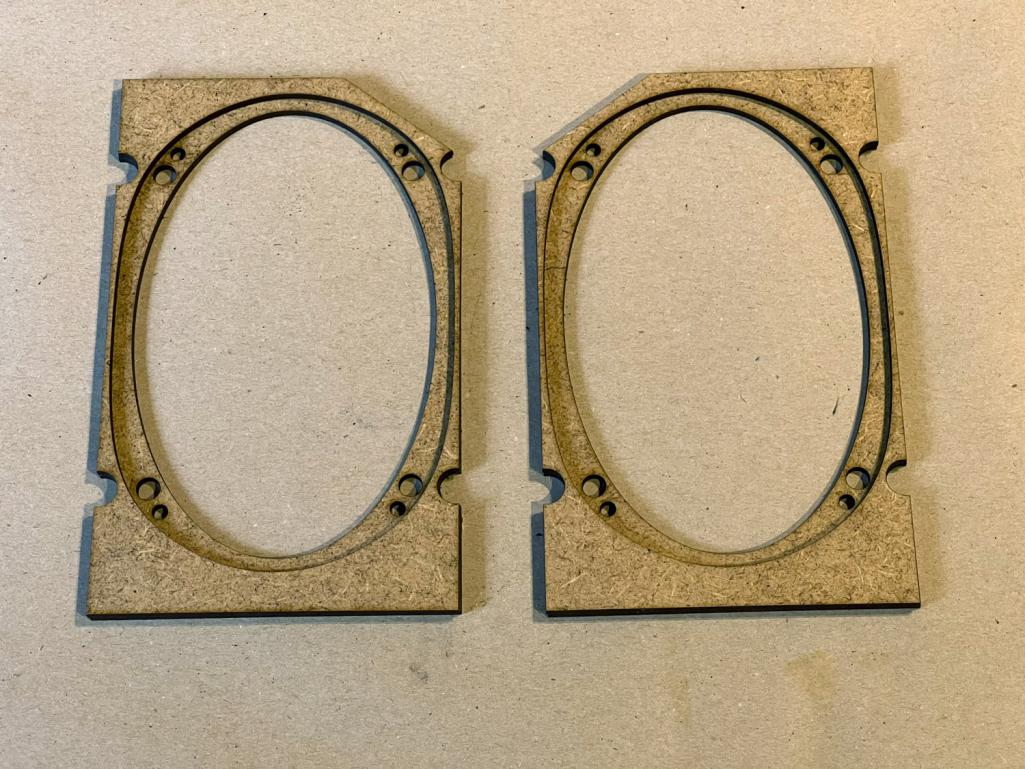 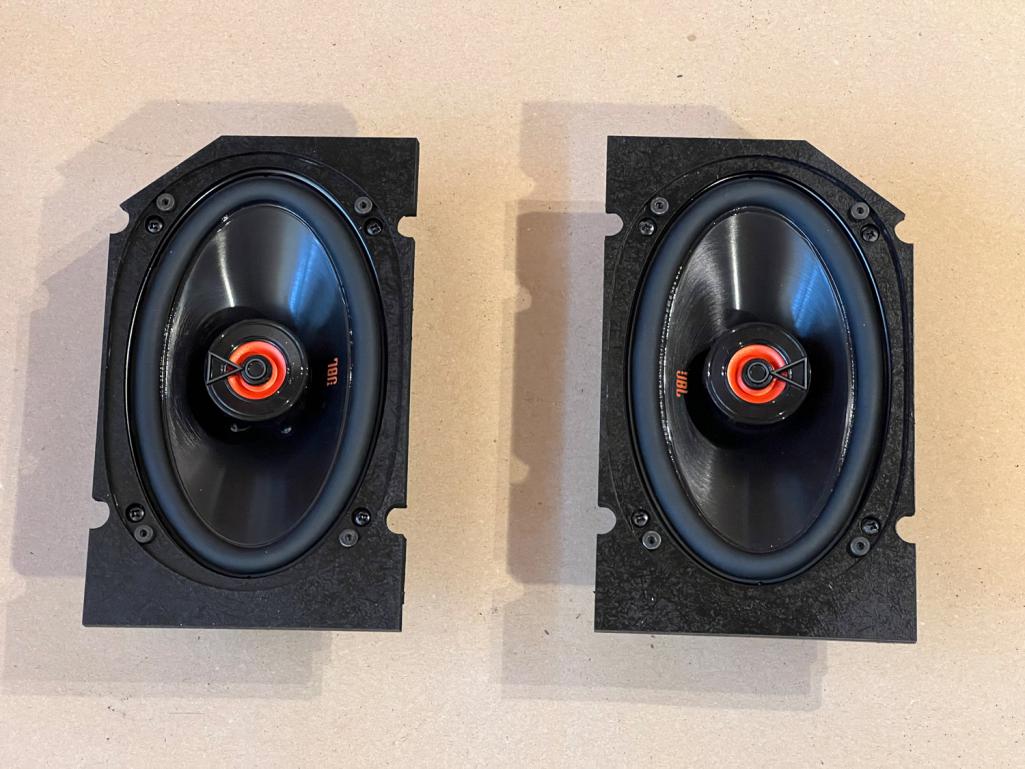 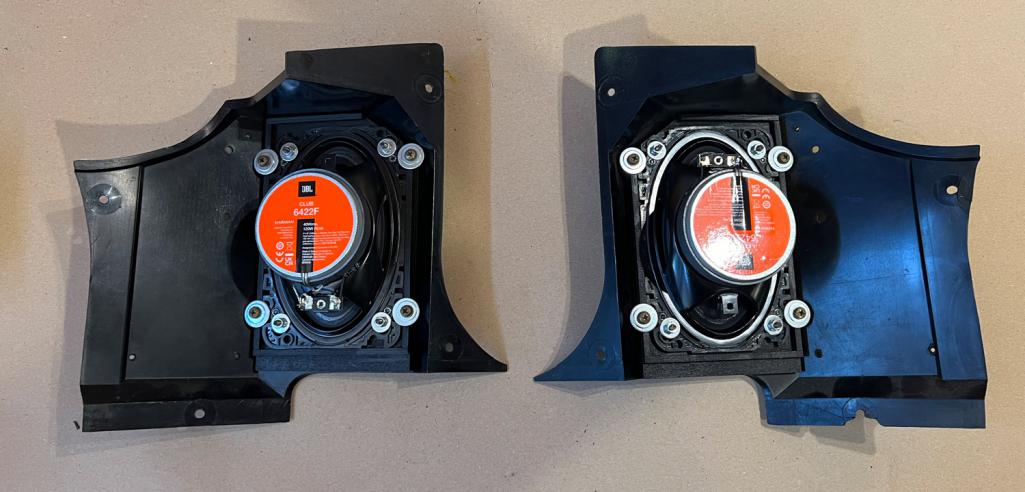 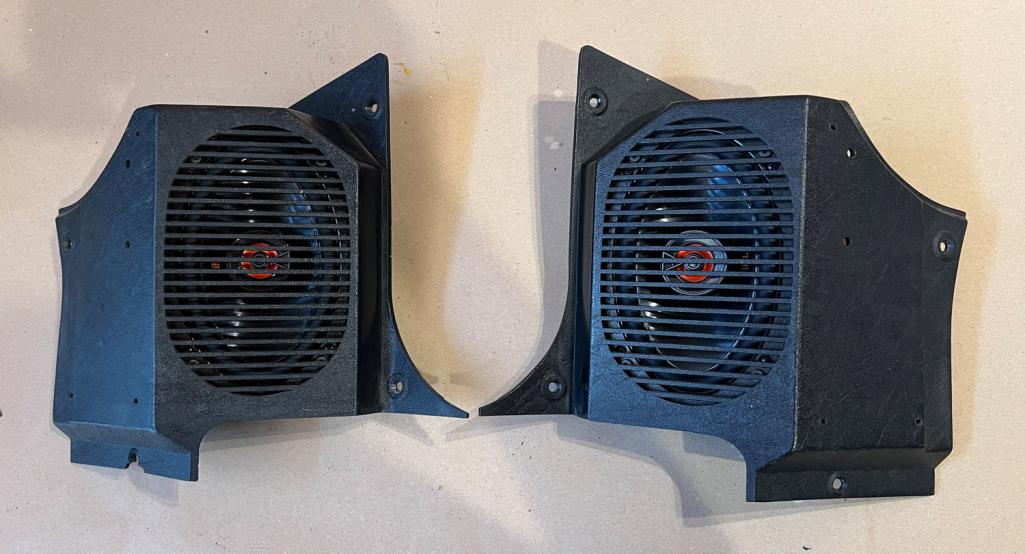 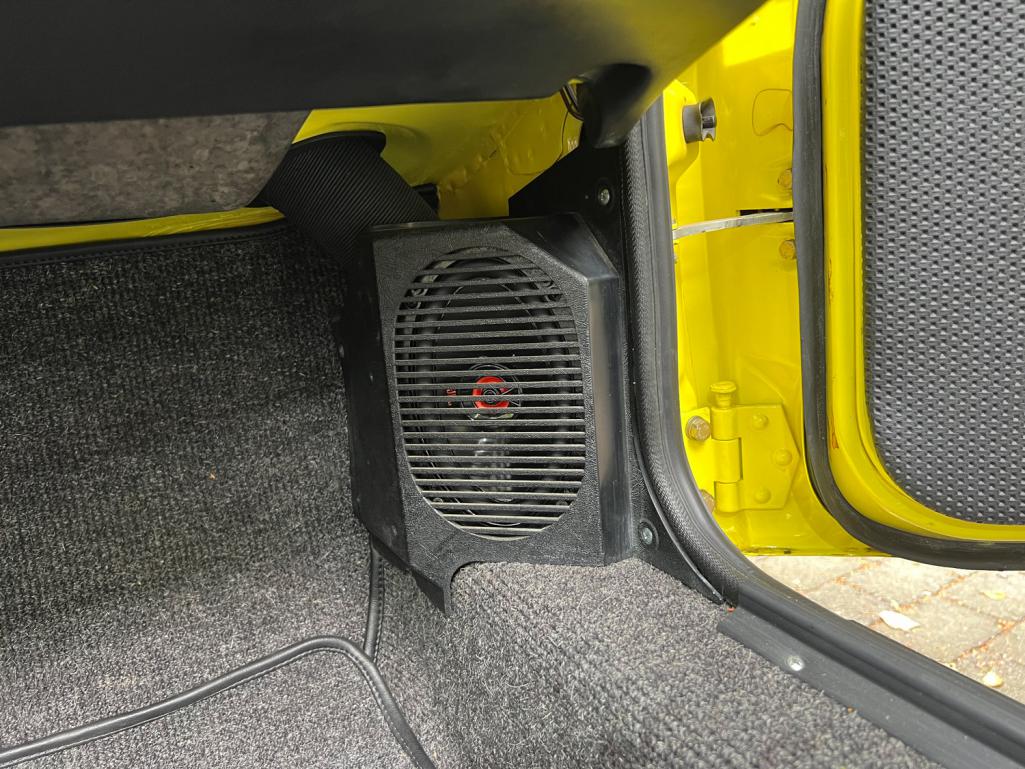 I’m quite happy with the result. The sound from the JBL's is clean and clear. Sure, there is no real bass from a pair of 4x6’s, but it’s not bad at all for a simple, clean sounding install for under $200 (including the Blaupunkt Nürnberg DAB+/Bluetooth radio, speakers, connectors, etc.) and a day or so of time invested. Have already ordered a Pioneer TS-WX010A compact subwoofer, which should actually fit inside the center console. The Blaupunkt works OK, install was a bit complicated (more on that later) my main complaint is that the Bluetooth doesn't automatically connect every time (like the Retrosound unit in my T-Bird does). I may look at other radio solutions at a later date. |
|
|
|
| burton73 |
Aug 25 2024, 08:40 AM
Post
#5
|
|
Senior member, and old dude Group: Members Posts: 4,016 Joined: 2-January 07 From: Los Angeles Member No.: 7,414 Region Association: Southern California |
@chmillman
I have done a few of these speaker mods in factory enclosers over the years and your solution it very good. The 6x9 sound with built in tweeter is the answer for the stock encloser and with a sub it should so rock hard. Some one should sell the custom adapter plates – laser cut MDF/ On my 6 I had PMB make up the adapters to fit my 6 but the sound is good but I believe your 6x9 will but out decent bass as compared to my Polk Audio with 4 inch bass and tweeter. I have a subwoofer, and the sounds kicks but I think the sound of your set up is what most people will want. Picture of my Polk Audi: Don’t mind the dust, there were installed as clean as a whistle Best Bob B 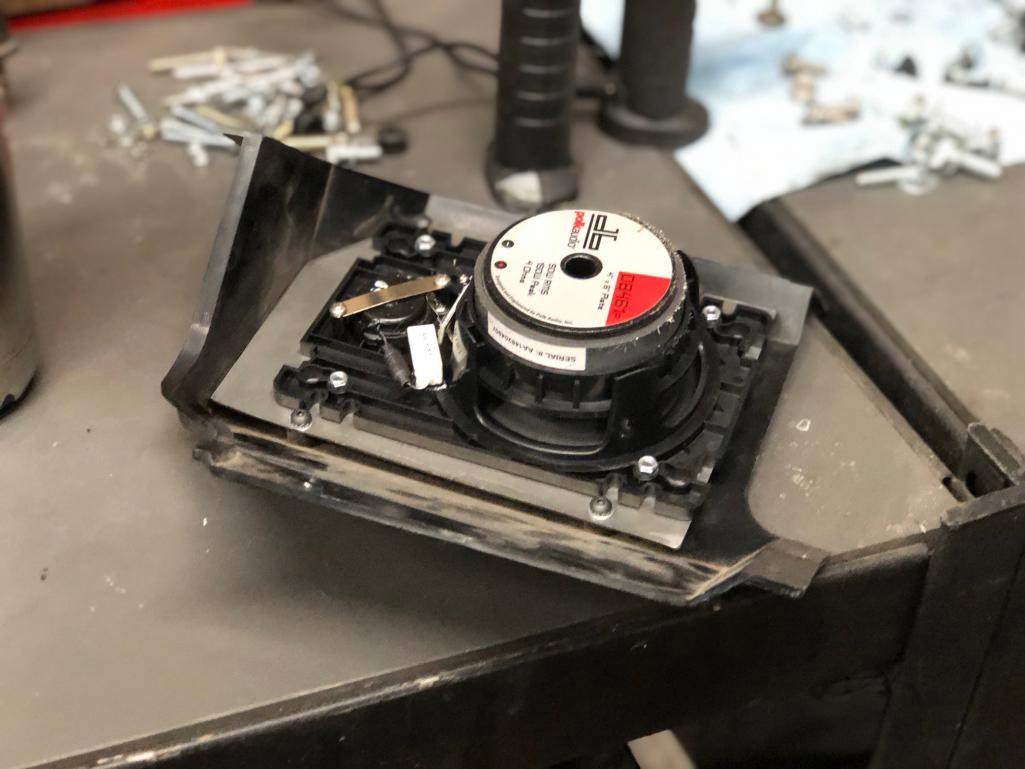 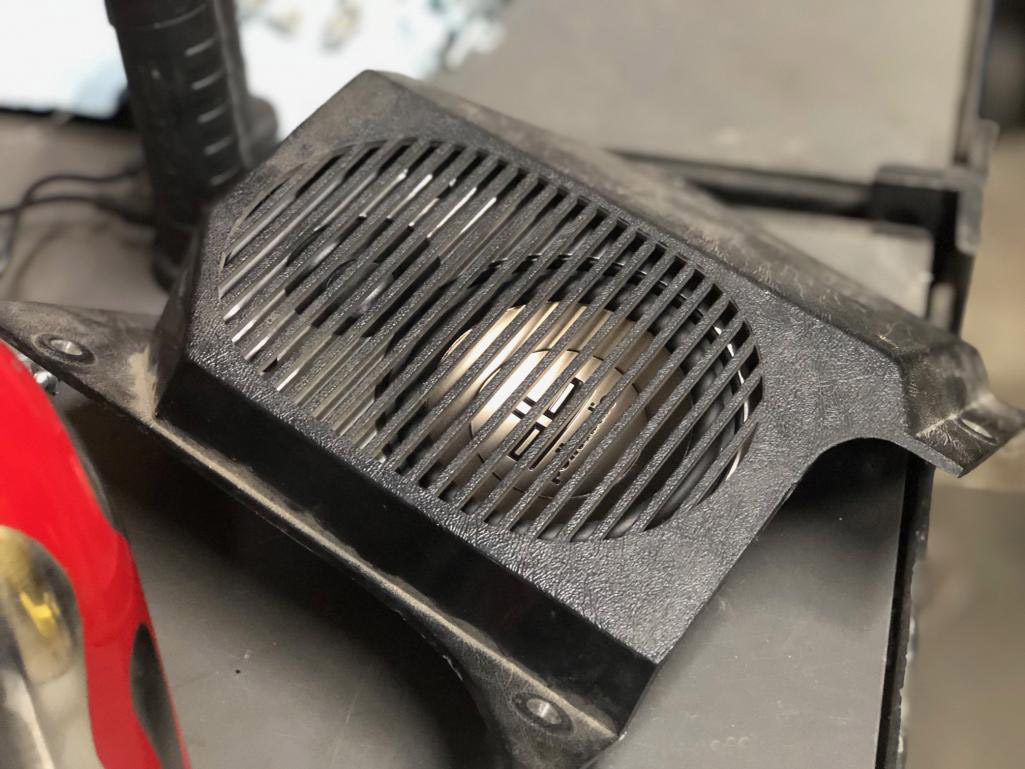 |
|
|
|
| chmillman |
Aug 25 2024, 09:25 AM
Post
#6
|
|
Member Group: Members Posts: 372 Joined: 15-June 24 From: Switzerland Member No.: 28,183 Region Association: Europe |
QUOTE(burton73 @ Aug 25 2024, 08:40 AM)  @chmillman but I believe your 6x9 will but out decent bass as compared to my Polk Audio with 4 inch bass and tweeter. They're actually coax 4x6 inchers, not 6x9's. Maybe a little more low-mid cone surface area than your pure 4" PA's, I don't know... Probably not that much difference. Will report back on the sound once I get the subwoofer installed. I was actually thinking of creating the 3D CAD file to make the adapters via 3D printing and just posting that... It was a tossup whether to laser cut or 3D print the parts (I have access to both), the laser cutting was just faster. |
|
|
|
| technicalninja |
Aug 25 2024, 11:24 AM
Post
#7
|
|
Advanced Member Group: Members Posts: 2,531 Joined: 31-January 23 From: Granbury Texas Member No.: 27,135 Region Association: Southwest Region |
QUOTE(chmillman @ Aug 25 2024, 04:25 AM) I used a slightly different approach to mounting some speakers in the original housings. First off, I had ordered 914Rubber’s speaker pods, thinking I would use a pair of Rockford-Fosgate 5 1/2's that I already had from another project that didn’t work out. Unfortunately, I was very disappointed when the speaker pods arrived to see how poor quality they were… Sorry 914Rubber guys, but the shiny, highly textured outer surface (Samsonite suitcase material) just does not do it for me; the indentations for the indicated hole placements are “somewhat approximate”. The pictures I saw before ordering don’t show that. Perhaps at some point I will try to clean them up, sand off the texture and repaint them with a matte, lightly textured finish, but that remains a project “for later”. So, as my original housings are still in good shape and I just wanted to get some reasonable sound going in the car now, I decided to adapt a pair of 4x6’s. I settled on JBL Club 4622’s which were inexpensive (around $60) and available here quickly – the Infinity Kappas aren’t - but also because they had good CAD data available online so I could see how they would fit. Once mounted, they’re only about 1/4" deeper than the factory originals. While it was possible to bolt them in directly diagonally, I didn’t like that solution having them just hanging in the air... So I made my own custom adapter plates – laser cut MDF/painted black – and mounted them vertically solidly to the housings. Briefly, I took a quick iPhone photo of the inside plus some basic measurements, brought that into my CAD software and adjusted stuff so I had a perfect scale outline of the inside of the front surface. I then printed some paper templates and stuck them on some MDF and made a quick "proof-of-concept" mockup using band saw/drill press/sanding. I could have just made a second hand-built one for the other side, but being a nut for precision and having access to a laser cutter, I cut out new parts in 3mm MDF and glued them up, painted them black. I’m quite happy with the result. The sound from the JBL's is clean and clear. Sure, there is no real bass from a pair of 4x6’s, but it’s not bad at all for a simple, clean sounding install for under $200 (including the Blaupunkt Nürnberg DAB+/Bluetooth radio, speakers, connectors, etc.) and a day or so of time invested. Have already ordered a Pioneer TS-WX010A compact subwoofer, which should actually fit inside the center console. The Blaupunkt works OK, install was a bit complicated (more on that later) my main complaint is that the Bluetooth doesn't automatically connect every time (like the Retrosound unit in my T-Bird does). I may look at other radio solutions at a later date. Nicely done! I haven't seen a cleaner install yet. Having the 3D cad file would be a wonderful thing. My son is big with 3d printing (current job is at the largest titanium 3D printer on the planet). Now for speakers I would rather have MDF as the substrate. The way you did it looks best to me... The 3d print stuff is just SO easy and we are talking about 4X6 speakers here. I'm not sure how much better MDF is over plastic on such a small speaker. Probably cannot hear the difference... |
|
|
|
| Garland |
Aug 25 2024, 12:39 PM
Post
#8
|
|
Restoration Fanatic Group: Members Posts: 1,431 Joined: 8-January 04 From: ......Michigan...... Member No.: 1,535 Region Association: Upper MidWest |
QUOTE(Literati914 @ Aug 24 2024, 10:47 PM) Nice work. I like the cloth trick. Were those speakers a recommendation or just something you decided to pick up and try? Also, can you provide their measured depth? (I know you've already installed them - maybe it's on the box?) Excellent question, I took that into consideration and should’ve posted the number. Yes the magnet clears the ductwork, and the depth from the speaker face to the back of the magnet is 2 inches. I use the heater system in my cars And did not want to damage those tubes. I decided to try them after shopping for a speaker that would fit the housing, and clear the ductwork. If you need the source I got them from PM me.  |
|
|
|
| chmillman |
Aug 27 2024, 03:30 AM
Post
#9
|
|
Member Group: Members Posts: 372 Joined: 15-June 24 From: Switzerland Member No.: 28,183 Region Association: Europe |
Here are 2D CAD (DXF) files for the laser cutting. Of course, they are custom for the JBL's. The main parts are in 3mm (1/8") MDF, the reinforcements which I glued on the back are in 4mm, they provide the bearing surface for the washers using the the original screw holes. You could also do them in 3mm - just might need an extra washer when installing.
 JBL4622_914_MDF.zip ( 28.99k )
Number of downloads: 90
JBL4622_914_MDF.zip ( 28.99k )
Number of downloads: 903D print (STL, STEP) files to follow when I get a moment. OK, here are the 3D files. Two versions, a one piece, which due to the part configuration, your printer will need to have support material and there may be some cleanup; and a two piece which can be printed flat on the printer bed (no support required) and then glued together (superglue, solvent, etc.). In the .zip are ready-to-print .stl's as well as STEP files if you have a 3D CAD system and want to modify them. I only put in one side, the other side should be mirror-imaged, which all CAD/Printer softwares can do.
JBL_4622_914_3DP.zip ( 177.23k )
Number of downloads: 109 |
|
|
|
| chmillman |
Sep 3 2024, 10:57 AM
Post
#10
|
|
Member Group: Members Posts: 372 Joined: 15-June 24 From: Switzerland Member No.: 28,183 Region Association: Europe |
|
|
|
|
|
1 User(s) are reading this topic (1 Guests and 0 Anonymous Users)
0 Members:

|
Lo-Fi Version | Time is now: 31st May 2026 - 05:23 AM |
Invision Power Board
v9.1.4 © 2026 IPS, Inc.