|
|
|
Porsche, and the Porsche crest are registered trademarks of Dr. Ing. h.c. F. Porsche AG.
This site is not affiliated with Porsche in any way. Its only purpose is to provide an online forum for car enthusiasts. All other trademarks are property of their respective owners. |
|
|

  |

| Phoenix914 |
 Jan 31 2007, 08:48 AM Jan 31 2007, 08:48 AM
Post
#1
|
|
Member  Group: Members Posts: 389 Joined: 6-December 06 From: Oviedo, FL Member No.: 7,322 Region Association: South East States |
Hello, group. This is my second post here, the first being in the "How did you get into 914's?" thread. I've been mostly lurking for the past few weeks since signing up on 914 Club just before the time of troubles. Today I'm appealing to the collective for advice and possibly real-person help with what to me is a big problem. I'm so close to sending this car to the paint shop, but one obstacle is in my way. The original owner at some point had the front turn signals filled in. (IMG:style_emoticons/default/barf.gif) I wish to un-fill them. I thought it was maybe just body filler, but you can see below there is some steel welded in place below all that bondo.
I'm not good at any kind of body work. I don't have the expertise or tools to cut this metal out of my way. Can any of you guys give me some advice or assistance to get this problem fixed? I know one of my problems is that I live in southern Delaware. Don't know if anybody is close to me or not, but I'm willing to drive to someone's place. It would also be nice to just have one of you more experienced guys take a gander at this car, since I've been working on it for almost four years now with almost no help at all, and nobody who knows anything about 914's. Well, take a look and tell me what you think... From the side 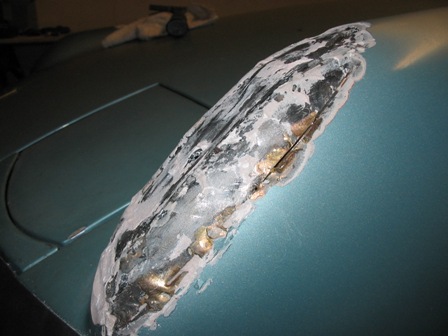 From the front 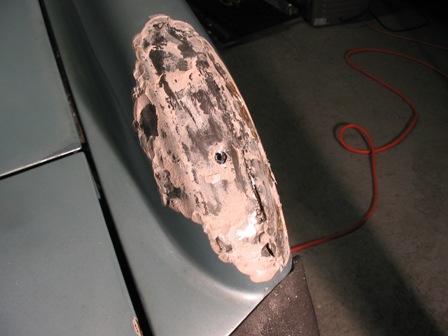 From under the fender 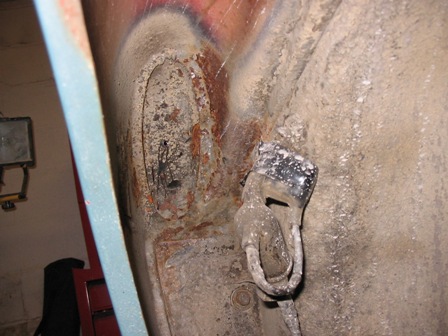 The other side  Thanks for any help you can offer. (IMG:style_emoticons/default/beer.gif) Bryan Greenly |
   |

 
|
| dr914@autoatlanta.com |
Jan 31 2007, 09:13 AM
Post
#2
|
|
914 Guru Group: Members Posts: 7,887 Joined: 3-January 07 From: atlanta georgia Member No.: 7,418 Region Association: None |
At least the guy left the lip in tact. You are my hero for bringing that 914 back to its original condition. I hate the guy who botched that car like that.
The way to fix this is to first grind off all of the body putty until you have perfectly clean metal, and then go from the underside with a metal saw or small die grinder and cut within the outline of the old original flange. then use the grinder on the top to clean the final metal slag. Then get a turn signal assembly and fit it to the hole. Then body work. |
|
|
|
| Phoenix914 |
Jan 31 2007, 09:42 AM
Post
#3
|
|
Member Group: Members Posts: 389 Joined: 6-December 06 From: Oviedo, FL Member No.: 7,322 Region Association: South East States |
Thanks for the fast response, George. I've bought 99% of my parts from you during this resto effort and always appreciate the advice you've given me on the phone and through email.
If I'm to do this myself, I'll need some tool advice. I can fix almost anything mechanical, but working with metal is a new endeavor for me. What kind of metal saw and/or grinder should I use? I can borrow a nice sawzall from a friend of mine. Is this an appropriate tool for the initial cutting? What kind of blade and what kind of grinding wheel? Thanks again. And just for fun, here are some pictures of what I've done to the inside: Before (floor at pedal cluster fixed) 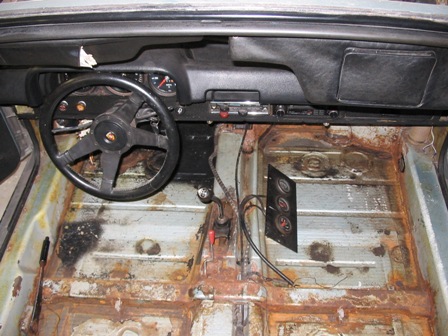 Coated with POR 15 and new tar on driver side 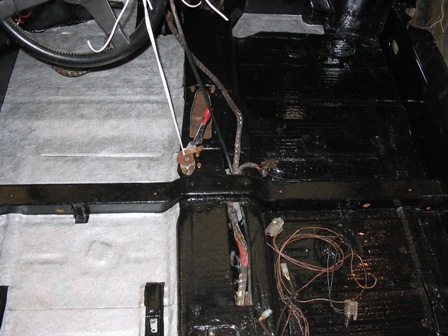 Painted original Marathon Blue! 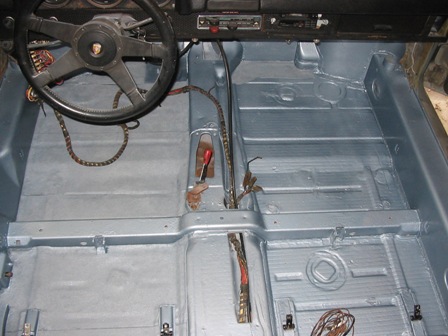 |
|
|
|
| Bleyseng |
Jan 31 2007, 09:45 AM
Post
#4
|
|
Aircooled Baby! Group: Members Posts: 13,035 Joined: 27-December 02 From: Seattle, Washington (for now) Member No.: 24 Region Association: Pacific Northwest |
(IMG:style_emoticons/default/agree.gif) yup, pretty doable using the right tools or leave it to the body/paint guy to fix as he should be able to clean that up pretty easy. (IMG:style_emoticons/default/clap56.gif)
no sawsall! use a diegrinder with a small metal cutting disc. |
|
|
|
| Carrera916 |
Jan 31 2007, 09:57 AM
Post
#5
|
|
Member Group: Members Posts: 292 Joined: 9-February 03 From: Pleasanton, CA Member No.: 273 |
Hi Bryant,
From the look of your pictures and if you have access to an acetylene/oxygen torch (or go to a body shop for this specific job) you can heat the brazing weld (goldish/copper colored blop) and let it soft up or melt, you can pry the homemade panel out of the turn signal opening with the screwdriver. It's much faster and somewhat cleaner to do that. It's important that you dont tear off or melt away the opening base flange/edge where the turn signal housing can sit on it. I've find that when one cuts out the panel piece and leave the remaining on the flange to grind out, it tends to make more mistakes of grinding out too much metal to the point that the flange/edge would become 'paper thin' or heat damaged which would do no good for supporting the TS housing. Just my .02 cent opinion... J |
|
|
|
| jasons |
Jan 31 2007, 10:03 AM
Post
#6
|
|
Jackstand Extraordinaire Group: Members Posts: 2,002 Joined: 19-August 04 From: Scottsdale, AZ Member No.: 2,573 Region Association: None |
You can heat the body filler with a propane torch and scrape it out. The heat makes it pretty easy. Once you expose the welded seams (assuming it is welded, maybe you'll get lucky and it just bondo'd in place) you can cut the "patch" out. Then grind it down smooth. Like the Doc said, fortunately the lip is there.
A dremmel tool with the little carbon wheels will cut that out. It actually looks like a pretty simple job to me. Just make sure you don't cut the lip off too. Interior looks good BTW. Methinks you can handle this job. |
|
|
|
| jasons |
Jan 31 2007, 10:06 AM
Post
#7
|
|
Jackstand Extraordinaire Group: Members Posts: 2,002 Joined: 19-August 04 From: Scottsdale, AZ Member No.: 2,573 Region Association: None |
Shit, upon further review, it looks like its just brazed in place then bondo filled. You could definitely cut those braze points with a grinder, a cutoff wheel or the Dremmel tool. Then just grind the excess off.
|
|
|
|
| dr914@autoatlanta.com |
Jan 31 2007, 10:14 AM
Post
#8
|
|
914 Guru Group: Members Posts: 7,887 Joined: 3-January 07 From: atlanta georgia Member No.: 7,418 Region Association: None |
QUOTE(Phoenix914 @ Jan 31 2007, 07:42 AM)  Thanks for the fast response, George. I've bought 99% of my parts from you during this resto effort and always appreciate the advice you've given me on the phone and through email. If I'm to do this myself, I'll need some tool advice. I can fix almost anything mechanical, but working with metal is a new endeavor for me. What kind of metal saw and/or grinder should I use? I can borrow a nice sawzall from a friend of mine. Is this an appropriate tool for the initial cutting? What kind of blade and what kind of grinding wheel? Thanks again. And just for fun, here are some pictures of what I've done to the inside: Before (floor at pedal cluster fixed) Coated with POR 15 and new tar on driver side Painted original Marathon Blue! I would use a three inch cutoff wheel to cut through the welds. (fits to the die grinder) if you cut the welds in half at the joint between the scabbed piece and the original fender the piece of metal should be easy to remove and then get a small grinder disc to clean up the area. You are doing a fabulous job congrats! |
|
|
|
| Phoenix914 |
Jan 31 2007, 10:21 AM
Post
#9
|
|
Member Group: Members Posts: 389 Joined: 6-December 06 From: Oviedo, FL Member No.: 7,322 Region Association: South East States |
Well, the more you guys respond, the better I'm starting to feel. The reason I decided to try this myself in the first place was that the body/paint guy gave me an estimate of 20 hrs. to do this job. That translated to $800. WTF? That's a lot of money. Honestly, I did cut through a small portion of one of the welds with my dremmel. It took a long time and I saw where I could potentially F up some good metal with that method. Some of the welds are pretty ugly and hard to judge where the seam is beneath.
Any more takers for the torch/melt the weld method? This sounds like the least invasive way to tackle it. Then just grind down what's left? I'll get back in there and remove the rest of the filler from both sides before doing any cutting or grinding. Who knows how the other side looks. |
|
|
|
| jasons |
Jan 31 2007, 10:35 AM
Post
#10
|
|
Jackstand Extraordinaire Group: Members Posts: 2,002 Joined: 19-August 04 From: Scottsdale, AZ Member No.: 2,573 Region Association: None |
QUOTE(Phoenix914 @ Jan 31 2007, 09:21 AM) Any more takers for the torch/melt the weld method? This sounds like the least invasive way to tackle it. Then just grind down what's left? I was going to suggest MAPP gas, but I don't know if you can get all the brazing off and you will probably end up grinding it anyway. Also, be careful heating the panel too much, it will warp. This applies to a grinder too. |
|
|
|
| Phoenix914 |
Jan 31 2007, 11:33 AM
Post
#11
|
|
Member Group: Members Posts: 389 Joined: 6-December 06 From: Oviedo, FL Member No.: 7,322 Region Association: South East States |
QUOTE(jasons @ Jan 31 2007, 11:35 AM) I was going to suggest MAPP gas, but I don't know if you can get all the brazing off and you will probably end up grinding it anyway. Also, be careful heating the panel too much, it will warp. This applies to a grinder too. I was thinking along those lines. Didn't want to mess anything else up by heating too much. I'll try to get the rest of the filler off this weekend and see how it looks at that point. I'm thinking there's a grinder in my future! Thanks, jasons. |
|
|
|
| Phoenix914 |
Jan 31 2007, 11:36 AM
Post
#12
|
|
Member Group: Members Posts: 389 Joined: 6-December 06 From: Oviedo, FL Member No.: 7,322 Region Association: South East States |
QUOTE(dr914@autoatlanta.com @ Jan 31 2007, 11:14 AM) I would use a three inch cutoff wheel to cut through the welds. (fits to the die grinder) if you cut the welds in half at the joint between the scabbed piece and the original fender the piece of metal should be easy to remove and then get a small grinder disc to clean up the area. You are doing a fabulous job congrats! Thanks for the grinder advice, Dr. I'll slip into Sears over the next few days and see what they have on sale. Another tool in the corral! (IMG:style_emoticons/default/clap56.gif) |
|
|
|
| jasons |
Jan 31 2007, 11:40 AM
Post
#13
|
|
Jackstand Extraordinaire Group: Members Posts: 2,002 Joined: 19-August 04 From: Scottsdale, AZ Member No.: 2,573 Region Association: None |
QUOTE(Phoenix914 @ Jan 31 2007, 10:36 AM) QUOTE(dr914@autoatlanta.com @ Jan 31 2007, 11:14 AM) I would use a three inch cutoff wheel to cut through the welds. (fits to the die grinder) if you cut the welds in half at the joint between the scabbed piece and the original fender the piece of metal should be easy to remove and then get a small grinder disc to clean up the area. You are doing a fabulous job congrats! Thanks for the grinder advice, Dr. I'll slip into Sears over the next few days and see what they have on sale. Another tool in the corral! (IMG:style_emoticons/default/clap56.gif) You know, I got one from Harbor Freight for like $15, 5 years ago. I thought it wouldn't last, but I have used the crap out of it and it keeps on going. |
|
|
|
| 914nerd |
Jan 31 2007, 11:42 AM
Post
#14
|
|
Who you callin' a "Member"? Group: Members Posts: 416 Joined: 18-July 06 From: Los Alamos, NM Member No.: 6,461 |
Once you get those off and it comes time to pick up some new housings, drop me a pm. I have a parts car with some housings and lenses in good shape that I would be glad to sell.
|
|
|
|
| andys |
Jan 31 2007, 11:58 AM
Post
#15
|
|
Advanced Member Group: Members Posts: 2,165 Joined: 21-May 03 From: Valencia, CA Member No.: 721 Region Association: None |
I would be inclined to start cutting through the added on piece just above the braze joint. That would reveal what's underneath, and determine the next step. I would likely then get that HF angle grinder and start gringing down to the original flange. Braze is more difficult to grind than one might suspect, but just take your time. You don't want to grind away or damage the original flange. I would also tend to stay away from trying to melt the braze to pull away the metal; I suspect that would be more difficult than it seems. Anyway, this is an entirely do-able project. I (we) invite you to post progress/what should I do next pictures, and I (we) can help you along step by step.
Andys |
|
|
|
| Phoenix914 |
Jan 31 2007, 12:36 PM
Post
#16
|
|
Member Group: Members Posts: 389 Joined: 6-December 06 From: Oviedo, FL Member No.: 7,322 Region Association: South East States |
QUOTE(914nerd @ Jan 31 2007, 12:42 PM) Once you get those off and it comes time to pick up some new housings, drop me a pm. I have a parts car with some housings and lenses in good shape that I would be glad to sell. Thanks for the offer of parts, 914nerd. I recently bought those very items from Pokey1168 in anticipation of this project. One of the lenses isn't in such good shape, but I was thinking about going with the Euro ones anyway. The housings I have are in great shape, though. I may need other bits and pieces, so I'll keep you in mind. (IMG:style_emoticons/default/cool.gif) |
|
|
|
| Phoenix914 |
Jan 31 2007, 12:41 PM
Post
#17
|
|
Member Group: Members Posts: 389 Joined: 6-December 06 From: Oviedo, FL Member No.: 7,322 Region Association: South East States |
QUOTE(andys @ Jan 31 2007, 12:58 PM) I would be inclined to start cutting through the added on piece just above the braze joint. That would reveal what's underneath, and determine the next step. I would likely then get that HF angle grinder and start gringing down to the original flange. Braze is more difficult to grind than one might suspect, but just take your time. You don't want to grind away or damage the original flange. I would also tend to stay away from trying to melt the braze to pull away the metal; I suspect that would be more difficult than it seems. Anyway, this is an entirely do-able project. I (we) invite you to post progress/what should I do next pictures, and I (we) can help you along step by step. Andys Looks like I'll be getting a grinder to do it rather than trying the torch method. I may use a propane torch to help soften the body filler, but I won't try to melt the braze. I don't have the right torch for that anyway. I checked out Harbor Freight, as jasons also suggested, and they do have some stupid cheap grinders, but I don't want to pay for or wait for shipping at this point. I still have a $25 gift card for the mall left over from Christmas and that's where Sears is!! Sounds like a Friday night shopping trip to me. edit: And I will post more pics or anguished questions as soon as I can. Thanks for your help, Andys. |
|
|
|
| Phoenix914 |
Feb 4 2007, 09:54 PM
Post
#18
|
|
Member Group: Members Posts: 389 Joined: 6-December 06 From: Oviedo, FL Member No.: 7,322 Region Association: South East States |
Major progress today! (IMG:style_emoticons/default/sawzall-smiley.gif) I decided to buy a relatively inexpensive set of die grinders that came with cutting discs and grinders of various types. It was $50 at Wal-mart.
 Turns out that this kit combined with my Dremmel (for some finer work) was exactly what I needed to tackle the job. In a nutshell, it took me about 3 hours to open up the turn signal holes. Looks like the two sides were done by different people. The driver side had three pieces of metal welded together in a cup, then welded to the fender and filled. The passenger side had just a flat piece welded over the hole (very well (IMG:style_emoticons/default/mad.gif) ), then a great gob of filler over the top to create a curve. Both fenders also have quite a bit of filler down the sides because the side markers were also removed and the holes welded shut. I thought the passenger side would be easier to fix because it looked like a cleaner job, but the reality was that there is a lot more material on that side that needs to be removed. It looks like the top of the original flange was beaten in a bit too, so I may just have to grind it back flush and leave some of the new metal on. Driver side with more filler removed around the edges. 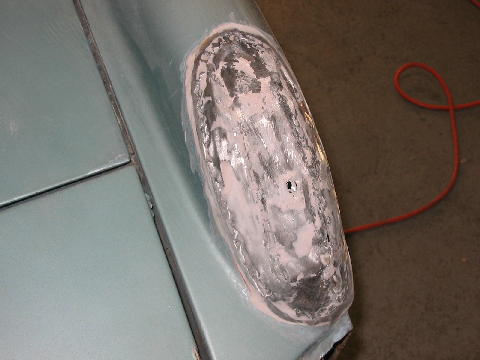 Driver side after removal of offending metal.  Under side of Driver fender. 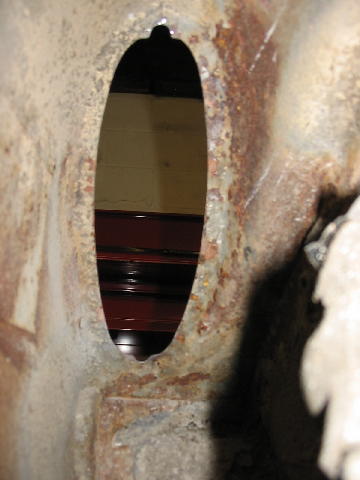 Passenger side flat cover welded on too damn well. 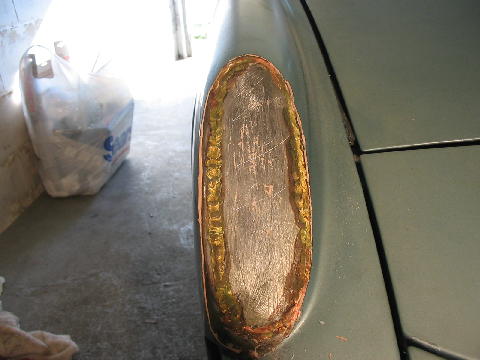 First cut on passenger side to remove the majority of the cover. I went a little wide on the right side, but not too bad. I should be able to smooth it out enough so it will still work OK. 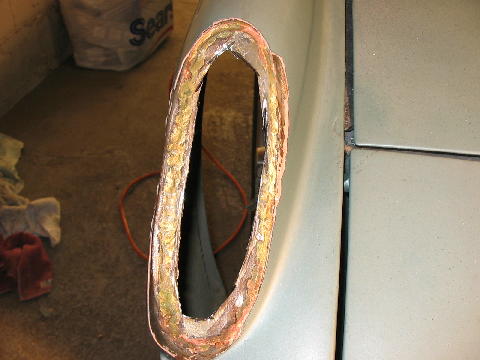 After trimming pretty close with my dremmel and a reinforced cutting disc.  And last , the under side of passenger fender. 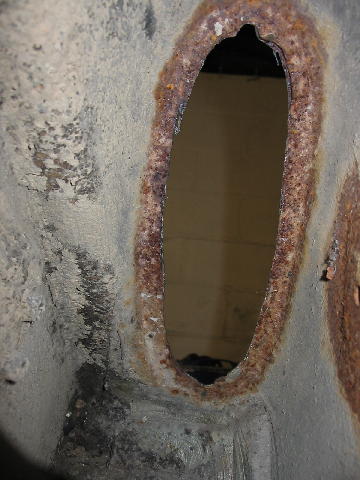 I have quite a bit more trimming and grinding to do on the passenger side. The welds are pretty tight. On the driver side it was a lot easier to separate the new metal from the original flange. I welcome any further comments or suggestions. The body shop will have to put the finishing touches on before painting. There will have to be a bit more filler put back on to make everything smooth, I'm thinking. Both sides seem a bit rippled in places. Thanks to all for the advice and encouragement to tackle this myself. It was a lot of fun, and easier than I thought. Just another notch in my belt of skills learned from working on this car. (IMG:style_emoticons/default/smile.gif) Bryan |
|
|
|
| Porsche Rescue |
Feb 5 2007, 10:46 AM
Post
#19
|
|
Saving and Enjoying Old Porsches Group: Members Posts: 2,978 Joined: 31-December 02 From: Bend, Oregon Member No.: 64 Region Association: None |
Very well done.
|
|
|
|
| crash914 |
Feb 5 2007, 12:23 PM
Post
#20
|
|
its a mystery to me Group: Members Posts: 1,826 Joined: 17-March 03 From: Marriottsville, MD Member No.: 434 Region Association: MidAtlantic Region |
here is a picture of a bumpy one that will still work....
keep going, you are doing a very nice job.... feel free to pm me or stop by if you are in the baltimore area...herb Attached image(s) 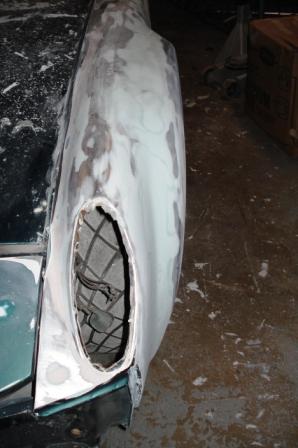
|
|
|
|
|
1 User(s) are reading this topic (1 Guests and 0 Anonymous Users)
0 Members:

|
Lo-Fi Version | Time is now: 2nd June 2024 - 02:53 AM |
Invision Power Board
v9.1.4 © 2024 IPS, Inc.