|
|
|
Porsche, and the Porsche crest are registered trademarks of Dr. Ing. h.c. F. Porsche AG.
This site is not affiliated with Porsche in any way. Its only purpose is to provide an online forum for car enthusiasts. All other trademarks are property of their respective owners. |
|
|

  |

| Air_Cooled_Nut |
 Jan 24 2004, 07:29 PM Jan 24 2004, 07:29 PM
Post
#1
|
|
914 Ronin - 914 owner who lost his 914club.com  Group: Members Posts: 1,748 Joined: 19-April 03 From: Beaverton, Oregon Member No.: 584 Region Association: None |
Tip:
When mounting the front bumper use double-sided tape to mount the 'dog bone' rubber piece to the bumper. Put the bolts in their holes on the body, and push the bumper onto the bolts. This is much easier than putting the bolts in the car, putting the dog bone on the bolts, then fitting the bumper to the bolts -- because you can't see the holes and thus lining things up is frustrating! With the dog bones on the bumper you can line up the bolts to the holes more easily. Luckily for me, I have a small foot stool that just fit under the bumper and acted as my other set of hands to hold the bumper up while I set the bolts in to it. I hate asking for help unless I'm desperate (IMG:style_emoticons/default/smile.gif) Anyway, bumper is now securely on the car with the air dam and, after some more rust cleaning, the front is looking more normal (IMG:style_emoticons/default/clap56.gif) Attached image(s) 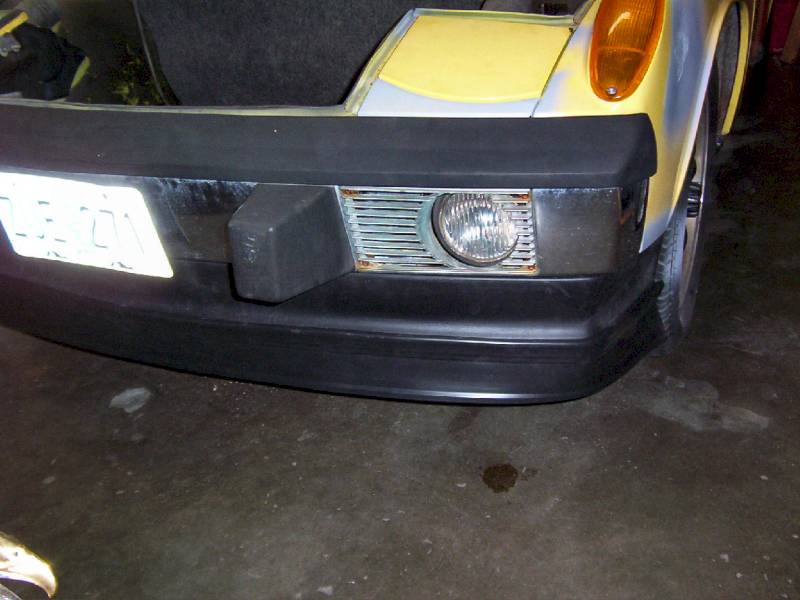
|
   |

 
|
| Joe Bob |
Jan 24 2004, 07:32 PM
Post
#2
|
|
Retired admin, banned a few times Group: Members Posts: 17,427 Joined: 24-December 02 From: Boulder CO Member No.: 5 Region Association: None |
Once you get used to it.....One person to hold it and one to wrench....IT IS a beetch to do it by your self..... (IMG:style_emoticons/default/blink.gif)
|
|
|
|
| Kargeek |
Jan 24 2004, 07:37 PM
Post
#3
|
|
Senior Member Group: Members Posts: 555 Joined: 14-March 03 From: Orange, CA Member No.: 430 |
Forget the 914, I'll take the Corvett! Dave H
|
|
|
|
| Bleyseng |
Jan 24 2004, 08:16 PM
Post
#4
|
|
Aircooled Baby! Group: Members Posts: 13,035 Joined: 27-December 02 From: Seattle, Washington (for now) Member No.: 24 Region Association: Pacific Northwest |
Nice touch to paint primer on the tire too!
Looks good all together! Geoff |
|
|
|
| ChrisReale |
Jan 24 2004, 08:19 PM
Post
#5
|
|
Sleazy Group: Members Posts: 2,665 Joined: 20-January 03 From: San Francisco Member No.: 176 |
Its a bit cumbersome, but I never had any problems
|
|
|
|
| boxstr |
Jan 24 2004, 08:20 PM
Post
#6
|
|
MEMBER:PACIFIC NORTHWEST REGION Group: Members Posts: 7,522 Joined: 25-December 02 From: OREGON Member No.: 12 Region Association: Pacific Northwest |
I would recommend a floor jack, to hold the bumper up, use a rag so it doe's not scratch the chrome and I also recommend a longer bolt that will screw into the bumper to hold it in place then you screw in the smaller bolts.
CCLINWALLTALK |
|
|
|
| J P Stein |
Jan 24 2004, 08:33 PM
Post
#7
|
|
Irrelevant old fart Group: Members Posts: 8,797 Joined: 30-December 02 From: Vancouver, WA Member No.: 45 Region Association: None |
Primer is gud.....not as gud as cheep, but gud.
That pic has it all. Primer, oil drop, & rust. 914 stuff. |
|
|
|
| markb |
Jan 25 2004, 09:13 AM
Post
#8
|
|
914less :( Group: Members Posts: 5,449 Joined: 22-January 03 From: Nipomo, CA Member No.: 180 Region Association: Central California |
Duct tape on the dogbones and a floor jack make things much easier.
Try it with a 916 style front end some time. It's enough to make you drink (like I need an excuse). (IMG:style_emoticons/default/rolleyes.gif) |
|
|
|
| krk |
Jan 25 2004, 09:52 AM
Post
#9
|
|
Senior Member Group: Members Posts: 997 Joined: 27-December 02 From: San Jose Member No.: 22 |
I use tape (duct or otherwise), place the bumper in place and prop the spare tire against it to hold it in place -- no marking. It does work better with an assistant tho -- particularly one with great legs. (IMG:style_emoticons/default/laugh.gif)
kim. |
|
|
|
| Mueller |
Jan 25 2004, 11:46 AM
Post
#10
|
|
914 Freak! Group: Members Posts: 17,146 Joined: 4-January 03 From: Antioch, CA Member No.: 87 Region Association: None |
I get rid of the bolts and use studs mounted in the bumper, much easier (IMG:style_emoticons/default/smile.gif)
A little tape to hold the "dog bones" from sliding off the studs helps as well. |
|
|
|
| Air_Cooled_Nut |
Jan 25 2004, 11:52 AM
Post
#11
|
|
914 Ronin - 914 owner who lost his 914club.com Group: Members Posts: 1,748 Joined: 19-April 03 From: Beaverton, Oregon Member No.: 584 Region Association: None |
QUOTE(Mueller @ Jan 25 2004, 09:46 AM) I get rid of the bolts and use studs mounted in the bumper, much easier (IMG:style_emoticons/default/smile.gif) A little tape to hold the "dog bones" from sliding off the studs helps as well. (IMG:style_emoticons/default/smilie_pokal.gif) That's the way to do it! Great idea...next time (IMG:style_emoticons/default/smile.gif) |
|
|
|
| Eric Taylor |
Jan 26 2004, 12:21 AM
Post
#12
|
|
Senior Member Group: Members Posts: 909 Joined: 1-June 03 From: Newport, OR/Eugene Oregon- UO Member No.: 770 |
Why don't you just shove the bolts throught the body and place the dog bones on them. Then just put the bumper up to the bolt's and wrench away. I've never had any problems, but then again all the dog bone's on my bumpers were rusted on to them (IMG:style_emoticons/default/smile.gif)
Eric |
|
|
|
| Neal |
Jan 26 2004, 09:42 AM
Post
#13
|
|
Member Group: Members Posts: 300 Joined: 23-April 03 From: Sammamish, Washington Member No.: 605 |
I am converting my 76 to the older style bumpers, what is the best way to mark and drill the bumper mounting holes ?
Neal |
|
|
|
| Joe Bob |
Jan 26 2004, 09:45 AM
Post
#14
|
|
Retired admin, banned a few times Group: Members Posts: 17,427 Joined: 24-December 02 From: Boulder CO Member No.: 5 Region Association: None |
There should be dimples on the inside that you drill out. Remember you need to grind the lip off that the later bumpers use to attach to the body....
|
|
|
|
| Neal |
Jan 26 2004, 09:47 AM
Post
#15
|
|
Member Group: Members Posts: 300 Joined: 23-April 03 From: Sammamish, Washington Member No.: 605 |
Mike, how about the back, is there dimples there because I did not see any, at least the top bolts you can see in the trunk.
Neal |
|
|
|
|
2 User(s) are reading this topic (2 Guests and 0 Anonymous Users)
0 Members:

|
Lo-Fi Version | Time is now: 15th June 2024 - 04:19 PM |
Invision Power Board
v9.1.4 © 2024 IPS, Inc.