|
|
|
Porsche, and the Porsche crest are registered trademarks of Dr. Ing. h.c. F. Porsche AG.
This site is not affiliated with Porsche in any way. Its only purpose is to provide an online forum for car enthusiasts. All other trademarks are property of their respective owners. |
|
|

  |

| turnaround89 |
 Oct 6 2008, 06:36 PM Oct 6 2008, 06:36 PM
Post
#1
|
|
Senior Member  Group: Members Posts: 671 Joined: 17-May 08 From: Rockford, Illinois Member No.: 9,067 Region Association: Upper MidWest |
I decided to do some interior work on my car and wanted a new center console, the one before was basically a big box on the floor, and i didn't like the look. When i bought the car i got like half of a 2.0 console and used that as a template for one side and built the rest the way i wanted it to look. It is not complete yet but will be. I still need to put the led lights on either side and inside the little compartment, to give a little more light in the interior. I need to cover it in vinyl and get the thrid switch for the last hole. The switches will be used to turn the fuel pump on and turn the leds on as well, the third(i guess second since the middle switch will do this) will be used as a kill switch, i haven't decided on that yet either. What do you think?
(IMG:http://i268.photobucket.com/albums/jj2/aheimer89/SG107749-1.jpg) (IMG:http://i268.photobucket.com/albums/jj2/aheimer89/SG107746-1.jpg) (IMG:http://i268.photobucket.com/albums/jj2/aheimer89/SG107748.jpg) (IMG:http://i268.photobucket.com/albums/jj2/aheimer89/SG107750-1.jpg) Is there a simple way to wire the two gauges so they work, i don't have any of the wiring for them? |
   |

 
|
| jc914 |
Oct 6 2008, 06:44 PM
Post
#2
|
|
Member Group: Members Posts: 289 Joined: 15-September 08 From: Miami, Florida Member No.: 9,548 Region Association: South East States |
That look nice. great job (IMG:style_emoticons/default/driving.gif)
|
|
|
|
| southernmost914 |
Oct 6 2008, 06:47 PM
Post
#3
|
|
KEY WEST/HAVANA Tunnel Authority Group: Members Posts: 338 Joined: 16-October 07 From: Key West/ St. Augie, Fl USA Member No.: 8,234 Region Association: South East States |
I like it better than stock. You will have more foot room. On 70-72 models you will need to run the wires. On 73-76 the wires are located under the center carpet tunnel. You will just need the pig tail to lengthen them or just make one. (IMG:style_emoticons/default/aktion035.gif)
Steve |
|
|
|
| Cevan |
Oct 6 2008, 07:21 PM
Post
#4
|
|
Senior Member Group: Members Posts: 1,079 Joined: 11-December 06 From: Western Massachusetts Member No.: 7,351 |
Very nice! I thought about making a new one, similar to yours and incorporating more storage space. Make sure you post photos of the finished product.
|
|
|
|
| turnaround89 |
Oct 6 2008, 07:42 PM
Post
#5
|
|
Senior Member Group: Members Posts: 671 Joined: 17-May 08 From: Rockford, Illinois Member No.: 9,067 Region Association: Upper MidWest |
i will probably have it done tomorrow, covered in vinyl, i bought the only two switches that AZ had so i am gonna find another AZ in town and buy it from them, i don't want mismatched switches. I was thinking of using some finishing washers on all the screws, might give it an interesting look and break up just the black vinyl. Thanks for the compliments everybody. The driver side was cut really short because of the foot room issue and gas pedal clearance. there is a little overhang on the drivers side when the console is in the car, but if i shift it over it just doens't look right, it matches up with the arm rest pad at the back really well with the overhang that when its moved over it just doesn't line up anymore. So the overhang stays and its something no one will really notice anyway, i don't want a show car just something that is fun to drive and i don't have to worry about when i park it!!
I also thought about removing the arm rest pad and putting in speakers that point upwards right there, my arm doesn't really rest there and i kind of want a couple more speakers in the car as well. The speaker enclosure would line up with the center console and look really nice, but not sure about having speakers where my passengers arms will sit!! Thanks again everybody for the compliments. Also gotta thank my grandma and grandpa(RIP papa, we miss you) for letting me use his awesome workshop and some of the extra plywood lying around the basement!! |
|
|
|
| Joe Owensby |
Oct 6 2008, 08:11 PM
Post
#6
|
|
JoeO Group: Members Posts: 527 Joined: 7-January 06 From: Spartanburg, SC Member No.: 5,385 Region Association: South East States |
Looks Great. Please share a photo when you get it covered. I was planning to do something similar, but do not know how to cover it with vinyl. Regards, JoeO
|
|
|
|
| jmill |
Oct 6 2008, 08:18 PM
Post
#7
|
|
Green Hornet Group: Members Posts: 2,449 Joined: 9-May 08 From: Racine, Wisconsin Member No.: 9,038 Region Association: Upper MidWest |
I was thinking of doing the same thing. Are you going to have the stock blower lever? If so don't forget to add the slot before you cover it.
BTW nice wood shop. I was thinking of buying a router table for my saw too. How do you like it? I wasn't sure if I wanted to do it because you have to drop the router bit everytime you cut with the saw. I figured it would be a pain to adjust the router height again. Here's mine. I still need a few more gadgets to fill the place up. Attached thumbnail(s) 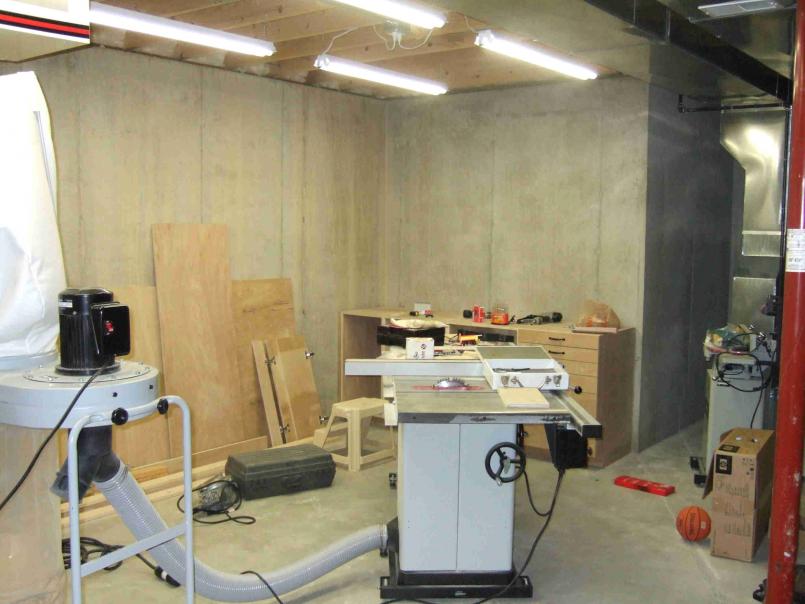
|
|
|
|
| jmill |
Oct 6 2008, 08:34 PM
Post
#8
|
|
Green Hornet Group: Members Posts: 2,449 Joined: 9-May 08 From: Racine, Wisconsin Member No.: 9,038 Region Association: Upper MidWest |
I was just thinking it might not be good to have the kill switch down low like that. You might hit it by accident with your right hand.
|
|
|
|
| Wilhelm |
Oct 6 2008, 08:40 PM
Post
#9
|
|
Member Group: Members Posts: 408 Joined: 7-September 07 From: Hooterville, OR Member No.: 8,088 Region Association: None |
Great job, but where is the cup holder?
|
|
|
|
| Dave_Darling |
Oct 6 2008, 09:00 PM
Post
#10
|
|
914 Idiot Group: Members Posts: 15,203 Joined: 9-January 03 From: Silicon Valley / Kailua-Kona Member No.: 121 Region Association: Northern California |
Wiring: You should be able to find a red/white "switched power" wire on top of the tunnel. I forget if it's a male or a female spade connector, bot you'll want to start with the opposite so you can plug into it.
Hook into that (there should be an available plug), and run a (preferably red/white) wire to a female spade connector. Crimp that wire and a second wire into that connector, and run it another 6" to 12" to another female spade connector. Similarly, chain together three female spade connectors on brown wire that will plug into the brown wire on top of the tunnel. That is have the connector for the on-top-of-tunnel connection, run a wire to one spade connector and crimp that and another brown wire into the spade. Run that to another spade, and crimp it and a third section of brown wire into the connector. Then make the final run to the third spade. (Note that you may have more grounds you need; e.g. for the switches you show.) There will be a black, I think, wire that is always "hot" which should go straight to the clock. There is the green/red wire (or was it green/black?) that runs to the oil temp gauge; just run a wire straight from its connector to the gauge. Finally, there are the illumination lights. Most will only have one terminal, which you'd hook a black/blue wire. You can chain those together similar to the way you did the ground wires above. IIRC, the connection on top of the center tunnel is to a grey wire, not a bk/bl. If there are any lights that have two terminals on them, you'll need to run a ground to the other one. No big deal, and they can go either way around. There is no separate signal wire for the voltmeter; it just measures what comes to it through the red/white wire. Run 'em neatly, cover with shrink tubing or split-loom. Or a bunch of tie-wraps if you really want the home-built look... --DD |
|
|
|
| angerosa |
Oct 6 2008, 09:07 PM
Post
#11
|
|
Member Group: Members Posts: 334 Joined: 21-August 07 From: Reston, VA Member No.: 8,023 Region Association: MidAtlantic Region |
very nice and I know wilhelm was just joking but I really would put a cup holder in there and maybe a change compartment.
|
|
|
|
| turnaround89 |
Oct 6 2008, 09:43 PM
Post
#12
|
|
Senior Member Group: Members Posts: 671 Joined: 17-May 08 From: Rockford, Illinois Member No.: 9,067 Region Association: Upper MidWest |
Cup holder in a german car, lol. it did cross my mind but the little compartment won over
jmill - The router table is great on the table saw, but i really don't use it all that much because my grandfather has a seperate router already plus two other portable routers(this workshop is LOADED for woodworking, not so much metalworking), don't know why he bought the table saw that way, but he did. I love the workshop you have, tons of space, mines a little small but as long as i don't build large items like furniture down there im good. A lot of great tools are in the shop right now, but like i said its small so things get cramped and put in corners, then you gotta move stuff out of the way to use one tool, works for me and my little projects but for larger undertakings it may not be the best. Thanks again everybody, also Dave_Darling thanks for the wiring info, should all these wires be there in a 1972, i think i might have actually found the wire harness for the gauges as well while i was looking around the garage!! Hopefully more pics will come tomorrow, i don't have class tomorrow so i should get a lot done, but covering something in vinyl takes time and patience!! Just wanted to see what it looked like in the car!! (IMG:style_emoticons/default/biggrin.gif) (IMG:http://i268.photobucket.com/albums/jj2/aheimer89/SG107756.jpg) (IMG:http://i268.photobucket.com/albums/jj2/aheimer89/SG107753.jpg) |
|
|
|
| Michael N |
Oct 6 2008, 10:13 PM
Post
#13
|
|
Certifiable Group: Members Posts: 1,432 Joined: 6-June 04 From: San Jose, Ca Member No.: 2,164 Region Association: Northern California |
Looks fantastic!!! (IMG:style_emoticons/default/smilie_pokal.gif)
|
|
|
|
| championgt1 |
Oct 6 2008, 10:22 PM
Post
#14
|
|
Don't embarrass me Filmore! Group: Members Posts: 2,681 Joined: 3-January 07 From: Tacoma, Washington Member No.: 7,420 Region Association: Pacific Northwest |
That looks real good. Nice work!
|
 |
|
| ahdoman |
Oct 6 2008, 10:23 PM
Post
#15
|
|
It's phonetic...Ah-D-O-Man (Audioman) Group: Members Posts: 667 Joined: 7-November 05 From: Santa Clarita, Ca. Member No.: 5,084 Region Association: Southern California |
Something you might consider is to face the gauge plate at a slight angle towards you. I found that trying to read the gauges in a center console while driving is a little tough. After I tilted mine a little it made a big difference.
|
|
|
|
| Dave_Darling |
Oct 7 2008, 01:40 AM
Post
#16
|
|
914 Idiot Group: Members Posts: 15,203 Joined: 9-January 03 From: Silicon Valley / Kailua-Kona Member No.: 121 Region Association: Northern California |
It's unlikely that the connectors for the console wiring would be there on top of the 1972 914's center tunnel. Worth a look, absolutely, but you may have to find wires of the appropriate kind to hook up to...
--DD |
|
|
|
| tronporsche |
Oct 7 2008, 03:29 AM
Post
#17
|
|
Member Group: Members Posts: 281 Joined: 21-August 08 From: California Member No.: 9,447 Region Association: Central California |
It looks really nice. I suggest taking it to a professional upholstery person and letting them wrap the vynl though. That is something that you want to last a long time, and if you don't have the experience, well....... Also, Have you considered a 3rd seatbelt in the middle ? I had one in mine, and it worked out great when I wanted to take both of my children out in the 914. But it won't work with speakers there !!!!!
|
|
|
|
| jmill |
Oct 7 2008, 10:15 AM
Post
#18
|
|
Green Hornet Group: Members Posts: 2,449 Joined: 9-May 08 From: Racine, Wisconsin Member No.: 9,038 Region Association: Upper MidWest |
I like it. With a good cover job folks will think its stock.
|
|
|
|
| Eric_Shea |
Oct 7 2008, 10:36 AM
Post
#19
|
|
PMB Performance Group: Admin Posts: 19,304 Joined: 3-September 03 From: Salt Lake City, UT Member No.: 1,110 Region Association: Rocky Mountains |
You do good work.
That's going to be smoking when covered. Why not a round shift lever hole? |
|
|
|
| turnaround89 |
Oct 7 2008, 10:39 AM
Post
#20
|
|
Senior Member Group: Members Posts: 671 Joined: 17-May 08 From: Rockford, Illinois Member No.: 9,067 Region Association: Upper MidWest |
Whoa tron, im only 19, i don't have any kids to put in the third seat, at least i don't think i do (IMG:style_emoticons/default/biggrin.gif) . I am just now going to get the led lights for the sides, the extra switch, and the vinyl. Hopefully this won't take to long to complete but i want it to looks good. If i do end up doing a bad job with the vinyl i will take it to an upholstery shop but i might as well give it a go since ive never done a copmlex object like this, only simple things. be back with the stuff and more pics later today. Thanks everybody.
Anyone got any ideas on how to run the shift boot over the shifter. I want to cover the square there and will use a shift boot but haven't figured how to attach it to the console. If i attach it to the top youll see the stable unless i do that first and then put vinyl over the shift boot!! (IMG:style_emoticons/default/dry.gif) the reason there isn't a round shift hole is bc i didn't have a big enough hole saw. I used the biggest one i had and the shifter would hit the console when shifted into reverse and first, pushing the whole console over, so i decided to just make the square large and now, now rubbing or pushing on the console |
|
|
|
|
1 User(s) are reading this topic (1 Guests and 0 Anonymous Users)
0 Members:

|
Lo-Fi Version | Time is now: 13th July 2025 - 08:22 PM |
Invision Power Board
v9.1.4 © 2025 IPS, Inc.