|
|
|
Porsche, and the Porsche crest are registered trademarks of Dr. Ing. h.c. F. Porsche AG.
This site is not affiliated with Porsche in any way. Its only purpose is to provide an online forum for car enthusiasts. All other trademarks are property of their respective owners. |
|
|


| Geezer914 |
 Oct 26 2009, 10:57 AM Oct 26 2009, 10:57 AM
Post
#1
|
|
Geezer914  Group: Members Posts: 1,434 Joined: 18-March 09 From: Salem, NJ Member No.: 10,179 Region Association: North East States |
Has anyone has installed a Mustang / F150 billet fuel door in the front hood to acess the gas filler cap without opening the hood? What needs to be done to get the rim to sit almost flush with the hood? If you just cut a hole is will sit a good 1/4" above the hood.
Attached image(s) 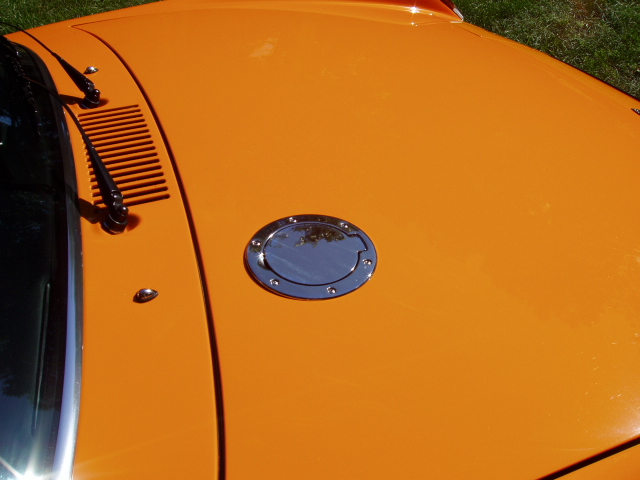
|
   |

 
|
  |
Replies(1 - 19)
| poorsche914 |
Oct 26 2009, 11:03 AM
Post
#2
|
|
T4 Supercharged Group: Members Posts: 3,091 Joined: 28-May 09 From: Smoky Mountains Member No.: 10,419 Region Association: South East States |
I am also interested in learning what might work best for a project like this.
(IMG:style_emoticons/default/popcorn[1].gif) |
 |
|
| tat2dphreak |
Oct 26 2009, 11:15 AM
Post
#3
|
|
stoya, stoya, stoya Group: Benefactors Posts: 8,797 Joined: 6-June 03 From: Wylie, TX Member No.: 792 Region Association: Southwest Region |
if you want it perfectly flush, you could cut a bigger hole in the front trunk and weld in a piece with a smaller diameter on the bottom side, maybe with a spacer too... it will look like crap if the "hood" is open, but look flush when it's closed. I personally don't think it looks bad sticking up a little like the picture, and I think it's more like 1/8"
my advice would be to get a junk hood, and get the technique down where you can do it once, correctly on your car. |
|
|
|
| tracks914 |
Oct 26 2009, 11:38 AM
Post
#4
|
|
Canadian Member Group: Benefactors Posts: 2,083 Joined: 15-January 03 From: Timmins, Ontario, Canada Member No.: 153 Region Association: None |
I was going to do that, but for the 3-4 times a year I fuel up the car, I thought I might just as well pop the hood.
|
|
|
|
| tat2dphreak |
Oct 26 2009, 11:41 AM
Post
#5
|
|
stoya, stoya, stoya Group: Benefactors Posts: 8,797 Joined: 6-June 03 From: Wylie, TX Member No.: 792 Region Association: Southwest Region |
if it turned out 1/2 as nice as iamchappy's car, it would be worth it, but without a paint job to closely follow, I don't think it would be nearly as good.
|
|
|
|
| flipb |
Oct 26 2009, 11:44 AM
Post
#6
|
|
Senior Member Group: Members Posts: 1,724 Joined: 2-September 09 From: Fairfax, VA Member No.: 10,752 Region Association: MidAtlantic Region |
I don't mean to (IMG:style_emoticons/default/hijacked.gif) , but...
My "hood" latch can be very hard to pull. Is there maintenance for the pull cable to keep it from seizing up? |
|
|
|
| iamchappy |
Oct 26 2009, 01:12 PM
Post
#7
|
|
It all happens so fast! Group: Members Posts: 4,893 Joined: 5-November 03 From: minnetonka, mn Member No.: 1,315 Region Association: Upper MidWest |
pics, mine sits up just a little bit but it has a beveled edge, i have been considering getting a aluminum finish
one and flat filing it to match the hoods contour. Attached image(s) 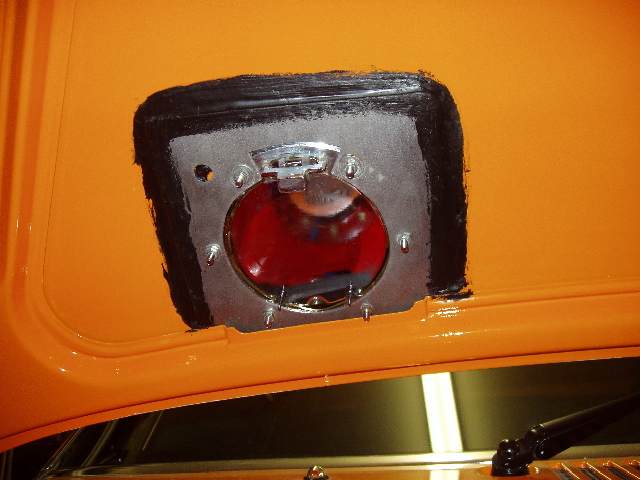 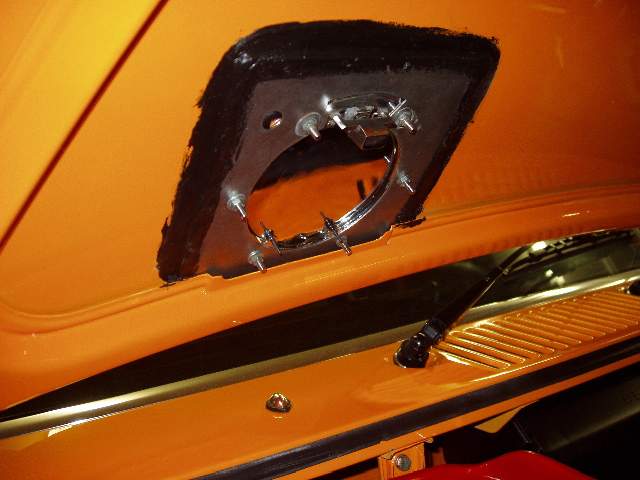 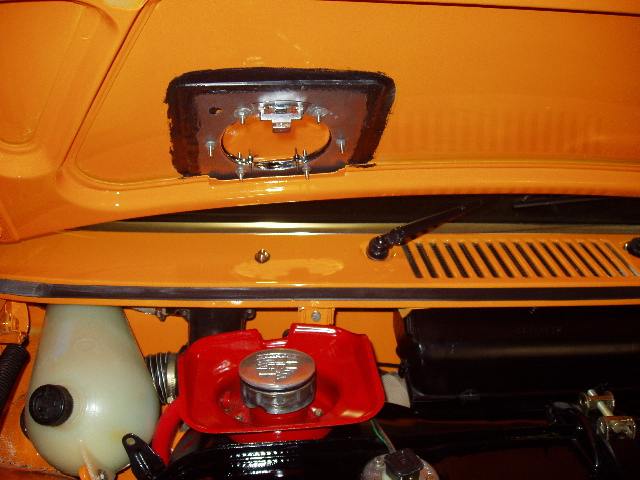 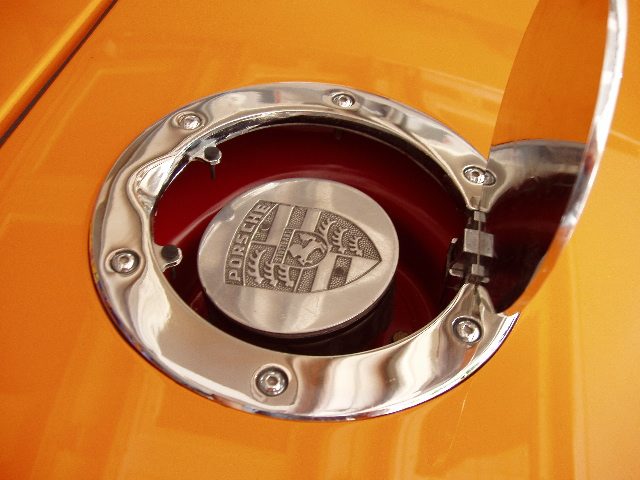
|
|
|
|
| tat2dphreak |
Oct 26 2009, 01:17 PM
Post
#8
|
|
stoya, stoya, stoya Group: Benefactors Posts: 8,797 Joined: 6-June 03 From: Wylie, TX Member No.: 792 Region Association: Southwest Region |
exactly the type of piece I was talking about chappy! yours turned out very well!
|
|
|
|
| Geezer914 |
Oct 26 2009, 01:27 PM
Post
#9
|
|
Geezer914 Group: Members Posts: 1,434 Joined: 18-March 09 From: Salem, NJ Member No.: 10,179 Region Association: North East States |
The way the installation looks, I need to cut the hole slightly smaller than the overall diameter, allowing the bevel edge to sit in the hole. This will allow the lip of the filler door to sit as low as posible to the hood. Thanks for the pictures.
|
|
|
|
| Elliot Cannon |
Oct 26 2009, 01:47 PM
Post
#10
|
|
914 Guru Group: Retired Members Posts: 8,487 Joined: 29-December 06 From: Paso Robles Ca. (Central coast) Member No.: 7,407 Region Association: None |
QUOTE(flipb @ Oct 26 2009, 10:44 AM)  I don't mean to (IMG:style_emoticons/default/hijacked.gif) , but... My "hood" latch can be very hard to pull. Is there maintenance for the pull cable to keep it from seizing up? Pull the cable out of the housing. Lube it up. Re-install cable. Works fine/lasts a long time. |
|
|
|
| steveherman |
Oct 26 2009, 04:13 PM
Post
#11
|
|
Member Group: Members Posts: 380 Joined: 12-September 09 From: Kissimmee Florida Member No.: 10,799 Region Association: South East States |
QUOTE(iamchappy @ Oct 26 2009, 03:12 PM) pics, mine sits up just a little bit but it has a beveled edge, i have been considering getting a aluminum finish one and flat filling it to match the hoods contour. i want more info on this. what parts for the actual filler neck and over flow thingy? |
|
|
|
| montoya 73 2.0 |
Oct 27 2009, 12:19 PM
Post
#12
|
|
Lack of consideration to others, and Selfish! Group: Members Posts: 1,791 Joined: 27-October 04 From: Paso Robles, Ca. Member No.: 3,016 Region Association: Central California |
Did you remove the expansion tank for another reason, or was it because of the installation of the door?
|
|
|
|
| iamchappy |
Oct 27 2009, 03:46 PM
Post
#13
|
|
It all happens so fast! Group: Members Posts: 4,893 Joined: 5-November 03 From: minnetonka, mn Member No.: 1,315 Region Association: Upper MidWest |
I just removed it for no other reason than i dont need it.
|
|
|
|
| Dr Evil |
Nov 20 2009, 01:08 PM
Post
#14
|
|
Send me your transmission! Group: Members Posts: 23,002 Joined: 21-November 03 From: Loveland, OH 45140 Member No.: 1,372 Region Association: MidAtlantic Region |
Bump...I am gonna have Scotty B imitate this on my car. Consider yourself flattered (IMG:style_emoticons/default/smile.gif)
|
|
|
|
| iamchappy |
Nov 20 2009, 01:33 PM
Post
#15
|
|
It all happens so fast! Group: Members Posts: 4,893 Joined: 5-November 03 From: minnetonka, mn Member No.: 1,315 Region Association: Upper MidWest |
After careful inspection of mine there is no hood contour even the circles i cut out of the hood are pretty darn flat, the beveled edge looks fine as is, so outside of painting the underside of the hood area, i guess I'm done.
|
|
|
|
| rick 918-S |
Nov 20 2009, 01:43 PM
Post
#16
|
|
Hey nice rack! -Celette Group: Members Posts: 20,473 Joined: 30-December 02 From: Now in Superior WI Member No.: 43 Region Association: Northstar Region |
If you end up with some rock chips and have the hood repainted I would come down and hammer a step or flange in the hood sheet metal for you. (IMG:style_emoticons/default/smash.gif) This would allow a close to flush fit. You could try a flanging tool but the step would be only about 22 GA deep.
You can hand hammer a step pretty deep if you work at it. Attached image(s) 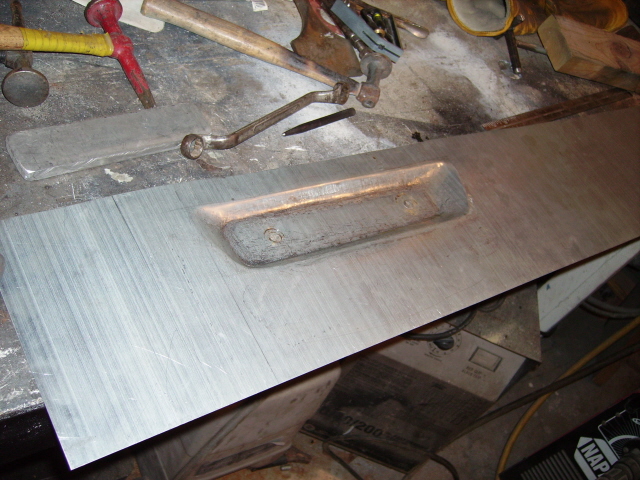
|
|
|
|
| rtalich |
Nov 20 2009, 01:57 PM
Post
#17
|
|
Member Group: Members Posts: 279 Joined: 25-September 06 From: Bellevue, WA Member No.: 6,913 Region Association: None |
QUOTE(steveherman @ Oct 26 2009, 02:13 PM) QUOTE(iamchappy @ Oct 26 2009, 03:12 PM) pics, mine sits up just a little bit but it has a beveled edge, i have been considering getting a aluminum finish one and flat filling it to match the hoods contour. i want more info on this. what parts for the actual filler neck and over flow thingy? Bumping this question... in order to get rid on the expansion tank. |
|
|
|
| Dr Evil |
Nov 20 2009, 01:59 PM
Post
#18
|
|
Send me your transmission! Group: Members Posts: 23,002 Joined: 21-November 03 From: Loveland, OH 45140 Member No.: 1,372 Region Association: MidAtlantic Region |
QUOTE(rick 918-S @ Nov 20 2009, 02:43 PM) If you end up with some rock chips and have the hood repainted I would come down and hammer a step or flange in the hood sheet metal for you. (IMG:style_emoticons/default/smash.gif) This would allow a close to flush fit. You could try a flanging tool but the step would be only about 22 GA deep. You can hand hammer a step pretty deep if you work at it. That is how I am gonna have Scotty do it. I want it flush and brushed aluminum (IMG:style_emoticons/default/smile.gif) Sexy. |
|
|
|
| Dr Evil |
Nov 20 2009, 02:14 PM
Post
#19
|
|
Send me your transmission! Group: Members Posts: 23,002 Joined: 21-November 03 From: Loveland, OH 45140 Member No.: 1,372 Region Association: MidAtlantic Region |
Hey Chap, what dia door did you use?
|
|
|
|
| iamchappy |
Nov 20 2009, 02:14 PM
Post
#20
|
|
It all happens so fast! Group: Members Posts: 4,893 Joined: 5-November 03 From: minnetonka, mn Member No.: 1,315 Region Association: Upper MidWest |
QUOTE(rtalich @ Nov 20 2009, 01:57 PM) QUOTE(steveherman @ Oct 26 2009, 02:13 PM) QUOTE(iamchappy @ Oct 26 2009, 03:12 PM) pics, mine sits up just a little bit but it has a beveled edge, i have been considering getting a aluminum finish one and flat filling it to match the hoods contour. i want more info on this. what parts for the actual filler neck and over flow thingy? Bumping this question... in order to get rid on the expansion tank. Just remove it, all the filler stuff is separate from it. i still ran a vapor line back to my air intake otherwise fumes seem to migrate into the interior. Attached image(s)  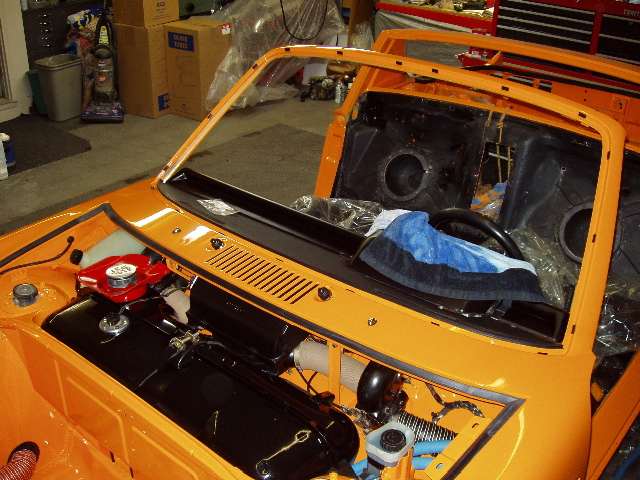
|
|
|
|
|
1 User(s) are reading this topic (1 Guests and 0 Anonymous Users)
0 Members:

|
Lo-Fi Version | Time is now: 2nd June 2024 - 04:53 PM |
Invision Power Board
v9.1.4 © 2024 IPS, Inc.