|
|
|
Porsche, and the Porsche crest are registered trademarks of Dr. Ing. h.c. F. Porsche AG.
This site is not affiliated with Porsche in any way. Its only purpose is to provide an online forum for car enthusiasts. All other trademarks are property of their respective owners. |
|
|


| swood |
 Nov 29 2009, 06:36 PM Nov 29 2009, 06:36 PM
Post
#1
|
|
Senior Member  Group: Members Posts: 1,839 Joined: 6-February 03 From: Strong Beach Member No.: 251 Region Association: None |
Just realized I was adding project info to a WTB add....so moving it to the garage.
It hit me today that since I'm using L-Jet heads, I need to add venting for the crankcase. Is the best method to drill and tap for a threaded insert? I've been reviewing breather boxes too. Not sure which I want. I'll be using cabin heat so if the breather puts out fumes, I'm putting it into the trunk. For the breather set up, I may need an early oil filler unit with the port on it. Anyone have one handy? I have the '75 LJet unit, can I modify this to work? Or can I use the larger diameter port that is t'd off the filler neck? Since I'll have to have this machining done, anything else I should do, like relocating the spark plug hole? Is that really a significant upgrade? The valves were re-done, 42x36. Got Weber 40's coming, 71mm crank/rods, Webcam 86b. Need to swap out the KB pistons with ones for the correct wrist pin ht. Also going to install 8mm rocker studs. maybe longer oil pump studs for the 30mm Shadek. Need to get the crank polished and rotating assembly balanced. I think in my spare '74 motor lies a fan with all the blades. Need to pull that out too. I will definitely need to get some of the wiring issues sorted out going from LJet FI to carbs. Feel like this is starting to come together... smile.gif |
   |

 
|
  |
Replies(1 - 19)
| r_towle |
Nov 29 2009, 07:18 PM
Post
#2
|
|
Custom Member Group: Members Posts: 24,705 Joined: 9-January 03 From: Taxachusetts Member No.: 124 Region Association: North East States |
Heads,
Drill and tap them for a breather fitting. Choose a 3/8 with an NPT pipe thread on the other side. Get them, give them to the machinist with the heads. They are available at any decent hardware store. Barb on one side, NPT threads on the other. The boss is on all heads...rear on passenger side, front on drivers side...so its basically in the same spot looking at the head...left side. For the oil filler, have you machinist install a similar fitting by drilling out the filler box. For the breather box, spend the extra money and get Chris Foley (tangerine racing) setup. It has a simple ability to vent the fumes via a hose to anywhere you choose. Rich |
|
|
|
| swood |
Nov 29 2009, 07:29 PM
Post
#3
|
|
Senior Member Group: Members Posts: 1,839 Joined: 6-February 03 From: Strong Beach Member No.: 251 Region Association: None |
OK, cool. sounds straight forward enough. How does the fitting get permanently connected to the oil filler box?
I've seen the CF unit. would you mount it to the engine compartment and run the vent elsewhere? like back of the rear engine wall? I haven't seen anyone do that yet. |
|
|
|
| r_towle |
Nov 29 2009, 07:34 PM
Post
#4
|
|
Custom Member Group: Members Posts: 24,705 Joined: 9-January 03 From: Taxachusetts Member No.: 124 Region Association: North East States |
fitting gets mounted the same as the pcv valve...a nut.
I would mount the breather in the engine bay, on the front firewall as high as you can, yet still be able to close the deck lid. You need the breather box higher than the heads ....the higher the better. Any oil buildup that is liquid drains back to the crankcase. Front firewall is easy and a decent height. Run a hose to vent the gases...could be under the wing piece next to the grill of the deck lid.. Rich |
|
|
|
| Gint |
Nov 29 2009, 08:00 PM
Post
#5
|
|
Mike Ginter Group: Admin Posts: 16,098 Joined: 26-December 02 From: Denver CO. Member No.: 20 Region Association: Rocky Mountains |
If you can drill straight enough, you don't have to tap. I couldn't drill straight either, but I didn't tap. I ended up with the tiniest bit of play. So I used JB weld around the tubes before I stuck 'em in and then formed a little bead around the tube at the top of the head. Worked great.
|
|
|
|
| swood |
Nov 29 2009, 08:12 PM
Post
#6
|
|
Senior Member Group: Members Posts: 1,839 Joined: 6-February 03 From: Strong Beach Member No.: 251 Region Association: None |
Do I need to add a pcv valve?
|
|
|
|
| ChrisFoley |
Nov 29 2009, 08:39 PM
Post
#7
|
|
I am Tangerine Racing Group: Members Posts: 7,990 Joined: 29-January 03 From: Bolton, CT Member No.: 209 Region Association: None |
QUOTE(swood @ Nov 29 2009, 09:12 PM)  Do I need to add a pcv valve? No. I'm pretty sure the hose I provide fits snugly inside the big side fitting on the l-jet filler neck. I also include a smaller diameter hose and fittings for a separate drain back line, so the outgoing crankcase vapors and returning oil don't have to share the same hose. |
|
|
|
| swood |
Nov 29 2009, 09:14 PM
Post
#8
|
|
Senior Member Group: Members Posts: 1,839 Joined: 6-February 03 From: Strong Beach Member No.: 251 Region Association: None |
Chris, it looks like the inlet is about 3/4" I.D. Kinda out of round at the moment, so that's give or take 1/16"
|
|
|
|
| swood |
Nov 29 2009, 09:26 PM
Post
#9
|
|
Senior Member Group: Members Posts: 1,839 Joined: 6-February 03 From: Strong Beach Member No.: 251 Region Association: None |
|
|
|
|
| jd74914 |
Nov 29 2009, 09:37 PM
Post
#10
|
|
Its alive Group: Members Posts: 4,852 Joined: 16-February 04 From: CT Member No.: 1,659 Region Association: North East States |
QUOTE(swood @ Nov 29 2009, 10:26 PM) Those are the correct style connections, but I would personally use brass ones. In the case that they ever have to be removed, brass won't gall and will come out much more easily. You can get them at Home Depot or other places to save on shipping. (IMG:style_emoticons/default/smile.gif) |
|
|
|
| swood |
Nov 29 2009, 09:44 PM
Post
#11
|
|
Senior Member Group: Members Posts: 1,839 Joined: 6-February 03 From: Strong Beach Member No.: 251 Region Association: None |
|
|
|
|
| ChrisFoley |
Dec 12 2009, 02:51 AM
Post
#12
|
|
I am Tangerine Racing Group: Members Posts: 7,990 Joined: 29-January 03 From: Bolton, CT Member No.: 209 Region Association: None |
QUOTE(swood @ Nov 29 2009, 07:36 PM) I need to add venting for the crankcase. Is the best method to drill and tap for a threaded insert? Here's a tip for when you are drilling for a head vent. Make an aluminum shield to protect the valve spring, and cover the pushrod tubes with paper towels to keep debris from getting into the engine. Attached image(s) 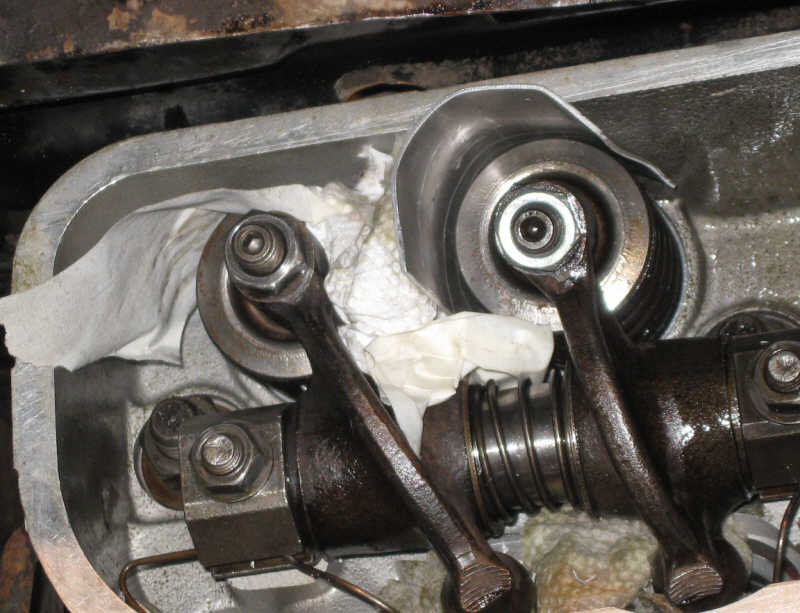 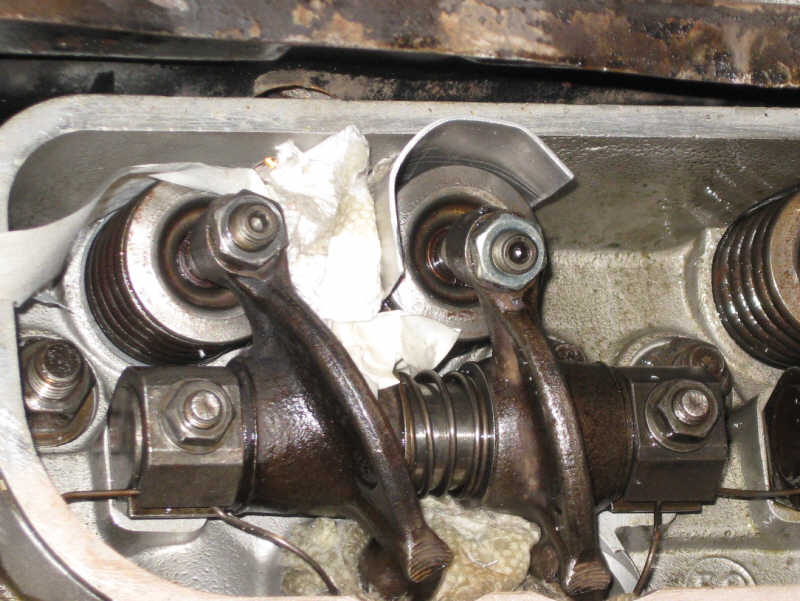
|
|
|
|
| swood |
Dec 12 2009, 01:27 PM
Post
#13
|
|
Senior Member Group: Members Posts: 1,839 Joined: 6-February 03 From: Strong Beach Member No.: 251 Region Association: None |
I'm pullin the heads to change out the rocker studs to 8mm ones. So I'll be able to keep it clean. But I will protect the springs.
Got a pic of the tube welded in there? Since the 75 head has no provisions (boss) to drill, any reason why it should be set at a perpendicular to the head or at a slight angle? (IMG:style_emoticons/default/smash.gif) |
|
|
|
| swood |
Dec 12 2009, 05:18 PM
Post
#14
|
|
Senior Member Group: Members Posts: 1,839 Joined: 6-February 03 From: Strong Beach Member No.: 251 Region Association: None |
X marks the spot? Definitely at an angle away from the intake. Ready to rock'n rolla...
Attached image(s) 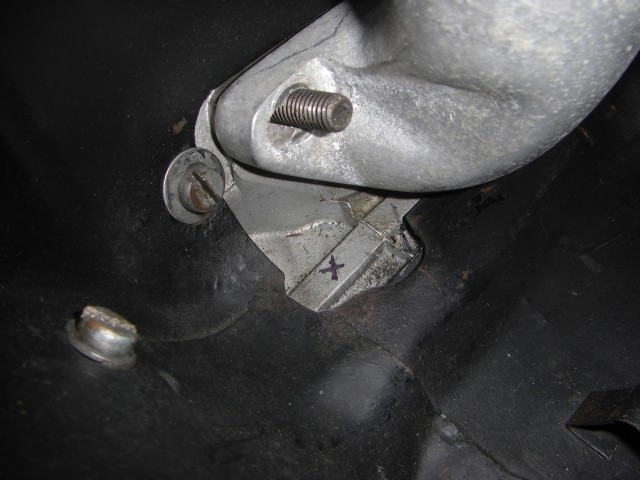
|
|
|
|
| ChrisFoley |
Dec 12 2009, 07:13 PM
Post
#15
|
|
I am Tangerine Racing Group: Members Posts: 7,990 Joined: 29-January 03 From: Bolton, CT Member No.: 209 Region Association: None |
AFAIK all the 914 heads had the boss for the tube. That looks like the 2L bus heads that are on my engine. The only reason I didn't post a pic of mine is that it isn't a 914 head, lol.
You have the right spot. We used about a 60 degree angle and kept the tube longer than stock so it was easier to attach the hose. The only problem with that head is the aluminum is a little thinner without the boss so use plenty of JB Weld. You will also need to start with a small drill and work up to the 1/2" gradually. Also, start the drill near vertical and once you have it started, change the angle to what you want. It will be tough to keep it in the exact spot so maybe start a little further to the left than you want to end up. |
|
|
|
| swood |
Dec 18 2009, 10:08 AM
Post
#16
|
|
Senior Member Group: Members Posts: 1,839 Joined: 6-February 03 From: Strong Beach Member No.: 251 Region Association: None |
Ok, so now I'm looking for a fuel pressure regulator. I'd like to use the fuel return set up, since I have CF's nice fuel lines.
I'd like to get a recommendation on which model to pick up. I was looking at the Mallory 4309 for about $90 + accessories. What do you guys think? |
|
|
|
| swood |
Jan 2 2010, 07:30 PM
Post
#17
|
|
Senior Member Group: Members Posts: 1,839 Joined: 6-February 03 From: Strong Beach Member No.: 251 Region Association: None |
That was easy. (IMG:style_emoticons/default/sawzall-smiley.gif)
Attached image(s) 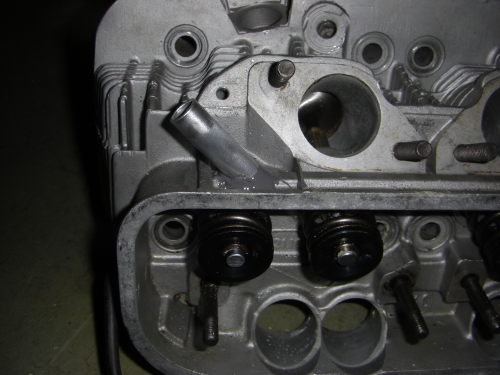
|
|
|
|
| Mike Bellis |
Jan 2 2010, 08:28 PM
Post
#18
|
|
Resident Electrician Group: Members Posts: 8,347 Joined: 22-June 09 From: Midlothian TX Member No.: 10,496 Region Association: None |
I use Aeromotive 13301, adjustable from 3-20 psi around the same price.
Attached image(s) 
|
|
|
|
| swood |
Jan 2 2010, 10:50 PM
Post
#19
|
|
Senior Member Group: Members Posts: 1,839 Joined: 6-February 03 From: Strong Beach Member No.: 251 Region Association: None |
QUOTE(kg6dxn @ Jan 2 2010, 06:28 PM) I use Aeromotive 13301, adjustable from 3-20 psi around the same price. Thanks. Looks like Summit has it, but it's about $30 more than the Mallory. |
|
|
|
| KaptKaos |
Jan 2 2010, 10:57 PM
Post
#20
|
|
Family Group: Members Posts: 4,009 Joined: 23-April 03 From: Near Wausau Member No.: 607 Region Association: Upper MidWest |
|
|
|
|
|
1 User(s) are reading this topic (1 Guests and 0 Anonymous Users)
0 Members:

|
Lo-Fi Version | Time is now: 12th July 2025 - 11:10 AM |
Invision Power Board
v9.1.4 © 2025 IPS, Inc.