|
|
|
Porsche, and the Porsche crest are registered trademarks of Dr. Ing. h.c. F. Porsche AG.
This site is not affiliated with Porsche in any way. Its only purpose is to provide an online forum for car enthusiasts. All other trademarks are property of their respective owners. |
|
|


| pktzygt |
 Oct 28 2010, 08:55 AM Oct 28 2010, 08:55 AM
Post
#1
|
|
Member  Group: Members Posts: 328 Joined: 20-March 07 From: Chesapeake, VA Member No.: 7,611 Region Association: MidAtlantic Region |
I will be replacing my inner suspension console and was hoping to get some tips on making a jig to get it back in the correct position. I will be installing the tangerine reinforcements so this does not happen again.
I will be tacking it in myself and plan on hiring a professional welder to come to the house and finishing it off. I'm new to welding and I don't think I should trust myself with such a critical weld. So, does anyone know of any threads that I have missed that detail a jig. Or any tips on doing it. I have been having a hard time finding the measurements that are supposedly on Pelican. |
   |

 
|
  |
Replies(1 - 13)
| pktzygt |
Oct 28 2010, 09:33 AM
Post
#2
|
|
Member Group: Members Posts: 328 Joined: 20-March 07 From: Chesapeake, VA Member No.: 7,611 Region Association: MidAtlantic Region |
Well, now I find the good threads.
Who thinks I should try to weld it myself. |
|
|
|
| ChrisFoley |
Oct 28 2010, 10:12 AM
Post
#3
|
|
I am Tangerine Racing Group: Members Posts: 7,934 Joined: 29-January 03 From: Bolton, CT Member No.: 209 Region Association: None |
QUOTE(pktzygt @ Oct 28 2010, 11:33 AM)  Well, now I find the good threads. Who thinks I should try to weld it myself. If you do some practice welds on similar materials you should be fine. Use the old console that you cut off as material for practicing. (IMG:style_emoticons/default/welder.gif) |
|
|
|
| PeeGreen 914 |
Oct 28 2010, 10:51 AM
Post
#4
|
|
Just when you think you're done...wait, there is more..lol Group: Members Posts: 10,219 Joined: 21-September 06 From: Seattle, WA... actually Everett Member No.: 6,884 Region Association: Pacific Northwest |
(IMG:style_emoticons/default/beerchug.gif) As I read the title I was thinking you should talk to Chris. And here he is posting already (IMG:style_emoticons/default/aktion035.gif)
|
|
|
|
| pktzygt |
Oct 28 2010, 11:43 AM
Post
#5
|
|
Member Group: Members Posts: 328 Joined: 20-March 07 From: Chesapeake, VA Member No.: 7,611 Region Association: MidAtlantic Region |
QUOTE(Racer Chris @ Oct 28 2010, 12:12 PM) QUOTE(pktzygt @ Oct 28 2010, 11:33 AM) Well, now I find the good threads. Who thinks I should try to weld it myself. If you do some practice welds on similar materials you should be fine. Use the old console that you cut off as material for practicing. (IMG:style_emoticons/default/welder.gif) Thanks Chris, Maybe I'll practice on the old one, then install the reinforcement piece I got from you on the other side. Then I'll see how the new one goes. And they say it's hard to beak things autocrossing!!! At least I did well before putting a few degrees of camber on the rear wheel. |
|
|
|
| smontanaro |
Oct 28 2010, 12:14 PM
Post
#6
|
|
Senior Member Group: Members Posts: 1,190 Joined: 3-June 05 From: Evanston, IL Member No.: 4,197 Region Association: Upper MidWest |
QUOTE(pktzygt @ Oct 28 2010, 10:33 AM) Well, now I find the good threads. What good threads? Aren't they all good threads? My, that's a nice suit you have on... (IMG:style_emoticons/default/wink.gif) |
|
|
|
| pktzygt |
Oct 28 2010, 06:11 PM
Post
#7
|
|
Member Group: Members Posts: 328 Joined: 20-March 07 From: Chesapeake, VA Member No.: 7,611 Region Association: MidAtlantic Region |
QUOTE(smontanaro @ Oct 28 2010, 02:14 PM) QUOTE(pktzygt @ Oct 28 2010, 10:33 AM) Well, now I find the good threads. What good threads? Aren't they all good threads? My, that's a nice suit you have on... (IMG:style_emoticons/default/wink.gif) I found some good threads that are older. Just enough info to make me less nervous about it. I'm finally making progress on this thing. There were a bunch of small things that needed to be done that were overwhelming me and now I'm knocking them out quickly. Feels good! |
|
|
|
| Jeff Hail |
Oct 28 2010, 08:11 PM
Post
#8
|
|
Senior Member Group: Members Posts: 1,141 Joined: 3-May 07 From: LA/ CA Member No.: 7,712 |
Hi
Attached thumbnail(s) 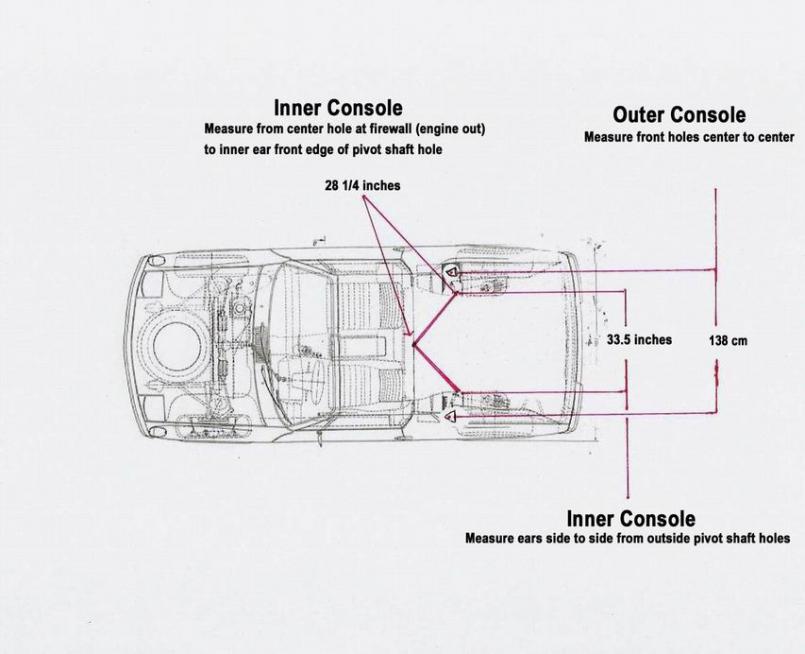
|
|
|
|
| pktzygt |
Oct 29 2010, 07:19 AM
Post
#9
|
|
Member Group: Members Posts: 328 Joined: 20-March 07 From: Chesapeake, VA Member No.: 7,611 Region Association: MidAtlantic Region |
Wow, I hadn't found that one yet.
Thank you much. |
|
|
|
| majkos |
Oct 29 2010, 08:07 AM
Post
#10
|
|
Senior Member Group: Members Posts: 1,370 Joined: 29-February 04 From: Mile High 914 Member No.: 1,729 Region Association: Rocky Mountains |
QUOTE(pktzygt @ Oct 29 2010, 05:19 AM) Wow, I hadn't found that one yet. Thank you much. INDEED! nice bit of info for future 914 repair/restore! Hey Sean, it should be easy for you to tack in everything, BTDT but with a crappy 110 arc crappeir than MacGyver welder. (IMG:style_emoticons/default/welder.gif) (IMG:style_emoticons/default/av-943.gif) (IMG:style_emoticons/default/av-943.gif) Good move on having somebody finish the welding. No way I can do the nice welds (still can't) |
|
|
|
| ChrisFoley |
Oct 29 2010, 08:20 AM
Post
#11
|
|
I am Tangerine Racing Group: Members Posts: 7,934 Joined: 29-January 03 From: Bolton, CT Member No.: 209 Region Association: None |
We just did a repair on a 3L track car with a replacement inner console.
The top front corner of the new console cracked because of the way it was welded in place. The welds were all on the edge of the flanges of the new console and in one area there was no penetration. We always punch holes in the flanges and make plug welds at 1" (or so) intervals, as the edge of the flange isn't a suitable location for the welds. |
|
|
|
| ChrisFoley |
Oct 29 2010, 08:48 AM
Post
#12
|
|
I am Tangerine Racing Group: Members Posts: 7,934 Joined: 29-January 03 From: Bolton, CT Member No.: 209 Region Association: None |
This is a pic of the crack that turned out to be the tip of an iceberg.
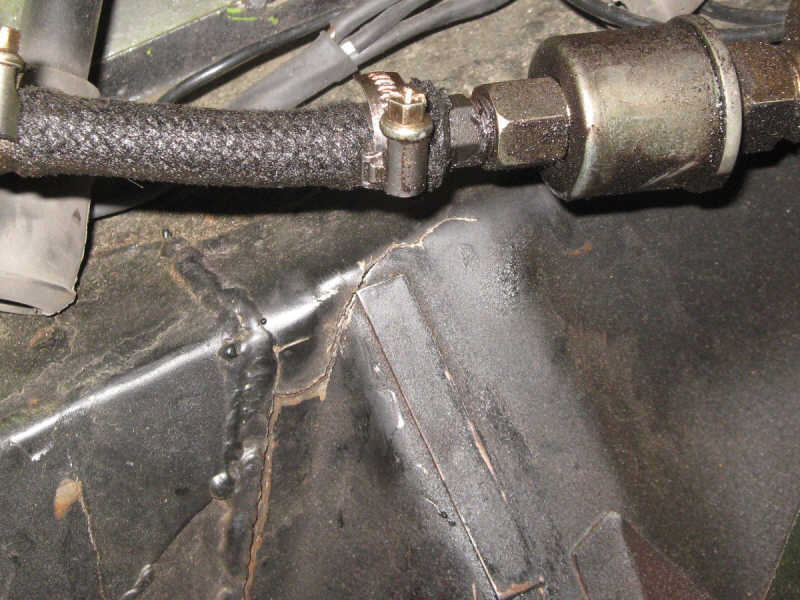 We cut the frame open and removed the bottom of the outer console during the repair as well. 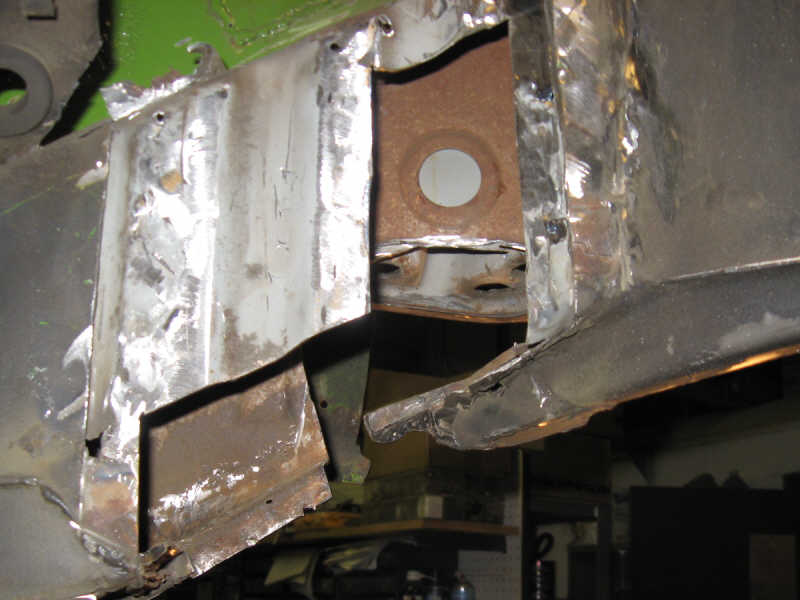 In my experience, the replacement console fits well in only one spot on the longitudinal. With Jeff's diagram it should be easy to position correctly without needing a fixture. |
|
|
|
| McMark |
Oct 29 2010, 12:26 PM
Post
#13
|
|
914 Freak! Group: Retired Admin Posts: 20,179 Joined: 13-March 03 From: Grand Rapids, MI Member No.: 419 Region Association: None |
QUOTE In my experience, the replacement console fits well in only one spot on the longitudinal. With Jeff's diagram it should be easy to position correctly without needing a fixture. (IMG:style_emoticons/default/agree.gif) Same here. |
|
|
|
| pktzygt |
Oct 29 2010, 06:25 PM
Post
#14
|
|
Member Group: Members Posts: 328 Joined: 20-March 07 From: Chesapeake, VA Member No.: 7,611 Region Association: MidAtlantic Region |
That crack is pretty bad, mine is a bit above the hole on the ear and goes forward and turns the corner a bit.
I'm hopeful that I won't find anything ugly underneath because I have about $5000 in receipts from the previous owner in rust repair, and no mention of a inner console. It is a camp914 car and everything that I was told by Craig has been spot on. I haven't found rust no matter how hard I poke with a screwdriver or tap with a mallet. Besides, I broke it autocrossing on 7" summer tires with a big motor. |
|
|
|
|
1 User(s) are reading this topic (1 Guests and 0 Anonymous Users)
0 Members:

|
Lo-Fi Version | Time is now: 31st May 2024 - 10:10 PM |
Invision Power Board
v9.1.4 © 2024 IPS, Inc.