|
|
|
Porsche, and the Porsche crest are registered trademarks of Dr. Ing. h.c. F. Porsche AG.
This site is not affiliated with Porsche in any way. Its only purpose is to provide an online forum for car enthusiasts. All other trademarks are property of their respective owners. |
|
|


| turk22 |
 Sep 2 2012, 05:20 PM Sep 2 2012, 05:20 PM
Post
#1
|
|
Treetop Flyer  Group: Members Posts: 735 Joined: 27-July 12 From: Cincinnati OH Member No.: 14,725 Region Association: Upper MidWest |
All,
I am ready to address some surface rust in my trunk. In looking thru a variety of threads on the subject I have a couple of questions. First the problem area: 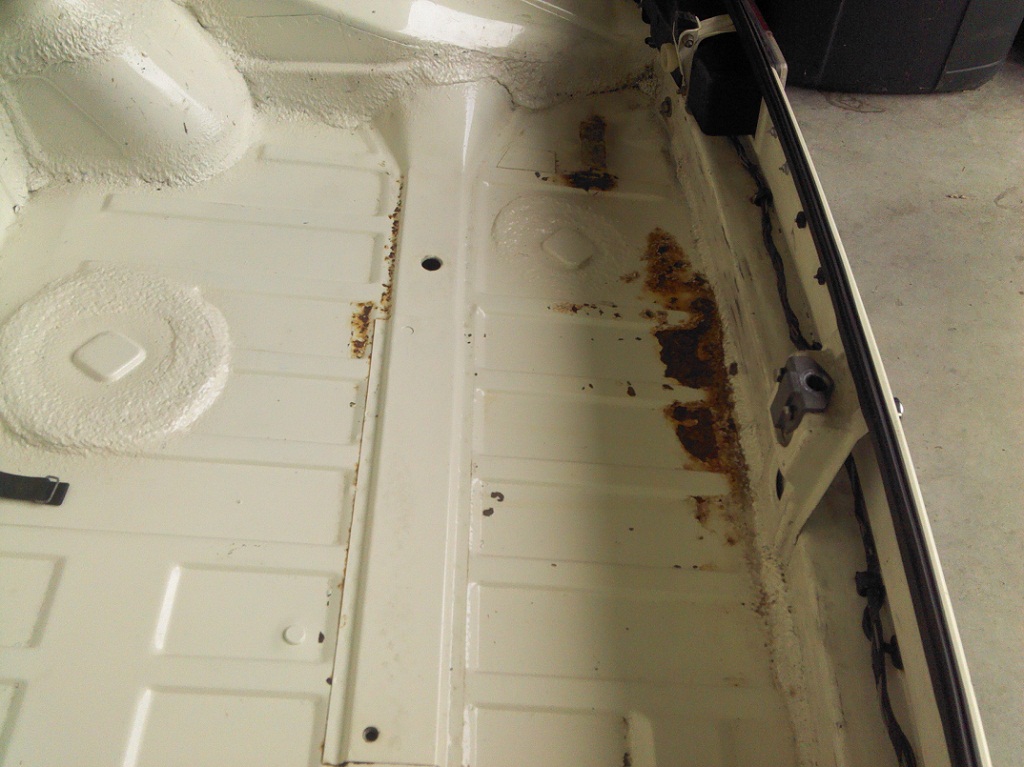 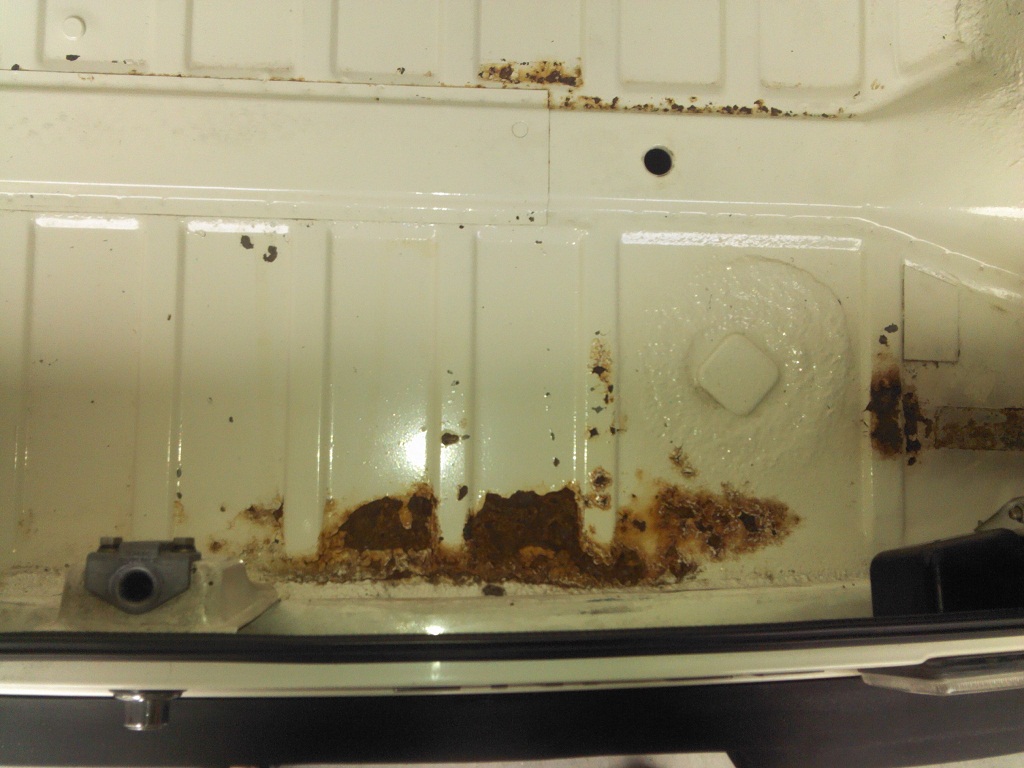 These are some of the tools I have, various brushes (steel/stainless steel/brass), Wire Wheel, Sanding disks, and air tool. 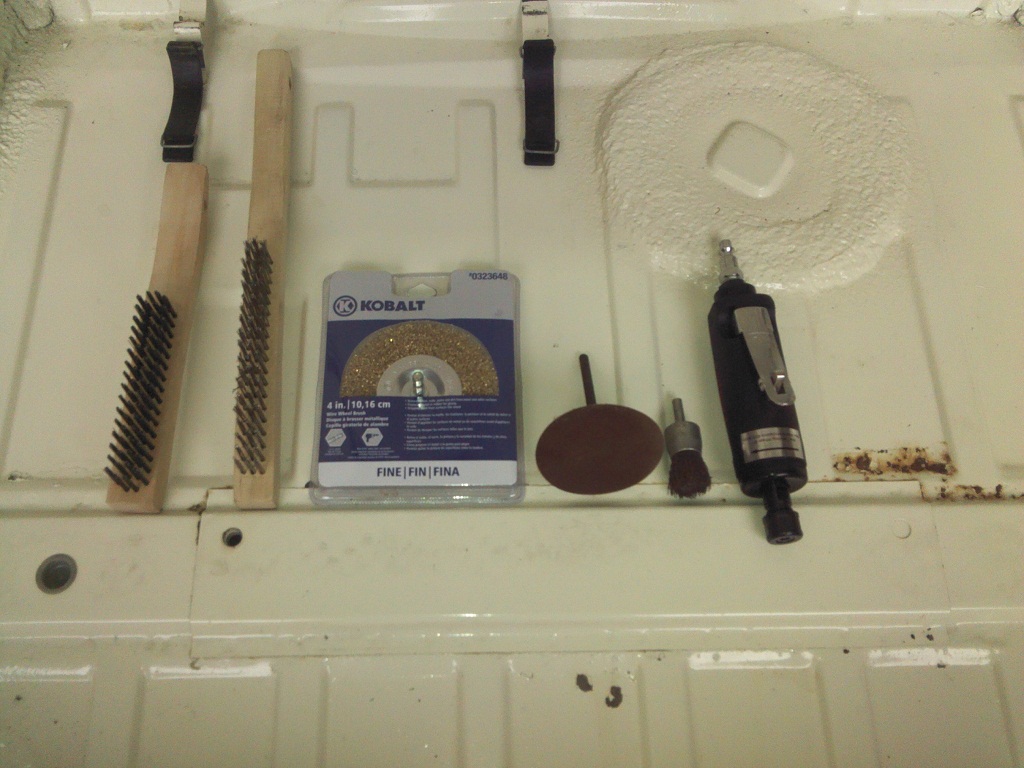 And from APS Tower Paint, two rattle cans, one of 1K Etching Primer, and one of 1K L80E Custom mixed paint: 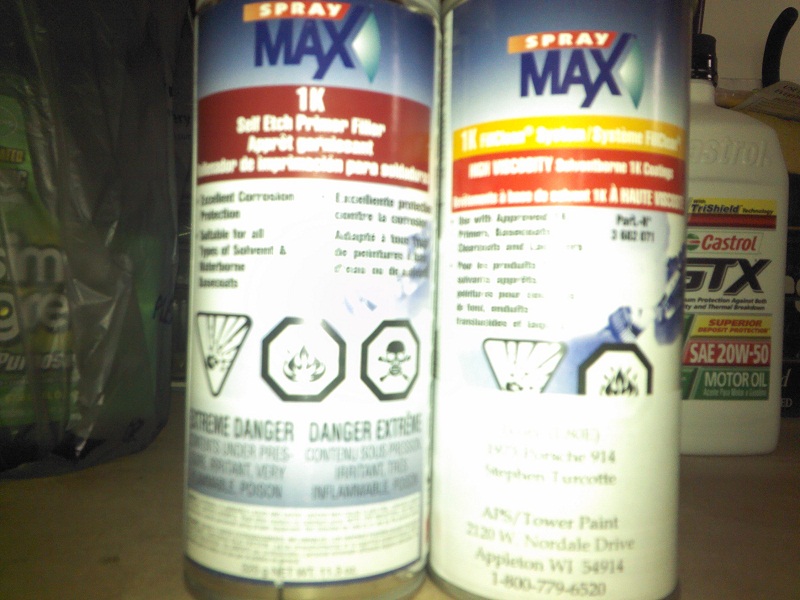 My goal is a short term rust abatement, prior to a more full scale respray in the coming years. I belive I have to: -use the brushes and wire wheels to remove all the rust scale and paint from the area(s) I need to address (feather the edges to blend in with the good paint?) -clean up the area.. What to use prior to laying down the primer, just denatured alcohol, or some more specific product for pre-paint. -lay down a couple coats of the etching primer (how many coats?) , (How long to wait before color, 24hours?). - lay down a couple of coats of the color (how many coats?) - not sure after that what I need to do to blend or buff the painted surfaces with the original paint. If I'm missing any important steps, please let me know. thx, Turk |
   |

 
|
  |
Replies(1 - 19)
| silver74insocal |
Sep 2 2012, 05:27 PM
Post
#2
|
|
Senior Member Group: Members Posts: 736 Joined: 26-November 09 From: rancho cucamonga Member No.: 11,073 Region Association: Southern California |
|
|
|
|
| carr914 |
Sep 2 2012, 05:53 PM
Post
#3
|
|
Racer from Birth Group: Members Posts: 126,105 Joined: 2-February 04 From: Tampa,FL Member No.: 1,623 Region Association: South East States |
Looks like the Rust at the Back will go all the way though after you start
|
|
|
|
| Katmanken |
Sep 2 2012, 06:19 PM
Post
#4
|
|
You haven't seen me if anybody asks... Group: Members Posts: 4,738 Joined: 14-June 03 From: USA Member No.: 819 Region Association: Upper MidWest |
The brushes will knock the tops off the rust cells and leave the deep conical pits of the rust cells still active in the metal. You need some ospho or another acidic rust neutralizer to both etch some of the rust out of the pits, and to neutralize it to a blackened neutral state. If you don't, it's coming back real soon.
And I agree that the rust is probably deeper than you realize. |
|
|
|
| euro911 |
Sep 2 2012, 06:20 PM
Post
#5
|
|
Retired & living the dream. God help me if I wake up! Group: Members Posts: 8,911 Joined: 2-December 06 From: So.Cal. & No.AZ (USA) Member No.: 7,300 Region Association: Southern California |
Someone was selling replacement panels for $75. a short while back. Try searching the classified ads to see if he still has any left (IMG:style_emoticons/default/confused24.gif)
|
|
|
|
| euro911 |
Sep 2 2012, 06:41 PM
Post
#6
|
|
Retired & living the dream. God help me if I wake up! Group: Members Posts: 8,911 Joined: 2-December 06 From: So.Cal. & No.AZ (USA) Member No.: 7,300 Region Association: Southern California |
|
|
|
|
| turk22 |
Sep 2 2012, 06:52 PM
Post
#7
|
|
Treetop Flyer Group: Members Posts: 735 Joined: 27-July 12 From: Cincinnati OH Member No.: 14,725 Region Association: Upper MidWest |
Thanks guys,
It sounds like I'm in for an unpleasent surprise... I don't think I'm ready for panel replacement at this point, but if it that has to happen in the future, I'm certainly willing to do that. In the short term, can I clean it up as well as possible and then try neutralize and maybe encapsulate? I've been reading mixed opinions about Por15, so I'm not sure what may be the best option. I'm missing one of the plastic plug's in my trunk rail.. I haven't seen them for sale, but I'm hoping to find a replacement: 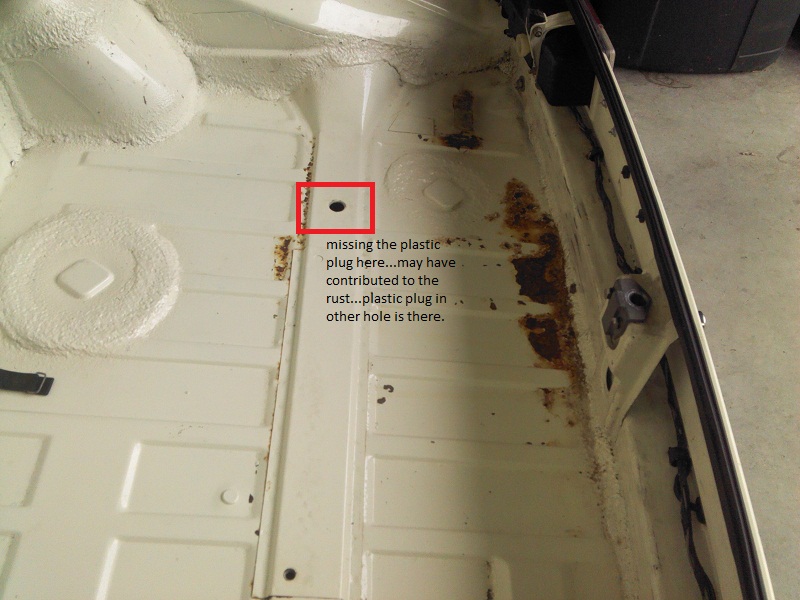 |
|
|
|
| turk22 |
Sep 2 2012, 06:55 PM
Post
#8
|
|
Treetop Flyer Group: Members Posts: 735 Joined: 27-July 12 From: Cincinnati OH Member No.: 14,725 Region Association: Upper MidWest |
QUOTE(euro911 @ Sep 2 2012, 08:41 PM)  Mark, every time I see your avatar, I expect to see you say "Boy, you going about it the wrong way, let me show you how its done!" |
|
|
|
| tod914 |
Sep 2 2012, 07:12 PM
Post
#9
|
|
Advanced Member Group: Members Posts: 3,755 Joined: 19-January 03 From: Lincoln Park, NJ Member No.: 170 |
Maybe remove the seam sealer and have that rear most area sand/media blasted. Then you'll have a better idea on what's going on. Overall the paint looks real nice in the trunk. Another area where water gets in is where the outer seal meets the rear engine lid/trunk area seal. If it's missing dum dum by the wiring harness and other side, water will get in. If you plan on driving it in the rain after it's fixed, keep the foam pad out. Good luck with your fix. Nice car!
|
|
|
|
| euro911 |
Sep 2 2012, 07:31 PM
Post
#10
|
|
Retired & living the dream. God help me if I wake up! Group: Members Posts: 8,911 Joined: 2-December 06 From: So.Cal. & No.AZ (USA) Member No.: 7,300 Region Association: Southern California |
(IMG:style_emoticons/default/laugh.gif) ... I say, I say (IMG:style_emoticons/default/laugh.gif) , boy ...
(IMG:style_emoticons/default/poke.gif) |
|
|
|
| rick 918-S |
Sep 2 2012, 11:02 PM
Post
#11
|
|
Hey nice rack! -Celette Group: Members Posts: 21,014 Joined: 30-December 02 From: Now in Superior WI Member No.: 43 Region Association: Northstar Region |
Do you have a sand blaster? You can take duct tape and heavy plastic and mask off the trunk, insert the sand blaster in the plastic and blast the rust without making a mess all over the shop and car. You don't even need a hood over your head to do it. When your done, unmask the area and vac up the sand. Then use your metal conditioner per the instrucitons of the product label before priming and painting.
|
|
|
|
| rjames |
Sep 3 2012, 01:12 PM
Post
#12
|
|
I'm made of metal Group: Members Posts: 4,315 Joined: 24-July 05 From: Shoreline, WA Member No.: 4,467 Region Association: Pacific Northwest |
3m makes a great paint stripping wheel that will take you down to bare metal quickly. Do the surrounding area to make sure you get it all. I like them better than the wire wheels. Once you've done that you can assess if you'll need to weld in small patch(es) that you can fab yourself, or find a repro or used piece if the area is big enough to warrant it.
Clean up the metal, treat it with ospho, weld, prime and paint. Check yer longs, too. (IMG:style_emoticons/default/smile.gif) |
 |
|
| rohar |
Sep 3 2012, 01:43 PM
Post
#13
|
|
Senior Member Group: Members Posts: 924 Joined: 25-October 08 From: spokane Member No.: 9,685 Region Association: None |
QUOTE(rick 918-S @ Sep 2 2012, 10:02 PM) Do you have a sand blaster? You can take duct tape and heavy plastic and mask off the trunk, insert the sand blaster in the plastic and blast the rust without making a mess all over the shop and car. You don't even need a hood over your head to do it. When your done, unmask the area and vac up the sand. Then use your metal conditioner per the instrucitons of the product label before priming and painting. I so agree. Even a cheezeball HF blaster (not the spot blaster, the 5 gallon tank type) is light years better than all the sanding/grinding/chemicals in the world. By your 5th job, you've spent that much on disks alone. |
|
|
|
| turk22 |
Sep 3 2012, 05:15 PM
Post
#14
|
|
Treetop Flyer Group: Members Posts: 735 Joined: 27-July 12 From: Cincinnati OH Member No.: 14,725 Region Association: Upper MidWest |
QUOTE(rohar @ Sep 3 2012, 03:43 PM) QUOTE(rick 918-S @ Sep 2 2012, 10:02 PM) Do you have a sand blaster? You can take duct tape and heavy plastic and mask off the trunk, insert the sand blaster in the plastic and blast the rust without making a mess all over the shop and car. You don't even need a hood over your head to do it. When your done, unmask the area and vac up the sand. Then use your metal conditioner per the instrucitons of the product label before priming and painting. I so agree. Even a cheezeball HF blaster (not the spot blaster, the 5 gallon tank type) is light years better than all the sanding/grinding/chemicals in the world. By your 5th job, you've spent that much on disks alone. Yea, I spent some time looking at them today, may have to run over to HF, and see what they look like. My issue is space... Not sure my wife is down with my idea about adding a third bay to the garage... (IMG:style_emoticons/default/hands.gif) (Maybe I can start with a carport, and then just 'finish it'...) |
|
|
|
| turk22 |
Sep 3 2012, 05:18 PM
Post
#15
|
|
Treetop Flyer Group: Members Posts: 735 Joined: 27-July 12 From: Cincinnati OH Member No.: 14,725 Region Association: Upper MidWest |
QUOTE(rjames @ Sep 3 2012, 03:12 PM) 3m makes a great paint stripping wheel that will take you down to bare metal quickly. Do the surrounding area to make sure you get it all. I like them better than the wire wheels. Once you've done that you can assess if you'll need to weld in small patch(es) that you can fab yourself, or find a repro or used piece if the area is big enough to warrant it. Clean up the metal, treat it with ospho, weld, prime and paint. Check yer longs, too. (IMG:style_emoticons/default/smile.gif) Is this the one your talking about: http://www.amazon.com/3M-9099DCNA-Large-Pa...r/dp/B00004Z4DV |
|
|
|
| rick 918-S |
Sep 3 2012, 05:38 PM
Post
#16
|
|
Hey nice rack! -Celette Group: Members Posts: 21,014 Joined: 30-December 02 From: Now in Superior WI Member No.: 43 Region Association: Northstar Region |
QUOTE(turk22 @ Sep 3 2012, 06:18 PM) QUOTE(rjames @ Sep 3 2012, 03:12 PM) 3m makes a great paint stripping wheel that will take you down to bare metal quickly. Do the surrounding area to make sure you get it all. I like them better than the wire wheels. Once you've done that you can assess if you'll need to weld in small patch(es) that you can fab yourself, or find a repro or used piece if the area is big enough to warrant it. Clean up the metal, treat it with ospho, weld, prime and paint. Check yer longs, too. (IMG:style_emoticons/default/smile.gif) Is this the one your talking about: http://www.amazon.com/3M-9099DCNA-Large-Pa...r/dp/B00004Z4DV Don't waste your time with silly wheels and wire brushes. If you have compressed air get a small sandblaster and do it like I said. It will be done in ten minutes and it will last an other 30 years. If your capable of doing the paint stuff in your garage and don't want to tackle the blasting bring it to a body shop and hire them to just do the blast part. The problem with wheels and brushes is they do nothing for the rust in the pits. BTW: the wheel you posted is for paint removal. You could try to use it on surface rust but again the issue you have is too far gone for that. |
|
|
|
| infraredcalvin |
Sep 3 2012, 09:52 PM
Post
#17
|
|
Distracted Member Group: Members Posts: 1,651 Joined: 25-August 08 From: Ladera Ranch, CA Member No.: 9,463 Region Association: Southern California |
Sorry, hope this isn't taken as a high jack, but I think it applies. What would typically be used to fill the pitted metal - assuming area isn't structural to warrant patch panel and rust was removed and treated. Would most of you cut and weld a new piece? Fiberglass or plastic filler? What about this stuff?
http://www.eastwood.com/metal-to-metal-fil...th-hardner.html I don't want to mess with lead, but I feel I'm missing something... |
|
|
|
| cary |
Sep 4 2012, 08:34 AM
Post
#18
|
|
Advanced Member Group: Members Posts: 3,900 Joined: 26-January 04 From: Sherwood Oregon Member No.: 1,608 Region Association: Pacific Northwest |
The seam sealer should come off. I did the same repair and found rust behind the seam sealer.
I'm pro Por15. I have repairs that are 10 years old that I'm having a bitch of a time getting off during my restoration. But like everyone has said they have to be covered. Anywhere it was exposed to sunlight it breaks down. |
|
|
|
| rohar |
Sep 4 2012, 09:05 AM
Post
#19
|
|
Senior Member Group: Members Posts: 924 Joined: 25-October 08 From: spokane Member No.: 9,685 Region Association: None |
QUOTE(turk22 @ Sep 3 2012, 04:15 PM) QUOTE(rohar @ Sep 3 2012, 03:43 PM) QUOTE(rick 918-S @ Sep 2 2012, 10:02 PM) Do you have a sand blaster? You can take duct tape and heavy plastic and mask off the trunk, insert the sand blaster in the plastic and blast the rust without making a mess all over the shop and car. You don't even need a hood over your head to do it. When your done, unmask the area and vac up the sand. Then use your metal conditioner per the instrucitons of the product label before priming and painting. I so agree. Even a cheezeball HF blaster (not the spot blaster, the 5 gallon tank type) is light years better than all the sanding/grinding/chemicals in the world. By your 5th job, you've spent that much on disks alone. Yea, I spent some time looking at them today, may have to run over to HF, and see what they look like. My issue is space... Not sure my wife is down with my idea about adding a third bay to the garage... (IMG:style_emoticons/default/hands.gif) (Maybe I can start with a carport, and then just 'finish it'...) I don't have space issues, but I still push the hulk out of the garage for blasting. A light breese is an awesome advantage when blasting. Even if you have a seperate space for blasting, the dust in the air makes it real hard to see sometimes. This isn't a problem outside. Oh, and if you stop by your local ACE, they'll have a whole inventory of rubber plugs. One of them will fit in that little hole. |
|
|
|
| euro911 |
Sep 4 2012, 05:01 PM
Post
#20
|
|
Retired & living the dream. God help me if I wake up! Group: Members Posts: 8,911 Joined: 2-December 06 From: So.Cal. & No.AZ (USA) Member No.: 7,300 Region Association: Southern California |
I like Rick's method of cordoning-off the area with plastic. To retain visibility, stick the nozzle from a ShopVac in the 'bag', but use a variac to slow the motor down.
|
|
|
|
|
1 User(s) are reading this topic (1 Guests and 0 Anonymous Users)
0 Members:

|
Lo-Fi Version | Time is now: 12th July 2025 - 10:33 AM |
Invision Power Board
v9.1.4 © 2025 IPS, Inc.