|
|
|
Porsche, and the Porsche crest are registered trademarks of Dr. Ing. h.c. F. Porsche AG.
This site is not affiliated with Porsche in any way. Its only purpose is to provide an online forum for car enthusiasts. All other trademarks are property of their respective owners. |
|
|


| 80cap |
 Jan 3 2016, 09:46 AM Jan 3 2016, 09:46 AM
Post
#1
|
|
Member  Group: Members Posts: 317 Joined: 6-February 15 From: ohio Member No.: 18,405 Region Association: None |
I just reinstalled my head light assemblies. I have not yet installed the wiring.
How do you sync the system one I wire up the motors. I can't find a thread on this subject. Thanks Brian |
   |

 
|
  |
Replies(1 - 8)
| Catorse |
Jan 3 2016, 10:28 AM
Post
#2
|
|
Member Group: Members Posts: 194 Joined: 27-August 15 From: Los Angeles Member No.: 19,106 Region Association: Southwest Region |
QUOTE(80cap @ Jan 3 2016, 07:46 AM)  I just reinstalled my head light assemblies. I have not yet installed the wiring. How do you sync the system one I wire up the motors. I can't find a thread on this subject. Thanks Brian I've never heard of such a procedure and I have 2 cars with popup headlights - 944 and 914. I will make sure the switch is in the off position, then reinstall the headlights. The I use the knob on the back of the motor to manually wind them down and closed. Start the car, flick the lights on a couple times, and they are good to go. |
 |
|
| Garland |
Jan 3 2016, 11:21 AM
Post
#3
|
|
Restoration Fanatic Group: Members Posts: 1,329 Joined: 8-January 04 From: ......Michigan...... Member No.: 1,535 Region Association: Upper MidWest |
Disconnect the arm from the motor to the headlamp assembly at the motor. Power up the motors by the headlamp switch, on, then off. The motors are now parked in the closed position. Reattach the arm to the motor, with the headlamp door down/closed.
|
|
|
|
| 80cap |
Jan 3 2016, 12:50 PM
Post
#4
|
|
Member Group: Members Posts: 317 Joined: 6-February 15 From: ohio Member No.: 18,405 Region Association: None |
Thanks
Brian (IMG:style_emoticons/default/flag.gif) |
|
|
|
| toolguy |
Jan 3 2016, 01:51 PM
Post
#5
|
|
Senior Member Group: Members Posts: 1,270 Joined: 2-April 11 From: San Diego / El Cajon Member No.: 12,889 Region Association: Southern California |
This is a very abbreviated description of the steps and process. .
If you disturbed the headlight pivot's mounting allens, it's a lot more difficult. . You'll need to align each door to be parallel and perpendicular to the hood and fender and eyebrow. . This is done by rotating the headlight pivot shafts. Not oly are you adjusting the gaps , but you're setting the height to match the hood level. First, remove the headlight motor actuator relay by the motor. . this is so you don't mash fingers. . Also be aware there is an full open door stop adjustment which keeps the headlights from wiggling when open and driving. . it's the big long bolt at the rear of the headlight bucket with the set nut. this is the last thing to adjust. Before you reassemble the door, inspect the top stop bolt and how it braces the headlight base when fully raised. This way you'll understand the very last adjustment, the door stop bolt. Disconnect the raise lower arm from the motor / 10mm nut on bevel shaft. gently pry the arm loose on the serrated bevel so the door will go up and down manually. with the arm lose, adjust the headlight door with the inner and outer pivot mounts so the door is properly aligned. It can be a bitch to get perfect. All this does is align the door. Tighten the pivot allens when gaps are set. Next is to get the full open and full closed position in place. If you haven't rotated the black knob on the rear of the motor, the motor is still in the 'full down position. Connect the actuator arm back on the motor shaft in the furthermost down position. . The door will probably be too high or too low. . Now the height is adjusted by loosening the 3 motor mount allens and repositioning the motor. Now the full down position is set. If the arm is not in the fully down position, this is why some headlights start the up cycle by actually going down a little then up. . Next to the full up position and the door stop bolt adjustment. With the relay still removed, rotate the black knob on the motor until the door is raising itself to full up. . you need to feel as the door rises to contact the stop bolt. You want to adjust the bolt in or out so the door mount assemble barely contacts the bolt in the fully raise position. . too tight and it binds the headlight motor operation. . too lose and the headlights will wiggle and vibrate when driving. . Don't be surprised if it takes all day to do both sides if you want it perfect. . |
|
|
|
| whitetwinturbo |
Jan 3 2016, 03:37 PM
Post
#6
|
|
Honey, does this wing make my ass look fat? Group: Members Posts: 1,391 Joined: 22-October 11 From: Newport Beach/Kalefornya/USA Member No.: 13,704 Region Association: Southern California |
I'm missing one of the black knobs on the rear of the motor. One side has it and the other side is gone (IMG:style_emoticons/default/WTF.gif)
Where do I find another one? |
|
|
|
| boxsterfan |
Jan 3 2016, 10:15 PM
Post
#7
|
|
914's are kewl Group: Members Posts: 1,776 Joined: 6-June 03 From: San Ramon, CA Member No.: 791 Region Association: Northern California |
QUOTE(whitetwinturbo @ Jan 3 2016, 01:37 PM) I'm missing one of the black knobs on the rear of the motor. One side has it and the other side is gone (IMG:style_emoticons/default/WTF.gif) Where do I find another one? Probably just find a used one here in the classifieds. Place a WTB ad. |
|
|
|
| shoguneagle |
Jan 4 2016, 10:05 AM
Post
#8
|
|
shoguneagle Group: Members Posts: 1,180 Joined: 3-January 03 From: CA, OR, AZ (CAZOR); New Mexico Member No.: 84 Region Association: Northern California |
As always information comes out regarding areas I am working on my car. Rebuilding the headlight assemblies and just about completed; what do I need? Adjustment of headlight movement? Do I need it?
Along comes this thread; could have been timed better. Thanks! |
|
|
|
| Mikey914 |
Jan 4 2016, 10:49 AM
Post
#9
|
|
The rubber man Group: Members Posts: 12,677 Joined: 27-December 04 From: Hillsboro, OR Member No.: 3,348 Region Association: None |
All the adjustment for the lights is on the outside arm. Simple as that.
Just make sure to remove the relay when the lights are up, and adjust from there. Attached image(s) 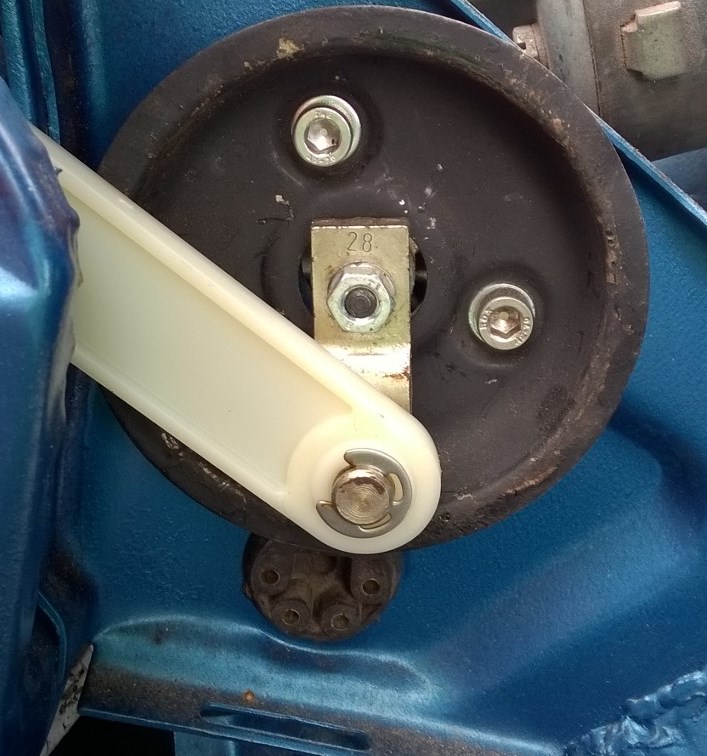
|
|
|
|
|
1 User(s) are reading this topic (1 Guests and 0 Anonymous Users)
0 Members:

|
Lo-Fi Version | Time is now: 2nd June 2024 - 05:36 AM |
Invision Power Board
v9.1.4 © 2024 IPS, Inc.