|
|
|
Porsche, and the Porsche crest are registered trademarks of Dr. Ing. h.c. F. Porsche AG.
This site is not affiliated with Porsche in any way. Its only purpose is to provide an online forum for car enthusiasts. All other trademarks are property of their respective owners. |
|
|


| orbit398 |
 Jan 6 2016, 08:31 AM Jan 6 2016, 08:31 AM
Post
#1
|
|
Member  Group: Members Posts: 139 Joined: 29-April 15 From: League city, Texas Member No.: 18,681 Region Association: Southwest Region |
On a few padded interior pieces, the black padded vinyl items, I have some small splits/cracks and wonder how these can be repaired to look good.
I was thinking of filling in the cracks with black paintable silicon and then painting the whole piece with black rubberized bumper paint but wondered if others had a better idea. thanks for suggestions |
   |

 
|
  |
Replies(1 - 19)
| Dion |
Jan 6 2016, 08:44 AM
Post
#2
|
|
RN Group: Members Posts: 2,766 Joined: 16-September 04 From: Audubon,PA Member No.: 2,766 Region Association: MidAtlantic Region |
I've had some success with this kit. Just repaired a center console with it. Just take your time and be patient.
Link: http://www.eastwood.com/vinyl-and-dashboar...CFYEmHwodyiEHcg |
|
|
|
| Cal |
Jan 6 2016, 08:49 AM
Post
#3
|
|
Senior Member Group: Members Posts: 615 Joined: 19-November 14 From: Philadelphia Member No.: 18,138 Region Association: North East States |
I'd be interested in hearing if there's a way to repair the vinyl also. I noticed a small 1/4" tear in the vinyl around my interior dome light while cleaning. Hopefully this can be fixed before it gets worse.
|
|
|
|
| Mikey914 |
Jan 6 2016, 11:50 AM
Post
#4
|
|
The rubber man Group: Members Posts: 12,677 Joined: 27-December 04 From: Hillsboro, OR Member No.: 3,348 Region Association: None |
For the foam, silicon would be fine. The vinyl is stretched tight enough that you can't really repair it for any length of time (splits). You may be able to repair a puncture. But this is why I made the back bolster piece available for $69, and I have a few in stock now.
It's actually the easiest piece to do. Attached image(s) 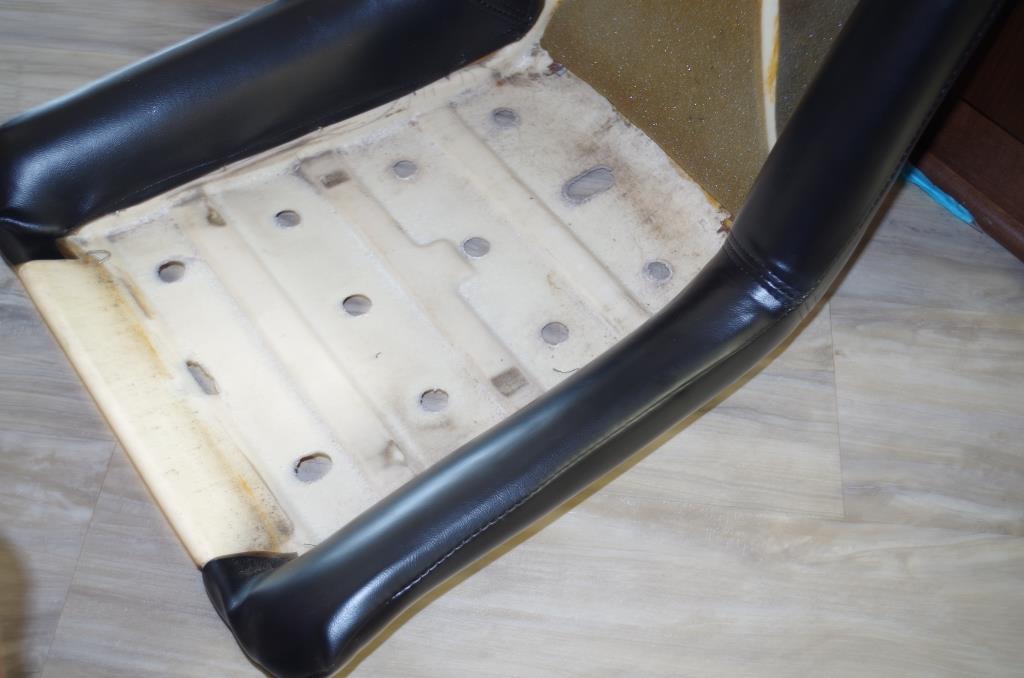
|
 |
|
| Mikey914 |
Jan 6 2016, 11:58 AM
Post
#5
|
|
The rubber man Group: Members Posts: 12,677 Joined: 27-December 04 From: Hillsboro, OR Member No.: 3,348 Region Association: None |
Here's the article I did for Fourteener motoring
Seat Recovery part I of II 914 seats are one of the most neglected parts of our cars. I’ve decided to break this process into 2 articles as I didn’t want to make a small novel on these. Part I Side bolsters and back The sides take much of the abuse that we dish out, every time you get in and out. They also show the damage as there is no texture. One of the most commonly damaged pieces of the seat are the side bolsters. Attached thumbnail(s) 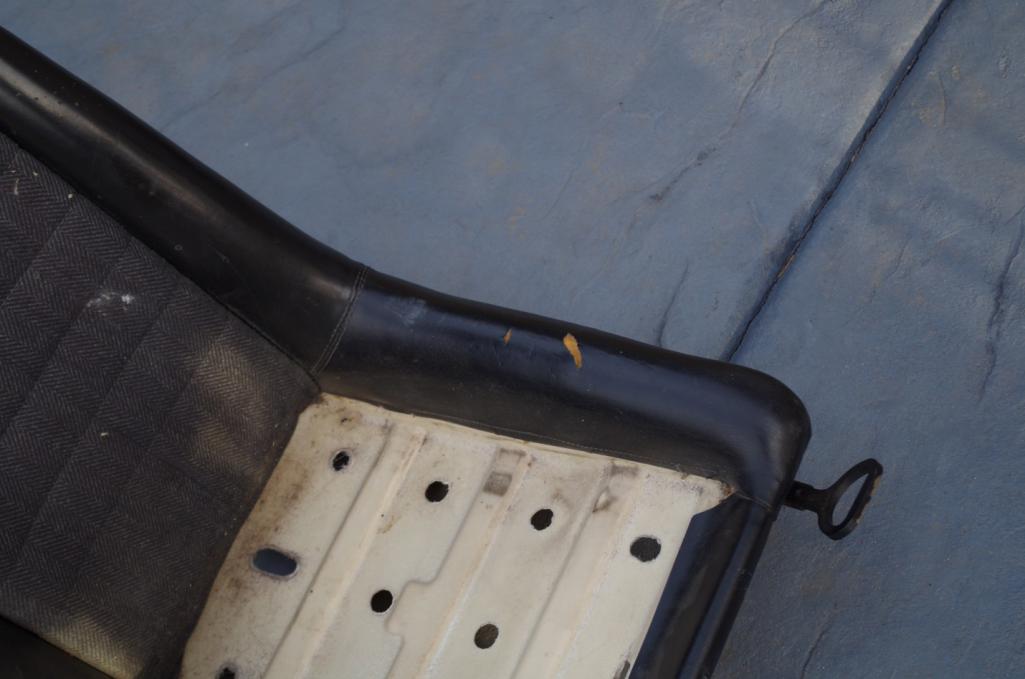
|
|
|
|
| Mikey914 |
Jan 6 2016, 11:59 AM
Post
#6
|
|
The rubber man Group: Members Posts: 12,677 Joined: 27-December 04 From: Hillsboro, OR Member No.: 3,348 Region Association: None |
To get o the Bolster you do need to disassemble much of the seat but if you are careful you will be able to re assemble without damaging the center upper section.
On a scale of 1-10 this is a solid 7. It’s not that it takes any incredible skill, but it requires patience and attention to detail. Particularly when re stretching the side bolsters to get then to look right. Time required per set 3 hours for just the side and back piece. Add another hour for the back if you are going that far and another for the base, as it has a few tricks you will need to make it look correct. Tools needed 10mm socket with ratchet – set removal Med sized standard screwdriver #1 phillips screwdriver 5mm Allen socket or socket key – base removal Small sharp knife (Exacto works well) Automotive contact cement – Camie 313 is my preference Optional – new seat adjuster handle chair to set the seat in while working To begin, remove the seat from the vehicle utilizing the 10mm socket. This is most easily done by sliding it forward and taking out all 4 10mm bolts from the back of the seat rail. The height adjustment mechanism can sometimes bind it up a little, so you may find it helpful to pull the lever arm on the side back to disengage the front section of the seat if it will not come right out. One the seat is removed you will need to take the base off . Attached image(s) 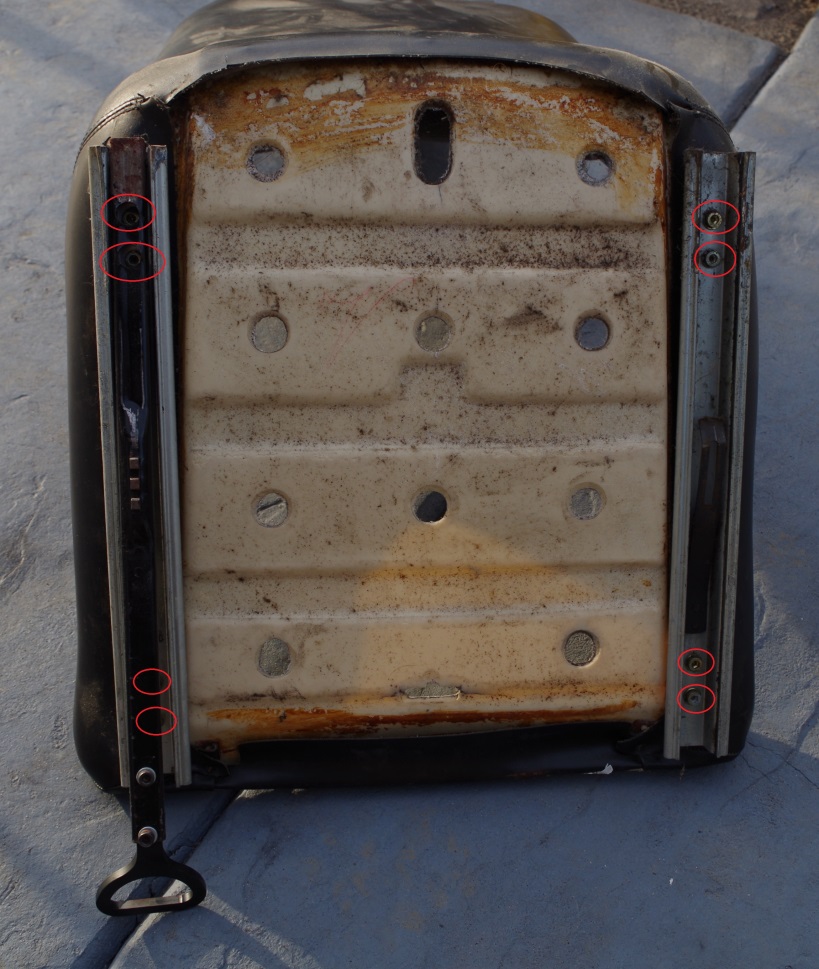
|
|
|
|
| Mikey914 |
Jan 6 2016, 12:01 PM
Post
#7
|
|
The rubber man Group: Members Posts: 12,677 Joined: 27-December 04 From: Hillsboro, OR Member No.: 3,348 Region Association: None |
Remove the 4 allen bolts with washers and set aside for later. The seat adjuster handle need not be removed unless you are replacing yours. There is a short pictorial how to on this thread on world -
http://www.914world.com/bbs2/index.php?sho...adjuster+handle If yours is missing, now if the time to replace it. Once the rails are removed, you need to start to remove the old piece. The center section will need to be removed to get access to the side sections. If you keep it intact you can easily re assemble. |
|
|
|
| Mikey914 |
Jan 6 2016, 12:03 PM
Post
#8
|
|
The rubber man Group: Members Posts: 12,677 Joined: 27-December 04 From: Hillsboro, OR Member No.: 3,348 Region Association: None |
Start by removing the 2 screws on the back of the seat at the headrest flap.
This will allow you to get at 2 hidden screws that hold the base of the headrest. Attached image(s) 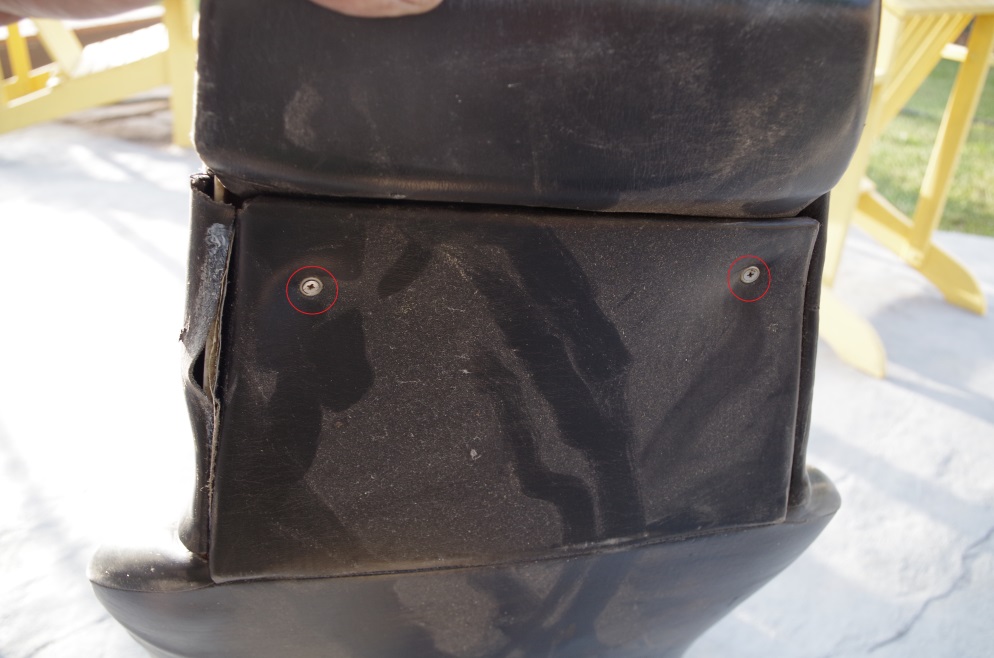 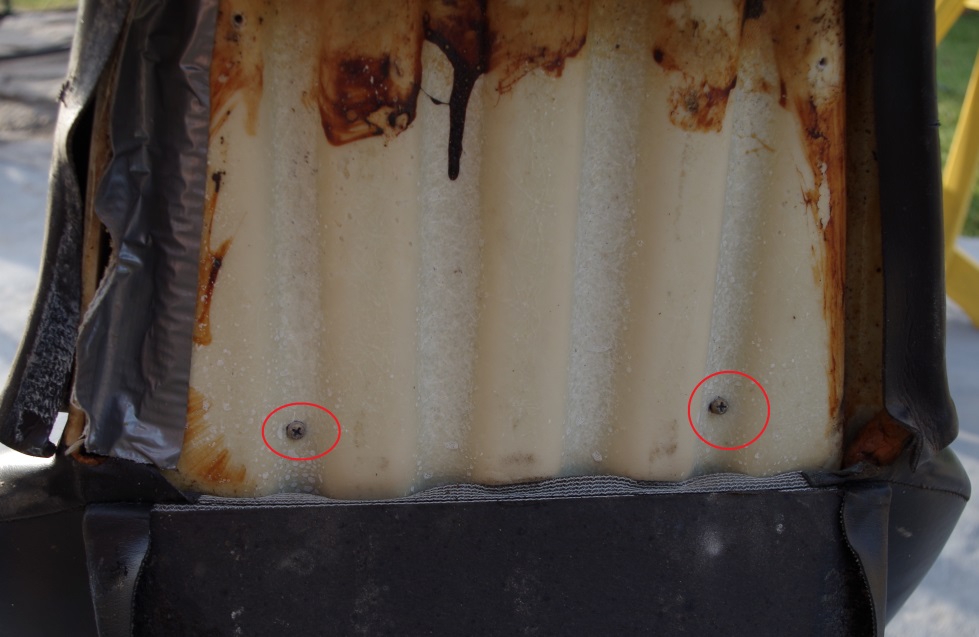
|
|
|
|
| Mikey914 |
Jan 6 2016, 12:04 PM
Post
#9
|
|
The rubber man Group: Members Posts: 12,677 Joined: 27-December 04 From: Hillsboro, OR Member No.: 3,348 Region Association: None |
At the base of the seat there is a wire that holds it down, you will need to dislodge the wire to allow the center section to come up, if not out.
There are 2 pointed prongs at the base that hold the wire on the base of the center section securely at the base. I chose to carefully bend these up using the standard flat screwdriver. You can then pull the base down to release. With the center removed you can now have full access to remove the side bolsters. You will want to start with the hidden prong under the front base of the seat. Attached thumbnail(s) 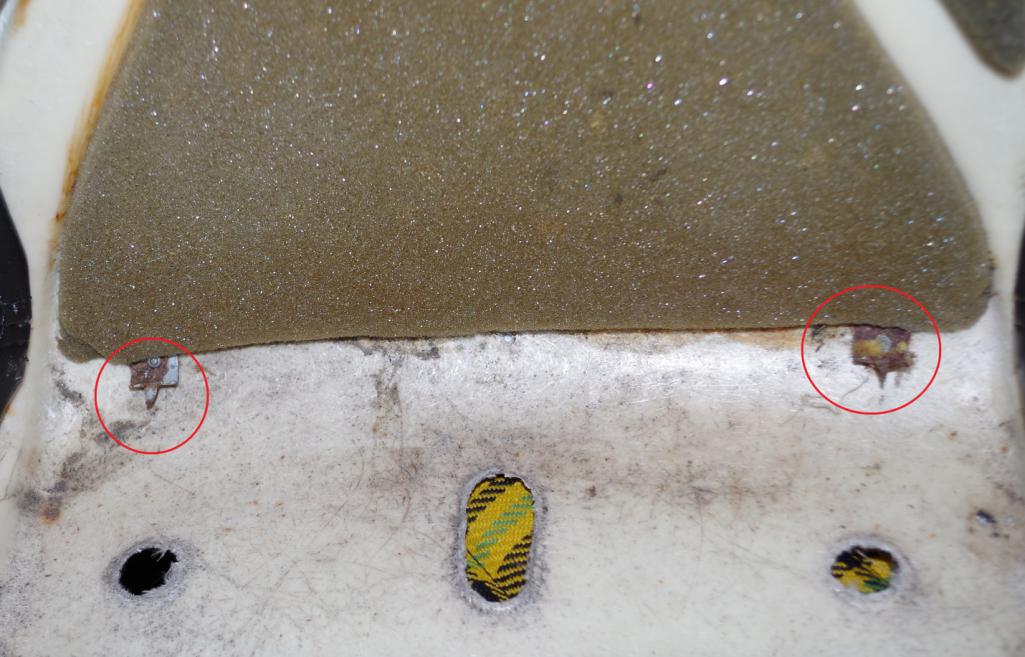 Attached image(s) 
|
|
|
|
| Mikey914 |
Jan 6 2016, 12:06 PM
Post
#10
|
|
The rubber man Group: Members Posts: 12,677 Joined: 27-December 04 From: Hillsboro, OR Member No.: 3,348 Region Association: None |
With the center removed you can now have full access to remove the side bolsters.
You will want to start with the hidden prong under the front base of the seat. Then the lower base prongs, Attached thumbnail(s) 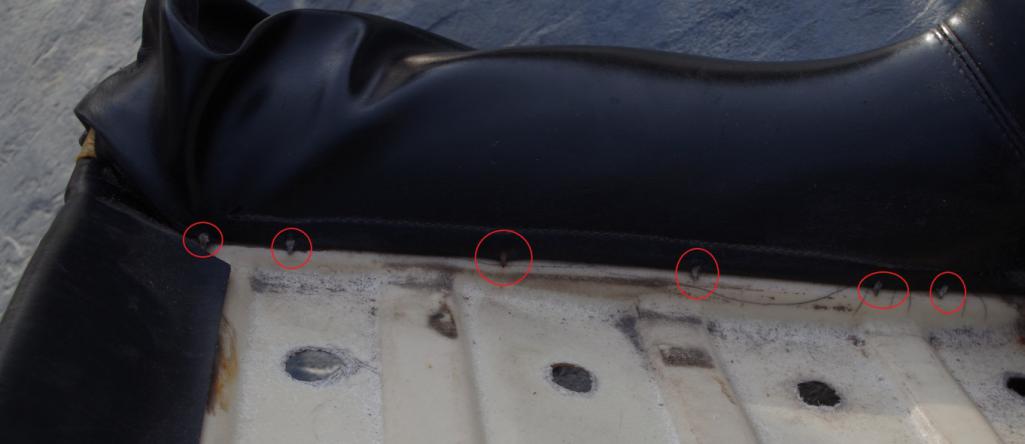 Attached image(s) 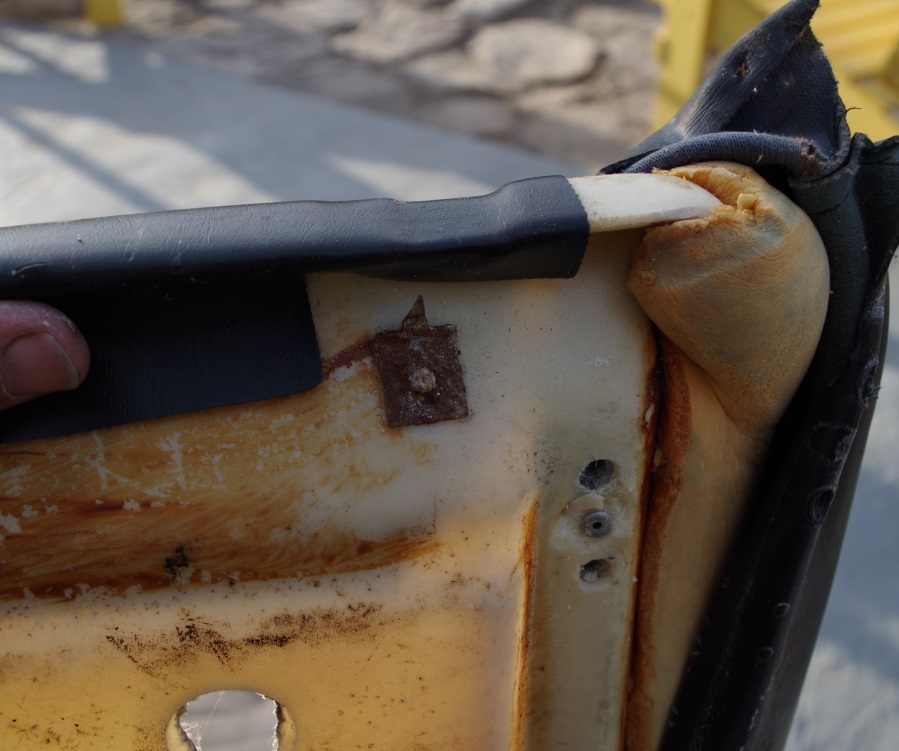
|
|
|
|
| Mikey914 |
Jan 6 2016, 12:07 PM
Post
#11
|
|
The rubber man Group: Members Posts: 12,677 Joined: 27-December 04 From: Hillsboro, OR Member No.: 3,348 Region Association: None |
Followed by the upper section.
Once removed you will need to harvest the metal from the old piece. This is most easily done using an small sharp knife to cut the stitches. Each side has one. Once removed, you will need to thread into the new section. Make sure the loop on the metal is at the top by the headrest, so you will feed the un looped section through from the top. This takes a little patience, and when you get to the corner you will need to be gentle as the path is more restricted and more difficult to find. With a little probing you will be able to get it through. Attached thumbnail(s) 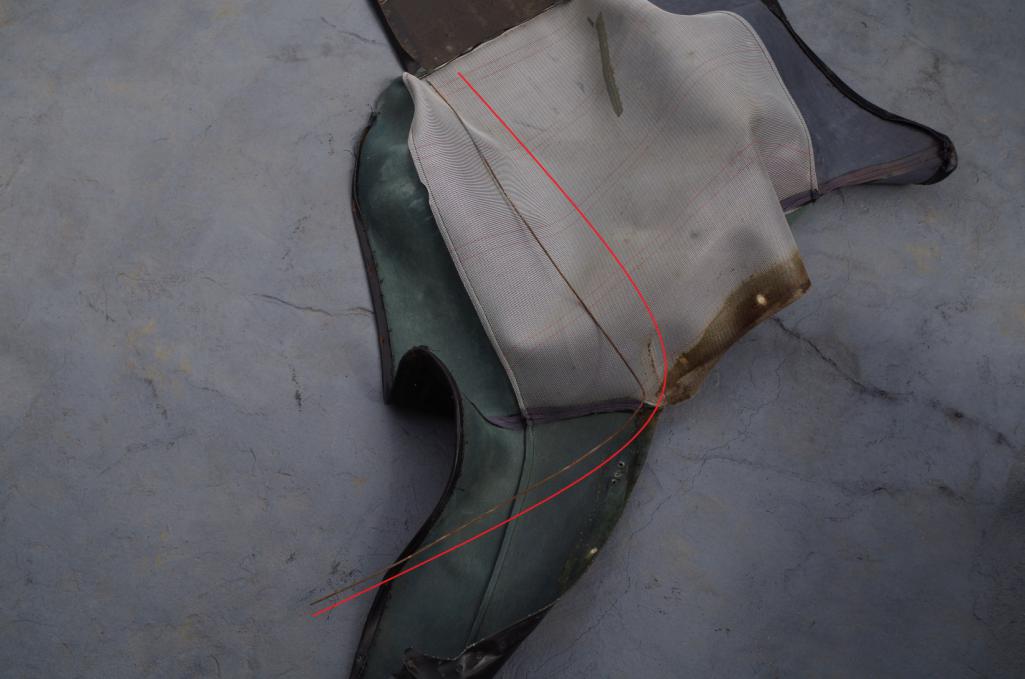 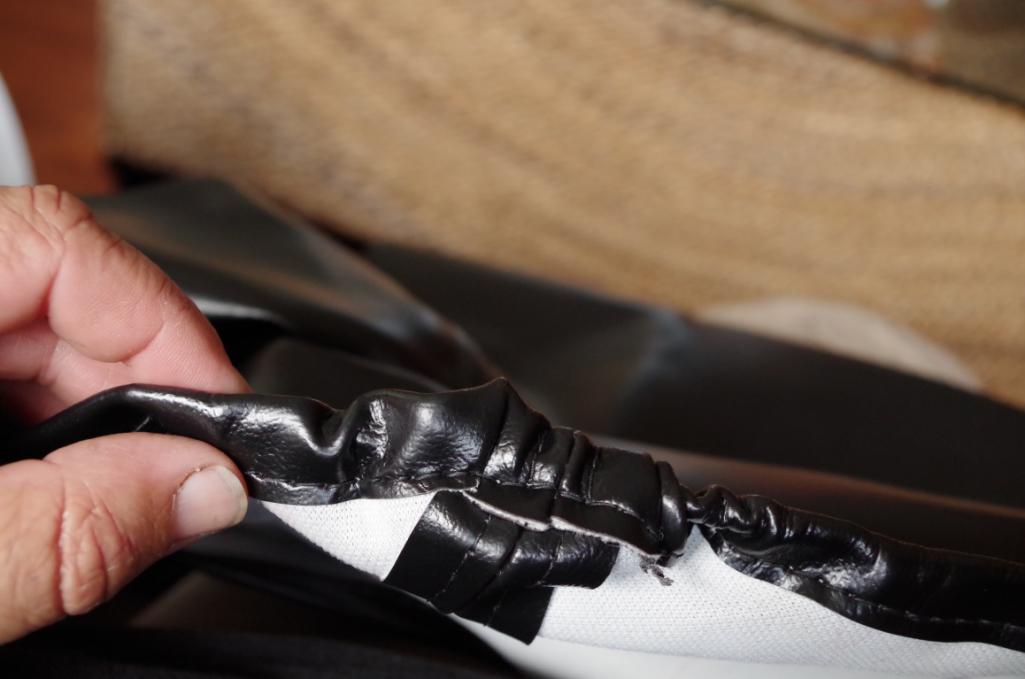
|
|
|
|
| Mikey914 |
Jan 6 2016, 12:08 PM
Post
#12
|
|
The rubber man Group: Members Posts: 12,677 Joined: 27-December 04 From: Hillsboro, OR Member No.: 3,348 Region Association: None |
Once you have the metal in you can begin the reassembly.
I supported the seat in a folding camping chair as I found it worked well to get it to a level that I could work and was readily available. I started at the front base and secured the first 2 prongs on each side Making sure that I had the same amount of material on each side. then proceeded to work my way back trying to keep the material even on each side. Attached thumbnail(s) 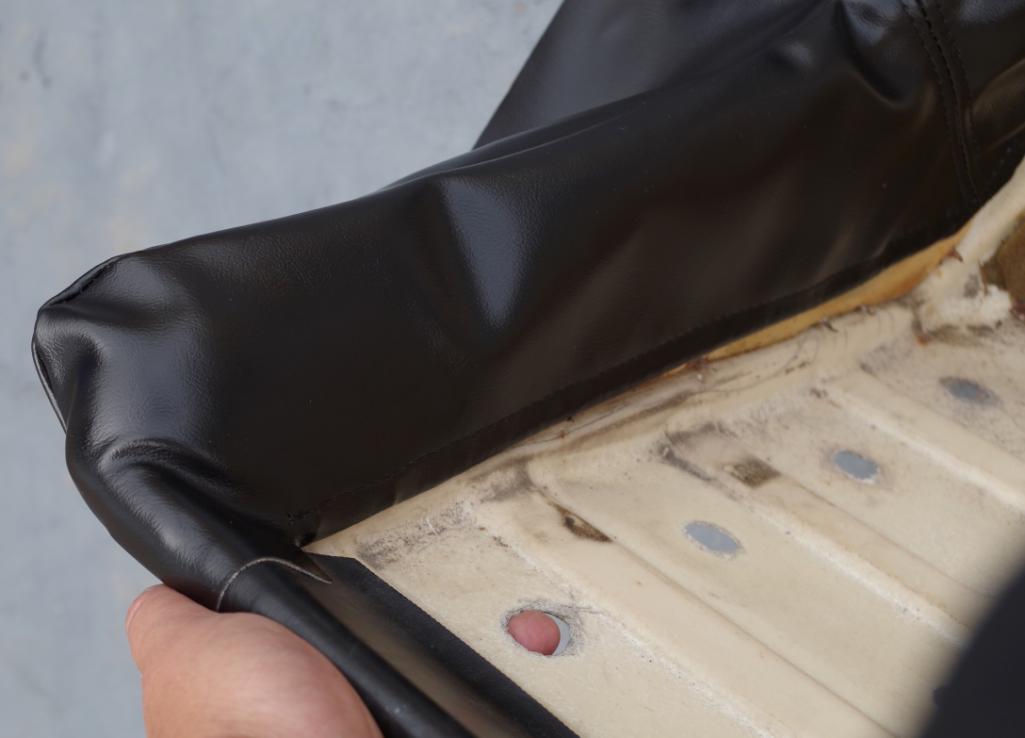 Attached image(s) 
|
|
|
|
| Mikey914 |
Jan 6 2016, 12:09 PM
Post
#13
|
|
The rubber man Group: Members Posts: 12,677 Joined: 27-December 04 From: Hillsboro, OR Member No.: 3,348 Region Association: None |
Continue up the side slowly making sure that you are securing it evenly as you progress. The fold on the seam in the last picture will stretch out, but your work here makes that much easier.
When this step is finished yours should look something like this. Attached thumbnail(s) 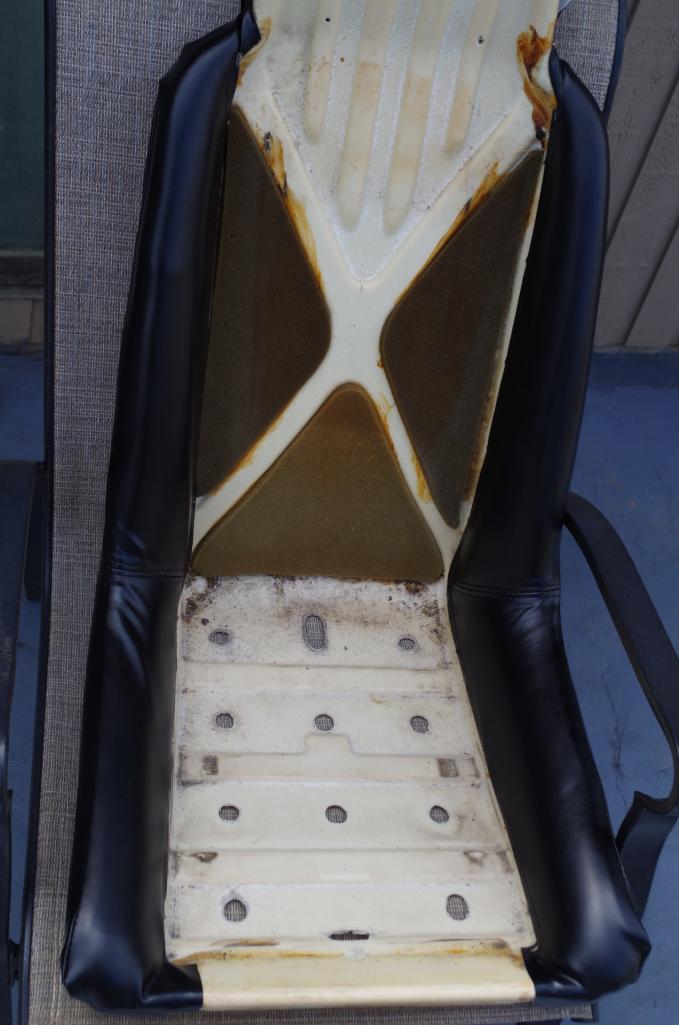
|
|
|
|
| Mikey914 |
Jan 6 2016, 12:11 PM
Post
#14
|
|
The rubber man Group: Members Posts: 12,677 Joined: 27-December 04 From: Hillsboro, OR Member No.: 3,348 Region Association: None |
Now is the best time to secure the base back on as you will be using the contact cement to tension the vinyl. I prefer the Camie 313. Once tensioned and glued , re attach the based. Your completed product thus far will look like this.
You can use a heat gun to remove wrinkles. Or do what I did and leave in the summer sun for 3 hours. Hope this helps Attached thumbnail(s) 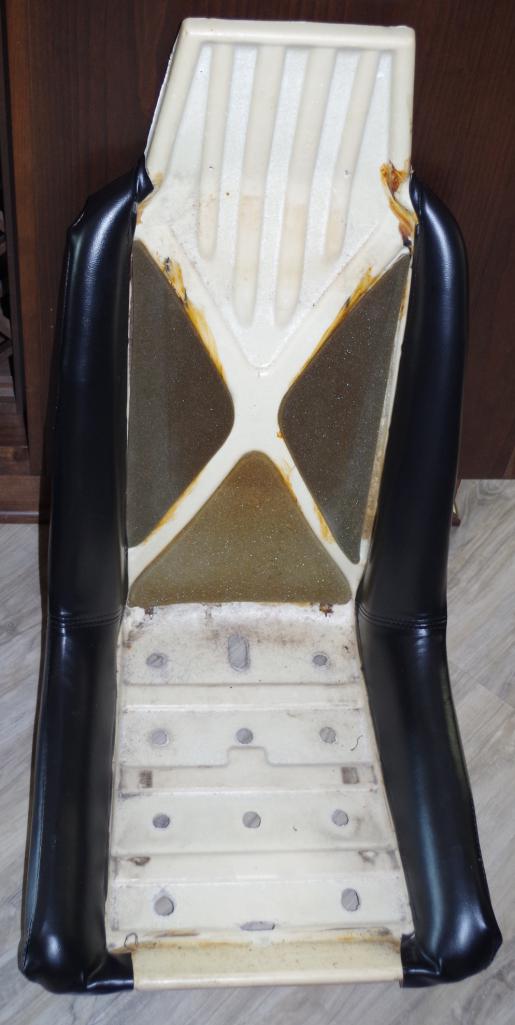 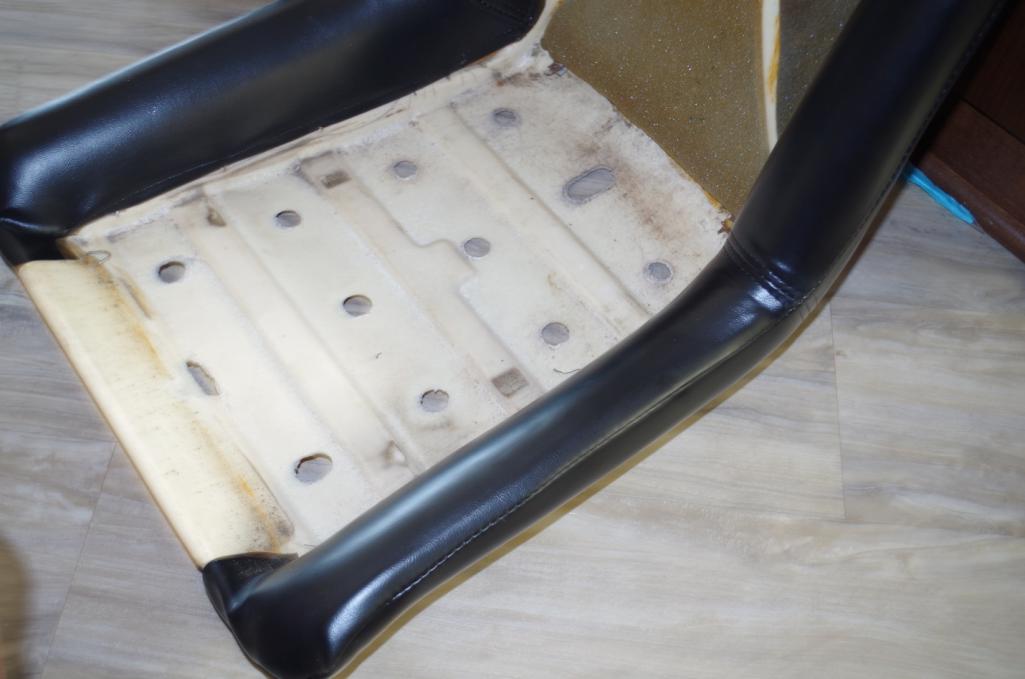
|
|
|
|
| Mikey914 |
Jan 6 2016, 12:13 PM
Post
#15
|
|
The rubber man Group: Members Posts: 12,677 Joined: 27-December 04 From: Hillsboro, OR Member No.: 3,348 Region Association: None |
For some reason I didn't see that I had showed the gluing of the back flap, but you will want to do it now to center it.
|
|
|
|
| orbit398 |
Jan 6 2016, 03:14 PM
Post
#16
|
|
Member Group: Members Posts: 139 Joined: 29-April 15 From: League city, Texas Member No.: 18,681 Region Association: Southwest Region |
I recovered the seats.
I am talking about the somewhat hard interior pieces, examples: windshield piler covers & one that goes across the top of the windshield, one that goes across the top by the back window ect. Those ones, things that have a bit of foam under the somewhat hard plastic. |
|
|
|
| orbit398 |
Jan 6 2016, 03:15 PM
Post
#17
|
|
Member Group: Members Posts: 139 Joined: 29-April 15 From: League city, Texas Member No.: 18,681 Region Association: Southwest Region |
I recovered the seats.
I am talking about the somewhat hard interior pieces, examples: windshield piler covers & one that goes across the top of the windshield, one that goes across the top by the back window ect. Those ones, things that have a bit of foam under the somewhat hard plastic. |
|
|
|
| malcolm2 |
Jan 6 2016, 04:17 PM
Post
#18
|
|
Advanced Member Group: Members Posts: 2,745 Joined: 31-May 11 From: Nashville Member No.: 13,139 Region Association: South East States |
QUOTE(Dion @ Jan 6 2016, 08:44 AM)  I've had some success with this kit. Just repaired a center console with it. Just take your time and be patient. Link: http://www.eastwood.com/vinyl-and-dashboar...CFYEmHwodyiEHcg I use that kit too. The tuff part is getting the color right. But it is not paint and does not dry until it gets heat, so you can, as mentioned above, TAKE YOUR TIME. And then there is the grain to match.... Remember that the color should be sealing the rip or filling the divot. Don't use too much or you will have a thick spot. |
|
|
|
| r_towle |
Jan 6 2016, 06:03 PM
Post
#19
|
|
Custom Member Group: Members Posts: 24,585 Joined: 9-January 03 From: Taxachusetts Member No.: 124 Region Association: North East States |
I tried two of those kits on my 911 dash with no luck.
It cracked again. |
|
|
|
| barefoot |
Jan 6 2016, 06:39 PM
Post
#20
|
|
Senior Member Group: Members Posts: 1,279 Joined: 19-March 13 From: Charleston SC Member No.: 15,673 Region Association: South East States |
I had a small burn close to the interior back pad interior light repaired by a guy with a mobile service who travels auto dealerships
You have to look close to see the repair |
|
|
|
|
1 User(s) are reading this topic (1 Guests and 0 Anonymous Users)
0 Members:

|
Lo-Fi Version | Time is now: 1st June 2024 - 11:00 AM |
Invision Power Board
v9.1.4 © 2024 IPS, Inc.