|
|
|
Porsche, and the Porsche crest are registered trademarks of Dr. Ing. h.c. F. Porsche AG.
This site is not affiliated with Porsche in any way. Its only purpose is to provide an online forum for car enthusiasts. All other trademarks are property of their respective owners. |
|
|


| ChrisFix |
 Mar 20 2005, 04:36 PM Mar 20 2005, 04:36 PM
Post
#1
|
|
Member  Group: Members Posts: 173 Joined: 3-March 05 From: Chapel Hill, NC Member No.: 3,707 |
I've been restoring a pair of pre '75 round OEM fog lamps I bought used and in pieces. I've cleaned and repainted everything, and with the help of Karl's repro seals am ready to reassemble.
I'm guessing the wire spring clips are supposed to hold the lens/reflector assembly to the front bezel, but haven't figured out how they accomplish that task. Also, does the seal go around both the lens and reflector, holding them together as an assembly? Any guidance or links to an exploded view? Thanks!! |
   |

 
|
  |
Replies(1 - 16)
| Katmanken |
Mar 20 2005, 05:31 PM
Post
#2
|
|
You haven't seen me if anybody asks... Group: Members Posts: 4,738 Joined: 14-June 03 From: USA Member No.: 819 Region Association: Upper MidWest |
Exploded view in the parts book shows......
Place lens in ring, place seal in next, place reflector in last sandwitching the seal. As I recall, the spring clips fit in under the rolled edge of the ring and push forward on the back edge of the reflector to compress the seal. Look for wear marks on the back of your reflector for clues/locations/orientations of the spring clips. Hope that helps, Ken |
|
|
|
| davep |
Mar 20 2005, 05:31 PM
Post
#3
|
|
914 Historian Group: Benefactors Posts: 5,151 Joined: 13-October 03 From: Burford, ON, N0E 1A0 Member No.: 1,244 Region Association: Canada |
The seal is only on the glass lens.
Put the seal on the lens and drop into the bezel. I beleive there is a notch in the back edge of the bezel. It goes down I think. Check the back cover and clip. Drop in the reflector. Secure the assembly with the wire springs. The wire ends go up into the back of the bezel while the center pushes on the reflector. |
|
|
|
| ChrisFix |
Mar 20 2005, 06:20 PM
Post
#4
|
|
Member Group: Members Posts: 173 Joined: 3-March 05 From: Chapel Hill, NC Member No.: 3,707 |
Thank you and thank you!!
Got the seal on the lens, the reflector then fits around the lens and seal. The lens/relfector assembly fits in the bezel (bezel has a small orientation notch that receives ridge on lens) and the wire springs hold it in nice and tight. There isn't any seal between the lamp housing and the bezel/lens/reflector assembly which seems weird. Perhaps it is protected enough by it's location? The Haynes manual, says to remove the bumper to install the fog light, but that can't be right. I've removed the grille and I see the hole in the bottom of the grille opening that looks like it is for for an attachement bolt. Is that where the bracket attaches? There is very little space between the bottom of the bumper and the front valance. What kind of bolt are you supposed to use to attach the lamp bracket to the car? Thanks again. |
|
|
|
| rhodyguy |
Mar 20 2005, 07:01 PM
Post
#5
|
|
Chimp Sanctuary NW. Check it out. Group: Members Posts: 22,084 Joined: 2-March 03 From: Orion's Bell. The BELL! Member No.: 378 Region Association: Galt's Gulch |
do you mean this one? i'm sure i will be taking mine apart.
k |
|
|
|
| rhodyguy |
Mar 20 2005, 07:02 PM
Post
#6
|
|
Chimp Sanctuary NW. Check it out. Group: Members Posts: 22,084 Joined: 2-March 03 From: Orion's Bell. The BELL! Member No.: 378 Region Association: Galt's Gulch |
asdf
Attached image(s) 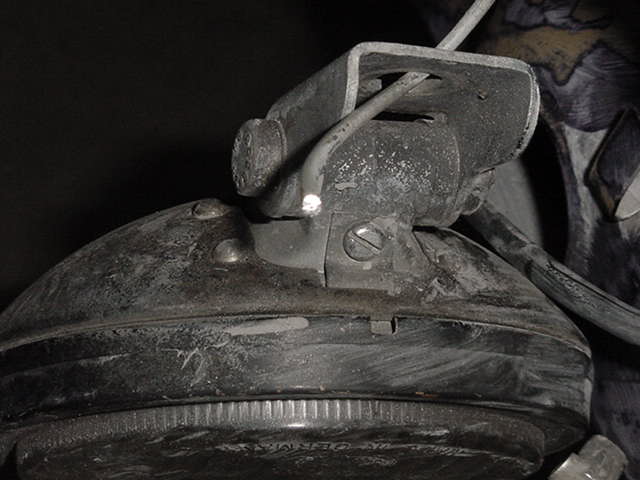
|
|
|
|
| rhodyguy |
Mar 20 2005, 07:06 PM
Post
#7
|
|
Chimp Sanctuary NW. Check it out. Group: Members Posts: 22,084 Joined: 2-March 03 From: Orion's Bell. The BELL! Member No.: 378 Region Association: Galt's Gulch |
that's the same manual that's tells you that the whole strut assembly has to be removed to change the strut cartridge. (IMG:http://www.914world.com/bbs2/html/emoticons/wacko.gif) what did you polish the lens with?
k |
|
|
|
| davep |
Mar 20 2005, 07:06 PM
Post
#8
|
|
914 Historian Group: Benefactors Posts: 5,151 Joined: 13-October 03 From: Burford, ON, N0E 1A0 Member No.: 1,244 Region Association: Canada |
There is not much protection. The metal back always seems to rot. I forget the bolt exactly, but an 8mm shank with Allen key head comes to mind.
Removing the bumper may not be necessary, but there is little room. It also forces you to ensure the bumper mount bolts are not seized (again). |
|
|
|
| jfort |
Mar 20 2005, 07:36 PM
Post
#9
|
|
Senior Member Group: Members Posts: 1,137 Joined: 5-May 03 From: Findlay, OH Member No.: 652 Region Association: Upper MidWest |
i cut out the bottom of the hole, started the bolt, slid down the mounting bracket and then tightened it with a ball-end hex key. only way i could figure to do it without removing the bumper.
|
|
|
|
| ChrisFix |
Mar 20 2005, 08:38 PM
Post
#10
|
||
|
Member Group: Members Posts: 173 Joined: 3-March 05 From: Chapel Hill, NC Member No.: 3,707 |
Thank you, but no. I mean the bolt that holds the mounting bracket to the bumper. My fogs came with all the hardware including two hex head bolts to attach the mounting bracket to the car that are too large in diameter to fit through the holes that exist in the bumper (bottom of the grille cut-out) - unless there is somewhere else this is supposed to attach. Is the mounting bracket attached with a nut and bolt through the hole in the bottom of the grille cut-out, or is there a blind nut that I'm not seeing? |
||
|
|
|
||
| Qarl |
Mar 20 2005, 08:45 PM
Post
#11
|
|
Shriveled member Group: Benefactors Posts: 5,233 Joined: 8-February 03 From: Florida Member No.: 271 Region Association: None |
There is a hex-head bolt that attaches through the bracket in the photo above.
There should be a thread hole on the sheet metal of the car behind the grille. You obviously have to take the grill off to get inside there. |
|
|
|
| Qarl |
Mar 20 2005, 08:48 PM
Post
#12
|
|
Shriveled member Group: Benefactors Posts: 5,233 Joined: 8-February 03 From: Florida Member No.: 271 Region Association: None |
Here...
Attached image(s) 
|
|
|
|
| ChrisFix |
Mar 20 2005, 09:15 PM
Post
#13
|
||
|
Member Group: Members Posts: 173 Joined: 3-March 05 From: Chapel Hill, NC Member No.: 3,707 |
Ahhhh....got it. I was looking at a different mount point entirely. I don't have my fog light grilles yet, so I didn't have anything to gauge where in the opening they belong. I wasn't looking at the correct mounting point because those mounting holes already have the mounting bolts installed in them from the factory (even on cars without factory fog lights). I now see why the first instruction in Haynes is to remove the bumper! The bolt head is partially obscured by the bumper. Thank you! (IMG:http://www.914world.com/bbs2/html/emoticons/pray.gif) By the way, the seals fit and look great! |
||
|
|
|
||
| Korijo |
Mar 21 2005, 01:43 AM
Post
#14
|
||
|
[]D o [] o []V[] o []D Group: Members Posts: 1,308 Joined: 16-July 03 From: North Bend, WA Member No.: 914 |
do you need new bulbs? HALOGEN BULBS?? LMK (IMG:http://www.914world.com/bbs2/html/emoticons/biggrin.gif) |
||
|
|
|
||
| ChrisFix |
Mar 21 2005, 07:13 AM
Post
#15
|
||||
|
Member Group: Members Posts: 173 Joined: 3-March 05 From: Chapel Hill, NC Member No.: 3,707 |
I have new OEM 35W OSRAM bulbs. Are there halogen upgrades that fit the OEM round fog lights? |
||||
|
|
|
||||
| rhodyguy |
Mar 21 2005, 08:42 AM
Post
#16
|
|
Chimp Sanctuary NW. Check it out. Group: Members Posts: 22,084 Joined: 2-March 03 From: Orion's Bell. The BELL! Member No.: 378 Region Association: Galt's Gulch |
so you're adding a set of light searly lights? the nut on the body is a captured nut, it sort of floats with a bracket of some sort on the back side. guys retro fitting the early style lights have to adapt and drill.
k Attached image(s) 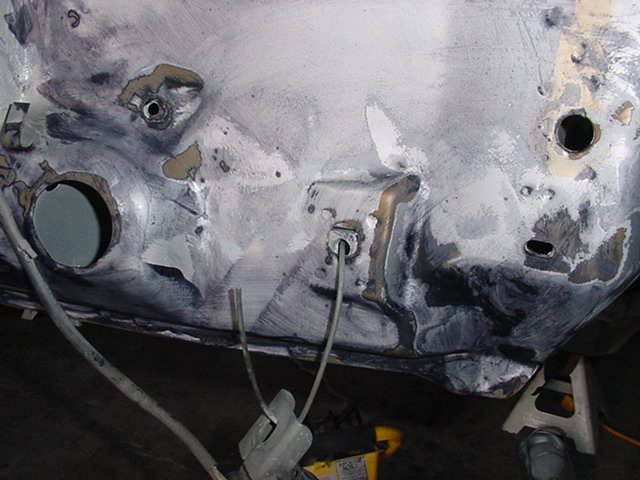
|
|
|
|
| ChrisFix |
Mar 21 2005, 09:53 AM
Post
#17
|
|
Member Group: Members Posts: 173 Joined: 3-March 05 From: Chapel Hill, NC Member No.: 3,707 |
Yes, I've found the factory mounting holes. They already have bolts intalled from the factory, so they didn't look to me like they were available mounting holes for the fogs - I figured the bolts were holding something together! Anyway, I have the OEM mounting bracket with the fog lights, I just need to pull the bolt that's already on the car and put it through the bracket and I'm done (I hope). I've wired up a light already (un-installed) and it works fine, so the hard stuff should be behind me.
|
|
|
|
|
1 User(s) are reading this topic (1 Guests and 0 Anonymous Users)
0 Members:

|
Lo-Fi Version | Time is now: 1st June 2024 - 12:58 PM |
Invision Power Board
v9.1.4 © 2024 IPS, Inc.