|
|
|
Porsche, and the Porsche crest are registered trademarks of Dr. Ing. h.c. F. Porsche AG.
This site is not affiliated with Porsche in any way. Its only purpose is to provide an online forum for car enthusiasts. All other trademarks are property of their respective owners. |
|
|


| jack20 |
 Feb 24 2016, 01:00 AM Feb 24 2016, 01:00 AM
Post
#1
|
|
Member  Group: Members Posts: 406 Joined: 7-November 14 From: Granite Bay, CA Member No.: 18,099 Region Association: Northern California |
With the help of the engine removal thread (thanks for all the useful text and photos),
I dropped my 2.0 on Sunday, the DAPO painted the alloy fan should black. Now the DACO, me, is trying to remove the shroud so I can have it media blasted back to natural. The front half seems to be hung up in the alternator area but I can't find any more screws or bolts to remove. The inner is still solid to the engine. I need to get these off. Photo is not of my engine but the alloy shroud is what I'm trying to remove. Any suggestions? 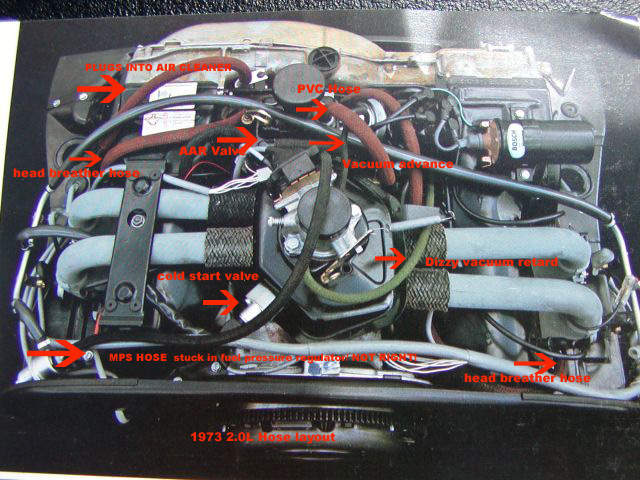 |
   |

 
|
  |
Replies(1 - 13)
| Larmo63 |
Feb 24 2016, 01:10 AM
Post
#2
|
|
Advanced Member Group: Members Posts: 4,264 Joined: 3-March 14 From: San Clemente, Ca Member No.: 17,068 Region Association: Southern California |
Take your time, it all comes apart. It's actually easy, you just have to use common sense.
|
|
|
|
| 911buff |
Feb 24 2016, 02:07 AM
Post
#3
|
|
Newbie Group: Members Posts: 36 Joined: 23-May 14 From: Kingsland, GA Member No.: 17,390 Region Association: South East States |
Once you remove the cooling impeller, there are four 13mm nuts holding the shroud to the case. Remove those four and the shroud will come right off. Good luck.
 |
|
|
|
| TheCabinetmaker |
Feb 24 2016, 06:10 AM
Post
#4
|
|
I drive my car everyday Group: Members Posts: 8,304 Joined: 8-May 03 From: Tulsa, Ok. Member No.: 666 |
Buy a Haynes manual
|
|
|
|
| Jetsetsurfshop |
Feb 24 2016, 06:50 AM
Post
#5
|
|
Senior Member Group: Members Posts: 814 Joined: 7-April 11 From: Marco Island Florida Member No.: 12,907 Region Association: South East States |
Did you disconnect the alternator boot?
|
|
|
|
| jack20 |
Feb 24 2016, 11:46 AM
Post
#6
|
|
Member Group: Members Posts: 406 Joined: 7-November 14 From: Granite Bay, CA Member No.: 18,099 Region Association: Northern California |
Thank you.
Yes I removed the alternator leads. I do have a Haynes manual. This is uncharteted territory for me and frankly I get a little cautious on some of this stuff. Probably more than I should. Seeing the engine disembodied from the car for the first time, in my own garage is intimidating. I'm taking notes and pictures as I go. This project is simply to refresh the tins, engine bay, fuel lines, brake lines, suspension and brakes. Thanks again for the help. |
|
|
|
| BeatNavy |
Feb 24 2016, 11:49 AM
Post
#7
|
|
Certified Professional Scapegoat Group: Members Posts: 2,924 Joined: 26-February 14 From: Easton, MD Member No.: 17,042 Region Association: MidAtlantic Region |
QUOTE(jack20 @ Feb 24 2016, 12:46 PM)  Thank you. Yes I removed the alternator leads. I do have a Haynes manual. This is uncharteted territory for me and frankly I get a little cautious on some of this stuff. Probably more than I should. Seeing the engine disembodied from the car for the first time, in my own garage is intimidating. I'm taking notes and pictures as I go. This project is simply to refresh the tins, engine bay, fuel lines, brake lines, suspension and brakes. Thanks again for the help. But did you remove the BOOT as Shane asked? That's the rubber part that can be seen in 911Buff's picture above (it's around the 3 o'clock position). It funnels cooling air over the alternator. You may just need to gently press it through the opening if that's what is causing the shroud to hang. |
|
|
|
| jack20 |
Feb 24 2016, 11:56 AM
Post
#8
|
|
Member Group: Members Posts: 406 Joined: 7-November 14 From: Granite Bay, CA Member No.: 18,099 Region Association: Northern California |
I see what you're saying. No I haven't gotten in that far. The outer shroud is still attached. I'll be back on this in about two hours.
Thanks |
|
|
|
| Amphicar770 |
Feb 24 2016, 02:23 PM
Post
#9
|
|
Senior Member Group: Members Posts: 1,198 Joined: 20-April 10 From: PA, USA Member No.: 11,639 Region Association: MidAtlantic Region |
Take lots of pictures AND lots of notes.
I am starting reassembly on my 914 now. Having pulled apart lots of stuff, having sent items out for powder coating, rebuild, etc. I know I will be running into several moments of "now where did this come from". Haynes manual useless. Shop manual and diagrams helpful. People on this forum, extremely helpful. |
|
|
|
| jack20 |
Feb 24 2016, 03:30 PM
Post
#10
|
|
Member Group: Members Posts: 406 Joined: 7-November 14 From: Granite Bay, CA Member No.: 18,099 Region Association: Northern California |
Thanks. I've been following your thread. You're a few days ahead of me. I was able to get the fan shroud off, which led to taking even more parts off than I anticipated. I'm off to the stripper/powder coater in a few minutes. I hope he's fast. I want to get this thing reassembled while my memory is still fresh...
|
|
|
|
| r_towle |
Feb 24 2016, 09:26 PM
Post
#11
|
|
Custom Member Group: Members Posts: 24,591 Joined: 9-January 03 From: Taxachusetts Member No.: 124 Region Association: North East States |
Remove the,alternator all th,way.
Remove the fan Remove the thermostat cable from the flappers Remove the top screws from the head tin Remove the bolts that hold the oil cooler support Remove the bolts behind the,fan,that hold the housing to the case. Pull. |
|
|
|
| jack20 |
Feb 25 2016, 12:24 AM
Post
#12
|
|
Member Group: Members Posts: 406 Joined: 7-November 14 From: Granite Bay, CA Member No.: 18,099 Region Association: Northern California |
Sounds like you've done this in your sleep. Very helpful. Many thanks for the response.
Jack |
|
|
|
| euro911 |
Feb 27 2016, 02:16 AM
Post
#13
|
|
Retired & living the dream. God help me if I wake up! Group: Members Posts: 8,851 Joined: 2-December 06 From: So.Cal. & No.AZ (USA) Member No.: 7,300 Region Association: Southern California |
Also, there's supposed to be a circlip that secures the alternator boot to the fan housing (on the inside of the boot and on the inside of the fan housing).
It's best to install the boot in the housing first, because it's a lot easier to get the circlip installed properly. (A lot of folks don't bother with the circlip because it's a pain in the (IMG:style_emoticons/default/bootyshake.gif) to retrofit, especially with the motor installed in the car). It might behoove you to get a new boot if yours isn't in good condition. They're pretty inexpensive (around $15 at Airhead Parts or some of the other bus specialty parts houses) ... just make sue you get the one for the 45 amp alternator. P.S. Your lower alternator bracket is all packaged up and going in the mail later today ... enjoy (IMG:style_emoticons/default/biggrin.gif) |
|
|
|
| jack20 |
Feb 27 2016, 01:28 PM
Post
#14
|
|
Member Group: Members Posts: 406 Joined: 7-November 14 From: Granite Bay, CA Member No.: 18,099 Region Association: Northern California |
Thanks Mark. You're correct. The boot is shot and I did find them on AP. Thanks for the tip on the size of alt at 45 amp.
Jack |
|
|
|
|
1 User(s) are reading this topic (1 Guests and 0 Anonymous Users)
0 Members:

|
Lo-Fi Version | Time is now: 15th June 2024 - 04:15 PM |
Invision Power Board
v9.1.4 © 2024 IPS, Inc.