|
|
|
Porsche, and the Porsche crest are registered trademarks of Dr. Ing. h.c. F. Porsche AG.
This site is not affiliated with Porsche in any way. Its only purpose is to provide an online forum for car enthusiasts. All other trademarks are property of their respective owners. |
|
|


| DennisO |
 Aug 26 2018, 11:47 AM Aug 26 2018, 11:47 AM
Post
#1
|
|
Member  Group: Members Posts: 61 Joined: 9-June 17 From: Clayton, NC Member No.: 21,162 Region Association: South East States |
Hi All,
I finally had time to get back to my '75 project after life kept getting in the way :-) I have about 95% of the car disassembled and have a pretty good idea of all the rust and hidden damage. The floor pans have some surface rust and a couple of spots that might need a patch (eg by brake/clutch pedals). However, the floor inside the tunnel has some pretty good rust that must be dealt with. Odd, but it look like water leaked just inside the tunnel and sat. Is there a good way to remove the tunnel to access the floor underneath? This is probably not a good idea, but can the floor be cut on both sides of the tunnel, removed, cleaned, painted, and rewelded? Any other ideas? Thanks, Dennis |
   |

 
|
  |
Replies(1 - 13)
| Dave_Darling |
Aug 26 2018, 12:05 PM
Post
#2
|
|
914 Idiot Group: Members Posts: 15,204 Joined: 9-January 03 From: Silicon Valley / Kailua-Kona Member No.: 121 Region Association: Northern California |
I don't think there's any good way. You can drill the spot-welds and pull it out, which means pulling out the cross-member the same way. A lot of people settle for scraping up what they can access, and using a rust conversion product (phosphoric acid or related stuff) and then epoxy paint on it.
--DD |
|
|
|
| DennisO |
Aug 26 2018, 12:11 PM
Post
#3
|
|
Member Group: Members Posts: 61 Joined: 9-June 17 From: Clayton, NC Member No.: 21,162 Region Association: South East States |
Thanks Dave.
If the tunnel spot welds are removed, then will the tunnel come out or is it joined to the rear firewall? |
|
|
|
| IronHillRestorations |
Aug 26 2018, 03:30 PM
Post
#4
|
|
I. I. R. C. Group: Members Posts: 6,833 Joined: 18-March 03 From: West TN Member No.: 439 Region Association: None |
Taking out the center tunnel is a major undertaking if you are just trying to mitigate the corrosion of a serviceable floor pan.
Tape up the wiring harness, and remove all control cables. Double check your clutch tube, as now would be the time to repair it if needed. I'll usually reinforce the firewall where it comes through, at the minimum. This method requires correct respiratory protection, and I'm not talking about a fiber particle mask, you need a respirator for paints and/or acid. As you'll be spraying both. What I've done in the past is use a undercoating kit with the different spray wands and nozzles. I start with very hot water and rinse it out, then more hot water with a cleaner (wet pickup shop vac as needed to clean up the water), and then rinse off the cleaner with clean water. While wet spray it all with 50/50 solution of Ospho, let it sit for a few mins and re-spray the 50/50 mix, wait a few more mins then rinse with more clean water. Clean up all the mess and spray it all good and dry with air, you can use the wands an nozzles for this too. You can also run your shop vac in reverse to blow it all dry. Let it sit for a day or so to make sure it's all dry. Then spray it with Eastwood's "Internal Frame Coating" really well, 2 or 3 coats. I'd do this with the longs too, just don't use as much water so you don't damage the paper coated heater tubes. My undercoating/rustproofing kit is about 25 years, so I don't know what's out there now. Mine has 3 different wands, 3 nozzles, and came with 3 poly paint/solution bottles that screw on the gun. Here's the Eastwood internal coating, it's the stuff to use. https://www.eastwood.com/eastwood-internal-...oz-aerosol.html |
|
|
|
| IronHillRestorations |
Aug 26 2018, 03:46 PM
Post
#5
|
|
I. I. R. C. Group: Members Posts: 6,833 Joined: 18-March 03 From: West TN Member No.: 439 Region Association: None |
Here's the closest thing I could find to what I've got. Looks like you may have to buy extra wands and nozzles https://www.eastwood.com/undercoating-gun-w...and-bottle.html
|
|
|
|
| Mike Bellis |
Aug 26 2018, 05:26 PM
Post
#6
|
|
Resident Electrician Group: Members Posts: 8,347 Joined: 22-June 09 From: Midlothian TX Member No.: 10,496 Region Association: None |
Eastwood makes a good rust converter that I have used. It turns the rust black and inert. Then you can prime or seal right over it.
|
|
|
|
| sithot |
Aug 26 2018, 05:33 PM
Post
#7
|
|
Member Group: Members Posts: 448 Joined: 25-October 06 From: Virginia Member No.: 7,090 Region Association: None |
Extend by Loctite is a great product I've used for years.
|
|
|
|
| mgphoto |
Aug 26 2018, 05:35 PM
Post
#8
|
|
"If there is a mistake it will find me" Group: Members Posts: 1,375 Joined: 1-April 09 From: Los Angeles, CA Member No.: 10,225 Region Association: Southern California |
I've seen where a section of the tunnel is cut and folded back for access so wire brush can be used for clean up.
After cleaning, treating and epoxy primer the section is bent back into position and welded. |
|
|
|
| DennisO |
Aug 26 2018, 06:33 PM
Post
#9
|
|
Member Group: Members Posts: 61 Joined: 9-June 17 From: Clayton, NC Member No.: 21,162 Region Association: South East States |
Guys,
Thanks for all the great advice. All the cables (clutch, e-brake, heater) have been removed. The harness and battery cable have already been removed, and I'm going to remove the fuel lines, since I plan to replace, I do have a couple of questions regarding the 50/50 solution of ospho. is there any concern about ospho getting into the joints (eg tunnel and floor spot welded joint) and cause me problems down the road? Or does the repeated rinses get it all out? Is it OK to you a propane torch to lightly dry the area in addition to the forced air? Thanks, Dennis |
|
|
|
| IronHillRestorations |
Aug 26 2018, 08:06 PM
Post
#10
|
|
I. I. R. C. Group: Members Posts: 6,833 Joined: 18-March 03 From: West TN Member No.: 439 Region Association: None |
The Ospho won't hurt getting into seams. I wouldn't use a torch, maybe a blow dryer or heat gun.
|
|
|
|
| bbrock |
Aug 26 2018, 09:28 PM
Post
#11
|
|
914 Guru Group: Members Posts: 5,269 Joined: 17-February 17 From: Montana Member No.: 20,845 Region Association: Rocky Mountains |
QUOTE(IronHillRestorations @ Aug 26 2018, 08:06 PM)  The Ospho won't hurt getting into seams. I wouldn't use a torch, maybe a blow dryer or heat gun. (IMG:style_emoticons/default/agree.gif) Getting Ospho in the seams should actually be a good thing as long as the water rinse also gets in there to neutralize it. It will convert any rust it contacts in the seams and leave a protective phophorous coating behind. |
|
|
|
| DennisO |
Aug 26 2018, 09:36 PM
Post
#12
|
|
Member Group: Members Posts: 61 Joined: 9-June 17 From: Clayton, NC Member No.: 21,162 Region Association: South East States |
Perfect. I'll try it next weekend. thanks all.
- Dennis |
|
|
|
| Curbandgutter |
Aug 27 2018, 01:15 PM
Post
#13
|
|
Senior Member Group: Members Posts: 565 Joined: 8-March 13 From: Murrieta CA Member No.: 15,637 Region Association: Southern California |
While you are in the mood shoot some of that coating in the hollow of the firewall where it meets the floor. This is what it looks like with the floor removed
Attached thumbnail(s) 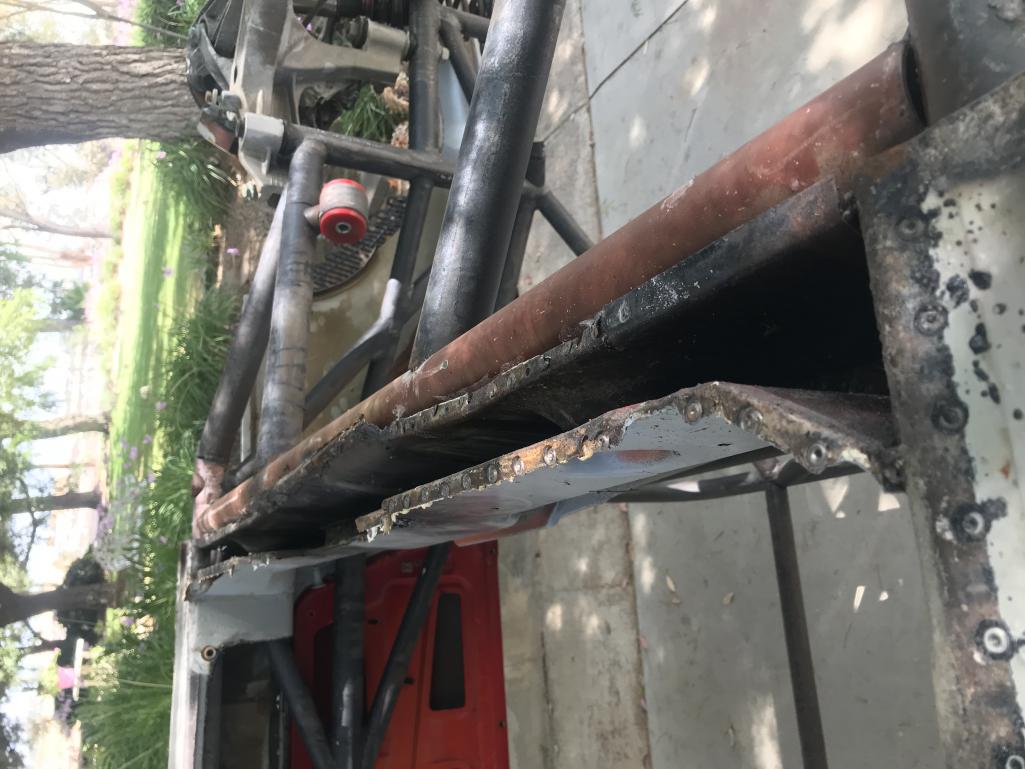
|
|
|
|
| ClayPerrine |
Aug 27 2018, 03:18 PM
Post
#14
|
|
Life's been good to me so far..... Group: Admin Posts: 16,445 Joined: 11-September 03 From: Hurst, TX. Member No.: 1,143 Region Association: NineFourteenerVille |
Strip the tub to bare metal.
Clean up the rust on every surface of the tub, and repair it. Have the whole tub galvanized. ;-) |
|
|
|
|
1 User(s) are reading this topic (1 Guests and 0 Anonymous Users)
0 Members:

|
Lo-Fi Version | Time is now: 15th July 2025 - 03:10 AM |
Invision Power Board
v9.1.4 © 2025 IPS, Inc.