|
|
|
Porsche, and the Porsche crest are registered trademarks of Dr. Ing. h.c. F. Porsche AG.
This site is not affiliated with Porsche in any way. Its only purpose is to provide an online forum for car enthusiasts. All other trademarks are property of their respective owners. |
|
|


| william harris |
 Jun 18 2005, 09:43 AM Jun 18 2005, 09:43 AM
Post
#1
|
|
914 Restorer  Group: Members Posts: 1,459 Joined: 9-January 04 From: Hamilton, MA Member No.: 1,539 |
OK, exhausted myself (of course working under jack stands is never fun) last night trying to reinstall the master cylinder so I could hook up Eric Shea's beautiful (IMG:http://www.914world.com/bbs2/html/emoticons/wub.gif) pedal assembly (IMG:http://www.914world.com/bbs2/html/emoticons/wub.gif) As anyone who has done this knows, the plastic lines up to the reservoir connect to about a three inch long brass line that fits into two press fit rubber boots on top of the master cylinder. Well you can't press them in after the cylinder is attached to the bolts coming thru from the pedal assembly. So what I have tried and tried to do is to pull the lines down about an inch or so, push them in and then have my son gently pull the lines up from the top while I push the master cylinder onto the bolts and into position. It just ain't working. Either the plastic lines kink (not good) or the damn things pull out of the master cylinder before I can get it into place. After trying this approach for about an hour I decided it was time to go watch TV. (IMG:http://www.914world.com/bbs2/html/emoticons/lol2.gif) Any suggestions for a better method? Oh, the damn grommets want to come out of the lower panel when you push the lines, making for more mischief. I gotta remind myself I do this for fun and enjoyment. (IMG:http://www.914world.com/bbs2/html/emoticons/headbang.gif)
|
   |

 
|
  |
Replies(1 - 19)
| Mueller |
Jun 18 2005, 10:14 AM
Post
#2
|
|
914 Freak! Group: Members Posts: 17,155 Joined: 4-January 03 From: Antioch, CA Member No.: 87 Region Association: None |
are the hoses still connected to the fluid resevoir tank??
I disconnect the hoses from up top to allow more freedom down below. |
|
|
|
| william harris |
Jun 18 2005, 10:18 AM
Post
#3
|
|
914 Restorer Group: Members Posts: 1,459 Joined: 9-January 04 From: Hamilton, MA Member No.: 1,539 |
No,they are loose. Hell, there ain't no reservoir tank in the car yet!! (IMG:http://www.914world.com/bbs2/html/emoticons/lol2.gif)
|
|
|
|
| mihai914 |
Jun 18 2005, 11:06 AM
Post
#4
|
|
Senior Member Group: Members Posts: 800 Joined: 2-March 05 From: Montreal, QC Member No.: 3,697 Region Association: None |
The only way I managed to do this is with the master bolted up and the lines loose. I know it's a big bitch to put those grommets in. This was my trick that took me an hour to figure out. You can't pry those in very easily but if you use a fuel injection hose clip it makes life much easier.
Put some soap or lubricant on the grommet and then put the clip around it and start squeezing it. The damn thing may slip so you have to compress the grommet perfectly, once it squeezed enough center it over the master hole and press in fast, it should slip out of the clip and in the master. It may take you a couple of tries but this was by far the best way I managed to get those lines in. |
|
|
|
| Grimstead |
Jun 18 2005, 11:15 AM
Post
#5
|
|
Cheaky Monkey Group: Members Posts: 835 Joined: 20-March 05 From: Corona, Ca Member No.: 3,789 Region Association: Southern California |
This is just a guess as I haven't put mine back on yet. But how hard would it be to put the lines and the MC together outside the car and then feed the lines back up to the hood? (IMG:http://www.914world.com/bbs2/html/emoticons/confused24.gif)
|
|
|
|
| mihai914 |
Jun 18 2005, 11:19 AM
Post
#6
|
|
Senior Member Group: Members Posts: 800 Joined: 2-March 05 From: Montreal, QC Member No.: 3,697 Region Association: None |
It's almost impossible because of the twist that the metal part of the lines take down under the car with the limited space also. Maybe the Cap'n should chime in...
|
|
|
|
| mikelsr |
Jun 18 2005, 11:20 AM
Post
#7
|
|
Senior Member Group: Members Posts: 657 Joined: 2-January 05 From: Mahomet, IL Member No.: 3,390 Region Association: Southwest Region |
If I can remember correctly here is what I did (after lots of hit and miss).
1) Pulled down on the lines (loosened the reservoir tank) to get a bit of slack in the lines. And yes the grommet came out. 2) Attach the rubber boots to the lines next. 3) Put the mc on to the bolts (at the ver end), then using finger power pushed the boots (with lines attached) into the mc. This took a lot of effort on my part. If I were to do it again I think I would put ky gel on them (the gel shouldn't hurt the boots and it will evaporate - don't use vasoline (sp? ) it is a petroleum product). 3a) Put the grommet back in place. You might want to lube the lines when pulling them back up. 4) Push the mc all the way back onto the bolts and tightened everything up. Make sure that you have the push rod centered in the mc before you push the mc back. 5) Adjust the brake pedal 6) Adjust the brake light switch I have pictures of the brake light switch. I don't know how to post an exact link to the response but it is on page 17, the 9th entry. Light switch Good luck, Mike |
|
|
|
| TravisNeff |
Jun 18 2005, 11:20 AM
Post
#8
|
||
|
914 Guru Group: Members Posts: 5,082 Joined: 20-March 03 From: Mesa, AZ Member No.: 447 Region Association: Southwest Region |
That's the ticket! I've also attached the hoses to the MC then bolted the MC to the pedal cluster, that was a pain. I have also bolted up the MC then attached the lines. Any way you do it, it is a pain - but Grimstead's idea beats them both! |
||
|
|
|
||
| Engman |
Jun 18 2005, 11:24 AM
Post
#9
|
|
Zoisite Group: Benefactors Posts: 1,349 Joined: 25-March 03 From: New Albany, IN Member No.: 475 |
This WAS one of the hardest things I did on my first 914. Then I got smarter.......
1. Take out the mc and the mc feed lines 2. mark the feed lines front and back (you will thank me later) 3. Take the feed lines off the old mc and transfer to the new one on a bench. These are easy to press in on a bench. A real PITA to try to do under the car. 4. Take your new mc with the feed lines in the correct holes (front and back) and feed the feed lines thru the correct holes below the fuel tank. Take your time as they can twist out here. 5. Bolt it on. M |
|
|
|
| Eric_Shea |
Jun 18 2005, 11:41 AM
Post
#10
|
|
PMB Performance Group: Admin Posts: 19,304 Joined: 3-September 03 From: Salt Lake City, UT Member No.: 1,110 Region Association: Rocky Mountains |
Tip: Make Eric do it. (the "other" Eric (IMG:http://www.914world.com/bbs2/html/emoticons/w00t.gif) )
Have a beer, shout encouraging words like "Look'n good" and "That's it... almost there" or "Need a hand with that?" (the later needs to be timed perfectly as the tool grunt is just about finished with the task). Sit back and relax. (IMG:http://www.914world.com/bbs2/html/emoticons/beer3.gif) |
|
|
|
| TimT |
Jun 18 2005, 12:06 PM
Post
#11
|
||
|
retired Group: Members Posts: 4,033 Joined: 18-February 03 From: Wantagh, NY Member No.: 313 |
(IMG:http://www.914world.com/bbs2/html/emoticons/agree.gif) thats the easy way to do it |
||
|
|
|
||
| william harris |
Jun 18 2005, 03:37 PM
Post
#12
|
|
914 Restorer Group: Members Posts: 1,459 Joined: 9-January 04 From: Hamilton, MA Member No.: 1,539 |
OK, I was afraid this might be part of the problem. So since a certain dumb ass didn't mark the lines front and back, how the hell can I tell which is which now? I am sure the wrong lines in the wrong hole will screw up the set up. Help. (IMG:http://www.914world.com/bbs2/html/emoticons/unsure.gif)
|
|
|
|
| Gint |
Jun 18 2005, 05:22 PM
Post
#13
|
|
Mike Ginter Group: Admin Posts: 16,098 Joined: 26-December 02 From: Denver CO. Member No.: 20 Region Association: Rocky Mountains |
Screw in the reservoir and then just put the lines up through and see how best they will fit/line up. Swap them back and forth etc... You'll figure it out.
|
|
|
|
| william harris |
Jun 18 2005, 06:30 PM
Post
#14
|
|
914 Restorer Group: Members Posts: 1,459 Joined: 9-January 04 From: Hamilton, MA Member No.: 1,539 |
OK, looks like my father's day project. (IMG:http://www.914world.com/bbs2/html/emoticons/lol2.gif)
|
|
|
|
| tat2dphreak |
Jun 18 2005, 06:47 PM
Post
#15
|
|
stoya, stoya, stoya Group: Benefactors Posts: 8,797 Joined: 6-June 03 From: Wylie, TX Member No.: 792 Region Association: Southwest Region |
it's not fun... what I did was "loosen up the grommets first... kinda opened/stretched them with my finger(with a little WD40 on it) and that REALLY helped!
|
|
|
|
| sgomes |
Jun 18 2005, 06:53 PM
Post
#16
|
||
|
Electric Member Group: Members Posts: 815 Joined: 6-May 04 From: Campbell, CA Member No.: 2,029 |
(IMG:http://www.914world.com/bbs2/html/emoticons/agree.gif) That is THE way to do it. I spent the better part of a weekend trying to figure this one out. By FAR the best way to do this is on the bench. For those of you with a gas tank in the car - you're S.O.L. I suggest removing it. |
||
|
|
|
||
| watsonrx13 |
Jun 18 2005, 07:10 PM
Post
#17
|
|
Advanced Member Group: Members Posts: 2,735 Joined: 18-February 03 From: Plant City, FL Member No.: 312 Region Association: South East States |
William, I just installed my new MC and lines last month, here's the pic underneath the car....
Attached image(s) 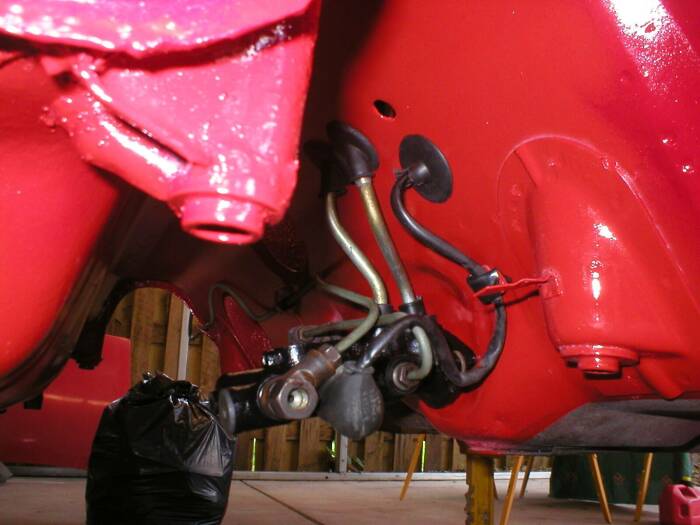
|
|
|
|
| watsonrx13 |
Jun 18 2005, 07:11 PM
Post
#18
|
|
Advanced Member Group: Members Posts: 2,735 Joined: 18-February 03 From: Plant City, FL Member No.: 312 Region Association: South East States |
Here's a shot underneath the fuel tank (removed)...
Here's a link to my web site showing the installation... Attached image(s) 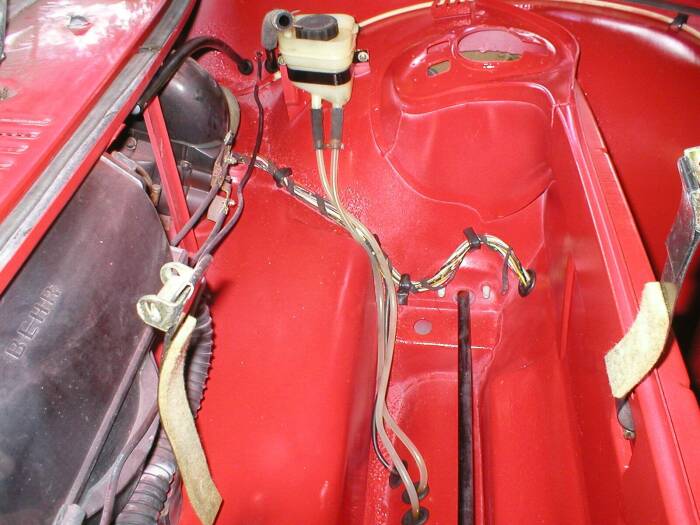
|
|
|
|
| watsonrx13 |
Jun 18 2005, 07:12 PM
Post
#19
|
|
Advanced Member Group: Members Posts: 2,735 Joined: 18-February 03 From: Plant City, FL Member No.: 312 Region Association: South East States |
Eric, here's the shot of my pedal cluster installed that I promised you...
Thanks for a great product... Attached image(s) 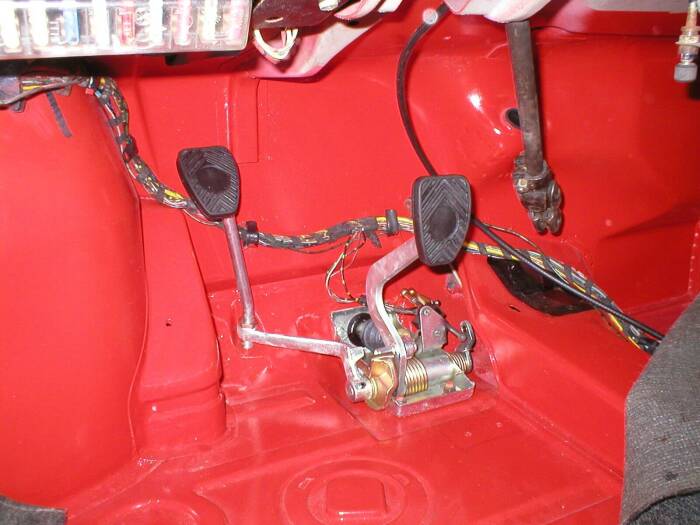
|
|
|
|
| firstknight13 |
Jun 18 2005, 08:43 PM
Post
#20
|
|
Senior Member Group: Members Posts: 652 Joined: 25-March 05 From: manchester,ct. Member No.: 3,817 |
(IMG:http://www.914world.com/bbs2/html/emoticons/smilie_pokal.gif) ok here is how YOU do it !!!very simple now but it took me a couple of hours to figure it out...... install the master cylinder in then take strong mason string and loop it around the plastic line 3-4 inches up. have two lines dangling down. wrap your fingers around the string and pull down straight and hard and your done!!! oh!! lube the ends first.... (IMG:http://www.914world.com/bbs2/html/emoticons/wink.gif)
|
|
|
|
|
1 User(s) are reading this topic (1 Guests and 0 Anonymous Users)
0 Members:

|
Lo-Fi Version | Time is now: 14th July 2025 - 08:07 PM |
Invision Power Board
v9.1.4 © 2025 IPS, Inc.