|
|
|
Porsche, and the Porsche crest are registered trademarks of Dr. Ing. h.c. F. Porsche AG.
This site is not affiliated with Porsche in any way. Its only purpose is to provide an online forum for car enthusiasts. All other trademarks are property of their respective owners. |
|
|


| John Kelly |
 Dec 16 2005, 07:13 AM Dec 16 2005, 07:13 AM
Post
#1
|
|
Senior Member  Group: Members Posts: 692 Joined: 1-May 03 From: Moclips WA. Member No.: 640 |
I've been working on a method for making mild reverse shapes that is a little easier than stretching the edge of a panel. A reverse is where instead of a crown or bulge in the body, you have a concave area. An example of this would be the cowl area on some early cars....or where a fender flare blends in with the body on a later car. In this case, you would have a normal outward curve up and down and a reverse curve front to back. Usually you stretch the edge of the panel that you want the reverse shape in to make it grow and create a valley just inboard of the edge. You stretch a lot on the edge and less as you blend the reverse into the panel. This can be very tricky, and your panel can get away from you.
Using a crowned shrinking disc, I made about 12 passes in a sample piece. The sample was rolled over my leg first to make a curve similar to what I would do for a fender flare where it meets the door gap. Instead of stretching the edge, I shrunk the valley. The panel is a little easier to control this way. I've attached three pictures. The first one is an example of a typical reverse. The reverse is where my hand is pressing on the flow strip. The fender flare was stretched making a valley (reverse) in the transition area between the flare and body. The second and third pictures are of the test panel I shrunk a reverse in. I will be playing with this method some more to see how far I can take it. I think a combination of shrinking the valley and a mild stretching of the edge will come in handy at some point. John www.ghiaspecialties.com Attached image(s) 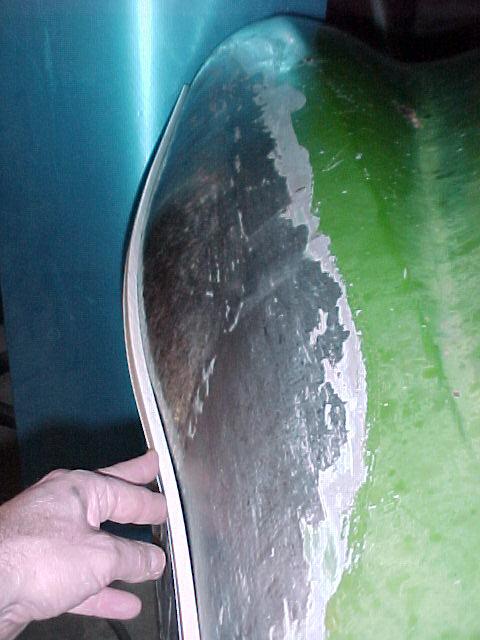
|
   |

 
|
  |
Replies(1 - 7)
| John Kelly |
Dec 16 2005, 07:16 AM
Post
#2
|
|
Senior Member Group: Members Posts: 692 Joined: 1-May 03 From: Moclips WA. Member No.: 640 |
....
Attached image(s) 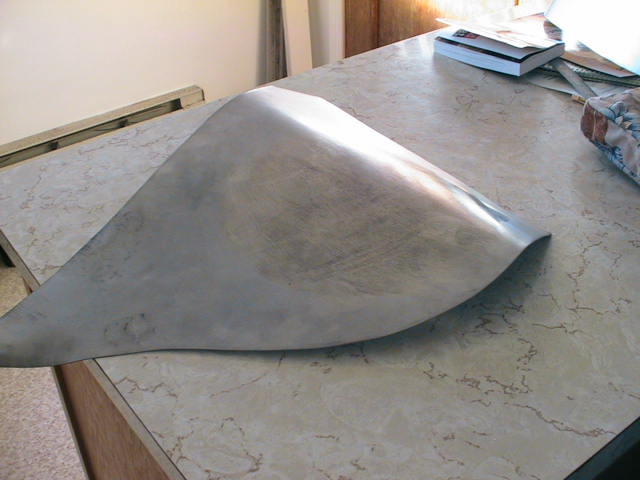
|
|
|
|
| John Kelly |
Dec 16 2005, 07:17 AM
Post
#3
|
|
Senior Member Group: Members Posts: 692 Joined: 1-May 03 From: Moclips WA. Member No.: 640 |
...
Attached image(s) 
|
|
|
|
| rick 918-S |
Dec 16 2005, 07:54 AM
Post
#4
|
|
Hey nice rack! -Celette Group: Members Posts: 20,492 Joined: 30-December 02 From: Now in Superior WI Member No.: 43 Region Association: Northstar Region |
Nice work John. Your a talented guy. Have you heard of Casimir Nawrocki? He's a friend of mine. Every time I visit him he's working some magic with metal.
Did you anneal that sheet first? Looks like it's slightly blued. |
|
|
|
| John Kelly |
Dec 16 2005, 09:10 AM
Post
#5
|
|
Senior Member Group: Members Posts: 692 Joined: 1-May 03 From: Moclips WA. Member No.: 640 |
Hi Rick,
Cass Nawrocki! Yes I've heard of him. A very innovative metalshaper from what I understand. Steel does not require annealing to shape it, but some folks think the shrinking disc does anneal. I don't know if this is true or not. I do know that you can work the metal for a long time without failure. Thanks for the kind words, John www.ghiaspecialties.com |
|
|
|
| John Kelly |
Dec 16 2005, 04:35 PM
Post
#6
|
|
Senior Member Group: Members Posts: 692 Joined: 1-May 03 From: Moclips WA. Member No.: 640 |
A little more progress...this is the most intuitive metalshaping concept I have ever come up with. Dead simple. Feel a high spot, shrink it down. It does not get any easier.
John www.ghiaspecialties.com Attached image(s) 
|
|
|
|
| McMark |
Dec 16 2005, 06:09 PM
Post
#7
|
|
914 Freak! Group: Retired Admin Posts: 20,179 Joined: 13-March 03 From: Grand Rapids, MI Member No.: 419 Region Association: None |
Doesn't the shrinking disk get harder and harder to use as you get more reverse? Or I guess you're probably shrinking on the "back" side.
|
|
|
|
| John Kelly |
Dec 17 2005, 07:58 AM
Post
#8
|
|
Senior Member Group: Members Posts: 692 Joined: 1-May 03 From: Moclips WA. Member No.: 640 |
Hi Mark,
I'm not using one of my flat shrinking discs. This is a crowned disc that I just started making which easliy reaches into a valley. If you were making a super reverse (think potato chip), shrinking from the other side would be a consideration at some point. I wish I had tried this when doing the reverses on Felix's flares... John www.ghiaspecialties.com |
|
|
|
|
1 User(s) are reading this topic (1 Guests and 0 Anonymous Users)
0 Members:

|
Lo-Fi Version | Time is now: 8th June 2024 - 09:09 PM |
Invision Power Board
v9.1.4 © 2024 IPS, Inc.