|
|
|
Porsche, and the Porsche crest are registered trademarks of Dr. Ing. h.c. F. Porsche AG.
This site is not affiliated with Porsche in any way. Its only purpose is to provide an online forum for car enthusiasts. All other trademarks are property of their respective owners. |
|
|


| billd |
 Sep 10 2007, 03:47 PM Sep 10 2007, 03:47 PM
Post
#1
|
|
Member  Group: Members Posts: 327 Joined: 25-May 05 From: Palo Alto, CA Member No.: 4,145 |
I'm in the process of replacing the stock latch on my front trunk lid with hood pins. To avoid hitting the bracing on the fiberglass lid, the pins need to be in at least 3.5 inches from the front and from the edge of the hood toward the headlight.
I riveted in a piece of aluminum angle between the "gutters" in the appropriate place and attempted to install a hood pin in this angle. However the pin is too high (even threaded all the way down) and at the wrong angle (Tilted too far forward). The angle matters because the clearance on the scuff plate is only about 0.62 inches. I'm about to fabricate a custom bracket to hold the pin at the right level and right angle. Before I spend a lot of time bending metal, does anyone have a photo of how this should be done? |
   |

 
|
  |
Replies(1 - 19)
| jim_hoyland |
May 5 2017, 08:19 PM
Post
#2
|
|
Get that VIN ? Group: Members Posts: 9,319 Joined: 1-May 03 From: Sunset Beach, CA Member No.: 643 Region Association: Southern California |
See
Attached image(s) 
|
 |
|
| wndsrfr |
May 5 2017, 08:44 PM
Post
#3
|
|
Senior Member Group: Members Posts: 1,430 Joined: 30-April 09 From: Rescue, Virginia Member No.: 10,318 Region Association: MidAtlantic Region |
Here's how Josh did it on Kermee.
 Now, consider keeping the safety latch in the middle...I managed to take a short ride forgetting the pins (just can't get good help these days) and BAM! Fractured the hood. I put the latch back on but gutted the main release mechanism keeping the safety latch.  |
|
|
|
| ConeDodger |
May 5 2017, 09:31 PM
Post
#4
|
|
Apex killer! Group: Members Posts: 23,613 Joined: 31-December 04 From: Tahoe Area Member No.: 3,380 Region Association: Northern California |
I kept the factory latch too. Eric Shea thinks everyone should! (IMG:style_emoticons/default/evilgrin.gif)
Attached thumbnail(s) 
|
|
|
|
| mlindner |
May 6 2017, 05:15 AM
Post
#5
|
|
Senior Member Group: Members Posts: 1,529 Joined: 11-November 11 From: Merrimac, WI Member No.: 13,770 Region Association: Upper MidWest |
Thanks Jim...Bill the first picture is mine. I used nylon spacers....The pin is at 19 degs. so the hole does not have to be longated. The nice thing about the nylon on top and bottom is you can rotate the nylon shims to make fine adjustments front to back and side to side. The Kelly-Moss 914-6 GT build had the pins straight up from the gutters and just kinda bend (or bow) the fiberglass hood as it was put down. Best, Mark
|
|
|
|
| jim_hoyland |
May 6 2017, 06:40 AM
Post
#6
|
|
Get that VIN ? Group: Members Posts: 9,319 Joined: 1-May 03 From: Sunset Beach, CA Member No.: 643 Region Association: Southern California |
QUOTE(mlindner @ May 6 2017, 04:15 AM)  Thanks Jim...Bill the first picture is mine. I used nylon spacers....The pin is at 19 degs. so the hole does not have to be longated. The nice thing about the nylon on top and bottom is you can rotate the nylon shims to make fine adjustments front to back and side to side. The Kelly-Moss 914-6 GT build had the pins straight up from the gutters and just kinda bend (or bow) the fiberglass hood as it was put down. Best, Mark Glad you responded: I have a question; what is the material ( part) you used for the collar. If I go into the Hardware store, what am I looking for ? And how did you set up the piece to cut it at the 19 degree angle ? Really liked your set up; getting ready to do this One other question: what size hole in the hood for the pin ? Any issues in drilling through ? Thanks.... (IMG:style_emoticons/default/smile.gif) |
|
|
|
| wndsrfr |
May 6 2017, 07:55 AM
Post
#7
|
|
Senior Member Group: Members Posts: 1,430 Joined: 30-April 09 From: Rescue, Virginia Member No.: 10,318 Region Association: MidAtlantic Region |
QUOTE(jim_hoyland @ May 6 2017, 04:40 AM) QUOTE(mlindner @ May 6 2017, 04:15 AM) Thanks Jim...Bill the first picture is mine. I used nylon spacers....The pin is at 19 degs. so the hole does not have to be longated. The nice thing about the nylon on top and bottom is you can rotate the nylon shims to make fine adjustments front to back and side to side. The Kelly-Moss 914-6 GT build had the pins straight up from the gutters and just kinda bend (or bow) the fiberglass hood as it was put down. Best, Mark Glad you responded: I have a question; what is the material ( part) you used for the collar. If I go into the Hardware store, what am I looking for ? And how did you set up the piece to cut it at the 19 degree angle ? Really liked your set up; getting ready to do this One other question: what size hole in the hood for the pin ? Any issues in drilling through ? Thanks.... (IMG:style_emoticons/default/smile.gif) One other thing to watch out for is the reinforcing rib on the underside of the hood interfering with the pin nut... |
|
|
|
| mlindner |
May 6 2017, 08:20 AM
Post
#8
|
|
Senior Member Group: Members Posts: 1,529 Joined: 11-November 11 From: Merrimac, WI Member No.: 13,770 Region Association: Upper MidWest |
Good morning Jim. the nylon collars are from the local hardware store. The size is 1 inch by 3/8th with a 3/8 hole (hole needs to be drilled a little larger for the pins. I took the collar and marked about an 1/8 on the bottom, then on a belt sander, sanded at an angle from the top on the left down to the mark on the right. Just a simple test, then made four more for the two pin set up (very easy). The hole for the hood...made a little paper template cut at a 71 deg. angle and taped to hood just above hole placement( which is determined by your pin scuff plates and placement. Drill small pilot hole all the way through....Then to the size needed for your pins. Only issue is the bottom hole in the hood support will need to be larger to fit the nut/nylon collar, also easy. After all fitted, took apart and paint all the bare metal, reassemble. Hope this helps. Best, Mark
      |
|
|
|
| mlindner |
May 6 2017, 08:24 AM
Post
#9
|
|
Senior Member Group: Members Posts: 1,529 Joined: 11-November 11 From: Merrimac, WI Member No.: 13,770 Region Association: Upper MidWest |
Like Bills, my pins would not thread down all the way. Had to take to the machine shop to extend the threads.
|
|
|
|
| Larmo63 |
May 6 2017, 08:38 AM
Post
#10
|
|
Advanced Member Group: Members Posts: 4,264 Joined: 3-March 14 From: San Clemente, Ca Member No.: 17,068 Region Association: Southern California |
|
|
|
|
| Elliot Cannon |
May 6 2017, 09:12 AM
Post
#11
|
|
914 Guru Group: Retired Members Posts: 8,487 Joined: 29-December 06 From: Paso Robles Ca. (Central coast) Member No.: 7,407 Region Association: None |
I'm wondering if you can get away with just two pins in the hood. Is it really necessary to install four? Thanks for the pics Lawrence. They are really helpful. I have also seen at least one small padlock used instead of a pin to secure the trunk. (IMG:style_emoticons/default/smile.gif)
Cheers, Elliot |
|
|
|
| mlindner |
May 6 2017, 10:13 AM
Post
#12
|
|
Senior Member Group: Members Posts: 1,529 Joined: 11-November 11 From: Merrimac, WI Member No.: 13,770 Region Association: Upper MidWest |
my is the original steel hood, only two pins....Fiber glass needs four if your going to be a track speeds.
|
|
|
|
| jim_hoyland |
May 6 2017, 11:18 AM
Post
#13
|
|
Get that VIN ? Group: Members Posts: 9,319 Joined: 1-May 03 From: Sunset Beach, CA Member No.: 643 Region Association: Southern California |
Mark, Thanks for all the additional specs (IMG:style_emoticons/default/smile.gif)
|
|
|
|
| mlindner |
May 6 2017, 11:58 AM
Post
#14
|
|
Senior Member Group: Members Posts: 1,529 Joined: 11-November 11 From: Merrimac, WI Member No.: 13,770 Region Association: Upper MidWest |
Your welcome Jim, have a fun summer. Mark
|
|
|
|
| jim_hoyland |
May 6 2017, 08:04 PM
Post
#15
|
|
Get that VIN ? Group: Members Posts: 9,319 Joined: 1-May 03 From: Sunset Beach, CA Member No.: 643 Region Association: Southern California |
? Alignment of holes; hood and gusset. Would it be practical to get the alignment by mounting the gussets and hood plates first; close the hood;then drill a pilot hole through the hood pin plate ( st a right angle to the hood) to the gusset ? Then go back and enlarge each hole as needed.?
|
|
|
|
| mlindner |
May 7 2017, 05:27 AM
Post
#16
|
|
Senior Member Group: Members Posts: 1,529 Joined: 11-November 11 From: Merrimac, WI Member No.: 13,770 Region Association: Upper MidWest |
Yup, top to bottom.....middle hole again will be enlarged later so not a big deal. That will tell you pin position. I made the top hole in hood a little bigger so the scuff plate was the true alignment . Mark
|
|
|
|
| mlindner |
May 7 2017, 05:31 AM
Post
#17
|
|
Senior Member Group: Members Posts: 1,529 Joined: 11-November 11 From: Merrimac, WI Member No.: 13,770 Region Association: Upper MidWest |
I reread your question.....I would not mount the scuff plate...position and mark hole., as you go through drilling you would scratch you scuff plate, and again that hole should be a little bigger. Mark
|
|
|
|
| Cracker |
May 7 2017, 06:29 AM
Post
#18
|
|
Advanced Member Group: Members Posts: 2,148 Joined: 2-February 10 From: Atlanta (area) Member No.: 11,316 Region Association: South East States |
Beyond your question: I only use two-pins up front and my hood (does not have "rib" reinforcement) is simply flat glass. I drive at a higher rate of speed - no problem here with it moving around or shearing off. I would suggest you consider using 14-gauge SS plate for the strike/backing plate...the aluminum piece first used easily "grooved" after repeated use (just a thought)!
PS: If you are driving on-track...I would suggest you use the .250" pins pictured below. Tech will not pass the quick-clip wire style retainers at our events. Tony QUOTE(mlindner @ May 6 2017, 12:13 PM) my is the original steel hood, only two pins....Fiber glass needs four if your going to be a track speeds.    |
|
|
|
| jim_hoyland |
May 7 2017, 06:29 AM
Post
#19
|
|
Get that VIN ? Group: Members Posts: 9,319 Joined: 1-May 03 From: Sunset Beach, CA Member No.: 643 Region Association: Southern California |
(IMG:style_emoticons/default/smile.gif) Thanks ! I Have a clearer picture now. Gonna do the two plate/pin set up. On a copper car four would be too loud unless I painted the plates the car color.
Attached image(s) 
|
|
|
|
| jim_hoyland |
May 7 2017, 06:56 AM
Post
#20
|
|
Get that VIN ? Group: Members Posts: 9,319 Joined: 1-May 03 From: Sunset Beach, CA Member No.: 643 Region Association: Southern California |
Couple of mock-up pics...
Attached image(s) 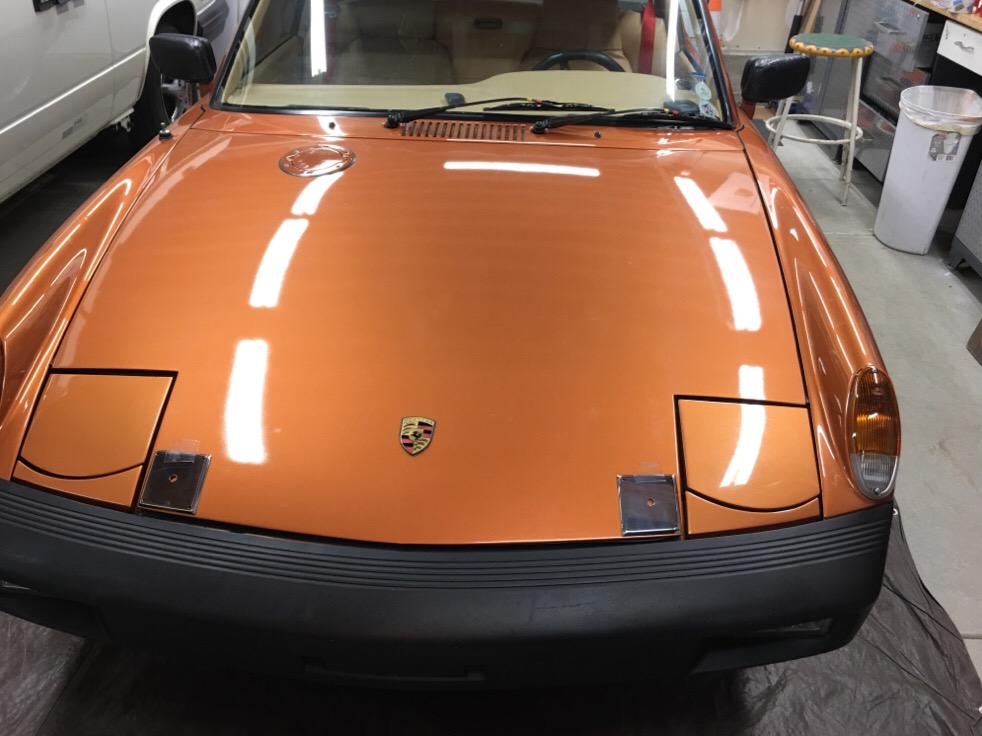 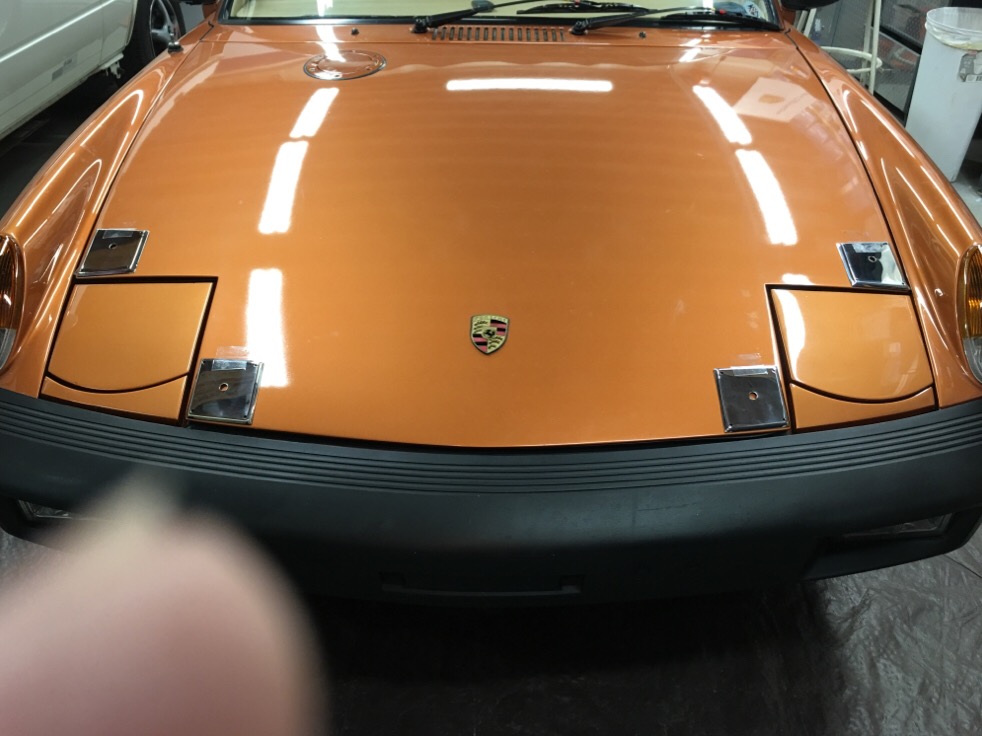 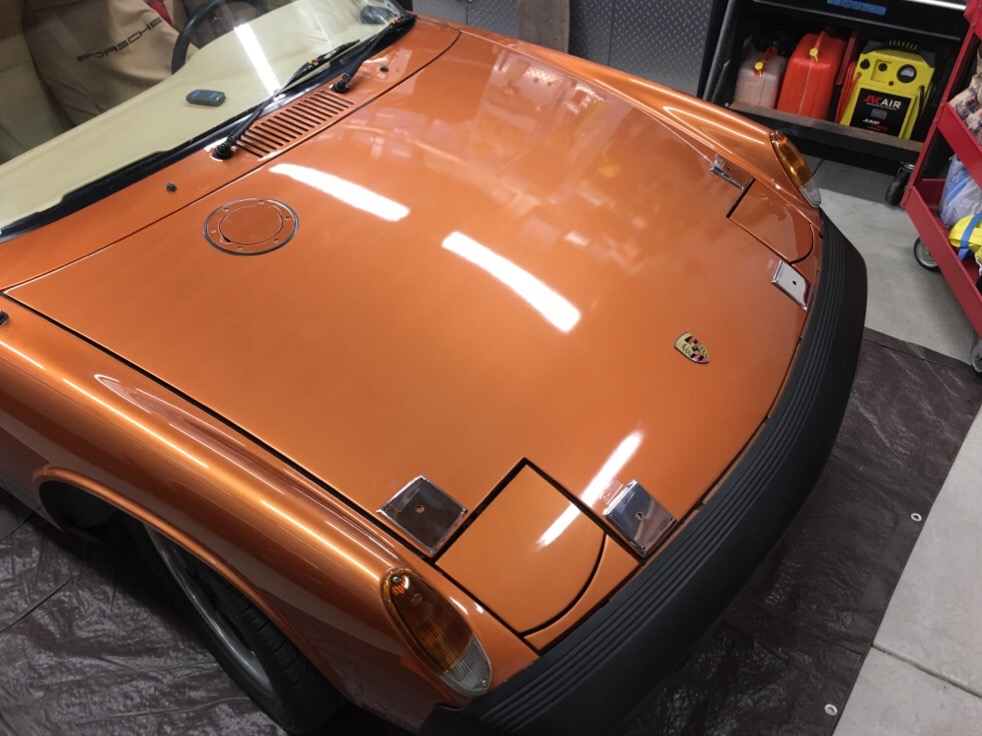
|
|
|
|
|
1 User(s) are reading this topic (1 Guests and 0 Anonymous Users)
0 Members:

|
Lo-Fi Version | Time is now: 9th June 2024 - 12:37 PM |
Invision Power Board
v9.1.4 © 2024 IPS, Inc.