|
|
|
Porsche, and the Porsche crest are registered trademarks of Dr. Ing. h.c. F. Porsche AG.
This site is not affiliated with Porsche in any way. Its only purpose is to provide an online forum for car enthusiasts. All other trademarks are property of their respective owners. |
|
|


| McMark |
 Sep 16 2008, 01:14 AM Sep 16 2008, 01:14 AM
Post
#1
|
|
914 Freak!  Group: Retired Admin Posts: 20,180 Joined: 13-March 03 From: Grand Rapids, MI Member No.: 419 Region Association: None |
I think it was the Tied House meet that gave me the kick in the pants, but I finally decided to jump in and get started on my car. It's been begging for work for a long time. I'm starting with the rear end sections. Can't wait for it to actually DRIVE! (IMG:style_emoticons/default/rolleyes.gif) Here's the list off the top of my head.
1. Pull the motor and fix oil leaks, pull the ceramic lifters, clean everything, install carbs (for now). 2. Fix the hell hole and firewall rust, plus weld all the little holes in the firewall. New battery tray and new rear trunk pivots. 3. Fix the 'access hole' some DAPO cut in the rear trunk. The top starter bolt is not THAT hard to get to. (IMG:style_emoticons/default/dry.gif) 4. Clean and paint the engine bay and rear trunk. 5. Clean and reseal the transmission and replace the speedo angle drive. Here are the pictures from day one. Attached image(s) 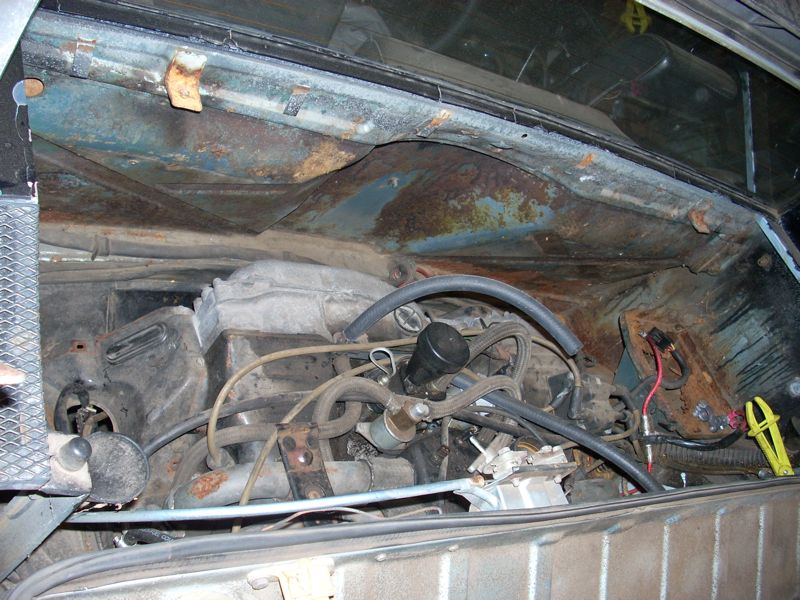 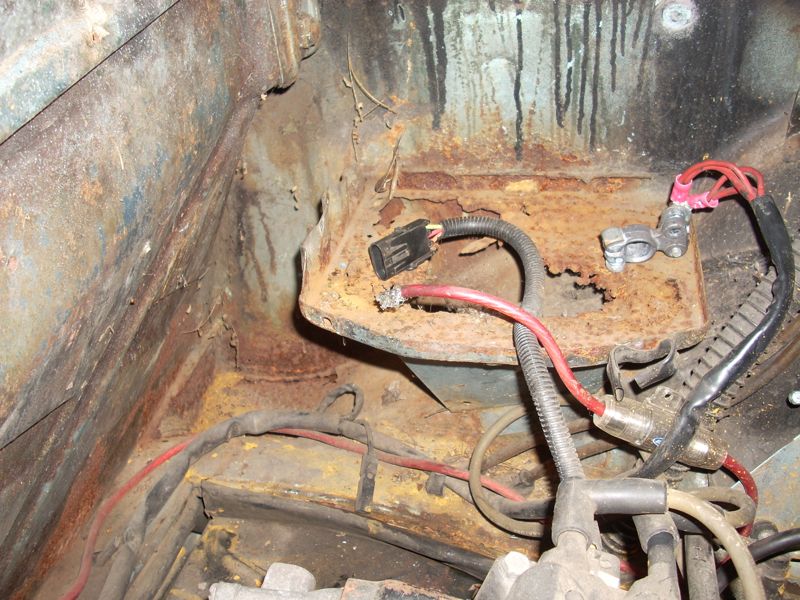 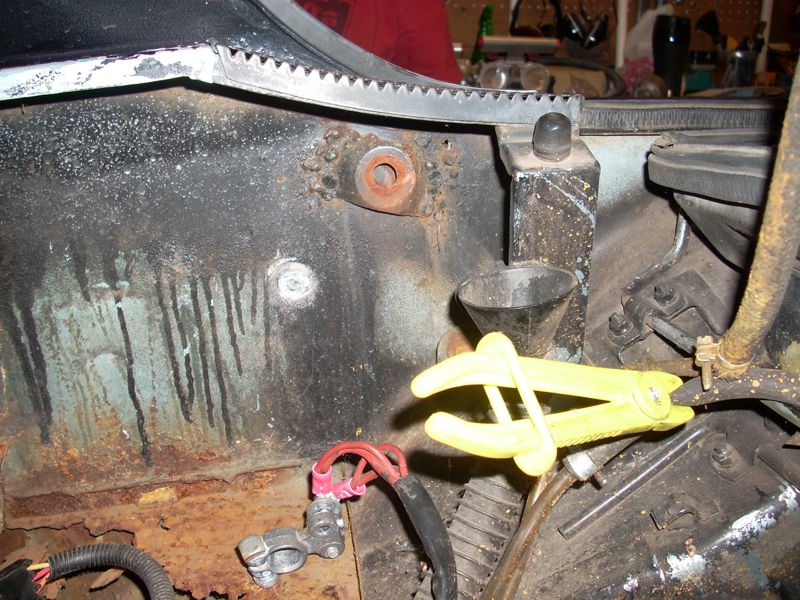 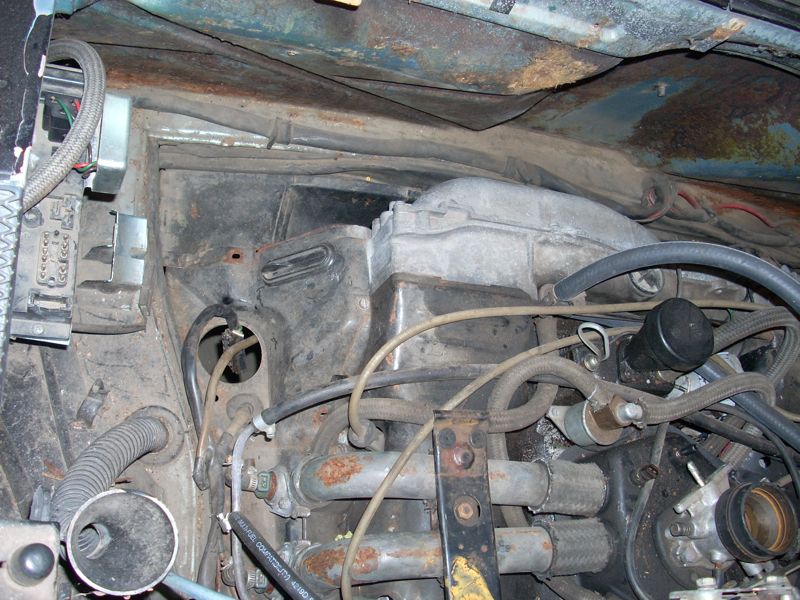 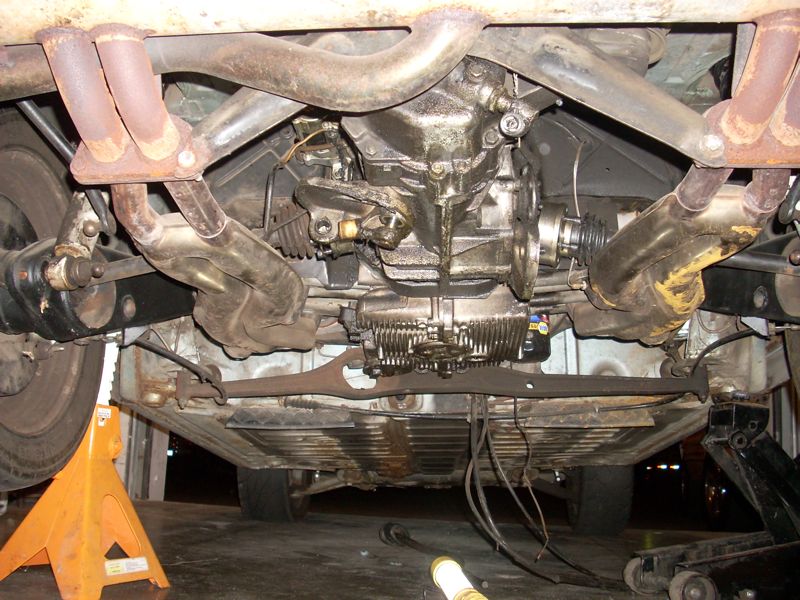 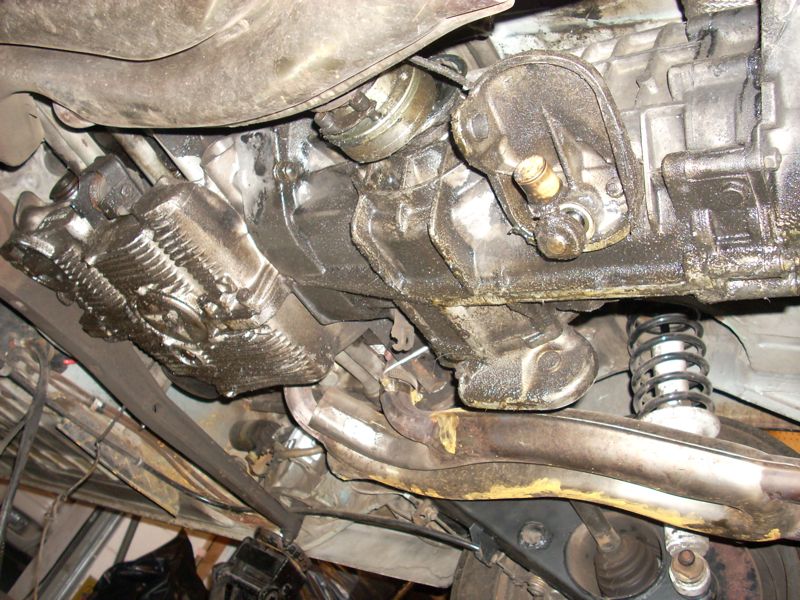 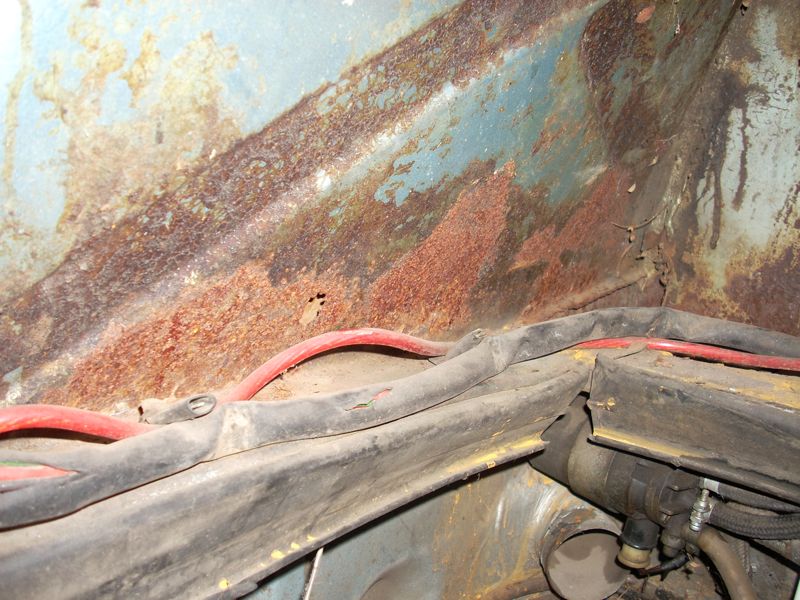 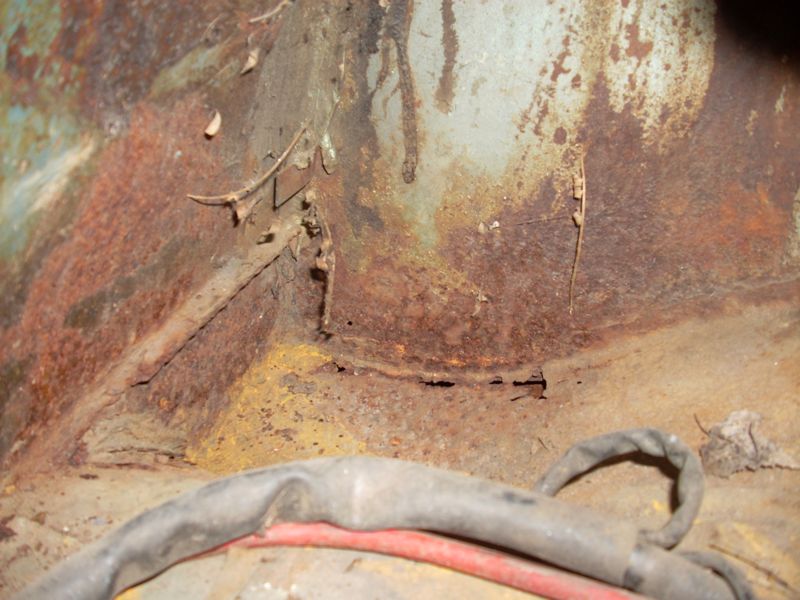 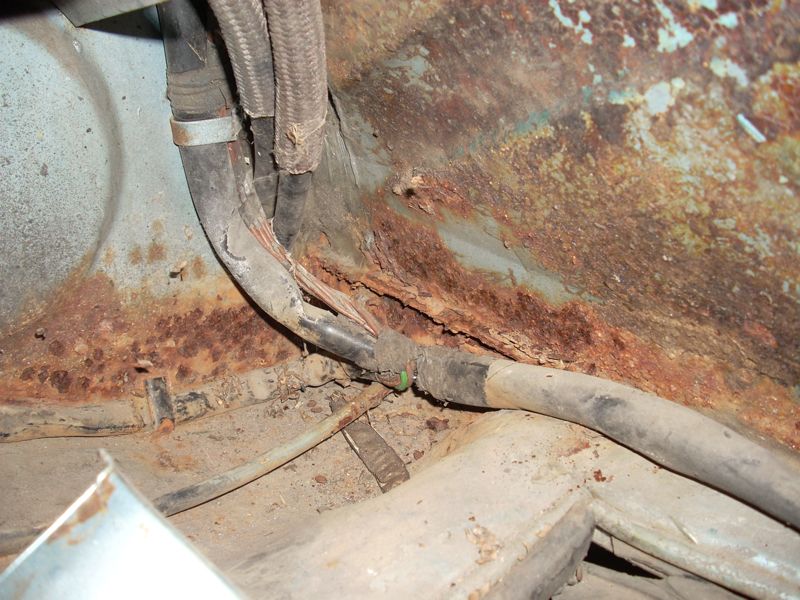 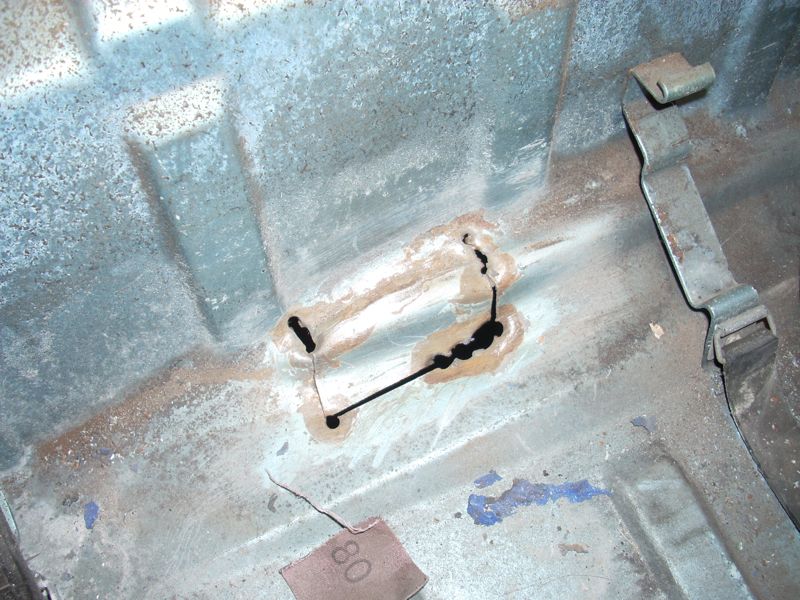 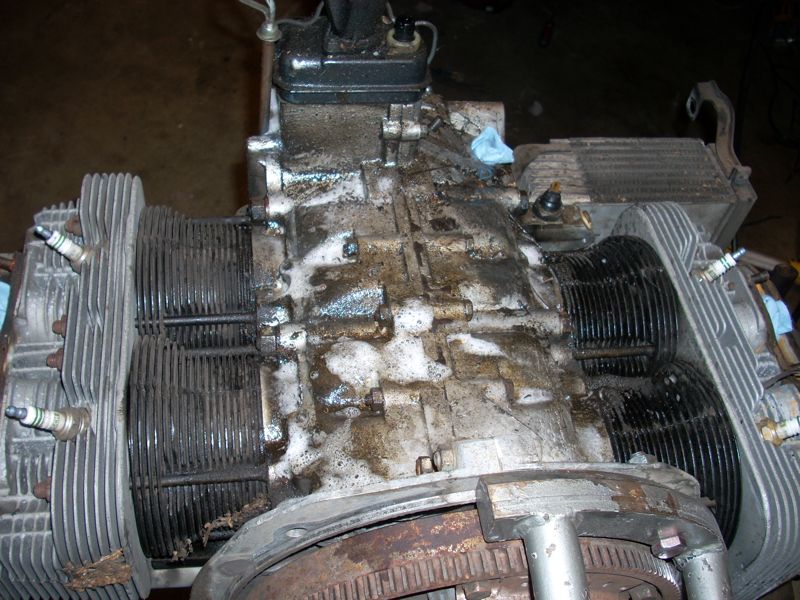 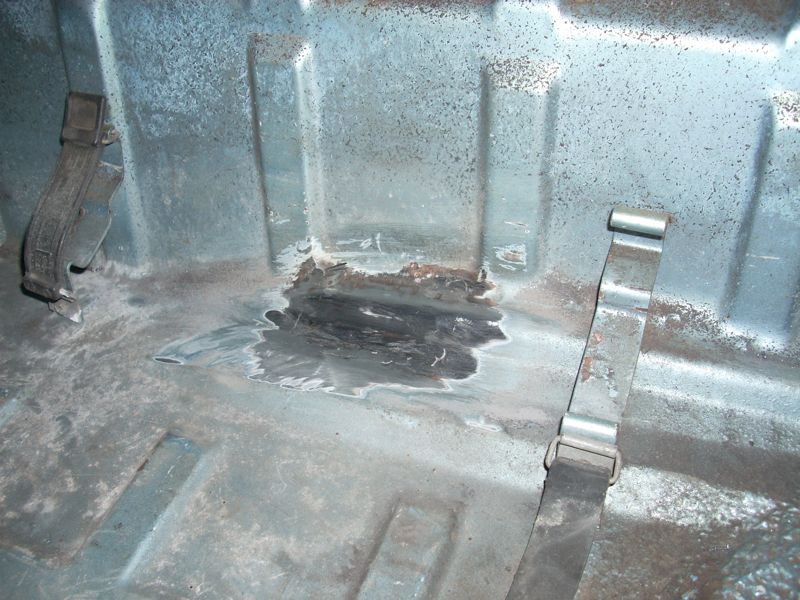
|
   |

 
|
  |
Replies
| McMark |
Nov 28 2009, 11:11 PM
Post
#2
|
|
914 Freak! Group: Retired Admin Posts: 20,180 Joined: 13-March 03 From: Grand Rapids, MI Member No.: 419 Region Association: None |
I finally finished the one thing that started off this whole madness. (IMG:style_emoticons/default/lol-2.gif)
The new rear trunk pivots are in. I bought stock reproductions, then TIG welded the nut boss to the 'frame'. The welds that came on the parts were obviously crap. One of my TIG welds came out better than the other. (IMG:style_emoticons/default/dry.gif) Once the welds cooled, I used some sandpaper on glass to smooth out the face, since the hinge will pivot on that face, and any 'boogers' will cause wear and could cause future damage. 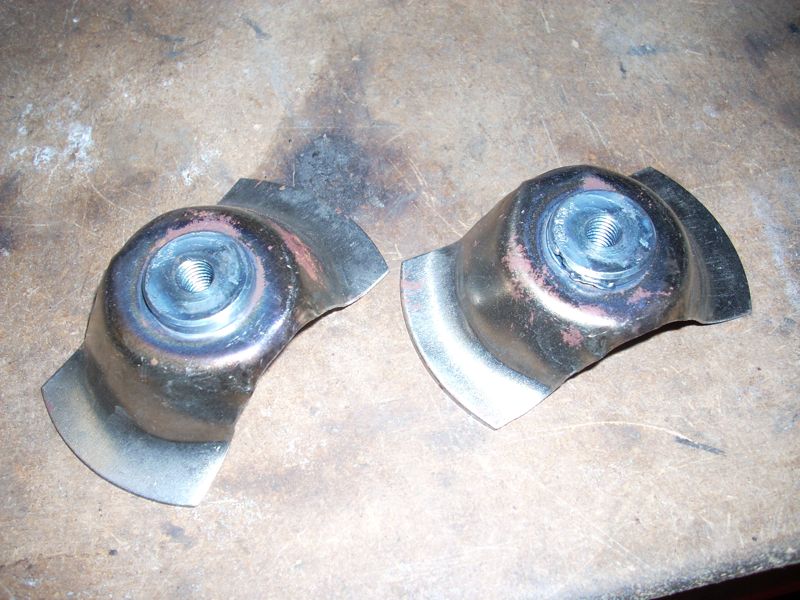 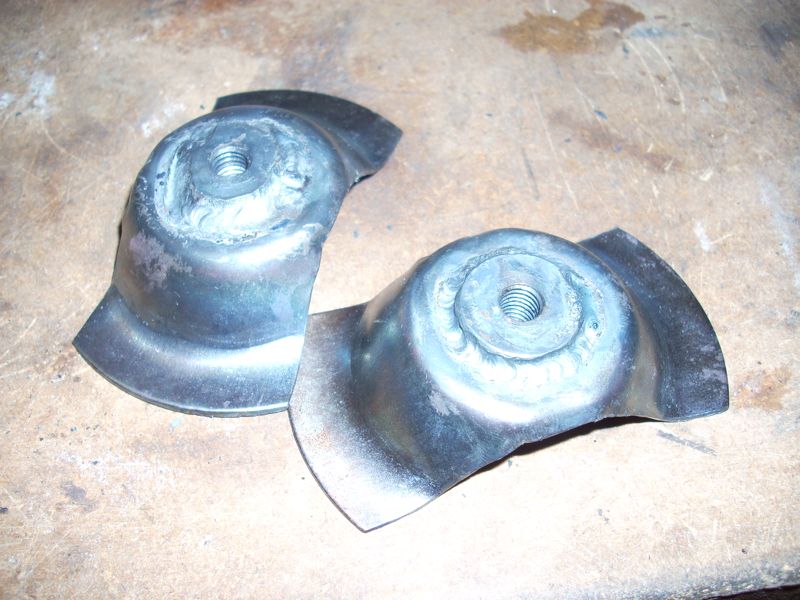 Then I drilled the holes for the rosette welds and painted the back side of the bracket (since you won't be able to get paint back there later). To weld them in I attach the hinges to the lid with the bolts in the middle of their adjustment, and set everything into place. The I line up the gaps as much as possible and use masking tape along the gaps to help hold everything in place. Then using shims I brace the lid up to the correct vertical height. Getting this part right is THE MOST IMPORTANT, since you won't be able to adjust it later. Then ZAP! (IMG:style_emoticons/default/welder.gif) I used power C and wire feed 5.5 on my Lincoln WeldPak 100 with bi-mix gas for the welding. 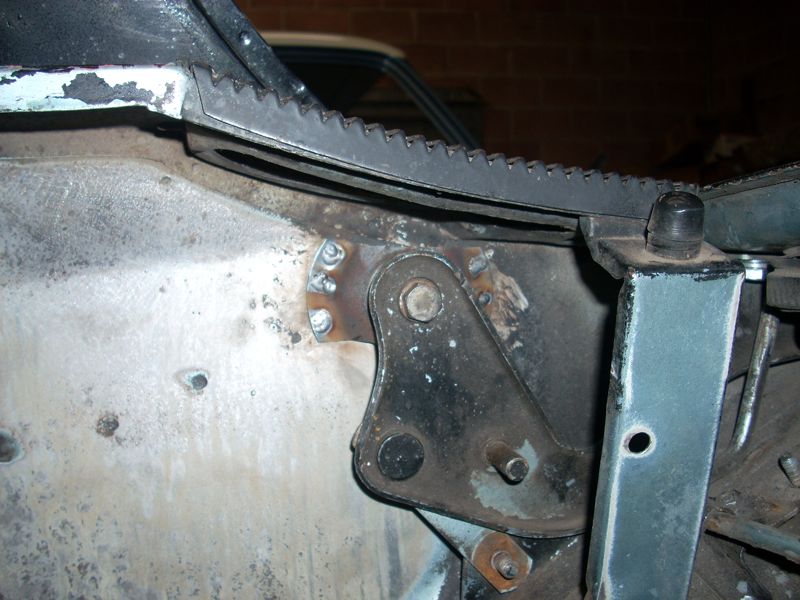 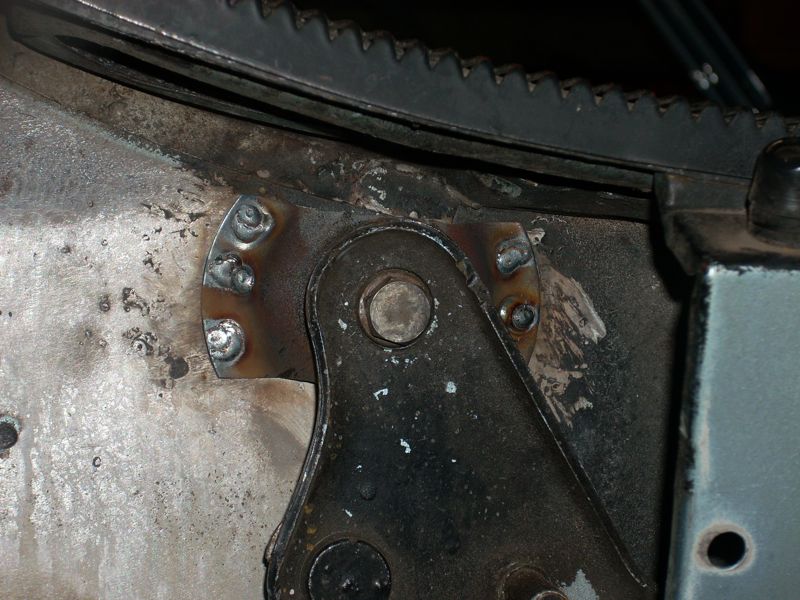 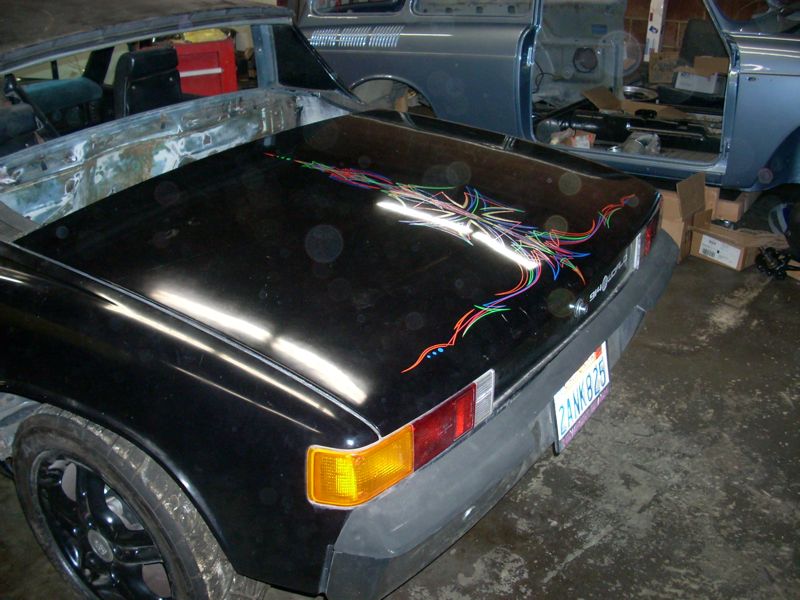 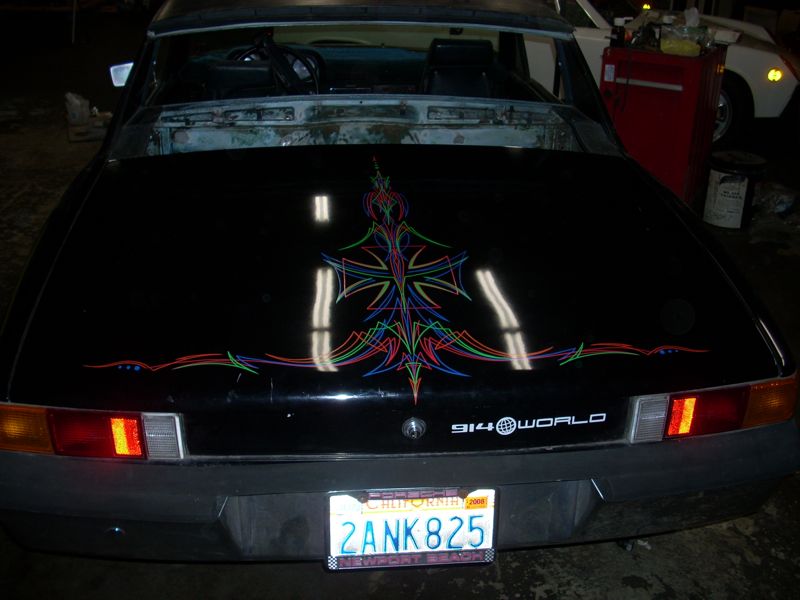 Now I can make the final gap adjustments as necessary. |
|
|
|
Posts in this topic
 McMark Hold The Phone! I'm working on MY CAR! Sep 16 2008, 01:14 AM
 watsonrx13 Congrats Mark.... Now, while you're in there..... Sep 16 2008, 06:03 AM SGB That might need a little spacklin' befor ya pa... Sep 16 2008, 07:12 AM r_towle Think about this...
Chrome engine bay......
inner... Sep 16 2008, 07:15 AM Dave_Darling Right on, McMark!
--DD Sep 16 2008, 07:44 AM rick 918-S WTG Mark! Sep 16 2008, 08:01 AM FourBlades Good to see you are getting going. You are going ... Sep 16 2008, 08:13 AM LarryR Hey, glad to see you are finding some time to work... Sep 16 2008, 08:33 AM jgara962 :Qarl:
Can't wait to see it on the road Sep 16 2008, 10:46 AM greenie It's about time... you were turning into the p... Sep 16 2008, 11:12 AM McMark
Heeheh, LOL. :lol: This will be going back to o... Sep 16 2008, 12:10 PM
watsonrx13 Congrats Mark.... Now, while you're in there..... Sep 16 2008, 06:03 AM SGB That might need a little spacklin' befor ya pa... Sep 16 2008, 07:12 AM r_towle Think about this...
Chrome engine bay......
inner... Sep 16 2008, 07:15 AM Dave_Darling Right on, McMark!
--DD Sep 16 2008, 07:44 AM rick 918-S WTG Mark! Sep 16 2008, 08:01 AM FourBlades Good to see you are getting going. You are going ... Sep 16 2008, 08:13 AM LarryR Hey, glad to see you are finding some time to work... Sep 16 2008, 08:33 AM jgara962 :Qarl:
Can't wait to see it on the road Sep 16 2008, 10:46 AM greenie It's about time... you were turning into the p... Sep 16 2008, 11:12 AM McMark
Heeheh, LOL. :lol: This will be going back to o... Sep 16 2008, 12:10 PM
 Vacca Rabite
Heeheh, LOL. :lol: This will be going back to o... Sep 16 2008, 12:47 PM Dr. Roger I'm with Zach. Keep it with graffitti and cal... Sep 16 2008, 01:39 PM ConeDodger OMG!!! Isn't it time you put the 2... Sep 16 2008, 02:21 PM McMark Missing heads... :(
The 2270 is for the Aubergine... Sep 16 2008, 06:42 PM r_towle Chrome paint the engine bay....do it...
Rich Sep 16 2008, 06:50 PM Gint Slacker... :) Sep 18 2008, 10:54 PM McMark Hey, some of us are still working... :P
The motor... Sep 19 2008, 01:54 AM PanelBilly How much fun can one person have? When you have a ... Sep 19 2008, 09:32 AM RoadGlue Good work mark! You're inspiring me to pu... Sep 19 2008, 02:43 PM sendjonathanmail
:agree: Sep 19 2008, 09:10 PM McMark Cleaned the transmission today. Got most of the n... Sep 20 2008, 12:03 AM knuckledrgr914
Cleaned the transmission today. Got most of the ... Apr 10 2009, 11:40 AM McMark More done today. Cutting the old metal out. Noth... Sep 20 2008, 09:47 PM LarryR
More done today. Cutting the old metal out. Not... Sep 20 2008, 10:13 PM ConeDodger
More done today. Cutting the old metal out. No... Apr 10 2009, 08:32 AM Root_Werks Stop, stop, stop, wait,,,, waaaaaay to much progre... Sep 20 2008, 09:53 PM McMark Do you know if they are early or late? I definite... Sep 20 2008, 10:17 PM LarryR
Do you know if they are early or late? I definit... Sep 20 2008, 10:28 PM McMark Sounds good! :thumbsup: My other car is a 72... Sep 20 2008, 10:34 PM McMark A month later, I made a little more progress... Oct 24 2008, 11:27 PM rick 918-S :popcorn: :headbanger: Oct 25 2008, 12:01 AM McMark a little more progress... I got a set of bus carb... Apr 9 2009, 07:27 PM SirAndy Maybe you can try the soda blasting setup on those... Apr 9 2009, 08:21 PM McMark As soon as you come up and help me pull the electr... Apr 9 2009, 09:14 PM r_towle pull them apart and dunk them in a citris based cl... Apr 9 2009, 09:19 PM Heeltoe914 Whats up Mark. Good to see you in Sacramento a few... Apr 9 2009, 10:49 PM McMark Here they are: Apr 10 2009, 12:14 AM SirAndy Translation:
-------------------------------------... Apr 10 2009, 12:57 AM ConeDodger This FourBlades guy John just has to be stopped... Apr 10 2009, 08:35 AM FourBlades
This FourBlades guy John just has to be stopped... Apr 10 2009, 07:38 PM McMark Post a new thread and I'll go into it. Apr 10 2009, 11:48 AM dbgriffith75 :blink:
All I can say is... WOW!
[Okay I ca... Apr 11 2009, 06:55 AM McMark Finished up the patch that I was halfway done with... Apr 11 2009, 09:15 PM JRust Looking good dude! Keep up the good work :danc... Apr 11 2009, 09:33 PM Rusty Looks awesome... hang in there! Apr 11 2009, 09:39 PM jcambo7 :popcorn: Apr 12 2009, 05:30 PM r_towle Its a customers car...
Rich Apr 12 2009, 07:55 PM McMark
Only if someone buys it before I'm done. :ev... Apr 13 2009, 10:48 AM McMark More work... months later. <_< Engine shel... Jul 8 2009, 07:05 PM greenie
More work... months later. <_< Engine she... Jul 8 2009, 07:58 PM r_towle
More work... months later. <_< Engine she... Jul 8 2009, 09:14 PM markb Depends, do you know what color it's going to ... Jul 8 2009, 07:29 PM pete-stevers If you think you are not going to mod that compart... Jul 8 2009, 10:23 PM ConeDodger Do it right. We both know that you spend hours pra... Jul 9 2009, 08:57 AM JRust Excellent Mark! Definately nice to spend a lit... Nov 29 2009, 12:38 AM McMark Time to update the ol' progress thread. Some ... Mar 31 2010, 08:44 PM kg6dxn This car going to make it to WCR 2010? Mar 31 2010, 10:55 PM McMark I'm tryin'! If it is, it'll most ... Mar 31 2010, 11:01 PM Dr Evil Fly me out early and I will finish it for you ;) Apr 1 2010, 12:01 AM Vacca Rabite Erics calipers are SO money!
Zach Apr 1 2010, 09:24 AM RobW Mark, its good to see you cranking on that thing..... Apr 1 2010, 09:28 AM kwales Hey Mark,
I got a dumb question. When you set up... Apr 1 2010, 10:15 AM McMark Can't say that I have... :confused: Apr 1 2010, 01:53 PM McMark Just about finished bleeding the brakes. One more... Apr 6 2010, 06:46 PM r_towle Dont ever touch that rear trunk lid...its art.
Ri... Apr 6 2010, 06:50 PM McMark Here's the brake flex video. I had forgotten ... Apr 7 2010, 10:21 AM Root_Werks That is crazy!
I haven't ever actually se... Apr 7 2010, 10:26 AM RobW Yikes is right... so that's the "play... Apr 7 2010, 12:54 PM bugsy0 So, what's the best repair - scab on a donut s... Apr 7 2010, 09:35 PM McMark Check out this thread.
After a bunch of R&D t... Apr 7 2010, 09:52 PM McMark I can't believe I started this thread FOUR yea... May 28 2012, 09:20 PM LarryR VERY cool!! :beer2: May 28 2012, 09:25 PM seanery We need a Like button! :thumbsup: May 28 2012, 09:28 PM JimN73 I saw the car Sunday morning. Not only was there ... May 28 2012, 09:35 PM ConeDodger Now to blow up that motor! SVR is having an au... May 28 2012, 09:50 PM McMark Gotta get the registration up to date first. ;) May 28 2012, 09:54 PM ConeDodger
Gotta get the registration up to date first. ;)
... May 28 2012, 10:12 PM rick 918-S :beer2: May 28 2012, 11:26 PM Lennies914 :Qarl: May 29 2012, 07:53 AM jsconst Nice, was wondering if that thing would ever move ... May 29 2012, 08:08 AM r_towle Mark,
I think my car has sat as long as yours...ma... May 29 2012, 10:34 AM Dave_Darling I suppose you could take that blue car I spotted i... May 29 2012, 11:18 AM McMark
I suppose you could take that blue car I spotted ... May 29 2012, 11:24 AM Dave_Darling
How about YOU take that blue car out to play. :r... May 29 2012, 06:04 PM ConeDodger
[quote name='McMark' post='1684092' date='May 29 ... May 30 2012, 08:40 AM RoadGlue Congrats Mark! May 29 2012, 11:27 AM McMark Here are a few details...
I installed the 1.7 men... May 29 2012, 11:42 AM Marty Yeoman
...and have the car registered and drivable.
:... May 30 2012, 01:48 PM McMark Okay, we took a right turn. :rotfl:
The carbs we... May 30 2012, 11:19 AM r_towle If they have been on the shelf...just give this a ... May 30 2012, 11:32 AM ChrisNPDrider Classic :beer2:
carb troubles cause the swap to ... May 30 2012, 01:36 PM McMark Different fuel pump is in, fuel pressure set, fire... May 30 2012, 04:06 PM ConeDodger
Different fuel pump is in, fuel pressure set, fir... May 30 2012, 05:26 PM biosurfer1
Now to get the last few pieces installed, like a ... May 30 2012, 04:19 PM Elliot Cannon Is this the car with the reallly cool mural on the... May 30 2012, 06:54 PM brant I need to buy a pump rebuild kit if you do put the... May 30 2012, 09:53 PM McMark Back window installed.
Driver's door outer h... May 31 2012, 08:45 PM jsconst That's awesome, that thing will be a DD in no ... May 31 2012, 09:28 PM
Vacca Rabite
Heeheh, LOL. :lol: This will be going back to o... Sep 16 2008, 12:47 PM Dr. Roger I'm with Zach. Keep it with graffitti and cal... Sep 16 2008, 01:39 PM ConeDodger OMG!!! Isn't it time you put the 2... Sep 16 2008, 02:21 PM McMark Missing heads... :(
The 2270 is for the Aubergine... Sep 16 2008, 06:42 PM r_towle Chrome paint the engine bay....do it...
Rich Sep 16 2008, 06:50 PM Gint Slacker... :) Sep 18 2008, 10:54 PM McMark Hey, some of us are still working... :P
The motor... Sep 19 2008, 01:54 AM PanelBilly How much fun can one person have? When you have a ... Sep 19 2008, 09:32 AM RoadGlue Good work mark! You're inspiring me to pu... Sep 19 2008, 02:43 PM sendjonathanmail
:agree: Sep 19 2008, 09:10 PM McMark Cleaned the transmission today. Got most of the n... Sep 20 2008, 12:03 AM knuckledrgr914
Cleaned the transmission today. Got most of the ... Apr 10 2009, 11:40 AM McMark More done today. Cutting the old metal out. Noth... Sep 20 2008, 09:47 PM LarryR
More done today. Cutting the old metal out. Not... Sep 20 2008, 10:13 PM ConeDodger
More done today. Cutting the old metal out. No... Apr 10 2009, 08:32 AM Root_Werks Stop, stop, stop, wait,,,, waaaaaay to much progre... Sep 20 2008, 09:53 PM McMark Do you know if they are early or late? I definite... Sep 20 2008, 10:17 PM LarryR
Do you know if they are early or late? I definit... Sep 20 2008, 10:28 PM McMark Sounds good! :thumbsup: My other car is a 72... Sep 20 2008, 10:34 PM McMark A month later, I made a little more progress... Oct 24 2008, 11:27 PM rick 918-S :popcorn: :headbanger: Oct 25 2008, 12:01 AM McMark a little more progress... I got a set of bus carb... Apr 9 2009, 07:27 PM SirAndy Maybe you can try the soda blasting setup on those... Apr 9 2009, 08:21 PM McMark As soon as you come up and help me pull the electr... Apr 9 2009, 09:14 PM r_towle pull them apart and dunk them in a citris based cl... Apr 9 2009, 09:19 PM Heeltoe914 Whats up Mark. Good to see you in Sacramento a few... Apr 9 2009, 10:49 PM McMark Here they are: Apr 10 2009, 12:14 AM SirAndy Translation:
-------------------------------------... Apr 10 2009, 12:57 AM ConeDodger This FourBlades guy John just has to be stopped... Apr 10 2009, 08:35 AM FourBlades
This FourBlades guy John just has to be stopped... Apr 10 2009, 07:38 PM McMark Post a new thread and I'll go into it. Apr 10 2009, 11:48 AM dbgriffith75 :blink:
All I can say is... WOW!
[Okay I ca... Apr 11 2009, 06:55 AM McMark Finished up the patch that I was halfway done with... Apr 11 2009, 09:15 PM JRust Looking good dude! Keep up the good work :danc... Apr 11 2009, 09:33 PM Rusty Looks awesome... hang in there! Apr 11 2009, 09:39 PM jcambo7 :popcorn: Apr 12 2009, 05:30 PM r_towle Its a customers car...
Rich Apr 12 2009, 07:55 PM McMark
Only if someone buys it before I'm done. :ev... Apr 13 2009, 10:48 AM McMark More work... months later. <_< Engine shel... Jul 8 2009, 07:05 PM greenie
More work... months later. <_< Engine she... Jul 8 2009, 07:58 PM r_towle
More work... months later. <_< Engine she... Jul 8 2009, 09:14 PM markb Depends, do you know what color it's going to ... Jul 8 2009, 07:29 PM pete-stevers If you think you are not going to mod that compart... Jul 8 2009, 10:23 PM ConeDodger Do it right. We both know that you spend hours pra... Jul 9 2009, 08:57 AM JRust Excellent Mark! Definately nice to spend a lit... Nov 29 2009, 12:38 AM McMark Time to update the ol' progress thread. Some ... Mar 31 2010, 08:44 PM kg6dxn This car going to make it to WCR 2010? Mar 31 2010, 10:55 PM McMark I'm tryin'! If it is, it'll most ... Mar 31 2010, 11:01 PM Dr Evil Fly me out early and I will finish it for you ;) Apr 1 2010, 12:01 AM Vacca Rabite Erics calipers are SO money!
Zach Apr 1 2010, 09:24 AM RobW Mark, its good to see you cranking on that thing..... Apr 1 2010, 09:28 AM kwales Hey Mark,
I got a dumb question. When you set up... Apr 1 2010, 10:15 AM McMark Can't say that I have... :confused: Apr 1 2010, 01:53 PM McMark Just about finished bleeding the brakes. One more... Apr 6 2010, 06:46 PM r_towle Dont ever touch that rear trunk lid...its art.
Ri... Apr 6 2010, 06:50 PM McMark Here's the brake flex video. I had forgotten ... Apr 7 2010, 10:21 AM Root_Werks That is crazy!
I haven't ever actually se... Apr 7 2010, 10:26 AM RobW Yikes is right... so that's the "play... Apr 7 2010, 12:54 PM bugsy0 So, what's the best repair - scab on a donut s... Apr 7 2010, 09:35 PM McMark Check out this thread.
After a bunch of R&D t... Apr 7 2010, 09:52 PM McMark I can't believe I started this thread FOUR yea... May 28 2012, 09:20 PM LarryR VERY cool!! :beer2: May 28 2012, 09:25 PM seanery We need a Like button! :thumbsup: May 28 2012, 09:28 PM JimN73 I saw the car Sunday morning. Not only was there ... May 28 2012, 09:35 PM ConeDodger Now to blow up that motor! SVR is having an au... May 28 2012, 09:50 PM McMark Gotta get the registration up to date first. ;) May 28 2012, 09:54 PM ConeDodger
Gotta get the registration up to date first. ;)
... May 28 2012, 10:12 PM rick 918-S :beer2: May 28 2012, 11:26 PM Lennies914 :Qarl: May 29 2012, 07:53 AM jsconst Nice, was wondering if that thing would ever move ... May 29 2012, 08:08 AM r_towle Mark,
I think my car has sat as long as yours...ma... May 29 2012, 10:34 AM Dave_Darling I suppose you could take that blue car I spotted i... May 29 2012, 11:18 AM McMark
I suppose you could take that blue car I spotted ... May 29 2012, 11:24 AM Dave_Darling
How about YOU take that blue car out to play. :r... May 29 2012, 06:04 PM ConeDodger
[quote name='McMark' post='1684092' date='May 29 ... May 30 2012, 08:40 AM RoadGlue Congrats Mark! May 29 2012, 11:27 AM McMark Here are a few details...
I installed the 1.7 men... May 29 2012, 11:42 AM Marty Yeoman
...and have the car registered and drivable.
:... May 30 2012, 01:48 PM McMark Okay, we took a right turn. :rotfl:
The carbs we... May 30 2012, 11:19 AM r_towle If they have been on the shelf...just give this a ... May 30 2012, 11:32 AM ChrisNPDrider Classic :beer2:
carb troubles cause the swap to ... May 30 2012, 01:36 PM McMark Different fuel pump is in, fuel pressure set, fire... May 30 2012, 04:06 PM ConeDodger
Different fuel pump is in, fuel pressure set, fir... May 30 2012, 05:26 PM biosurfer1
Now to get the last few pieces installed, like a ... May 30 2012, 04:19 PM Elliot Cannon Is this the car with the reallly cool mural on the... May 30 2012, 06:54 PM brant I need to buy a pump rebuild kit if you do put the... May 30 2012, 09:53 PM McMark Back window installed.
Driver's door outer h... May 31 2012, 08:45 PM jsconst That's awesome, that thing will be a DD in no ... May 31 2012, 09:28 PM |
1 User(s) are reading this topic (1 Guests and 0 Anonymous Users)
0 Members:

|
Lo-Fi Version | Time is now: 5th June 2026 - 10:28 AM |
Invision Power Board
v9.1.4 © 2026 IPS, Inc.