|
|
|
Porsche, and the Porsche crest are registered trademarks of Dr. Ing. h.c. F. Porsche AG.
This site is not affiliated with Porsche in any way. Its only purpose is to provide an online forum for car enthusiasts. All other trademarks are property of their respective owners. |
|
|


| 76-914 |
 Jan 7 2011, 01:08 PM Jan 7 2011, 01:08 PM
Post
#1
|
|
Repeat Offender & Resident Subaru Antagonist  Group: Members Posts: 13,866 Joined: 23-January 09 From: Temecula, CA Member No.: 9,964 Region Association: Southern California |
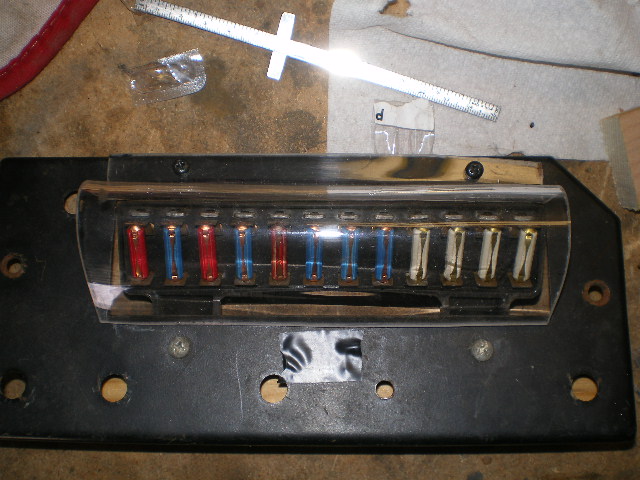
First; thanks to Joe Sharpe and Saun Malloy for the effort to provide me with a panel, with which to practice. Second; fuses are placed at random and are not emblematic of a correct installation. Thirdly; this item is for CSOB's and not Pebble Beach. That being said, here is the first attempt. My goal is to provide you with info on "how to" make one of these in a few min's with materials that are free (already in your inventory) or quite cheap and the instructions to do so. Also, I want to develope two different methods for forming these. One using a heat gun and the other using your oven (in case you don't own a heat gun). I haven't got all the details down for the oven method complete but hope to have that completed in the next week. You will see that I have drilled 2 holes in the board 11mm apart to secure it. This spacing is used so you can use the existing 2 screws holding the fuse block if you don't want to drill your board. Either way, you will need a screwdriver to remove it in order to R&R a fuse. I'm pretty sure most of us carry a screwdriver in our 914, anyway. Will update this in the next few days.
   |
   |

 
|
  |
Replies
| 76-914 |
Jan 8 2011, 08:02 PM
Post
#2
|
|
Repeat Offender & Resident Subaru Antagonist Group: Members Posts: 13,866 Joined: 23-January 09 From: Temecula, CA Member No.: 9,964 Region Association: Southern California |
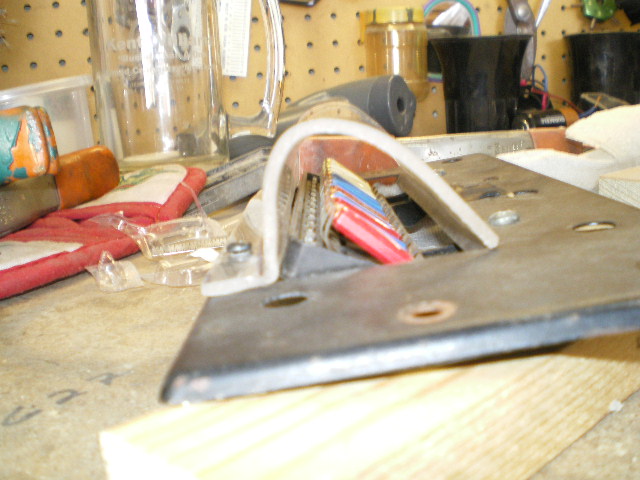
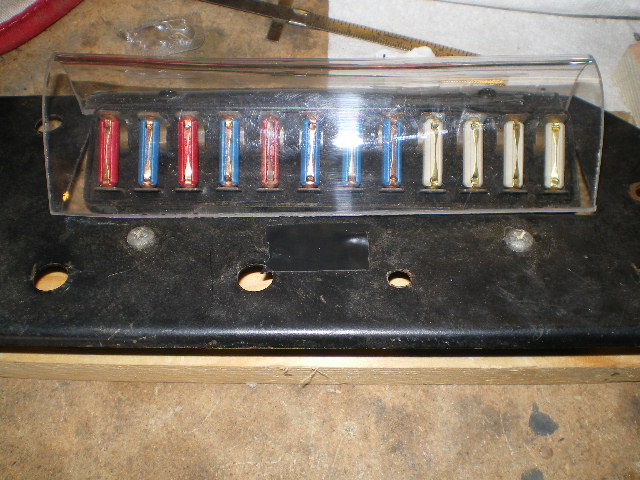
So here are a few shots of a finished cover. The jig is working so next is to make a few in Lexan (polycarbonate), as this might be more available. Also, want to try a 1/16" version. If 1/16" proves strong enough I will continue with the oven method. May take a few more days of tinkering. More pic's w/ jig (fancy word for wood blocks) later.
Front view. Piece was narrowed and is now tucked inside: 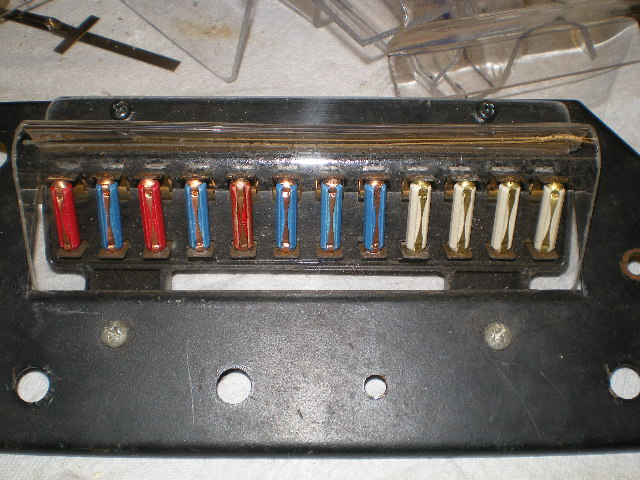 Underside. If you look closely you can see how the piece tucks in and below: 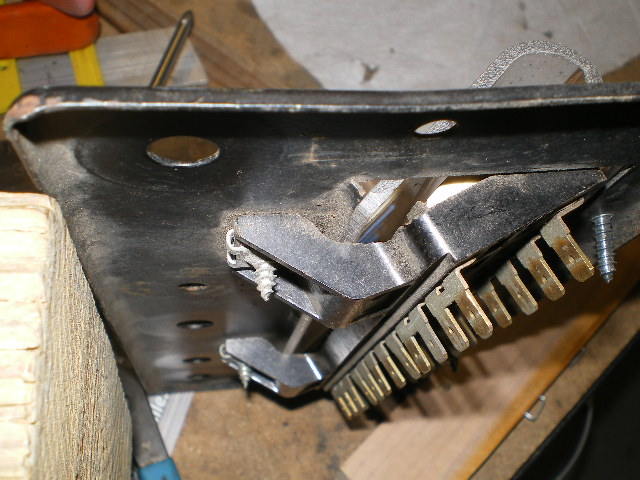 End view. Close up: 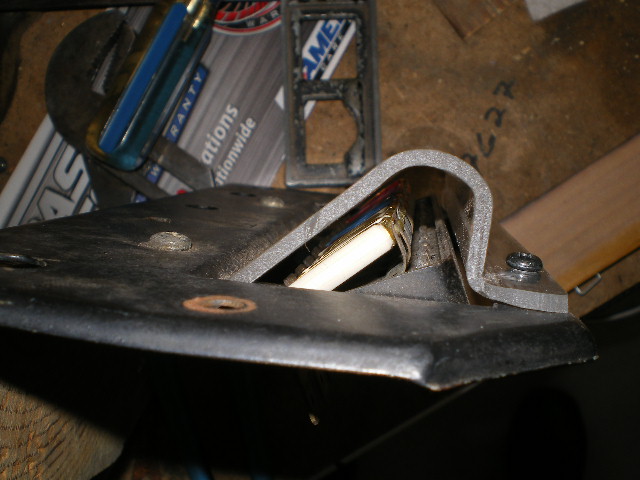 |
|
|
|
Posts in this topic
76-914 Fuse Covers Jan 7 2011, 01:08 PM dr914@autoatlanta.com Neat idea!!!! Has it been ... Jan 7 2011, 01:14 PM Drums66 ....that looks like it has some promise.....eager ... Jan 7 2011, 02:44 PM flipb :clap:
Fantastic!
My fuse cover was cracked ... Jan 7 2011, 02:49 PM rfuerst911sc Maybe velcro ? Jan 7 2011, 03:00 PM zonedoubt ...or you can just buy the cheap VW one which fits... Jan 7 2011, 03:02 PM kg6dxn It looks great but... If you blow a fuse on the ro... Jan 8 2011, 11:47 PM
dr914@autoatlanta.com Neat idea!!!! Has it been ... Jan 7 2011, 01:14 PM Drums66 ....that looks like it has some promise.....eager ... Jan 7 2011, 02:44 PM flipb :clap:
Fantastic!
My fuse cover was cracked ... Jan 7 2011, 02:49 PM rfuerst911sc Maybe velcro ? Jan 7 2011, 03:00 PM zonedoubt ...or you can just buy the cheap VW one which fits... Jan 7 2011, 03:02 PM kg6dxn It looks great but... If you blow a fuse on the ro... Jan 8 2011, 11:47 PM RJMII
It looks great but... If you blow a fuse on the r... Jan 9 2011, 09:12 AM
RJMII
It looks great but... If you blow a fuse on the r... Jan 9 2011, 09:12 AM 76-914
It looks great but... If you blow a fuse on the r... Jan 9 2011, 10:05 AM silver74insocal :trophy: lookin good Kent.. Jan 9 2011, 12:04 AM RJMII Kent, it's not necessarily that one might blow... Jan 9 2011, 02:10 PM kg6dxn How about some self adhesive magnetic strip on the... Jan 9 2011, 02:39 PM 76-914
How about some self adhesive magnetic strip on th... Jan 10 2011, 09:24 AM
76-914
It looks great but... If you blow a fuse on the r... Jan 9 2011, 10:05 AM silver74insocal :trophy: lookin good Kent.. Jan 9 2011, 12:04 AM RJMII Kent, it's not necessarily that one might blow... Jan 9 2011, 02:10 PM kg6dxn How about some self adhesive magnetic strip on the... Jan 9 2011, 02:39 PM 76-914
How about some self adhesive magnetic strip on th... Jan 10 2011, 09:24 AM |
1 User(s) are reading this topic (1 Guests and 0 Anonymous Users)
0 Members:

|
Lo-Fi Version | Time is now: 3rd March 2026 - 07:41 PM |
Invision Power Board
v9.1.4 © 2026 IPS, Inc.