|
|
|
Porsche, and the Porsche crest are registered trademarks of Dr. Ing. h.c. F. Porsche AG.
This site is not affiliated with Porsche in any way. Its only purpose is to provide an online forum for car enthusiasts. All other trademarks are property of their respective owners. |
|
|


| mrbubblehead |
 Jan 24 2013, 11:25 AM Jan 24 2013, 11:25 AM
Post
#1
|
|
Twodollardoug  Group: Members Posts: 1,155 Joined: 17-December 10 From: calimesa ca. Member No.: 12,492 Region Association: Southern California |
I have been talking to Ray Scruggs and he sent me his pdf file on how to home wheel align a 914. He said he didnt mind if I posted it up here for us. Which was pretty cool of him I thought. But I don't know how to post it. If you know how, pm me and I will email it to you.
|
   |

 
|
  |
Replies
| strawman |
Jan 24 2013, 09:33 PM
Post
#2
|
|
Senior Member Group: Members Posts: 891 Joined: 25-January 08 From: Los Osos, CA Member No.: 8,624 Region Association: Central California |
I've used string alignment setups for years for a variety of street, autocross and track cars. To do it "right," you'll need a very flat surface. I've used stacks of 1/8" thick 12"x12" vinyl flooring tiles to "shim" the garage floor, based on where the car will sit during the alignment process. Essentially, I just parked the car where I've got a lot of room around it to work and marked the tire footprints with chalk. Then you back the car up, place one vinyl tire over each mark, pull the car back on top to make sure the tire footprints are squarely in the middle, mark around each square with a felt-tip pen, pull the car back out, and paint over the edge of each square with spraypaint. It'll last for years; use different colors for each car.
You can then use a long piece of clear vinyl tubing taped to a vertical surface, fill it mostly with water and water to figure out the relative heights of each of the four squares. Rather than try to explain it, DIY Water Level provides a good explanation. Then shim with additional or fewer tiles until each square is at the same height as the other three. Use a Sharpie to write inside each "square" on the floor to record how many tiles are necessary to provide a flat surface. The tiles are less than a buck each at Home Despot (don't get the ones with the waxpaper covered stickiness). I've used the jackstands method to hold the strings along both sides of the car, but I've found building a poor-man's Smart Strings setup is pretty easy. And this setup lets you move the car around to settle the suspension after each change to the alignment setting. Below are some pics of the one I built last weekend (I seem to toss the previous version every time I move!). I've got about $30 bucks and an hour of my time into it. It is adjustable and works for my 914, as well as my two E36 BMWs. First up is the front setup on the front of my car: 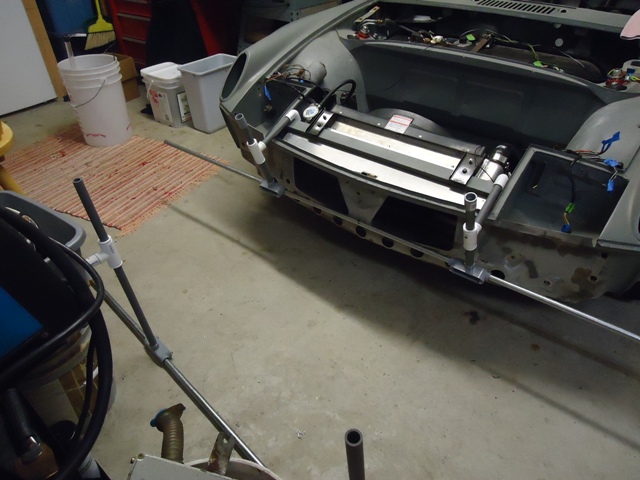 Next up is a close-up of some of the parts. You'll need four of the grey 1/2" PVC junction boxes ($2.50 each), four 3/4" white PVC tees ($0.80 each), eight 3/4" to 1/2" white PVC bushings ($0.40 each), four 1/2" white PVC elbows ($0.35 each), one 10' stick of 1/2" schedule 40 grey PVC pipe ($1.75) and two 10' sticks of 1/2" EMT galvanized metal conduits ($4.75 each). You'll also want to use 1" screws in place of the ones that come with the four grey junction boxes (those screws are too short); you use 'em to secure the metal conduit once you size things up. All the grey PVC parts are found in the Electrical section of your hated hardware store, and the white PVC parts are found in the Plumbing section. Be sure to curse the lack of helpful assistance in the aisles of the big box hardware stores while you're there... 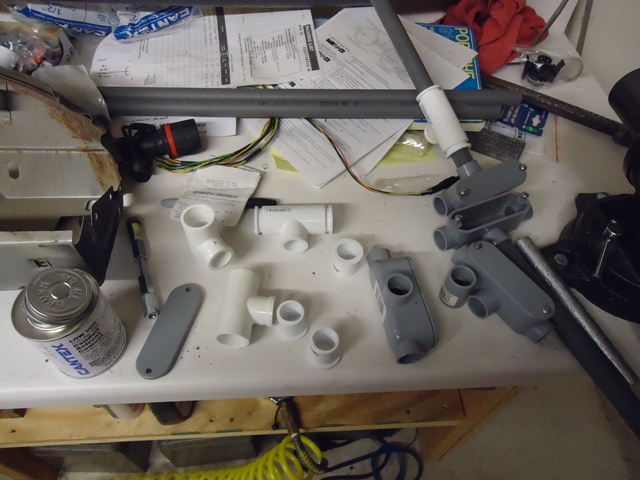 Next is a close up of the front-side of the junctions. Note that you'll want the grey sched 40 PVC pipe to slide up/down through the white PVC bushings you glued into the tee (it won't as purchased!), and a head porting sandpaper cone makes short work of it. I suppose you could use a round bastard file, but that would take a lot of sweating and swearing -- and you probably won't file it very straight. You'll also need to slightly open up the grey junction box holes for the EMT to slide left/right; again the porting sanding cone works great for this. Note the screw in the white PVC tee; that locks the grey PVC pipe in the vertical adjustment once you get the measurements right. Essentially, you want the strings on each side of the car to pass horizontally at the hub centers. 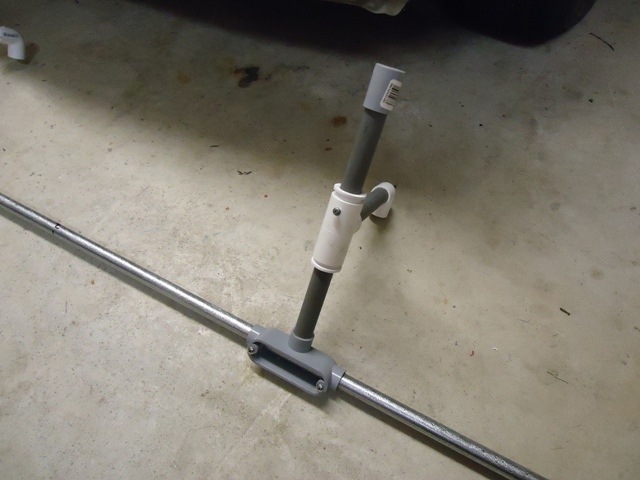 Finally is a pic of the backside. Nuthin' too exciting. You don't need to, but I like to push-on (don't glue!) a cap or union on the top of the vertical PVC pipe so it doesn't slide off when making the initial adjustments. 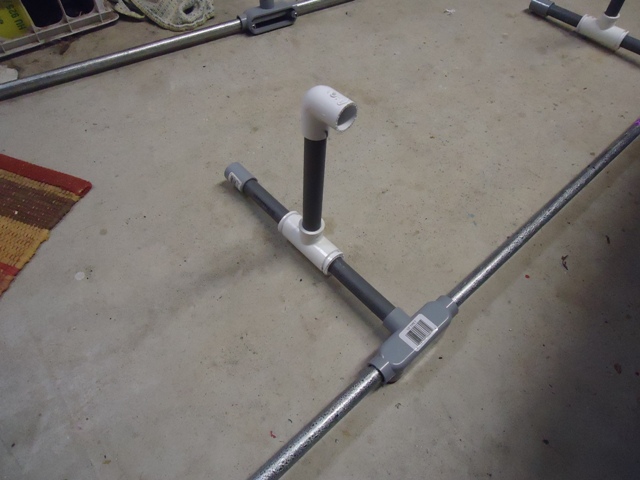 You'll want to find the exact center of the front and rear of the car, mark it on the car (a small Sharpie mark is virtually invisible) and line it up with the center of the front and rear of the string bars -- if you want the car to drive straight down the road. Once you get the strings equi-distant from the center at the front and rear, and tighten the strings and it will stay put while you make your measurements and changes. The four level squares on your garage floor can also be used to counter-balance your car -- but that's a whole 'nother story. File this under Cheap Bastard Racing solutions... |
|
|
|
Posts in this topic
 mrbubblehead Home Wheel Alignment Jan 24 2013, 11:25 AM
 r_towle Open the file and take a screen shot of each page.... Jan 24 2013, 11:41 AM rmital PM sent...I have Adobe Acobat on my PC here at wor... Jan 24 2013, 11:53 AM McMark Post the PDF just like you would a picture. Jan 24 2013, 12:04 PM mrbubblehead For now, right click, and save link as.... the att... Jan 24 2013, 12:32 PM 914Eric Tried it 4 times...never worked.
Just sat loading... Jan 24 2013, 04:42 PM Tilly74 Yeah, didn't work for me either. When we do a... Jan 24 2013, 04:46 PM
r_towle Open the file and take a screen shot of each page.... Jan 24 2013, 11:41 AM rmital PM sent...I have Adobe Acobat on my PC here at wor... Jan 24 2013, 11:53 AM McMark Post the PDF just like you would a picture. Jan 24 2013, 12:04 PM mrbubblehead For now, right click, and save link as.... the att... Jan 24 2013, 12:32 PM 914Eric Tried it 4 times...never worked.
Just sat loading... Jan 24 2013, 04:42 PM Tilly74 Yeah, didn't work for me either. When we do a... Jan 24 2013, 04:46 PM
 mrbubblehead
Yeah, didn't work for me either. When we do ... Jan 24 2013, 05:19 PM ThePaintedMan Man I've been trying to get a copy of this for... Jan 24 2013, 04:50 PM mrbubblehead sorry guys, were working on it.
hopefully we wi... Jan 24 2013, 05:17 PM rmital I'll post the images first thing tomorrow morn... Jan 24 2013, 06:00 PM mrbubblehead
I'll post the images first thing tomorrow mor... Jan 24 2013, 06:30 PM sixnotfour If you cant wait;
http://www.2l7registry.com/doc/... Jan 24 2013, 06:41 PM mrbubblehead
If you cant wait;
http://www.2l7registry.com/doc... Jan 24 2013, 06:48 PM sixnotfour the method is the same Jan 24 2013, 06:55 PM Drums66 ....Bro, I think it's the old school front end... Jan 24 2013, 07:10 PM mrbubblehead Your right, but the rear suspension is totally dif... Jan 24 2013, 07:12 PM David J Great info - Thanks! Jan 24 2013, 07:56 PM mrbubblehead That is a fantastic right up strawman! Thanks ... Jan 24 2013, 09:50 PM strawman
what keeps them attached to the car when you move... Jan 24 2013, 10:00 PM Spoke I was able to download the PDF.
Right click on t... Jan 24 2013, 09:50 PM mrbubblehead
I was able to download the PDF.
Right click on ... Jan 24 2013, 09:52 PM Black22 Worked for me too...it just took a minute. Thanks... Jan 24 2013, 09:58 PM mrbubblehead
Worked for me too...it just took a minute. Thanks... Jan 24 2013, 09:59 PM draganc That's awesome strawman - thanks! Jan 24 2013, 10:03 PM rmital original PDF images:
Jan 25 2013, 07:33 AM rmital more:
Jan 25 2013, 07:35 AM rmital figures:
Jan 25 2013, 07:37 AM Eric_Shea
Just amazing. Thanks! Is the rear any differ... Jan 25 2013, 11:06 PM strawman
Is the rear any different?
The rear verticals a... Jan 25 2013, 11:34 PM
mrbubblehead
Yeah, didn't work for me either. When we do ... Jan 24 2013, 05:19 PM ThePaintedMan Man I've been trying to get a copy of this for... Jan 24 2013, 04:50 PM mrbubblehead sorry guys, were working on it.
hopefully we wi... Jan 24 2013, 05:17 PM rmital I'll post the images first thing tomorrow morn... Jan 24 2013, 06:00 PM mrbubblehead
I'll post the images first thing tomorrow mor... Jan 24 2013, 06:30 PM sixnotfour If you cant wait;
http://www.2l7registry.com/doc/... Jan 24 2013, 06:41 PM mrbubblehead
If you cant wait;
http://www.2l7registry.com/doc... Jan 24 2013, 06:48 PM sixnotfour the method is the same Jan 24 2013, 06:55 PM Drums66 ....Bro, I think it's the old school front end... Jan 24 2013, 07:10 PM mrbubblehead Your right, but the rear suspension is totally dif... Jan 24 2013, 07:12 PM David J Great info - Thanks! Jan 24 2013, 07:56 PM mrbubblehead That is a fantastic right up strawman! Thanks ... Jan 24 2013, 09:50 PM strawman
what keeps them attached to the car when you move... Jan 24 2013, 10:00 PM Spoke I was able to download the PDF.
Right click on t... Jan 24 2013, 09:50 PM mrbubblehead
I was able to download the PDF.
Right click on ... Jan 24 2013, 09:52 PM Black22 Worked for me too...it just took a minute. Thanks... Jan 24 2013, 09:58 PM mrbubblehead
Worked for me too...it just took a minute. Thanks... Jan 24 2013, 09:59 PM draganc That's awesome strawman - thanks! Jan 24 2013, 10:03 PM rmital original PDF images:
Jan 25 2013, 07:33 AM rmital more:
Jan 25 2013, 07:35 AM rmital figures:
Jan 25 2013, 07:37 AM Eric_Shea
Just amazing. Thanks! Is the rear any differ... Jan 25 2013, 11:06 PM strawman
Is the rear any different?
The rear verticals a... Jan 25 2013, 11:34 PM |
2 User(s) are reading this topic (2 Guests and 0 Anonymous Users)
0 Members:

|
Lo-Fi Version | Time is now: 13th May 2026 - 02:11 PM |
Invision Power Board
v9.1.4 © 2026 IPS, Inc.