|
|
|
Porsche, and the Porsche crest are registered trademarks of Dr. Ing. h.c. F. Porsche AG.
This site is not affiliated with Porsche in any way. Its only purpose is to provide an online forum for car enthusiasts. All other trademarks are property of their respective owners. |
|
|


| VWTortuga336 |
 Nov 7 2014, 10:23 AM Nov 7 2014, 10:23 AM
Post
#1
|
|
Member  Group: Members Posts: 285 Joined: 5-October 14 From: Kansas City, Missouri Member No.: 17,979 Region Association: None |
I'm working on stripping down my 2.0L out of my '74. I've done a top end rebuild on my '71 Type 1 engine, but am new to Type IVs and bottom end rebuilds. So, I'm looking for some advice.
So far, from what I can tell the heads on my engine look like they are still in good, re-usable condition, but the engine is seized and the cylinders are badly rusted to the pistons. At this point, would I be better off just using the BFH method to destroy the 94mm cylinders that installed now and go with 96mm's, or is there any hope in saving these? (I'm thinking there isn't) Also, there was water in the case, so what does that typically mean for internal component replacements - cam, crank, bearings, etc? (IMG:style_emoticons/default/confused24.gif) Just in the planning phase now and trying to collect as much info as possible. 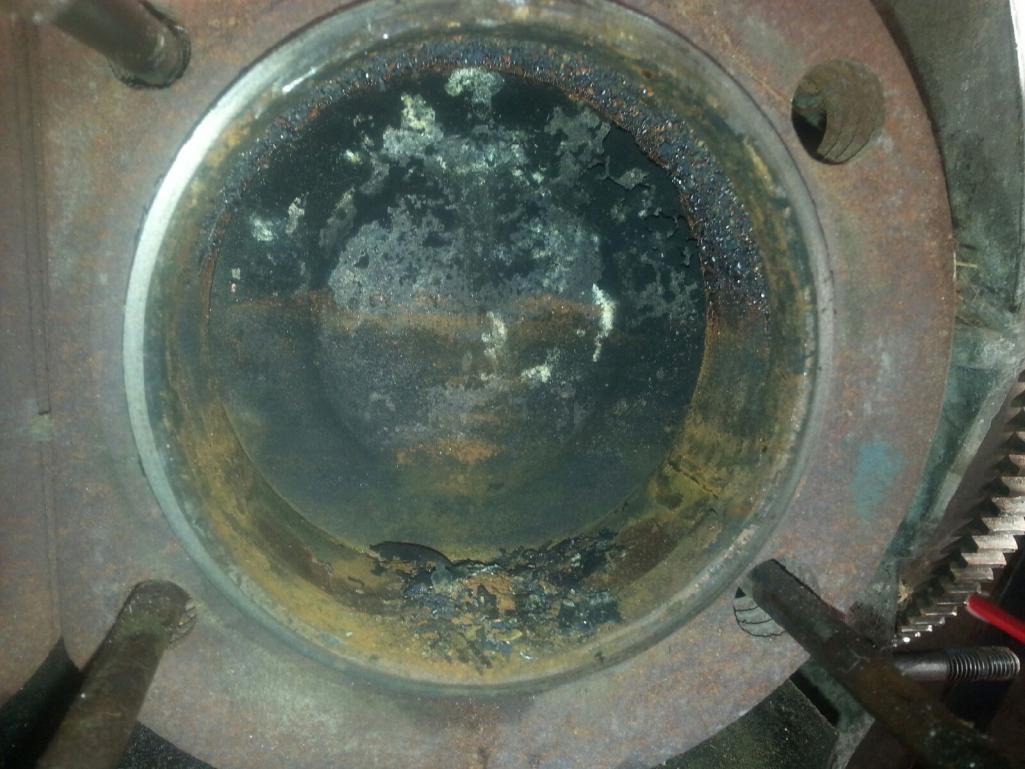 |
   |

 
|
  |
Replies
| VWTortuga336 |
Nov 23 2014, 07:26 PM
Post
#2
|
|
Member Group: Members Posts: 285 Joined: 5-October 14 From: Kansas City, Missouri Member No.: 17,979 Region Association: None |
I was finally able to move the crank and begin removing the pistons. I'm to the point now where I have been able to actually split the case and begin removing internals. I have a few questions:
1. I'm going to be running carbs on this engine and want to make sure I have the right cam to match. The cam that's installed looks to be in good shape, but I want to make sure it's correct. Where is the cam stamped to identify it? 2. Since there's a good chance my case is toast, due to the broken boss above the oil pickup, I'm going to attempt to reattach the broken piece, build it up, fill in the threads with JB Weld and re-tap it. I know this might not be the best, or most robust solution, but given the fact that cracking and/or breaking these on Type IV engines is very common, I'm thinking this might not be all that bad. Anyone ever tried this? Am I totally crazy for thinking this might work (IMG:style_emoticons/default/smoke.gif) ? (Pictures below) 3. The crank has lots of surface rust, but from what I can tell (very new to Type IV, untrained eyes here) seems to be in decent shape. What should I look for to determine if it's salvageable? Attached thumbnail(s) 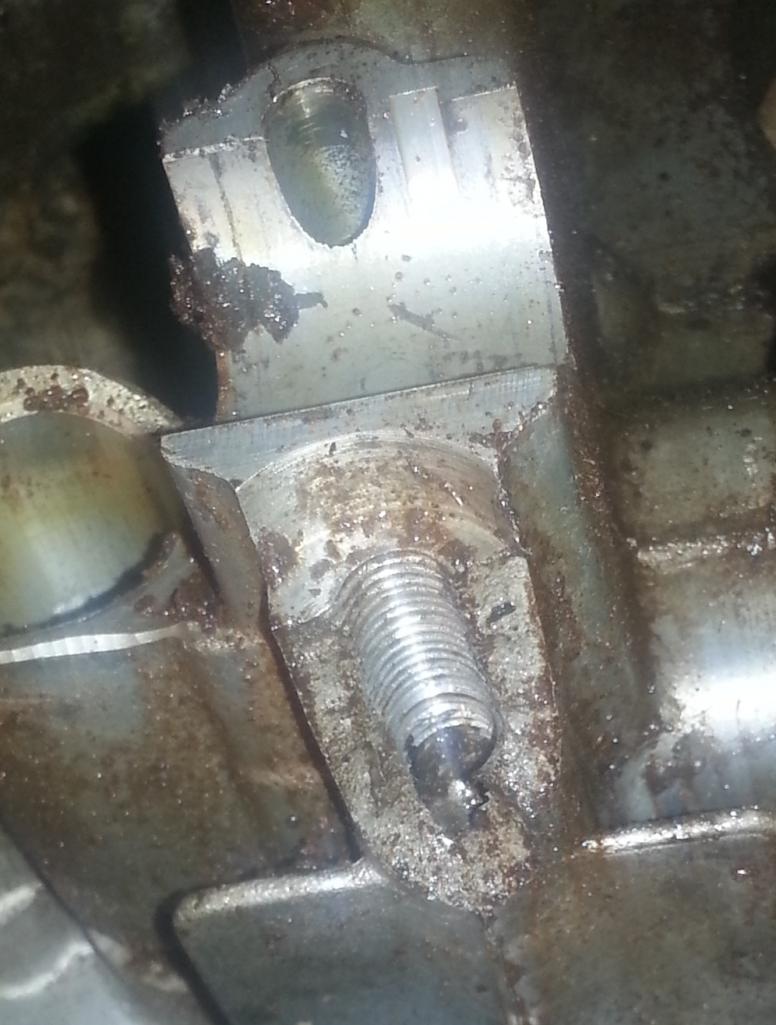 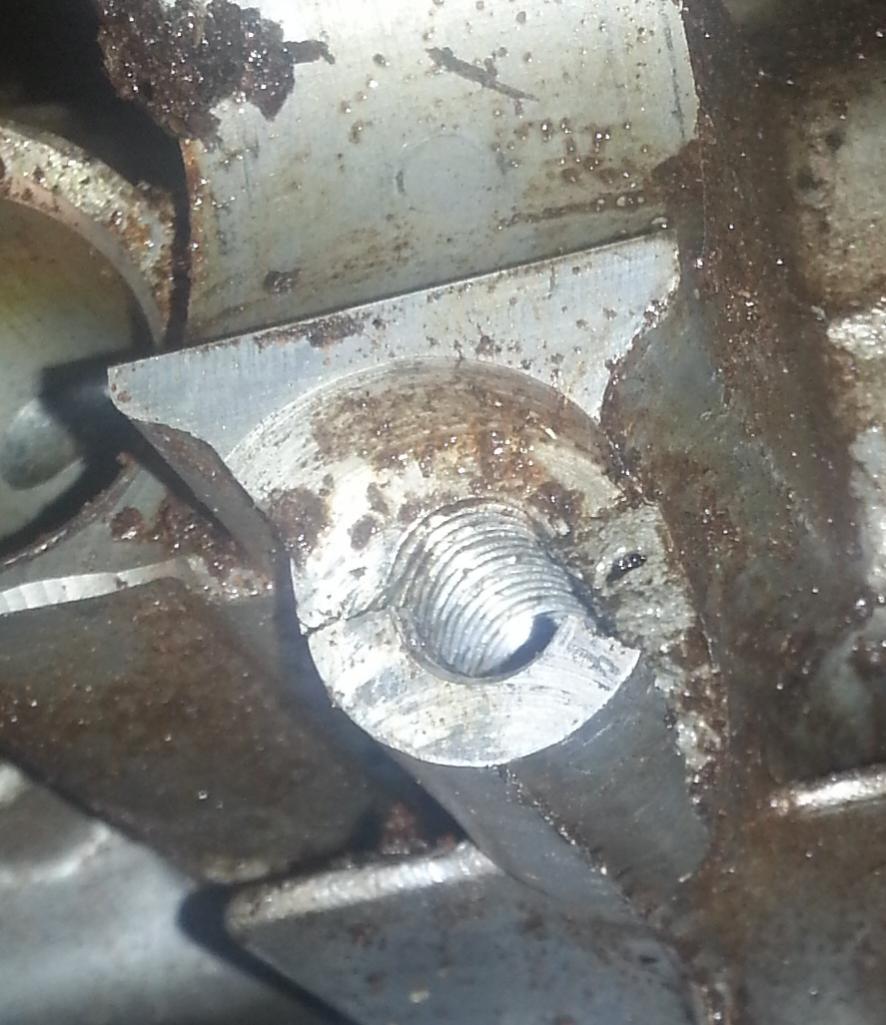  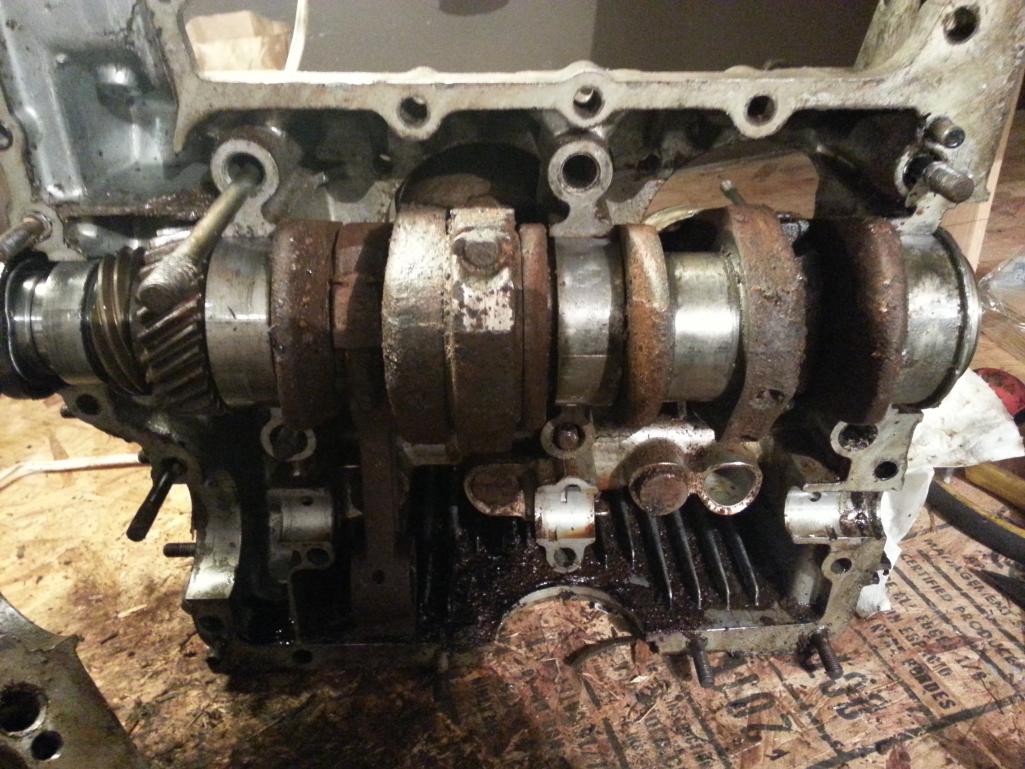
|
|
|
|
| Bulldog9 |
Dec 9 2014, 12:31 PM
Post
#3
|
|
Senior Member Group: Members Posts: 706 Joined: 21-August 13 From: United States Member No.: 16,283 Region Association: MidAtlantic Region |
It's your time and $$, but if everything else checks out (crank, con rods, P & C's I'd just go for a good used case. The only way to repair this case would be to weld a new boss then retap. My guess is you could buy a new/used case for less than this alone nevermind al lthe other work you have to do to the case. Is it really worth it? afterall the serial # is on the fan housing.
Though I am a neub, looking at your P&C's crank, con rods, bearings in the pic, I think you are looking at sourcing a 99% new motor, wil lneed to turn the crank, new P&C, rebuild con rods, and agree with others, go buy a good used motor and start from there, or have it rebuilt. If I had it to do all over again, I would have sent my longblock to McMark and called it done. Unfortunately, I diddnt find out about that option untill I was well into the project in parts and time. I'm building mine from scratch, but my case crank, bearings and such were pristine, just dirty oil. Crank diddnt need to be turned or anything. I did buy a 2056 P&C kit, but the rest of the core components were reuseable. I have spent over $5K on my motor just in parts, and I took my time over 2 years to buy. Granted, I had to buy carbs and went to a new distributor, but it adds up, and knowing it was RIGHT is worth a ton. Then you have to think about your heads. If they are as bad as the rest of you rmotor, they are likely unuseable. What else was cracked/damaged as you attempted this dissasembly? if you cracked that boss, I wonder what else is cracked/damaged? It adds up......... Here is a list of my Motor build. Dont get me wrong, I am haivng fun and understand doing it yourself, but.....it's your time and $$. ENGINE Reinz Engine Gasket Set Mahle Cam Bearings Silverline Main Bearings (steel back) Mahle Connecting Rod Bearings Reinze Oil filter & sump seal 96MM 2.0 PISTON & PIN - Keith Black (EMW) 96MM Cast Iron CYL - (EMW) 96MM RING SET 1.8, 2.0 K/B - Hastings .060 CYL SHIMS Remanufacture Heads (Hoffman) Modified 1.7 Rocker Arms (Hoffman Modified) Mahle-Wizemann 911 Swivel Foot Adjusters & Nuts 26MM FLAT OIL PUMP & cover MOCAL OILSTAT SANDWICH ADAPTER with thermostat WEBCAM EMW G CAM 287 DUR. X .430" LIFT WEBCAM ALUMINUM CAM GEAR & Bolts SOLID LIFTER - Scat Performance Lubealobe CHROMOLY CUT TO FIT PUSHRODS 3/8 Oil Strainer & gasket Viton pushrod tube seals (16) Alternator 75Amp remanufactured Bosch Alternator - Fanbelt Bosch starter relay/hot start kit Starter - Bosch Remanufactured Spark Plug Tin Boots - OEM Valve Covers - Aluminum Ribbed (CB Performance) Thermostat & Cable - (Awesome powdercoat) Sport Engine Mounts (rear/transmission) OEM Engine Mounts (Front) - OEM Pertronix BILLET DIST. W/IGNITOR 2 Pertronix FLAME-THROWER COIL 3.0 OHM Pertronix WIRE SET BLK 35.00 35.00 Dellorto 36DLRA Carbs & Mounts & Jets Air Filter Gasket, Pair Dellorto DRLA "Anti-Whistle" Base Gasket, SCAT Centerpull Linkage Oil Pressure Sending Unit, Stock, 021-919-081B VDO 80psi Oil Pressure Sending Unit, 1/8 -27 NPTF VDO Sending Unit "T" Adapter, 1/8 - 27, V240850 12mm Nut (8mm Thread), 12 Pieces ACN Flanged Racing Intake/Exhaust Nuts, 8 x 10m New Cam Plug Raby Engine nuts & bolt kit New Tin Screws New Con Rod Nuts New Rocker Arm Nuts Curil-T Engine Sealant, 75ml Tube Curil-K2 Engine Sealant, 125ml Bottle with Brush Machining: Case cleaned and boresited, crank mic'd polished and rotating mass balanced. QUOTE(VWTortuga336 @ Nov 23 2014, 08:26 PM)  I was finally able to move the crank and begin removing the pistons. I'm to the point now where I have been able to actually split the case and begin removing internals. I have a few questions: 1. I'm going to be running carbs on this engine and want to make sure I have the right cam to match. The cam that's installed looks to be in good shape, but I want to make sure it's correct. Where is the cam stamped to identify it? 2. Since there's a good chance my case is toast, due to the broken boss above the oil pickup, I'm going to attempt to reattach the broken piece, build it up, fill in the threads with JB Weld and re-tap it. I know this might not be the best, or most robust solution, but given the fact that cracking and/or breaking these on Type IV engines is very common, I'm thinking this might not be all that bad. Anyone ever tried this? Am I totally crazy for thinking this might work (IMG:style_emoticons/default/smoke.gif) ? (Pictures below) 3. The crank has lots of surface rust, but from what I can tell (very new to Type IV, untrained eyes here) seems to be in decent shape. What should I look for to determine if it's salvageable? |
|
|
|
Posts in this topic
 VWTortuga336 2.0 Engine Rebuild Advice Nov 7 2014, 10:23 AM
 eyesright My 2.0 was a '76 with lower compression dished... Nov 7 2014, 11:07 AM VWTortuga336 I'm planning on doing as much of the work myse... Nov 7 2014, 11:18 AM barefoot I'm going thru the same thing presently and pl... Nov 7 2014, 11:29 AM mapguy I am also going through this right now. I decided... Nov 7 2014, 12:51 PM
 DavidSweden What components do you have to change when changin... Nov 7 2014, 01:08 PM VWTortuga336 Someone please correct me if I'm wrong, but it... Nov 7 2014, 01:12 PM pilothyer
Someone please correct me if I'm wrong, but i... Nov 7 2014, 01:41 PM Bob L. You can get the 96mm pistons and if your cylinders... Nov 7 2014, 01:41 PM mapguy Correct, the 96mm P/C fit with no modification. If... Nov 7 2014, 02:39 PM VWTortuga336 Well, I am just about to the point where I'm t... Nov 11 2014, 12:37 PM stugray You should be able to get the pistons out without ... Nov 11 2014, 01:13 PM VWTortuga336 Stupid question time: what do I need to look for o... Nov 11 2014, 02:40 PM r_towle If you cannot move it, put it on a stand, tip it s... Nov 11 2014, 03:53 PM VWTortuga336 Here's a pic of one of the cylinders, showing ... Nov 11 2014, 09:47 PM VWTortuga336 Anyone have any opinions on these fins? Also, is ... Nov 14 2014, 09:02 AM pilothyer
Anyone have any opinions on these fins? Also, is... Nov 14 2014, 02:42 PM Steve Pratel I kept my original P&C's, & have them... Nov 14 2014, 04:11 PM VWTortuga336 I took everyone's advice and decided to go wit... Nov 14 2014, 06:20 PM stugray You can either remove the rods from the crank, or ... Nov 14 2014, 09:17 PM r_towle Remove rods from crank.
Bolt the case to a long b... Nov 14 2014, 09:48 PM VWTortuga336 I just hit another snag...when I was removing the ... Nov 15 2014, 08:31 AM Dave_Darling ...I forgot about the bolt that goes above the sum... Nov 15 2014, 11:49 AM Jesco Reient
I just hit another snag...when I was removing the... Nov 15 2014, 12:40 PM veekry9 Yes,a submerged engine needs a delicate approach,l... Nov 15 2014, 08:52 AM Java2570 I'd give Brad Mayeur a call: http://914ltd.com... Nov 15 2014, 11:56 AM stugray
No Problem.
If you had waited 45 more minutes I ... Nov 15 2014, 01:32 PM Old Yella Hi
I don't normally comment but thought I woul... Nov 15 2014, 03:16 PM DavidSweden Yes you can pay someone to do it for you.
But isn... Nov 15 2014, 03:26 PM Highland I agree with David. What's the point if you d... Nov 15 2014, 05:03 PM Old Yella The reason I usually don't comment is the endl... Nov 15 2014, 06:05 PM DavidSweden
The reason I usually don't comment is the end... Nov 15 2014, 06:18 PM 914_teener
The reason I usually don't comment is the en... Dec 8 2014, 01:54 PM VWTortuga336 I gotta say, I do enjoy working on my cars as much... Nov 15 2014, 06:38 PM DirtyCossack Marvel Mystery Oil can break the pistons free with... Nov 16 2014, 02:47 PM VWTortuga336 Just another thought, would it be possible to do t... Nov 23 2014, 08:42 PM mapguy I really like this thread, it makes me thankful of... Nov 24 2014, 12:53 PM funk European motor works has cases at reasonable price... Dec 8 2014, 12:40 AM
DavidSweden What components do you have to change when changin... Nov 7 2014, 01:08 PM VWTortuga336 Someone please correct me if I'm wrong, but it... Nov 7 2014, 01:12 PM pilothyer
Someone please correct me if I'm wrong, but i... Nov 7 2014, 01:41 PM Bob L. You can get the 96mm pistons and if your cylinders... Nov 7 2014, 01:41 PM mapguy Correct, the 96mm P/C fit with no modification. If... Nov 7 2014, 02:39 PM VWTortuga336 Well, I am just about to the point where I'm t... Nov 11 2014, 12:37 PM stugray You should be able to get the pistons out without ... Nov 11 2014, 01:13 PM VWTortuga336 Stupid question time: what do I need to look for o... Nov 11 2014, 02:40 PM r_towle If you cannot move it, put it on a stand, tip it s... Nov 11 2014, 03:53 PM VWTortuga336 Here's a pic of one of the cylinders, showing ... Nov 11 2014, 09:47 PM VWTortuga336 Anyone have any opinions on these fins? Also, is ... Nov 14 2014, 09:02 AM pilothyer
Anyone have any opinions on these fins? Also, is... Nov 14 2014, 02:42 PM Steve Pratel I kept my original P&C's, & have them... Nov 14 2014, 04:11 PM VWTortuga336 I took everyone's advice and decided to go wit... Nov 14 2014, 06:20 PM stugray You can either remove the rods from the crank, or ... Nov 14 2014, 09:17 PM r_towle Remove rods from crank.
Bolt the case to a long b... Nov 14 2014, 09:48 PM VWTortuga336 I just hit another snag...when I was removing the ... Nov 15 2014, 08:31 AM Dave_Darling ...I forgot about the bolt that goes above the sum... Nov 15 2014, 11:49 AM Jesco Reient
I just hit another snag...when I was removing the... Nov 15 2014, 12:40 PM veekry9 Yes,a submerged engine needs a delicate approach,l... Nov 15 2014, 08:52 AM Java2570 I'd give Brad Mayeur a call: http://914ltd.com... Nov 15 2014, 11:56 AM stugray
No Problem.
If you had waited 45 more minutes I ... Nov 15 2014, 01:32 PM Old Yella Hi
I don't normally comment but thought I woul... Nov 15 2014, 03:16 PM DavidSweden Yes you can pay someone to do it for you.
But isn... Nov 15 2014, 03:26 PM Highland I agree with David. What's the point if you d... Nov 15 2014, 05:03 PM Old Yella The reason I usually don't comment is the endl... Nov 15 2014, 06:05 PM DavidSweden
The reason I usually don't comment is the end... Nov 15 2014, 06:18 PM 914_teener
The reason I usually don't comment is the en... Dec 8 2014, 01:54 PM VWTortuga336 I gotta say, I do enjoy working on my cars as much... Nov 15 2014, 06:38 PM DirtyCossack Marvel Mystery Oil can break the pistons free with... Nov 16 2014, 02:47 PM VWTortuga336 Just another thought, would it be possible to do t... Nov 23 2014, 08:42 PM mapguy I really like this thread, it makes me thankful of... Nov 24 2014, 12:53 PM funk European motor works has cases at reasonable price... Dec 8 2014, 12:40 AM |
1 User(s) are reading this topic (1 Guests and 0 Anonymous Users)
0 Members:

|
Lo-Fi Version | Time is now: 7th March 2026 - 12:44 AM |
Invision Power Board
v9.1.4 © 2026 IPS, Inc.