|
|
|
Porsche, and the Porsche crest are registered trademarks of Dr. Ing. h.c. F. Porsche AG.
This site is not affiliated with Porsche in any way. Its only purpose is to provide an online forum for car enthusiasts. All other trademarks are property of their respective owners. |
|
|


| relentless |
 Aug 20 2015, 08:17 PM Aug 20 2015, 08:17 PM
Post
#1
|
|
Member  Group: Members Posts: 352 Joined: 1-April 07 From: Oregon Member No.: 7,636 |
I took out my '76 and while driving I could tell there was some additional drag when I depressed the clutch pedal. I pulled over and felt the wheels, and found the driver's side rear was much warmer than the other three. So, after filling with E-free gas, I drove home and put her up on blocks.
I took the rear wheels off first, and found the driver's side rotor and caliper were essentially seized - I couldn't turn the rotor at all. Since the car is almost 40 years old, and in terrific condition otherwise, I placed an order with PMB Performance for a complete brake replacement. I started by cleaning the wheel wells that had decades of dirt. Here is what the rear looked like: Attached thumbnail(s) 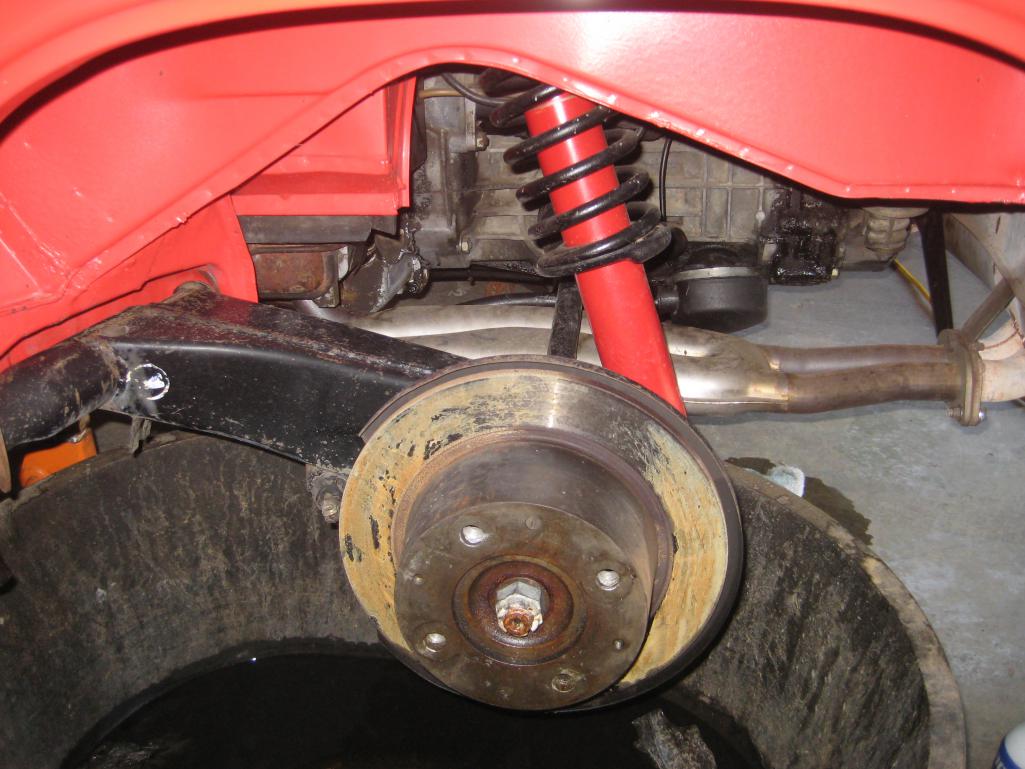 
|
   |

 
|
  |
Replies
| relentless |
Sep 29 2015, 10:47 AM
Post
#2
|
|
Member Group: Members Posts: 352 Joined: 1-April 07 From: Oregon Member No.: 7,636 |
Here's what the workshop manual says about adjusting the front wheel bearings:
Watch out for correct adjustment of wheel bearing. a. Tighten clamping nut slightly (approx. 1.5 mkp = 11 ft. lbs) while turning the wheel or hub, so that the taper rollers can rest well against the bearing races. b. Loosen clamping nut until the nose washer can be just pushed along from the side with a screw driver and no noticeable bearing play is indicated during axial movements of the wheel hub. Caution! Do not support screw driver against hub but hold freely in hand. c. Tighten cheesehead screw of clamping nut to specified tightening torque. Check adjustment once again by moving nose washer and without turning clamping nut, and correct, if required. Caution! The slot width of the clamping nut should be 2.5 + 0.5 mm (.1 + .02”) so that perfect clamping is obtained even under unfavorable tolerance overlaps. |
|
|
|
| stugray |
Jan 6 2017, 01:27 PM
Post
#3
|
|
Advanced Member Group: Members Posts: 3,825 Joined: 17-September 09 From: Longmont, CO Member No.: 10,819 Region Association: None |
QUOTE(relentless @ Sep 29 2015, 09:47 AM)  Here's what the workshop manual says about adjusting the front wheel bearings: Watch out for correct adjustment of wheel bearing. a. Tighten clamping nut slightly (approx. 1.5 mkp = 11 ft. lbs) while turning the wheel or hub, so that the taper rollers can rest well against the bearing races. b. Loosen clamping nut until the nose washer can be just pushed along from the side with a screw driver and no noticeable bearing play is indicated during axial movements of the wheel hub. Caution! Do not support screw driver against hub but hold freely in hand. c. Tighten cheesehead screw of clamping nut to specified tightening torque. Check adjustment once again by moving nose washer and without turning clamping nut, and correct, if required. Caution! The slot width of the clamping nut should be 2.5 + 0.5 mm (.1 + .02”) so that perfect clamping is obtained even under unfavorable tolerance overlaps. d. Drive the car for a few miles, then recheck torque on front bearings. They will usually loosen slightly after "break-in" |
|
|
|
Posts in this topic
relentless New Brakes Aug 20 2015, 08:17 PM mikedsilva that wheel arch is amazingly clean! Aug 20 2015, 08:26 PM relentless The other side.
I used some of Eastwood's C... Aug 20 2015, 08:41 PM
mikedsilva that wheel arch is amazingly clean! Aug 20 2015, 08:26 PM relentless The other side.
I used some of Eastwood's C... Aug 20 2015, 08:41 PM relentless
The other side.
I used some of Eastwood's ... Aug 20 2015, 08:50 PM
relentless
The other side.
I used some of Eastwood's ... Aug 20 2015, 08:50 PM simonjb Looks great!
What brand/color/type of paint d... Jan 5 2017, 11:31 AM relentless Strange, I'm getting redundant pix and not in ... Aug 20 2015, 08:55 PM relentless
Strange, I'm getting redundant pix and not in... Aug 21 2015, 01:38 PM relentless The disc guards were powdercoated mirror black.
... Aug 21 2015, 01:46 PM relentless The same steps were used for the front of the car.... Aug 21 2015, 01:57 PM Cairo94507 Nice work. That is the way to keep these cars loo... Aug 21 2015, 03:34 PM relentless Thanks Cairo94507. Today I took delivery of the r... Aug 21 2015, 06:58 PM relentless Here is the Eastwood vacuum device I used to bleed... Sep 22 2015, 01:32 PM relentless I kept drawing out old brake fluid and topping the... Sep 22 2015, 01:49 PM draganc I don't care about the brake job, I want to kn... Sep 22 2015, 05:36 PM JawjaPorsche Thank you for posting. Always learn something fro... Sep 22 2015, 06:09 PM Eric_Shea You really did a great job! Sep 22 2015, 06:58 PM
simonjb Looks great!
What brand/color/type of paint d... Jan 5 2017, 11:31 AM relentless Strange, I'm getting redundant pix and not in ... Aug 20 2015, 08:55 PM relentless
Strange, I'm getting redundant pix and not in... Aug 21 2015, 01:38 PM relentless The disc guards were powdercoated mirror black.
... Aug 21 2015, 01:46 PM relentless The same steps were used for the front of the car.... Aug 21 2015, 01:57 PM Cairo94507 Nice work. That is the way to keep these cars loo... Aug 21 2015, 03:34 PM relentless Thanks Cairo94507. Today I took delivery of the r... Aug 21 2015, 06:58 PM relentless Here is the Eastwood vacuum device I used to bleed... Sep 22 2015, 01:32 PM relentless I kept drawing out old brake fluid and topping the... Sep 22 2015, 01:49 PM draganc I don't care about the brake job, I want to kn... Sep 22 2015, 05:36 PM JawjaPorsche Thank you for posting. Always learn something fro... Sep 22 2015, 06:09 PM Eric_Shea You really did a great job! Sep 22 2015, 06:58 PM |
1 User(s) are reading this topic (1 Guests and 0 Anonymous Users)
0 Members:

|
Lo-Fi Version | Time is now: 1st June 2026 - 11:21 AM |
Invision Power Board
v9.1.4 © 2026 IPS, Inc.