|
|
|
Porsche, and the Porsche crest are registered trademarks of Dr. Ing. h.c. F. Porsche AG.
This site is not affiliated with Porsche in any way. Its only purpose is to provide an online forum for car enthusiasts. All other trademarks are property of their respective owners. |
|
|


| Mikey914 |
 Mar 3 2018, 11:57 AM Mar 3 2018, 11:57 AM
Post
#1
|
|
The rubber man  Group: Members Posts: 12,772 Joined: 27-December 04 From: Hillsboro, OR Member No.: 3,348 Region Association: None |
Includes
Main Windshield top seal 91456303910 Lower main seal 91456331910 Roof to window seals 1 - 91453118510 - left targa top side seal 1 - 91453118610 - right targa top side seal Vertical targa seals 1 - 91453114310 - left rollbar side seal 1 - 91453114410 - right rollbar side seal #9 &28. 20 &36 in sets. With 14 as an option Will include a copy of the factory maintenance manual to allow you to locate the adjustments for the door windows. I am working on installation instructions and techniques you can use to install these that will be available in about 9 days and can be emailed to you. There is a re occurring theme that these seals are difficult to install correctly, and if not installed correctly will allow for more water to enter your cabin. This is my attempt to put together a kit in a format that will educate the installers as to what you need to do and not do at least from my experience. The 914 is prone to leaking, but lets minimize that to the extent possible. Will have option to purchase the OEM profile rear seal with the fuzzey for $42 (1/2 off) only with the kit. https://900designs.zoeysite.com/914/914-cha...rts/811-00-roof Attached thumbnail(s) 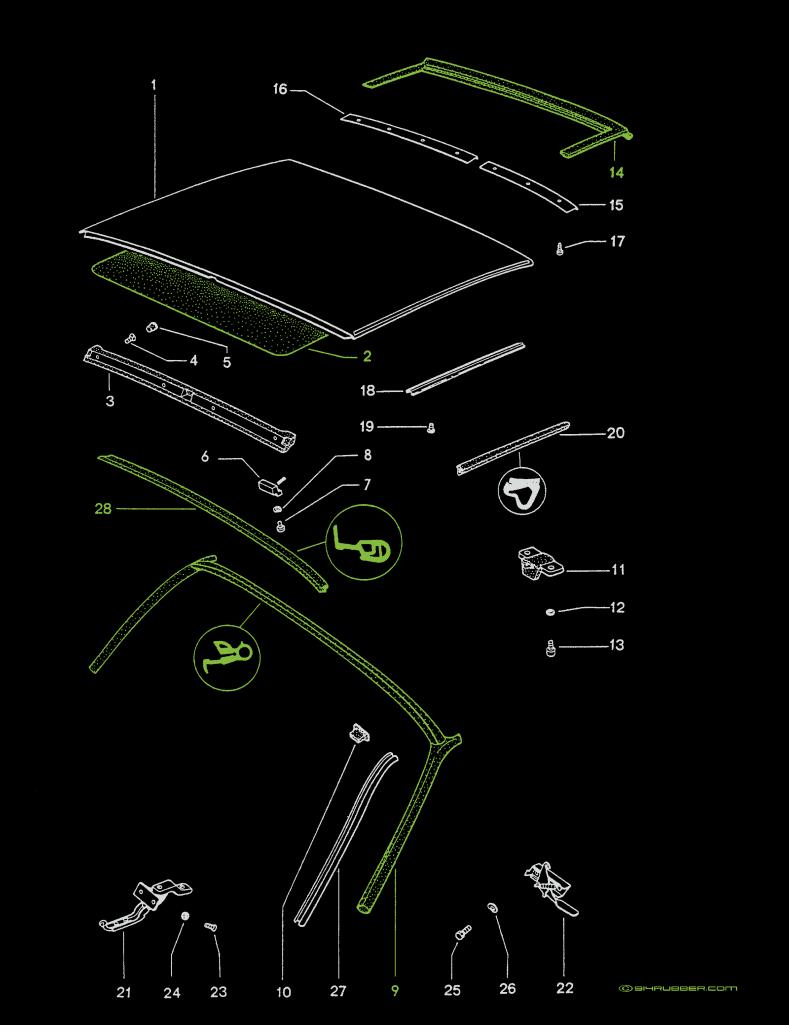
|
   |

 
|
  |
Replies
| Mikey914 |
Apr 25 2018, 12:21 AM
Post
#2
|
|
The rubber man Group: Members Posts: 12,772 Joined: 27-December 04 From: Hillsboro, OR Member No.: 3,348 Region Association: None |
Email sent. The trick is to install the upper corners 1st. The vertical sides do not slide through the track. The back side engages in the inside of the track. You push it forward onto the tab on the aluminum, and install the screw in the corner hole that holds it. Work your way down the sides starting the back 1st. It is a tight fit as it needs to stay in. Use a flat screwdriver to push the front side in. You will notice that the factory took a tool and punched the chrome down at the bottom. You will need to use the same large flat screwdriver to carefully bend the punched part out of the track. Note this is new rubber and will be slightly larger than the old as it shrinks over time. It may be necessary to make some fine adjustments to the tilt of the bar as it's slightly larger. I didn't have to on mine, but I adjusted mine when I fitted the 1st Gen 5 years ago.
Hope this helps we are working on more extensive install instructions. Thanks, mark |
|
|
|
| 98101 |
Apr 25 2018, 02:21 AM
Post
#3
|
|
Michael in Seattle Group: Members Posts: 373 Joined: 7-October 17 From: Seattle, WA Member No.: 21,495 Region Association: Pacific Northwest |
QUOTE(Mikey914 @ Apr 24 2018, 11:21 PM)  Email sent. The trick is to install the upper corners 1st. The vertical sides do not slide through the track. The back side engages in the inside of the track. You push it forward onto the tab on the aluminum, and install the screw in the corner hole that holds it. Work your way down the sides starting the back 1st. It is a tight fit as it needs to stay in. Use a flat screwdriver to push the front side in. You will notice that the factory took a tool and punched the chrome down at the bottom. You will need to use the same large flat screwdriver to carefully bend the punched part out of the track. Note this is new rubber and will be slightly larger than the old as it shrinks over time. It may be necessary to make some fine adjustments to the tilt of the bar as it's slightly larger. I didn't have to on mine, but I adjusted mine when I fitted the 1st Gen 5 years ago. Hope this helps we are working on more extensive install instructions. Thanks, mark (Rich/914werke did 99.9% of the work while I tried not to lose too many of his tools.) Installing the thick lower windshield seal wasn't too bad ... about the effort I was expecting. My car (brought up from California) was missing this piece entirely! The vertical sides (attached to the upper seal) were quite difficult. Even with glycerin we weren't able to slide it onto the track past the first couple inches due to the small screw heads in the track. We hadn't seen these instructions yet. I gave up, and Rich got them on with a screwdriver somehow. 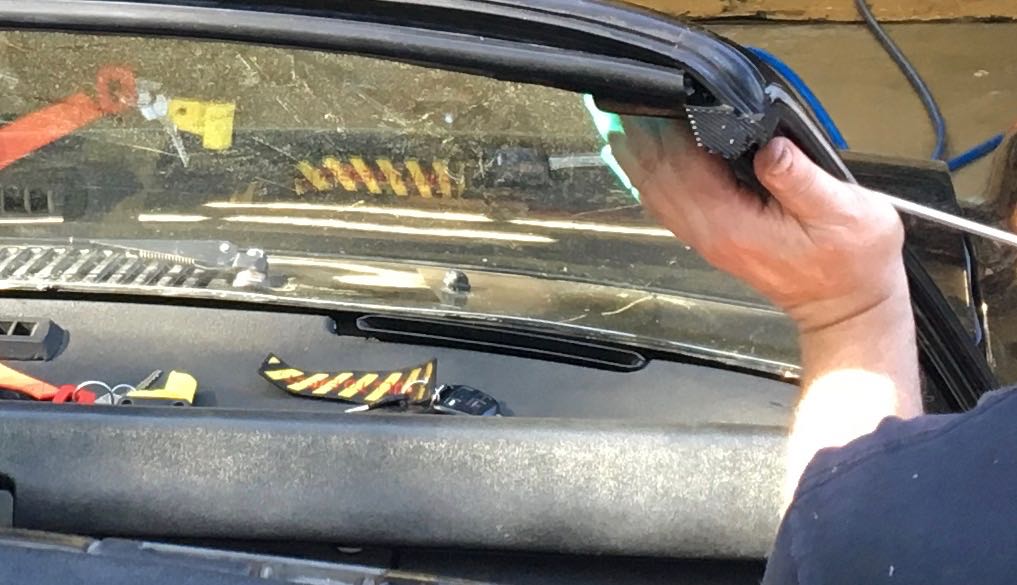 Cutting the lower part to mate with the closing door properly was complicated by the fact my car seems to be missing some rubber here. I think it's part of a complex piece that seals the little triangular window. Mark do you sell this piece for a 1970, early-door model? 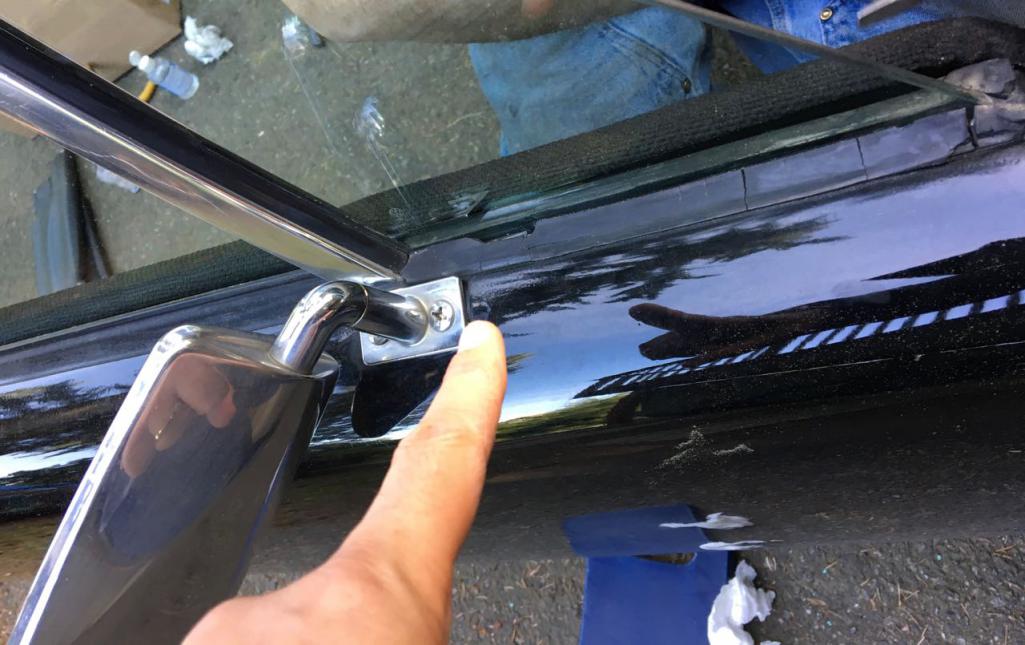 Rich also installed the rear targa seal. This probably should have been easy, but some of the screws holding the metal strips didn't want to come out, and also some previous owner had covered everything in duct tape that was beginning to fossilize. Question about that, is the fuzzy part supposed to extrude outside the car as far as this? 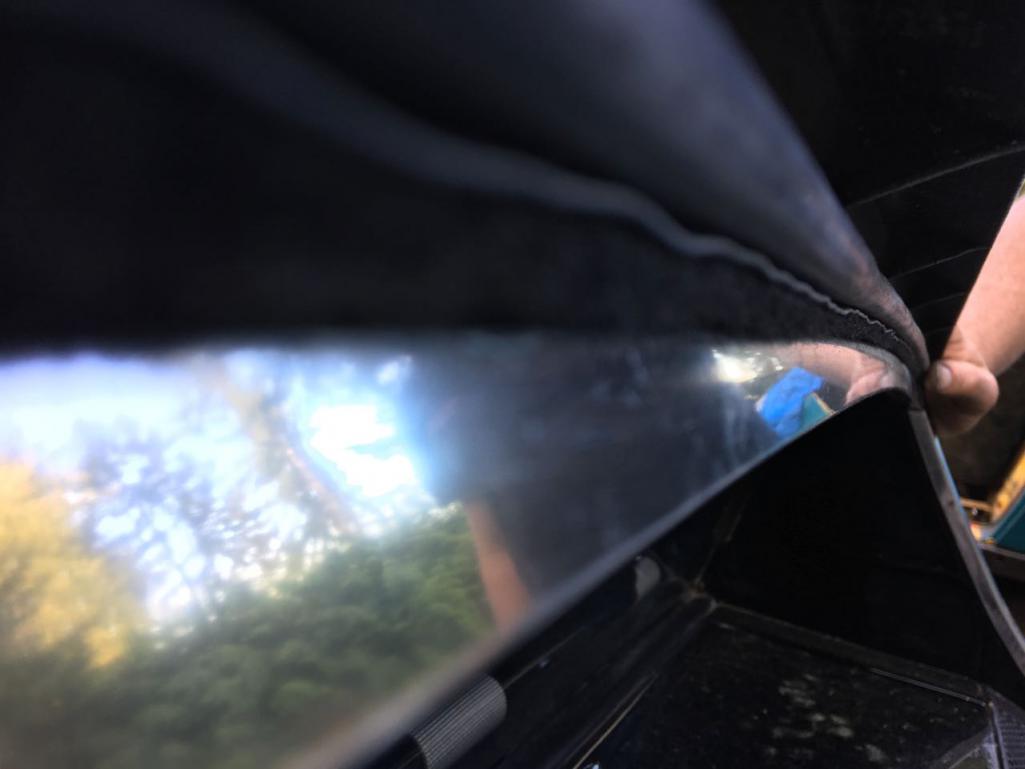 I'm grateful that 914Rubber sells these parts, and that Rich is willing to install them. On my own I would have given up after the first few snags. Even with just the first three parts installed, the roof fits snugly, rattle and squeak reduced, and not feeling as much of the breeze as I was before. I felt confident enough to take it to a self car wash, first time I've washed it since acquiring last winter. |
|
|
|
Posts in this topic
 Mikey914 GB limited quantity 20 sets only Cabin seal set $214 Mar 3 2018, 11:57 AM
 Mikey914 More Mar 3 2018, 11:59 AM
 mb911
More
In for set.. Mar 3 2018, 12:54 PM
mb911
More
In for set.. Mar 3 2018, 12:54 PM cn2800 One set for me, please! Mar 3 2018, 04:57 PM cn2800
One set for me, please!
Oops. Plus #14 as w... Mar 3 2018, 11:19 PM rhodyguy Wow. Mar 3 2018, 03:09 PM markhoward I'm in for a set too.. +14 Mar 3 2018, 04:54 PM Chris914n6 I was going to give you crap about slacking on the... Mar 3 2018, 05:07 PM Mercurial Count me in...+14 Mar 3 2018, 05:23 PM jet1 Please add me to the list +14 as well Mar 3 2018, 06:12 PM Flightpath I will take a set with the option on #14 Mar 3 2018, 06:16 PM carking1996 I'm in! Mar 3 2018, 06:17 PM plays with cars I'm in for a set. +14 for me too.
Point of cl... Mar 3 2018, 10:28 PM Mikey914
I'm in for a set. +14 for me too.
Point of c... Mar 4 2018, 04:12 AM Daiberl In for one set, + #14 Mar 3 2018, 11:32 PM JamesM Perfect timing. Count me in! Mar 3 2018, 11:59 PM jcd914 The timing is not great but I need these.
I'm ... Mar 4 2018, 01:20 AM gus'914 I am in for a set plus 14, Thanks. Mar 4 2018, 01:55 AM 98101 If there is a single raindrop or gust of wind, it ... Mar 4 2018, 02:20 AM Gary I'll take a set, +14. thnx. Mar 4 2018, 05:50 AM billh1963 I'll take a set! Mar 4 2018, 07:05 AM 914four One kit please. Mar 4 2018, 07:26 AM Mikey914 PMs sent to all Mar 4 2018, 01:28 PM Shadowfax One set please plus No. 14. Thanks! Mar 4 2018, 01:42 PM mb911 Paid already thanks. Mar 4 2018, 01:51 PM scallyk9 Add me please! I'll call in an order to in... Mar 4 2018, 02:44 PM warpig put me down for one, and the throttle cable too.
... Mar 4 2018, 06:28 PM Mikey914 PMs sent to all one left.
If you miss it and wa... Mar 5 2018, 12:20 AM maf914 I'll take one set of cabin seals. I will also... Mar 5 2018, 07:36 AM Mikey914 The cable will not be ready to ship out with thes... Mar 5 2018, 10:42 AM Shadowfax Payment sent this morning. Thanks, Mark! Mar 5 2018, 10:51 AM mmichalik PM sent Mar 5 2018, 10:58 AM Dougster Put me in line for a set if someone drops out plea... Mar 5 2018, 11:11 AM cwpeden Put me in line too! With #14 Mar 5 2018, 11:41 AM Shadowfax Got the seals today. Installed the rear Targa seal... Mar 8 2018, 11:00 AM Mikey914 Use a new break away blade knife knife and soapy ... Mar 8 2018, 11:43 AM Shadowfax
Use a new break away blade knife knife and soapy... Mar 8 2018, 11:51 AM 98101
I am working on installation instructions and tec... Apr 24 2018, 04:14 PM Mikey914 Heres some pics from my install.
The rubber will ... Apr 25 2018, 11:46 AM Mikey914 Stary the inside edge Apr 25 2018, 11:47 AM Mikey914 Push in the edhe all the way down Apr 25 2018, 11:49 AM 98101 Cutting the lower part to mate with the closing do... Apr 25 2018, 09:03 PM
cn2800 One set for me, please! Mar 3 2018, 04:57 PM cn2800
One set for me, please!
Oops. Plus #14 as w... Mar 3 2018, 11:19 PM rhodyguy Wow. Mar 3 2018, 03:09 PM markhoward I'm in for a set too.. +14 Mar 3 2018, 04:54 PM Chris914n6 I was going to give you crap about slacking on the... Mar 3 2018, 05:07 PM Mercurial Count me in...+14 Mar 3 2018, 05:23 PM jet1 Please add me to the list +14 as well Mar 3 2018, 06:12 PM Flightpath I will take a set with the option on #14 Mar 3 2018, 06:16 PM carking1996 I'm in! Mar 3 2018, 06:17 PM plays with cars I'm in for a set. +14 for me too.
Point of cl... Mar 3 2018, 10:28 PM Mikey914
I'm in for a set. +14 for me too.
Point of c... Mar 4 2018, 04:12 AM Daiberl In for one set, + #14 Mar 3 2018, 11:32 PM JamesM Perfect timing. Count me in! Mar 3 2018, 11:59 PM jcd914 The timing is not great but I need these.
I'm ... Mar 4 2018, 01:20 AM gus'914 I am in for a set plus 14, Thanks. Mar 4 2018, 01:55 AM 98101 If there is a single raindrop or gust of wind, it ... Mar 4 2018, 02:20 AM Gary I'll take a set, +14. thnx. Mar 4 2018, 05:50 AM billh1963 I'll take a set! Mar 4 2018, 07:05 AM 914four One kit please. Mar 4 2018, 07:26 AM Mikey914 PMs sent to all Mar 4 2018, 01:28 PM Shadowfax One set please plus No. 14. Thanks! Mar 4 2018, 01:42 PM mb911 Paid already thanks. Mar 4 2018, 01:51 PM scallyk9 Add me please! I'll call in an order to in... Mar 4 2018, 02:44 PM warpig put me down for one, and the throttle cable too.
... Mar 4 2018, 06:28 PM Mikey914 PMs sent to all one left.
If you miss it and wa... Mar 5 2018, 12:20 AM maf914 I'll take one set of cabin seals. I will also... Mar 5 2018, 07:36 AM Mikey914 The cable will not be ready to ship out with thes... Mar 5 2018, 10:42 AM Shadowfax Payment sent this morning. Thanks, Mark! Mar 5 2018, 10:51 AM mmichalik PM sent Mar 5 2018, 10:58 AM Dougster Put me in line for a set if someone drops out plea... Mar 5 2018, 11:11 AM cwpeden Put me in line too! With #14 Mar 5 2018, 11:41 AM Shadowfax Got the seals today. Installed the rear Targa seal... Mar 8 2018, 11:00 AM Mikey914 Use a new break away blade knife knife and soapy ... Mar 8 2018, 11:43 AM Shadowfax
Use a new break away blade knife knife and soapy... Mar 8 2018, 11:51 AM 98101
I am working on installation instructions and tec... Apr 24 2018, 04:14 PM Mikey914 Heres some pics from my install.
The rubber will ... Apr 25 2018, 11:46 AM Mikey914 Stary the inside edge Apr 25 2018, 11:47 AM Mikey914 Push in the edhe all the way down Apr 25 2018, 11:49 AM 98101 Cutting the lower part to mate with the closing do... Apr 25 2018, 09:03 PM |
1 User(s) are reading this topic (1 Guests and 0 Anonymous Users)
0 Members:

|
Lo-Fi Version | Time is now: 2nd April 2026 - 12:17 PM |
Invision Power Board
v9.1.4 © 2026 IPS, Inc.