|
|
|
Porsche, and the Porsche crest are registered trademarks of Dr. Ing. h.c. F. Porsche AG.
This site is not affiliated with Porsche in any way. Its only purpose is to provide an online forum for car enthusiasts. All other trademarks are property of their respective owners. |
|
|


| drdriddle |
 Feb 21 2024, 09:48 AM Feb 21 2024, 09:48 AM
Post
#1
|
|
Newbie  Group: Members Posts: 29 Joined: 16-March 23 From: montana Member No.: 27,230 Region Association: None |
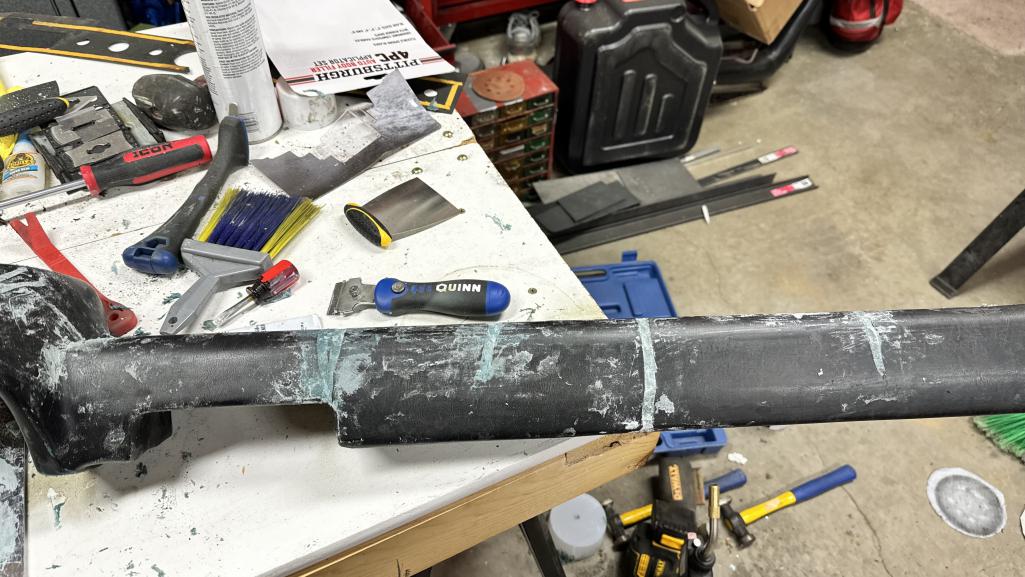
started the process of fixing the dash cracks. Using bondo with fiberglass, then skim coat of regular bondo. will be flocking this weekend. There is a corresponding portion of the metal dash component that will be flockled as well.
 |
   |

 
|
  |
Replies
| drdriddle |
Feb 26 2024, 01:03 AM
Post
#2
|
|
Newbie Group: Members Posts: 29 Joined: 16-March 23 From: montana Member No.: 27,230 Region Association: None |
So the big questions are the time and money. The two small cans of bondo, one with glass and one without was about $40 bucks at harbor freight. The flocking kit was between $60-70 but I got that last year and have been sitting on it waiting to get to the point of doing it, so not firm on that cost. Then you need some small ancillary things like a dremel with a pointed stone attachment, a couple of plastic bondo applicators, a sander,(you can hand sand the whole thing if you don’t have a small orbital) and I used 120 grit as it doesn’t need to be super smooth. I had all those things but again HF has those cheap…say another $20 for the small stuff. Less than $150 for all the supplies.
Time total was about 5-7 hours…and the drying time between the 2 projects. The dremel is used to widen and deepen all the cracks, then the glass bondo is used on the cracks. Wait for it to set overnight, sand and then light coat of the regular bondo, set overnight and then sand smooth. That was for the dash pad. The metal portion of the dash was easy, strip off the old cracked vinyl and adhesive in that area a quick sand and seal it with primer. The adhesive for the flocking is brushed on quickly…it has a 10-15 working time, then flock away until it’s covered. The flocking will bed down and I stood over it, flocking little sections that looked wet until it was evenly coated. Wait 15 hours until dry. Did the whole project over 4 days Neighbor has already asked me to do his 78 merc 300d. I would definitely do it again Now for how strong is it and the wear. You can rub it like cloth and it feels really sturdy. There is no give to it. Hard to describe, but it’s like if I took some alcantara cloth and glued it down to a board? It doesn’t leave a mark or streak like when you run your hands over suede. It is on the dash and I don’t think much rubbing will occur. I’m still contemplating doing the knee board that runs along the bottom of the dash. I think it would look like a nice tie in to the top. It’s the easiest piece to remove and swap out/recover/do something different if it doesn’t hold up. The metal dash was a breeze. As the whole thing is flat and in one plane. The rubber dash is harder as the adhesive is self leveling but it’s in 2 different planes. If you put the adhesive on too thick on the vertical plane it wants to run…but it’s a thicker glue/paint so it doesn’t run very fast. I lost a bit of working time, running back over those area with a brush until it set enough not to run. But it only took 2-3 minutes to flock the whole thing. So far it’s been one of the most rewarding projects on the car, and if it holds up, a bit of a money saving one as well. I spent three hours doing the drivers side targa main seal down the A pillar and was so pissy by the end that I haven’t done the passengers side yet. This was a much more fun project. I think I got all the questions but if there’s anything I missed, please let me know. And thank you for saying it looks good…it’s nice thinking it’s not just me being overly confident in its outcome. |
|
|
|
Posts in this topic
 drdriddle dash flocking progress Feb 21 2024, 09:48 AM
 drdriddle RE: dash flocking progress Feb 21 2024, 09:50 AM
 worn
Interesting. I just started playing around wit... Feb 21 2024, 07:24 PM PanelBilly Its never going to be stock again, so why don... Feb 21 2024, 12:31 PM mb911
Its never going to be stock again, so why don... Feb 21 2024, 04:01 PM windforfun
Its never going to be stock again, so why don... Feb 21 2024, 05:26 PM drdriddle
[quote name='mb911' post='3129892' date='Feb 21 2... Feb 22 2024, 10:17 AM r_towle It’s a flocking dash, what do you think ? Feb 21 2024, 04:14 PM windforfun
It’s a flocking dash, what do you think ?
:l... Feb 21 2024, 05:26 PM Root_Werks Interesting, I wonder if this is sort of what... Feb 21 2024, 06:22 PM dr914@autoatlanta.com we have plenty of our factory look dashes on the s... Feb 22 2024, 11:23 AM drdriddle
we have plenty of our factory look dashes on the ... Feb 22 2024, 03:18 PM PanelBilly You could do a hydro dip if the doesn’t work
Feb 22 2024, 10:28 PM Nogoodwithusernames Following along for my VW dash pad. Let us know ho... Feb 23 2024, 11:20 AM drdriddle Did the metal part of the dash last night. This is... Feb 23 2024, 04:11 PM drdriddle Also did a glovebox delete. Couldn’t get it to l... Feb 23 2024, 04:13 PM burton73 Are you using a flocking gun and slow dry BK ename... Feb 23 2024, 05:02 PM drdriddle Yes it’s a flocking kit. It’s a brush on self ... Feb 23 2024, 08:45 PM drdriddle Well here is the dash pad… I think it looks awes... Feb 24 2024, 05:22 PM drdriddle RE: dash flocking progress Feb 24 2024, 05:23 PM drdriddle RE: dash flocking progress Feb 24 2024, 05:24 PM drdriddle RE: dash flocking progress Feb 24 2024, 05:24 PM Krieger That looks really good! Are you going round d... Feb 24 2024, 06:16 PM windforfun
That looks really good! Are you going around... Feb 24 2024, 06:24 PM drdriddle Ahhh, actually I did an ashtray delete as well. Ho... Feb 25 2024, 12:53 AM burton73 It came out looking really great. Nice job on this... Feb 25 2024, 11:58 AM Mitox Looks good! Feb 25 2024, 12:25 PM slowrodent Really nice job! I'll be curious to see ho... Feb 25 2024, 04:34 PM Beach914 How abrasion resistant do you feel it will be when... Feb 25 2024, 05:55 PM rick 918-S I like it. Feb 25 2024, 06:13 PM 914werke Not bad at all.
How much time/$'s have yo... Feb 25 2024, 09:08 PM technicalninja Dash flocking????
:WTF:
Works far, far better... Feb 25 2024, 09:54 PM drdriddle
Progress do far Mar 2 2024, 04:10 PM ValcoOscar
Progress do far
Just plain E X C E L L E N T... Mar 2 2024, 10:13 PM Retroracer Looks great! Thx for posting and good to know ... Mar 3 2024, 10:41 AM technicalninja Looks "hi-end" custom for chump change... Mar 3 2024, 11:12 AM bzettner :Qarl:
I agree it looks great. My personal conc... Mar 3 2024, 12:02 PM drdriddle The kit I used was from https://www.flockit.com/or... Mar 3 2024, 11:01 PM drdriddle
The underdash pad is ready for flocking…proba... Mar 3 2024, 11:03 PM drdriddle Here is the dash back in the car. Vacuuming the da... Sep 1 2024, 09:09 PM drdriddle Different angle Sep 1 2024, 09:14 PM drdriddle Btw, I would rather remove my own eyeballs with a ... Sep 1 2024, 09:25 PM 76-914
Btw, I would rather remove my own eyeballs with a... Sep 2 2024, 08:47 AM drdriddle Here’s the center divider. Seat heater controls ... Sep 2 2024, 10:14 PM
worn
Interesting. I just started playing around wit... Feb 21 2024, 07:24 PM PanelBilly Its never going to be stock again, so why don... Feb 21 2024, 12:31 PM mb911
Its never going to be stock again, so why don... Feb 21 2024, 04:01 PM windforfun
Its never going to be stock again, so why don... Feb 21 2024, 05:26 PM drdriddle
[quote name='mb911' post='3129892' date='Feb 21 2... Feb 22 2024, 10:17 AM r_towle It’s a flocking dash, what do you think ? Feb 21 2024, 04:14 PM windforfun
It’s a flocking dash, what do you think ?
:l... Feb 21 2024, 05:26 PM Root_Werks Interesting, I wonder if this is sort of what... Feb 21 2024, 06:22 PM dr914@autoatlanta.com we have plenty of our factory look dashes on the s... Feb 22 2024, 11:23 AM drdriddle
we have plenty of our factory look dashes on the ... Feb 22 2024, 03:18 PM PanelBilly You could do a hydro dip if the doesn’t work
Feb 22 2024, 10:28 PM Nogoodwithusernames Following along for my VW dash pad. Let us know ho... Feb 23 2024, 11:20 AM drdriddle Did the metal part of the dash last night. This is... Feb 23 2024, 04:11 PM drdriddle Also did a glovebox delete. Couldn’t get it to l... Feb 23 2024, 04:13 PM burton73 Are you using a flocking gun and slow dry BK ename... Feb 23 2024, 05:02 PM drdriddle Yes it’s a flocking kit. It’s a brush on self ... Feb 23 2024, 08:45 PM drdriddle Well here is the dash pad… I think it looks awes... Feb 24 2024, 05:22 PM drdriddle RE: dash flocking progress Feb 24 2024, 05:23 PM drdriddle RE: dash flocking progress Feb 24 2024, 05:24 PM drdriddle RE: dash flocking progress Feb 24 2024, 05:24 PM Krieger That looks really good! Are you going round d... Feb 24 2024, 06:16 PM windforfun
That looks really good! Are you going around... Feb 24 2024, 06:24 PM drdriddle Ahhh, actually I did an ashtray delete as well. Ho... Feb 25 2024, 12:53 AM burton73 It came out looking really great. Nice job on this... Feb 25 2024, 11:58 AM Mitox Looks good! Feb 25 2024, 12:25 PM slowrodent Really nice job! I'll be curious to see ho... Feb 25 2024, 04:34 PM Beach914 How abrasion resistant do you feel it will be when... Feb 25 2024, 05:55 PM rick 918-S I like it. Feb 25 2024, 06:13 PM 914werke Not bad at all.
How much time/$'s have yo... Feb 25 2024, 09:08 PM technicalninja Dash flocking????
:WTF:
Works far, far better... Feb 25 2024, 09:54 PM drdriddle
Progress do far Mar 2 2024, 04:10 PM ValcoOscar
Progress do far
Just plain E X C E L L E N T... Mar 2 2024, 10:13 PM Retroracer Looks great! Thx for posting and good to know ... Mar 3 2024, 10:41 AM technicalninja Looks "hi-end" custom for chump change... Mar 3 2024, 11:12 AM bzettner :Qarl:
I agree it looks great. My personal conc... Mar 3 2024, 12:02 PM drdriddle The kit I used was from https://www.flockit.com/or... Mar 3 2024, 11:01 PM drdriddle
The underdash pad is ready for flocking…proba... Mar 3 2024, 11:03 PM drdriddle Here is the dash back in the car. Vacuuming the da... Sep 1 2024, 09:09 PM drdriddle Different angle Sep 1 2024, 09:14 PM drdriddle Btw, I would rather remove my own eyeballs with a ... Sep 1 2024, 09:25 PM 76-914
Btw, I would rather remove my own eyeballs with a... Sep 2 2024, 08:47 AM drdriddle Here’s the center divider. Seat heater controls ... Sep 2 2024, 10:14 PM |
1 User(s) are reading this topic (1 Guests and 0 Anonymous Users)
0 Members:

|
Lo-Fi Version | Time is now: 12th July 2025 - 03:28 PM |
Invision Power Board
v9.1.4 © 2025 IPS, Inc.