|
|
|
Porsche, and the Porsche crest are registered trademarks of Dr. Ing. h.c. F. Porsche AG.
This site is not affiliated with Porsche in any way. Its only purpose is to provide an online forum for car enthusiasts. All other trademarks are property of their respective owners. |
|
|


| Stratfink |
 Aug 30 2024, 06:32 PM Aug 30 2024, 06:32 PM
Post
#1
|
|
Member  Group: Members Posts: 76 Joined: 27-December 21 From: SoCal Member No.: 26,198 Region Association: Southern California |
I bought my first (and only) 914 about 2 years ago from TDSkip after skulking around in the background here on the forum for a couple of years. I've really enjoyed the car and done a few upgrade and maintenance items (123 Dizzy, new TPS board, stereo, and some cosmetic stuff like Coco Mats). But I have been acquiring parts to backdate the exhaust, update the suspension, and to go 5-lug for quite awhile and finally got into the project. Between work and other projects it is going slow, but the deeper I get into it the more questions I have (and the scope of the project grows of course...).
Starting this thread to share some progress, but more importantly to call on the wisdom of the amazing 914 community for help since I have not done any of this work before. Thought a good "before" pic would be a good way to start this off... 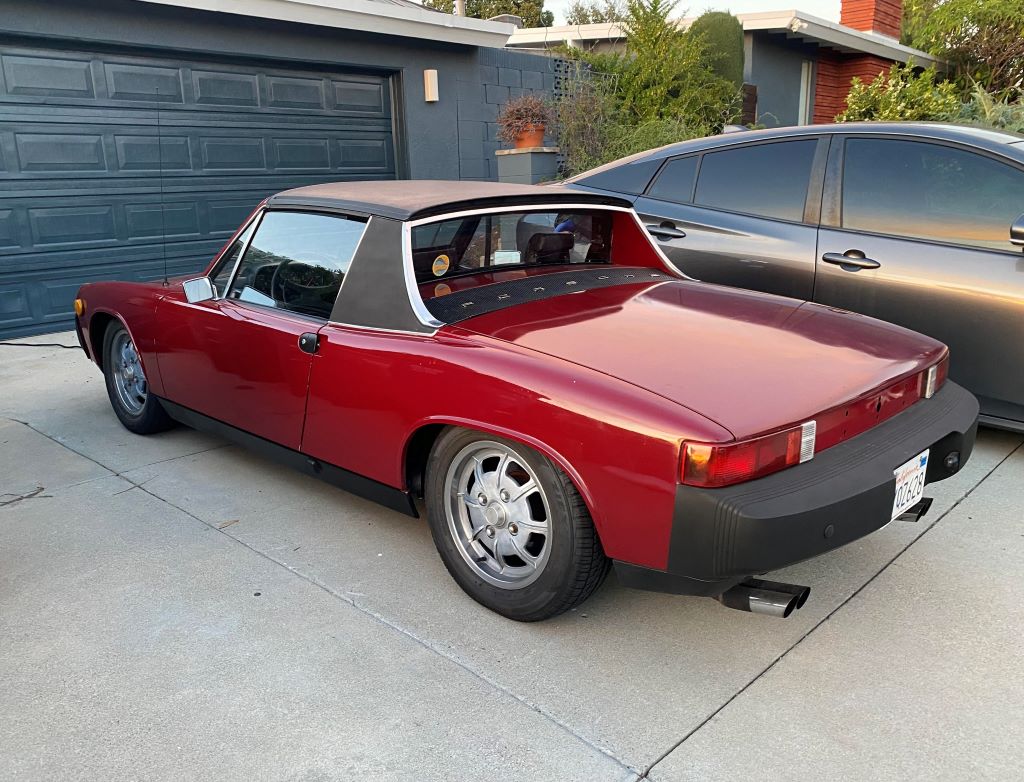 First step was getting the Monza exhaust and '75 Heat Exchangers off the car... 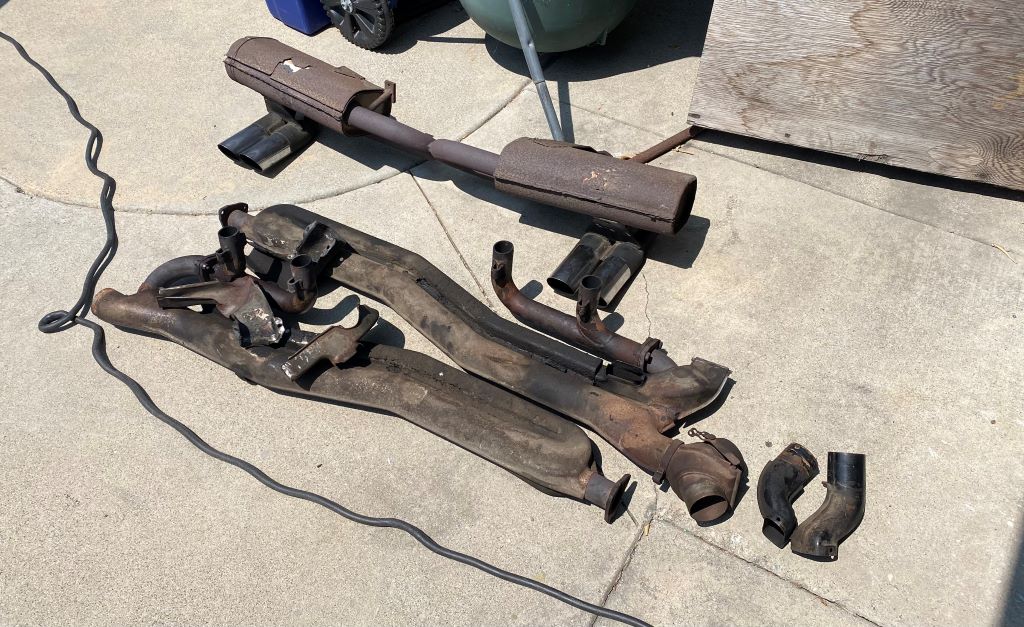 Generous amounts of PB Blaster were applied to the fasteners for several days before pulling this apart. Luckily no exhaust studs snapped - however in 3 locations the studs came out instead of the nuts coming loose. 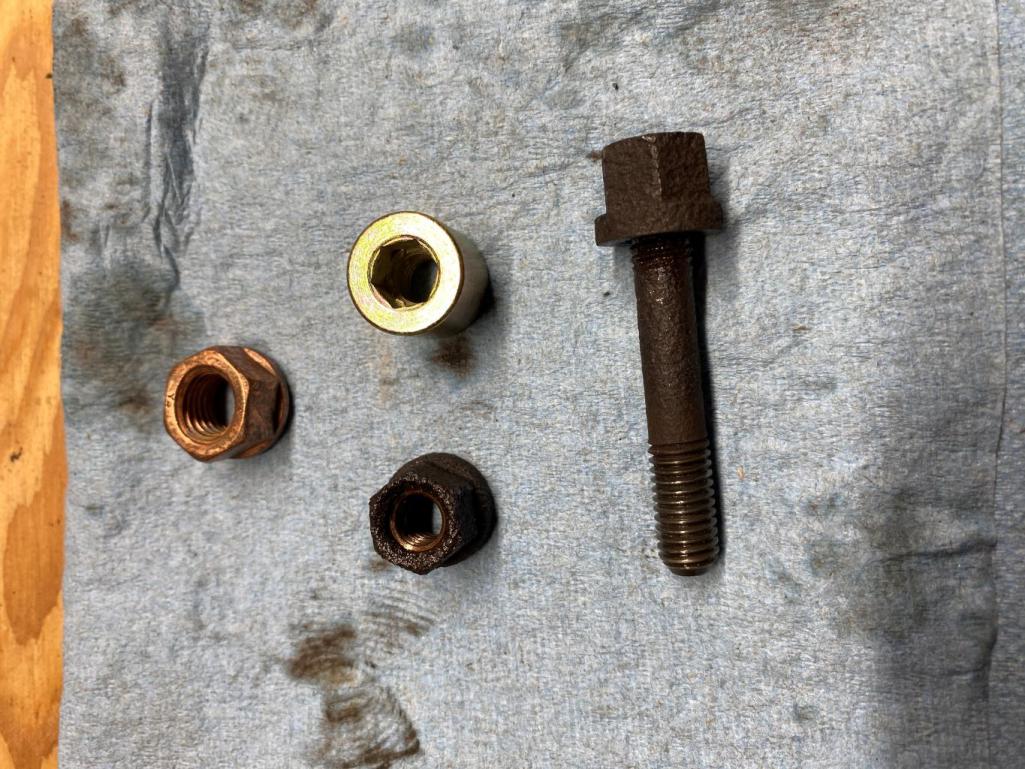 You can see the condition of the threads in the picture. Also shown are the new nuts I purchased (although the copper lock nuts are the wrong thread size). I have not tried to remove the old nut from the stud now that the stud is out of the car - perhaps best to get new studs for these 3 locations. I also plan to use some anti-sieze for the re-install. 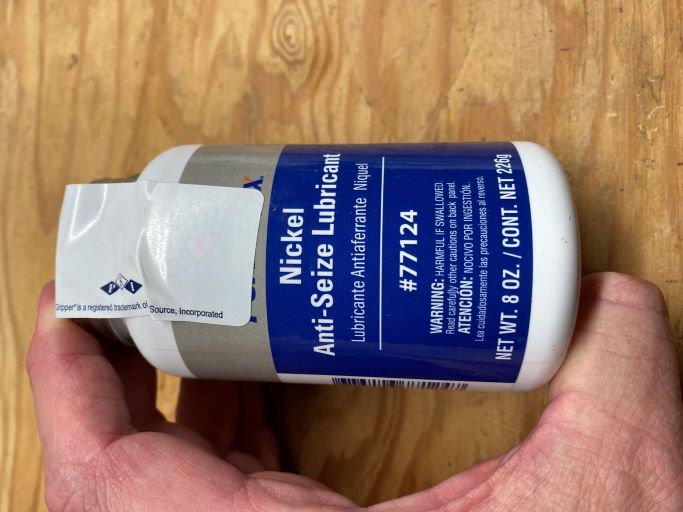 After getting the exhaust out I could see that there had been some oil leaks that should be addressed. More on that in the next post (as well as the start of the 5-lug work that I got into while stressing about the oil leaks...). Thanks in advance - Joe |
   |

 
|
  |
Replies
| Stratfink |
Aug 30 2024, 07:05 PM
Post
#2
|
|
Member Group: Members Posts: 76 Joined: 27-December 21 From: SoCal Member No.: 26,198 Region Association: Southern California |
Thanks Mark! The body has a few flaws but its mine (IMG:style_emoticons/default/smile.gif)
I got started on dis-assembling the rear for the coil-overs and 5-lug conversion. Thanks to some good searching here I was able to get the acorn nuts loose on the stub-axles, and break the 19mm bolts free for the rear calipers. Admittedly when I ordered the kit from PMB I was not aware of the bearing removal/install processes and I was not planning to remove the rear trailing arms. This is where the questions start. 1. I assume it is best to remove the trailing arm in order to get the old wheel bearings out. I have read the threads on slide hammers and other approaches to do this while on the vehicle - but feeling like I am headed for removal to do this on the bench or take to a shop with a press. To get the trailing arm off do I need to remove the suspension console (3 fasteners)? 2. Is there a specific way to drain the brake fluid before removing the rear calipers? Is it OK to just disconnect where the lines connect at the trailing arm and capture the spillage there? Or given the need to bleed the system during re-assembly is another method preferred? Thanks again - Joe |
|
|
|
| fiacra |
Aug 31 2024, 09:11 AM
Post
#3
|
|
Person.Woman.Man.Camera.TV Group: Members Posts: 578 Joined: 1-March 19 From: East Bay Region - California Member No.: 22,920 Region Association: Northern California |
QUOTE(Stratfink @ Aug 30 2024, 06:05 PM)  Thanks Mark! The body has a few flaws but its mine (IMG:style_emoticons/default/smile.gif) I got started on dis-assembling the rear for the coil-overs and 5-lug conversion. Thanks to some good searching here I was able to get the acorn nuts loose on the stub-axles, and break the 19mm bolts free for the rear calipers. Admittedly when I ordered the kit from PMB I was not aware of the bearing removal/install processes and I was not planning to remove the rear trailing arms. This is where the questions start. 1. I assume it is best to remove the trailing arm in order to get the old wheel bearings out. I have read the threads on slide hammers and other approaches to do this while on the vehicle - but feeling like I am headed for removal to do this on the bench or take to a shop with a press. To get the trailing arm off do I need to remove the suspension console (3 fasteners)? 2. Is there a specific way to drain the brake fluid before removing the rear calipers? Is it OK to just disconnect where the lines connect at the trailing arm and capture the spillage there? Or given the need to bleed the system during re-assembly is another method preferred? Thanks again - Joe Just recently pulled the trailing arm off to do bushing replacement. A picture would help me understand your question about removal of the suspension console, but the bolts you are asking about are likely the outboard bolts holding the trailing arm at the shim carrier. I would take the trailing arm and do the work on a press, at least that's what I did and I found it was fairly easy to do it that way. As far as the brake fluid, I simply used a bleeder screw cap on the hard line when I disconnected it and that worked fine to prevent a mess. You are going to need to bleed/flush the system but no need to empty it first as all the fluid is going to come out anyway. |
|
|
|
Posts in this topic
 Stratfink Raspberry 914 finally getting some updates Aug 30 2024, 06:32 PM
 mepstein Beautiful car. :beer2: Aug 30 2024, 06:46 PM
 Stratfink
Just recently pulled the trailing arm off to do b... Sep 2 2024, 10:48 AM rick 918-S Nice car. Isn't that Aubergine? I have a Raspb... Aug 30 2024, 08:31 PM Jett Nice car but looks like Malaga red Aug 30 2024, 08:42 PM scallyk9 Malaga Red (L 30 C), a standard 1975-76 color? Aug 30 2024, 09:13 PM Stratfink
Malaga Red (L 30 C), a standard 1975-76 color?
... Aug 30 2024, 09:28 PM dr914@autoatlanta.com looks like malaga to me!!!
I boug... Aug 31 2024, 09:46 AM FlacaProductions Looks like great progress, Joe.
I'm usually o... Aug 31 2024, 11:40 AM Stratfink To be more exact I guess it is the 3 bolt location... Sep 2 2024, 09:03 PM East coaster That’s how I took mine out Sep 3 2024, 05:07 AM technicalninja Those are supposed to have plastic plugs in them (... Sep 3 2024, 01:07 PM FlacaProductions Here's a pic i found that shows the plugs and ... Sep 4 2024, 08:38 AM Stratfink Finally getting back to the 914 today after a few ... Jan 1 2025, 11:29 PM Root_Werks Looks like some great progress!
Also really l... Jan 2 2025, 10:26 AM Stratfink Chipping away and making some (slow) progress on t... Mar 22 2025, 05:11 PM Stratfink Cleaned up the bushing - part number 914 424 224 0... Mar 22 2025, 06:19 PM bkrantz Is that the bushing for the shift rod hole in the ... Mar 22 2025, 07:38 PM Stratfink
Is that the bushing for the shift rod hole in the... Mar 22 2025, 09:23 PM porschetub
[quote name='bkrantz' post='3197467' date='Mar 22... Mar 24 2025, 04:15 PM Stratfink I have been thinking through the sequence of event... Mar 29 2025, 04:54 PM Stratfink A couple of questions from the thermostat and shif... Apr 18 2025, 10:21 PM Cairo94507 Great progress. That conical screw does not look ... Apr 19 2025, 08:18 AM JeffBowlsby The L bracket is for the screw that holds the air ... Apr 19 2025, 08:25 AM Stratfink Awesome - thanks for the replies Jeff and Cairo... Apr 19 2025, 08:38 PM Dave_Darling I have had some success wiggling the coupler to ge... Apr 19 2025, 08:55 PM Stratfink Thanks for all the inputs - shift rod is done (con... Apr 26 2025, 09:09 PM Dave_Darling The rotor isn't firmly held in place until the... Apr 27 2025, 05:45 AM Stratfink Got the SSI heat exchangers in and the muffler on ... May 24 2025, 07:01 PM FlacaProductions Really great progress, Joe! I'm frequentl... May 25 2025, 07:55 AM
Stratfink
Just recently pulled the trailing arm off to do b... Sep 2 2024, 10:48 AM rick 918-S Nice car. Isn't that Aubergine? I have a Raspb... Aug 30 2024, 08:31 PM Jett Nice car but looks like Malaga red Aug 30 2024, 08:42 PM scallyk9 Malaga Red (L 30 C), a standard 1975-76 color? Aug 30 2024, 09:13 PM Stratfink
Malaga Red (L 30 C), a standard 1975-76 color?
... Aug 30 2024, 09:28 PM dr914@autoatlanta.com looks like malaga to me!!!
I boug... Aug 31 2024, 09:46 AM FlacaProductions Looks like great progress, Joe.
I'm usually o... Aug 31 2024, 11:40 AM Stratfink To be more exact I guess it is the 3 bolt location... Sep 2 2024, 09:03 PM East coaster That’s how I took mine out Sep 3 2024, 05:07 AM technicalninja Those are supposed to have plastic plugs in them (... Sep 3 2024, 01:07 PM FlacaProductions Here's a pic i found that shows the plugs and ... Sep 4 2024, 08:38 AM Stratfink Finally getting back to the 914 today after a few ... Jan 1 2025, 11:29 PM Root_Werks Looks like some great progress!
Also really l... Jan 2 2025, 10:26 AM Stratfink Chipping away and making some (slow) progress on t... Mar 22 2025, 05:11 PM Stratfink Cleaned up the bushing - part number 914 424 224 0... Mar 22 2025, 06:19 PM bkrantz Is that the bushing for the shift rod hole in the ... Mar 22 2025, 07:38 PM Stratfink
Is that the bushing for the shift rod hole in the... Mar 22 2025, 09:23 PM porschetub
[quote name='bkrantz' post='3197467' date='Mar 22... Mar 24 2025, 04:15 PM Stratfink I have been thinking through the sequence of event... Mar 29 2025, 04:54 PM Stratfink A couple of questions from the thermostat and shif... Apr 18 2025, 10:21 PM Cairo94507 Great progress. That conical screw does not look ... Apr 19 2025, 08:18 AM JeffBowlsby The L bracket is for the screw that holds the air ... Apr 19 2025, 08:25 AM Stratfink Awesome - thanks for the replies Jeff and Cairo... Apr 19 2025, 08:38 PM Dave_Darling I have had some success wiggling the coupler to ge... Apr 19 2025, 08:55 PM Stratfink Thanks for all the inputs - shift rod is done (con... Apr 26 2025, 09:09 PM Dave_Darling The rotor isn't firmly held in place until the... Apr 27 2025, 05:45 AM Stratfink Got the SSI heat exchangers in and the muffler on ... May 24 2025, 07:01 PM FlacaProductions Really great progress, Joe! I'm frequentl... May 25 2025, 07:55 AM |
1 User(s) are reading this topic (1 Guests and 0 Anonymous Users)
0 Members:

|
Lo-Fi Version | Time is now: 16th July 2025 - 05:41 AM |
Invision Power Board
v9.1.4 © 2025 IPS, Inc.