|
|
|
Porsche, and the Porsche crest are registered trademarks of Dr. Ing. h.c. F. Porsche AG.
This site is not affiliated with Porsche in any way. Its only purpose is to provide an online forum for car enthusiasts. All other trademarks are property of their respective owners. |
|
|


| Eric_Shea |
 Nov 6 2005, 12:06 PM Nov 6 2005, 12:06 PM
Post
#1
|
|
PMB Performance  Group: Admin Posts: 19,304 Joined: 3-September 03 From: Salt Lake City, UT Member No.: 1,110 Region Association: Rocky Mountains |
NEW V-CALIPERS ARE HERE!
The V-Caliper was designed to allow teeners the use of a vented rear rotor on their 4 or 5 lug cars (If you’re going to remain 4-lug you’ll need to have your rotors drilled for the 4 x130mm pattern). These are sold as completed calipers on an exchange basis and have all the features of our regular caliper rebuild service. Here's what you get: * Disassemble caliper * Bead blast caliper to bare metal * Replate with factory silver zinc plating. * Hone the cylinders * Polish Pistons * Install piston and adjuster screw rebuild kits * Lube and reassemble the caliper * Install caliper spacers * Special rotor spacer drilled for 4 or 5 lug applications * Longer brake pad pins. Pricing is $455.00 per pair plus core and shipping. I only sell these in pairs (obviously). Shipping is a flat $9.30 for Priority Mail to anywhere in the continental United States. For international orders you can still use the USPS link. Boxed weight is 17lbs. You can calculate postage from 84092 using this site USPS Shipping Calculator This application will now use the standard 1970-1977 vented rear rotor. The vented rotor will need 4mm turned off the outside edge (8mm total) to work with the V-Caliper. We can supply new Zimmerman rotors for $75.00 each plus shipping. PMB Performance - 1861 E. Gracey Lane - Sandy - UT - 84092 Call 801.674.3669 Attached image(s) 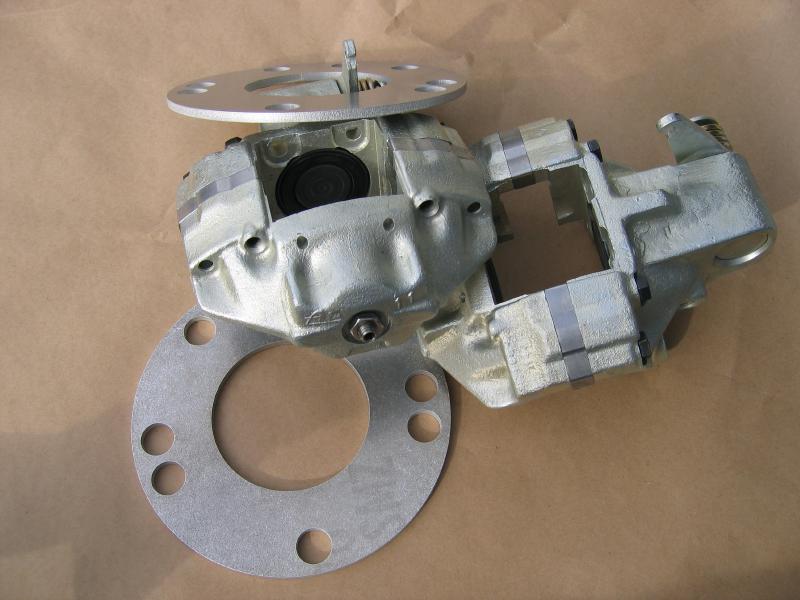
|
   |

 
|
  |
Replies
| Eric_Shea |
Jun 14 2007, 10:57 AM
Post
#2
|
|
PMB Performance Group: Admin Posts: 19,304 Joined: 3-September 03 From: Salt Lake City, UT Member No.: 1,110 Region Association: Rocky Mountains |
QUOTE Mike had to grind down part of my powdercoated trailing arm to allow one of the calipers to fit. He also added a bunch of washers to their mount. Is this to be expected? Nada. The caliper spacers space the "nose" of the caliper out "away" from the trailing arm. The mounting surface will remain "exactly" the same as a standard 914 caliper (because it is). We use to ship all of our calipers with the 10mm inner adjuster cover that is commonly sold as a replacement for the flawed factory 4mm hex cover. These stick out but... they would only effect the mounting if the caliper was mounted with them "on" and only on some "rare" occasions where the inner adjuster access hole tube was welded in a bit high at the factory. These are meant to be mounted through that hole anyway so... again, this would not necessitate any grinding of the arm. We now use a deep 5mm hex cover that looks factory but actually works. I like it a little better than the 10mm head style. There is simply no need to grind the arm in any way, shape or form. This is a stock bolt up. Now... regarding the washers: These kits come with rotor spacers (shown prominently above in each picture) that move the rotor out 4.88mm to center it in the now widened slot. We've had customers put the rotor spacers "on top" of the rotor vs. "underneath" the rotor where it is meant to go. This may be what happened. The proper mounting procedure is: 1. 5-lug hub 2. Rotor spacer on hub 3. Rotor on top of rotor spacer There are two methods to align a rotor in a widened caliper; You either need to space the rotor out with the supplied spacers or you need to space the caliper back with washers or mounting ear spacers. I don't recommend the washers ear spacers because of clearance issues with these calipers (as you now know). Others have done them with no modifications needed. From your comments above I can only assume that the rotor spacers were not used. That being the case, you would "have" to shim the caliper back 5mm hence the "bunch of washers" and hence the clearance problem with the control arm. Mike's a smart cookie so I'm guessing that the extra 5mm under your rotor might have caused clearance issues with your wheel/tire combo necessitating the "other" method of spacing the caliper back. (IMG:style_emoticons/default/wink.gif) |
|
|
|
| neo914-6 |
Jun 15 2007, 12:39 AM
Post
#3
|
|
neo life Group: Members Posts: 5,086 Joined: 16-January 03 From: Willow Glen (San Jose) Member No.: 159 |
QUOTE(Eric_Shea @ Jun 14 2007, 09:57 AM)  QUOTE Mike had to grind down part of my powdercoated trailing arm to allow one of the calipers to fit. He also added a bunch of washers to their mount. Is this to be expected? Nada. The caliper spacers space the "nose" of the caliper out "away" from the trailing arm. The mounting surface will remain "exactly" the same as a standard 914 caliper (because it is). We use to ship all of our calipers with the 10mm inner adjuster cover that is commonly sold as a replacement for the flawed factory 4mm hex cover. These stick out but... they would only effect the mounting if the caliper was mounted with them "on" and only on some "rare" occasions where the inner adjuster access hole tube was welded in a bit high at the factory. These are meant to be mounted through that hole anyway so... again, this would not necessitate any grinding of the arm. We now use a deep 5mm hex cover that looks factory but actually works. I like it a little better than the 10mm head style. There is simply no need to grind the arm in any way, shape or form. This is a stock bolt up. Now... regarding the washers: These kits come with rotor spacers (shown prominently above in each picture) that move the rotor out 4.88mm to center it in the now widened slot. We've had customers put the rotor spacers "on top" of the rotor vs. "underneath" the rotor where it is meant to go. This may be what happened. The proper mounting procedure is: 1. 5-lug hub 2. Rotor spacer on hub 3. Rotor on top of rotor spacer There are two methods to align a rotor in a widened caliper; You either need to space the rotor out with the supplied spacers or you need to space the caliper back with washers or mounting ear spacers. I don't recommend the washers ear spacers because of clearance issues with these calipers (as you now know). Others have done them with no modifications needed. From your comments above I can only assume that the rotor spacers were not used. That being the case, you would "have" to shim the caliper back 5mm hence the "bunch of washers" and hence the clearance problem with the control arm. Mike's a smart cookie so I'm guessing that the extra 5mm under your rotor might have caused clearance issues with your wheel/tire combo necessitating the "other" method of spacing the caliper back. (IMG:style_emoticons/default/wink.gif) The grinding was done at one of the adjuster access hole tubes. The spacers are correctly under the rotor yet still required a bunch of washers between the caliper and ear mount. Could it have the wrong type of rotor (thickness)? I have a 911 hub set up, see this thread: arms I'll get current semi-assembled pics this weekend... |
|
|
|
Posts in this topic
Eric_Shea V-Calipers are Here! Nov 6 2005, 12:06 PM Eric_Shea [font=Impact]NEW V-CALIPER KITS ARE HERE!
The... Nov 6 2005, 12:12 PM seanery Those look nice eric! Nov 6 2005, 12:24 PM grasshopper nice http://www.914world.com... Nov 6 2005, 08:25 PM Eric_Shea :bump: for Bryan.
These will work with your 911 r... Sep 27 2006, 10:05 PM neo914-6 Eric,
I bought a set of your v-calipers from Muel... Jun 14 2007, 03:28 AM
Eric_Shea [font=Impact]NEW V-CALIPER KITS ARE HERE!
The... Nov 6 2005, 12:12 PM seanery Those look nice eric! Nov 6 2005, 12:24 PM grasshopper nice http://www.914world.com... Nov 6 2005, 08:25 PM Eric_Shea :bump: for Bryan.
These will work with your 911 r... Sep 27 2006, 10:05 PM neo914-6 Eric,
I bought a set of your v-calipers from Muel... Jun 14 2007, 03:28 AM Eric_Shea
No clue :confused:
Nothing in that kit would re... Jun 15 2007, 09:59 AM Eric_Shea I looked at the eBay picture again and I would alm... Jun 15 2007, 10:21 AM neo914-6 Here's a better pic:
apparently 944 hubs Jun 15 2007, 09:09 PM PRS914-6 I don't know if this will help you guys but lo... Jun 16 2007, 01:43 AM Eric_Shea
The diameter of the shaft (42mm) is the same fro... Jun 19 2007, 12:03 AM JazonJJordan :huh: Greetings Eric, any new possibilities?
Inve... Aug 1 2009, 03:13 PM
Eric_Shea
No clue :confused:
Nothing in that kit would re... Jun 15 2007, 09:59 AM Eric_Shea I looked at the eBay picture again and I would alm... Jun 15 2007, 10:21 AM neo914-6 Here's a better pic:
apparently 944 hubs Jun 15 2007, 09:09 PM PRS914-6 I don't know if this will help you guys but lo... Jun 16 2007, 01:43 AM Eric_Shea
The diameter of the shaft (42mm) is the same fro... Jun 19 2007, 12:03 AM JazonJJordan :huh: Greetings Eric, any new possibilities?
Inve... Aug 1 2009, 03:13 PM Eric_Shea Thanks for this,
You can get kits:
http://www.pm... Aug 4 2009, 12:03 PM
Eric_Shea Thanks for this,
You can get kits:
http://www.pm... Aug 4 2009, 12:03 PM |
2 User(s) are reading this topic (2 Guests and 0 Anonymous Users)
0 Members:

|
Lo-Fi Version | Time is now: 17th December 2025 - 03:31 AM |
Invision Power Board
v9.1.4 © 2025 IPS, Inc.