|
|
|
Porsche, and the Porsche crest are registered trademarks of Dr. Ing. h.c. F. Porsche AG.
This site is not affiliated with Porsche in any way. Its only purpose is to provide an online forum for car enthusiasts. All other trademarks are property of their respective owners. |
|
|

  |

| Rusty |
 Apr 21 2006, 02:35 AM Apr 21 2006, 02:35 AM
Post
#1
|
|
914 Guru  Group: Retired Admin Posts: 7,993 Joined: 24-December 02 From: North Alabama Member No.: 6 Region Association: South East States |
I'm about to start assembling my own combo gauge from a kit that I received from Clay.
The kit comes with two plates - one instrument plate and one backplate. It's designed to combine oil temp, oil pressure and the fuel gauge into one instrument. The instructions are detailed but the pictures are lacking in quality. Just photocopied pages. Also, there appears to be a photocopy of a stickers page? Maybe it's just a template on how to re-silkscreen the individual gauge modules. A couple of questions to start: 1. Is it better to buy the oil pressure and oil temp guages new with matching senders? Seems like it would simplify thing later. Maybe it doesn't matter... I dunno. 2. About making the numbers and lines on the gauge modules line up... do I need to make stickers, pry off the needles and paste new graphics onto the modules? I'll be posting in the classifieds for some 914 gauges to tinker with. I won't start messing with the project for a few week as I'm still in a couple of college classes. -Rusty (IMG:style_emoticons/default/smoke.gif) |
   |

 
|
| jasons |
Apr 21 2006, 08:14 AM
Post
#2
|
|
Jackstand Extraordinaire Group: Members Posts: 2,011 Joined: 19-August 04 From: Scottsdale, AZ Member No.: 2,573 Region Association: None |
I am getting ready to do this so I have done some homework.
I'm not sure about the senders. I think if you search you will probably find the answer. Plenty of people have used the 911 Oil press/temp gauge. It seems like most people just plug the gauges in with the numbers located as is. It would be nice to put a decal or new silk screen on there to get them turned correctly. Here is a link about someone elses experience. 904 triple gauge stuff Good luck |
|
|
|
| 914forme |
Apr 21 2006, 09:56 AM
Post
#3
|
|
Times a wastin', get wrenchin'! Group: Members Posts: 3,899 Joined: 24-July 04 From: Dayton, Ohio Member No.: 2,388 Region Association: None |
Okay there are a couple tips I have to make this easier.
1) take your time, this is not rocket sicience it all fits it just takes some time to get it done. 2) If you can source a late style fuel gauge you can then use the late style connecttors which are so much eaiser to put into place. If not all is not lost there. It is just a pita to open up a nearly style spade connector. I willl put up a picture of the modifications this requires, its a few extra holes. 3.) The back needs to be opened up. I use a sheet metal nibbler to do this. Attached image(s) 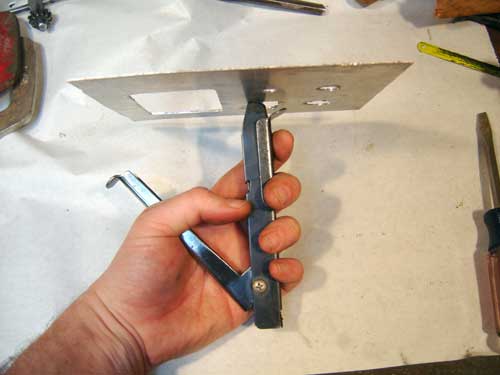
|
|
|
|
| 914forme |
Apr 21 2006, 10:14 AM
Post
#4
|
|
Times a wastin', get wrenchin'! Group: Members Posts: 3,899 Joined: 24-July 04 From: Dayton, Ohio Member No.: 2,388 Region Association: None |
You can also use a jigsaw with a metal blade, or a plasma cutter if you have access.
4) You will want to make a device to hold the gauge in place while you work on it. This is not really hard, a few dowels spaced out or a plug that can be screwed to a bench or held in a vice. You place a small cloth over it to make sure you don't scratch stuff up. You know what. Screw this. Okay here is what I will do, this weekend I will take pictures of each step and do a photo document of the process. It might take a while to do it, but then you will have all the tips and tricks I used to do these etc. It will be simplier than me typing this all out. And hopefully it will be a classic thread, or atleast a decent reference on the process. The steps I use can be redone for about any guage, as long as you can make the face, you can build a gauge. |
|
|
|
| azbill |
Apr 21 2006, 10:17 AM
Post
#5
|
|
Member Group: Members Posts: 455 Joined: 26-July 04 From: Glendale, Az Member No.: 2,403 Region Association: Southwest Region |
Get a hold of Mike "Dr. Evil" he assembled the one I have. I am sure he will tell all.
Bill Shaffer |
|
|
|
| Aaron Cox |
Apr 21 2006, 10:22 AM
Post
#6
|
|
Professional Tinkerer Group: Retired Admin Posts: 24,548 Joined: 1-February 03 From: Corona, CA Member No.: 219 Region Association: Southern California |
QUOTE(914forme @ Apr 21 2006, 09:14 AM)  You can also use a jigsaw with a metal blade, or a plasma cutter if you have access. 4) You will want to make a device to hold the gauge in place while you work on it. This is not really hard, a few dowels spaced out or a plug that can be screwed to a bench or held in a vice. You place a small cloth over it to make sure you don't scratch stuff up. You know what. Screw this. Okay here is what I will do, this weekend I will take pictures of each step and do a photo document of the process. It might take a while to do it, but then you will have all the tips and tricks I used to do these etc. It will be simplier than me typing this all out. And hopefully it will be a classic thread, or atleast a decent reference on the process. The steps I use can be redone for about any guage, as long as you can make the face, you can build a gauge. i thought the instructions were good when i built mine. color pics would be great! |
|
|
|
| jasons |
Apr 21 2006, 10:26 AM
Post
#7
|
|
Jackstand Extraordinaire Group: Members Posts: 2,011 Joined: 19-August 04 From: Scottsdale, AZ Member No.: 2,573 Region Association: None |
QUOTE(914forme @ Apr 21 2006, 09:14 AM) Okay here is what I will do, this weekend I will take pictures of each step and do a photo document of the process. Cool Deal! Thanks! (IMG:style_emoticons/default/clap56.gif) |
|
|
|
| 914forme |
Apr 21 2006, 10:55 AM
Post
#8
|
|
Times a wastin', get wrenchin'! Group: Members Posts: 3,899 Joined: 24-July 04 From: Dayton, Ohio Member No.: 2,388 Region Association: None |
Not a problem, should have redone the instructions a long time ago with modren technology. ie color, etc......
|
|
|
|
| John |
Apr 21 2006, 02:57 PM
Post
#9
|
|
member? what's a member? Group: Members Posts: 3,393 Joined: 30-January 04 From: Evansville, IN (SIRPCA) Member No.: 1,615 Region Association: None |
My instructions are in PDF format.
|
|
|
|
| Rusty |
Apr 22 2006, 01:27 AM
Post
#10
|
|
914 Guru Group: Retired Admin Posts: 7,993 Joined: 24-December 02 From: North Alabama Member No.: 6 Region Association: South East States |
Cool... that's awesome of you to take the time to do that. Sounds like a "classic thread" in the making!
I'm starting entirely from scratch. Since the later fuel connectors are preferred, should I just get a late gauge to start with? This gauge is probably going in the (generally) stock 914/6. -Rusty (IMG:style_emoticons/default/smoke.gif) |
|
|
|
| markb |
Apr 23 2006, 07:40 AM
Post
#11
|
|
914less :( Group: Members Posts: 5,450 Joined: 22-January 03 From: Nipomo, CA Member No.: 180 Region Association: Central California |
If you can start with brand new gauges & senders, do it. Call North Hollywood Speedo, or Palo Alto Speedo, and tell them what you're doing, and they'll get the gauge faces pointed in the right directions for you.
|
|
|
|
| jasons |
Apr 23 2006, 09:03 AM
Post
#12
|
|
Jackstand Extraordinaire Group: Members Posts: 2,011 Joined: 19-August 04 From: Scottsdale, AZ Member No.: 2,573 Region Association: None |
QUOTE(markb @ Apr 23 2006, 06:40 AM) If you can start with brand new gauges & senders, do it. Call North Hollywood Speedo, or Palo Alto Speedo, and tell them what you're doing, and they'll get the gauge faces pointed in the right directions for you. So, if you send them the oil gauges they will re-screen them or something? |
|
|
|
| 914forme |
Apr 23 2006, 08:32 PM
Post
#13
|
|
Times a wastin', get wrenchin'! Group: Members Posts: 3,899 Joined: 24-July 04 From: Dayton, Ohio Member No.: 2,388 Region Association: None |
Well I have started a new thread with all the info, just to clean it up a little.904 combo gauge build.
|
|
|
|
| ClayPerrine |
Apr 23 2006, 08:50 PM
Post
#14
|
|
Life's been good to me so far..... Group: Admin Posts: 16,542 Joined: 11-September 03 From: Hurst, TX. Member No.: 1,143 Region Association: NineFourteenerVille |
Here's a pict of the one in Betty's car. It took me about 3 hours to assemble it.
I didn't worry about re-stenseling the numbers. They were not far enough off to bother us. Attached image(s) 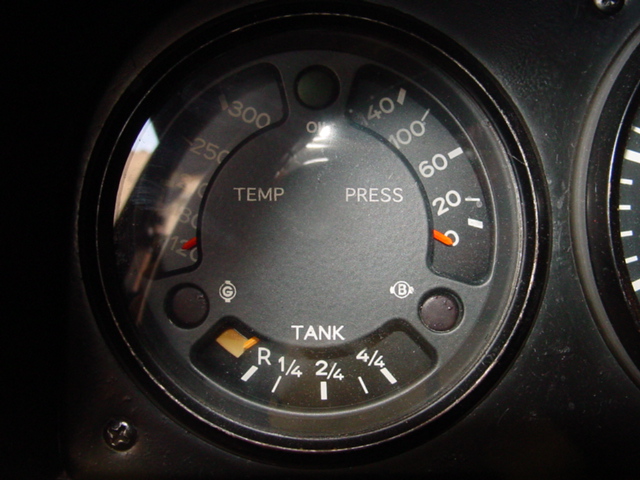
|
|
|
|
|
1 User(s) are reading this topic (1 Guests and 0 Anonymous Users)
0 Members:

|
Lo-Fi Version | Time is now: 2nd April 2026 - 07:27 AM |
Invision Power Board
v9.1.4 © 2026 IPS, Inc.