|
|
|
Porsche, and the Porsche crest are registered trademarks of Dr. Ing. h.c. F. Porsche AG.
This site is not affiliated with Porsche in any way. Its only purpose is to provide an online forum for car enthusiasts. All other trademarks are property of their respective owners. |
|
|

  |

| 914Sixer |
 Jan 26 2020, 03:33 PM Jan 26 2020, 03:33 PM
Post
#21
|
|
914 Guru  Group: Members Posts: 8,874 Joined: 17-January 05 From: San Angelo Texas Member No.: 3,457 Region Association: Southwest Region |
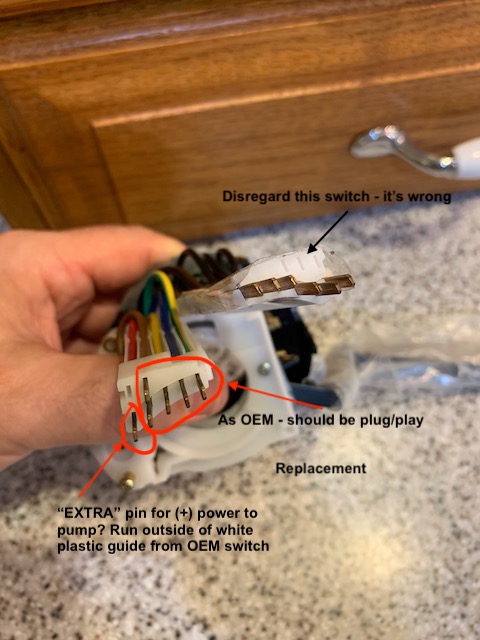
You will have to match the wire location of the aftermarket switch to old factory switch and write down the wire colors to know how wires lay in old tray.
You have to use the old 5 pin tray 7pin is too thick to go in 72-74 housing. Not sure if 7 pin will fit later 75-76. |
   |

 
|
| FlacaProductions |
Jan 26 2020, 03:58 PM
Post
#22
|
|
Senior Member Group: Members Posts: 1,570 Joined: 24-November 17 From: LA Member No.: 21,628 Region Association: Southern California |
Yep. I agree. I think I finally have this correct in my head.
|
|
|
|
| barefoot |
Jan 26 2020, 09:42 PM
Post
#23
|
|
Senior Member Group: Members Posts: 1,270 Joined: 19-March 13 From: Charleston SC Member No.: 15,673 Region Association: South East States |
QUOTE(swood @ Nov 29 2009, 08:41 PM)  Lastly, the steering column switch. Again looking for assistance on making the wired connection. Thanks. And yes, I'm breaking out the wiring diagrams to reference. And this is a '75 model. Thanks. There's a replacement for your pneumatic "switch" which converts to an electric switch to power your washer pump. I haven't installed mine yet as i had previously wired a momentary push switch in the dash. If interested I can find the vendor for you. Barefoot |
|
|
|
| FlacaProductions |
Jan 26 2020, 09:46 PM
Post
#24
|
|
Senior Member Group: Members Posts: 1,570 Joined: 24-November 17 From: LA Member No.: 21,628 Region Association: Southern California |
Thanks @barefoot - I have that switch as well but since I was replacing the whole thing I thought I’d try to go w stock wiring. I am just trying to not have to do it twice.
|
|
|
|
| RickS |
Jan 26 2020, 10:07 PM
Post
#25
|
|
Senior Member Group: Members Posts: 1,408 Joined: 17-April 06 From: 'False City', WA Member No.: 5,880 Region Association: None |
Wow, rather than dealing with mounting the stalk switch and the wiring issues, I just installed a Radio Shack push on spring switch with an in-line fuse and was done with it. It looks like it belongs right next to the pull-on switches. Might just be too simple.
The advice here how to do it properly is spot on though. |
|
|
|
| cary |
Jan 26 2020, 10:27 PM
Post
#26
|
|
Advanced Member Group: Members Posts: 3,900 Joined: 26-January 04 From: Sherwood Oregon Member No.: 1,608 Region Association: Pacific Northwest |
|
|
|
|
| FlacaProductions |
Jan 27 2020, 09:30 AM
Post
#27
|
|
Senior Member Group: Members Posts: 1,570 Joined: 24-November 17 From: LA Member No.: 21,628 Region Association: Southern California |
I've read all of the threads on this and done a lot of research but I guess my question boils down to: is the "extra" pin (circled) (+) or (-) when the stalk is pulled back?
 |
|
|
|
| ctc911ctc |
Jan 28 2020, 01:55 PM
Post
#28
|
|
Senior Member Group: Members Posts: 892 Joined: 9-June 18 From: boston Member No.: 22,206 Region Association: North East States |
I just changed the wiper selector in my '74 2.0.
Since I was going in there I changed the turn signal selector as well. I followed the direction in this thread and I too burned a few fuses when I installed the assembly. My findings: 1. The new wiper selector mounting assembly (round white plastic) has been modified (perhaps for the 924?) and is a mil or two larger in diameter than the original equipment, as a result, it is a much tighter fit into a 914. My source has stated it _was_ for a 924 but was mechanically the same part with the exception of the extra wire. 2. Once it was installed, one of the copper blades is "proud" or "outside of" the plastic mounting piece and as a result grounds itself against the inside of the steering wheel shaft housing. 3. I tried to put tape over the blade but the fitting is so tight, the blade did what blades do and cut through the tape 4. I then thought about removing the blade and then decided to file it back below the edge of the mounting housing so it would NOT rub against the steering wheel shaft housing. 4. It took a few in/out exercises and as a result, the handle is now a bit loose and feels like it has been bent and then loosened internally......sigh. 5. I am buying ANOTHER one since the man-handling was my fault. Will install it and PRIOR I will do the following A. file back the blade B. use a micrometer and grind/sand the assemble so it is a better fit internally so the install and the removal is somewhat straightforward. C. Take pictures and try and write an authoritative procedure using a 924 wiper controller. Stay tuned! |
|
|
|
| ctc911ctc |
Jan 29 2020, 05:08 PM
Post
#29
|
|
Senior Member Group: Members Posts: 892 Joined: 9-June 18 From: boston Member No.: 22,206 Region Association: North East States |
OK, I think I guessed incorrectly.....however,
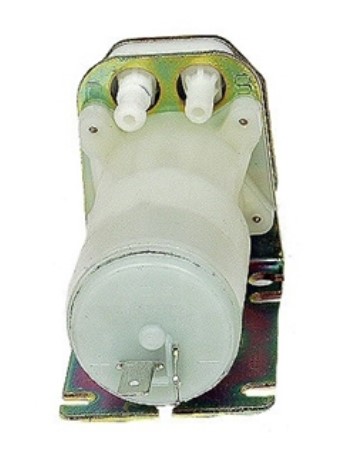 I guessed the pressure side of the pump would be the one with the notch on the nozzle (marked D - Druck?) where the nozzle without the notch would be the one sucking (Marked S - Sauger perhaps? ). Hooked it up and no squirty fluid. Lot's of noise though! (IMG:style_emoticons/default/confused24.gif) Since the markings are so intuitive ( "S" and "D" ??????) perhaps I hooked up incorrectly? Any experience with this device? I bought it from a 914 reputable web site. Note to web dealers - perhaps a little piece of paper decrypting installations for your parts? (installation guides, URLs, piece of paper, schematic, anything.....) |
|
|
|
| FlacaProductions |
Jan 29 2020, 06:53 PM
Post
#30
|
|
Senior Member Group: Members Posts: 1,570 Joined: 24-November 17 From: LA Member No.: 21,628 Region Association: Southern California |
that should be correctly plumbed - the one with the barb goes to the nozzles because of the pressure outgoing.
is the tank vented so a vacuum isn't created? how long did you run it? Is it below the tank? |
|
|
|
| ctc911ctc |
Jan 29 2020, 08:51 PM
Post
#31
|
|
Senior Member Group: Members Posts: 892 Joined: 9-June 18 From: boston Member No.: 22,206 Region Association: North East States |
QUOTE(FlacaProductions @ Jan 29 2020, 07:53 PM) that should be correctly plumbed - the one with the barb goes to the nozzles because of the pressure outgoing. is the tank vented so a vacuum isn't created? how long did you run it? Is it below the tank? Ah - gravity feed????? OK, got it - will correct and report......Darn, had a REAL good spot for it too................... (IMG:style_emoticons/default/mad.gif) |
|
|
|
| FlacaProductions |
Jan 29 2020, 08:58 PM
Post
#32
|
|
Senior Member Group: Members Posts: 1,570 Joined: 24-November 17 From: LA Member No.: 21,628 Region Association: Southern California |
not sure it's exactly gravity fed but i've read where that's the way it needs to be....
|
|
|
|
| SirAndy |
Jan 29 2020, 09:31 PM
Post
#33
|
|
Resident German Group: Admin Posts: 41,614 Joined: 21-January 03 From: Oakland, Kalifornia Member No.: 179 Region Association: Northern California |
QUOTE(FlacaProductions @ Jan 29 2020, 04:53 PM) is the tank vented so a vacuum isn't created? (IMG:style_emoticons/default/agree.gif) You *need* a hole in the filler cap for this to work, otherwise the pump will never get any water out of the bottle. http://www.914world.com/specs/tech_el_washer.php (IMG:style_emoticons/default/shades.gif) |
|
|
|
| davep |
Jan 29 2020, 09:46 PM
Post
#34
|
|
914 Historian Group: Benefactors Posts: 5,137 Joined: 13-October 03 From: Burford, ON, N0E 1A0 Member No.: 1,244 Region Association: Canada |
So I designed a disc that was 3D printed to fit the cap and provide the venting for my kit, and the mount for a momentary switch to replace the water valve. No need to replace the wiper switch assembly.
|
|
|
|
| ctc911ctc |
Jan 30 2020, 07:19 AM
Post
#35
|
|
Senior Member Group: Members Posts: 892 Joined: 9-June 18 From: boston Member No.: 22,206 Region Association: North East States |
Yes, I have the filler cap off - biggest hole I could find - (IMG:style_emoticons/default/smile.gif)
Thank you! QUOTE(SirAndy @ Jan 29 2020, 10:31 PM) QUOTE(FlacaProductions @ Jan 29 2020, 04:53 PM) is the tank vented so a vacuum isn't created? (IMG:style_emoticons/default/agree.gif) You *need* a hole in the filler cap for this to work, otherwise the pump will never get any water out of the bottle. http://www.914world.com/specs/tech_el_washer.php (IMG:style_emoticons/default/shades.gif) |
|
|
|
|
1 User(s) are reading this topic (1 Guests and 0 Anonymous Users)
0 Members:

|
Lo-Fi Version | Time is now: 4th May 2024 - 03:06 AM |
Invision Power Board
v9.1.4 © 2024 IPS, Inc.