|
|
|
Porsche, and the Porsche crest are registered trademarks of Dr. Ing. h.c. F. Porsche AG.
This site is not affiliated with Porsche in any way. Its only purpose is to provide an online forum for car enthusiasts. All other trademarks are property of their respective owners. |
|
|

  |

| McMark |
 Dec 13 2009, 07:14 PM Dec 13 2009, 07:14 PM
Post
#21
|
|
914 Freak!  Group: Retired Admin Posts: 20,180 Joined: 13-March 03 From: Grand Rapids, MI Member No.: 419 Region Association: None |
QUOTE(Spoke @ Dec 13 2009, 03:46 PM)  I was hoping this thread would give some tips of what to do or what not to do but it seems to be more concerned with the wording of the title. So what are the do's and don'ts of this kit? I have a kit waiting for me to finish some long repair then install the kit. I know to keep the metal cool. Do I do a couple of welds at one end, then let it cool then do some welds on the other end? See my post above. I wrote quite a bit about exactly how I did it. If you have any specific questions, I'll be happy to elaborate. |
   |

 
|
| FourBlades |
Dec 13 2009, 09:43 PM
Post
#22
|
|
From Wreck to Rockin Group: Members Posts: 2,056 Joined: 3-December 07 From: Brevard, FL Member No.: 8,414 Region Association: South East States |
I wish now I had taken some really careful before and after measurements when I welded in my kit to see if that was the real cause or if I F-ed up the rear passenger fender when I welded it back together. Looking back, I realize I pieced the whole passenger door sill together from patches without ever test fitting the door (dumb). I did seam weld the heck of the kit, including all the edges where the sides join the rear pieces and a lot of the top seams. I bought two more kits when Mark had a group buy on them so I am definitely not turned off them. I also bought the heavy duty Tangerine racing bracing set. I will weld slower next time, start at one end and work along, and take more time. (IMG:style_emoticons/default/smile.gif) John |
|
|
|
| andys |
Dec 14 2009, 12:48 PM
Post
#23
|
|
Advanced Member Group: Members Posts: 2,165 Joined: 21-May 03 From: Valencia, CA Member No.: 721 Region Association: None |
QUOTE(McMark @ Dec 13 2009, 02:36 PM) It's important for me to mention that the Engman Kit fits absolutely perfectly. I didn't have to tweak, modify, or otherwise manipulate his parts. They dropped right into place. Pictures on Tuesday. Glad that you had success where others have had trouble; trouble that's self induced if not careful. Perfect fit is debatable IMO; some mis-fitting areas are inherent to the 914 chassis, and others are with the kit itself. Let me explain. I quickly discovered that the top surface of the longs is not flat (mine was slightly dished in some areas, and bowed out in others). This results in a gap between the long kit (which is flat) and the top of the long, which is not favorable to welding. The same is also true for the sides of the longs, though slightly less pronounced in my case. The bowed-out areas could be gently pounded flat with a rubber mallet. The kit doesn't fit or line up properly in several areas. The cutouts for the seatbelt anchors on mine did not line up, so I had to remove material. The inside of the long kit where the cutout is for the 914 crossbrace rests atop the flanged and spot welded area which resultantly lifts it off the surface causing an undesirable gap for welding. On the transverse piece at the firewall, it needs to be notched to allow the 914 floor rib to clear on both sides. There are some other minor areas, but those are the main spots that. I've got photos and was going to do an install write-up, but time did not permit. As with others, I used TEK screws to fasten down the kit prior to welding. The paint had to first be removed in the local areas that need welding. I measured (using calipers) and documented my door gaps both before and after welding. Some shrinkage was noticed after a methodical and slow process similar to those previously described. I used a TIG welder which is favorable to minimizing the heat input, but would not recommend it due to its very tedious and slow progress and all the contortions and angles requiring two hands (one for the torch, the other for filler rod). The Engman kit IMO is still a good kit, and would recommend it with the understanding that some file-to-fit areas may be necessary. Andys |
|
|
|
| ConeDodger |
Dec 14 2009, 01:19 PM
Post
#24
|
|
Apex killer! Group: Members Posts: 24,118 Joined: 31-December 04 From: Tahoe Area Member No.: 3,380 Region Association: Northern California |
We all also need to consider that some of our problems could be related to almost 40 years of abuse and use of our 914 chassis. If you weld on a panel that has body putty in it, your heat shrink and warp will be diferent than a panel that is just metal.
I drove the car to work today and continue to be impressed with the feel of the chassis. This is a very worthwhile modification. Again, my purpose in starting this thread is to illuminate the method McMark is using because as he said, he used absolutely no bracing, welded with the wheels on the ground etc... |
|
|
|
| McMark |
Dec 14 2009, 02:28 PM
Post
#25
|
|
914 Freak! Group: Retired Admin Posts: 20,180 Joined: 13-March 03 From: Grand Rapids, MI Member No.: 419 Region Association: None |
Andys, when did you get your kit? Mark B (Engman) has revised the fitment throughout the production life. The newest set to arrive is the one mentioned in this thread and fits much much better than the one I got 3 or 4 years ago. Geez, has it really been that long?
|
|
|
|
| andys |
Dec 14 2009, 03:41 PM
Post
#26
|
|
Advanced Member Group: Members Posts: 2,165 Joined: 21-May 03 From: Valencia, CA Member No.: 721 Region Association: None |
QUOTE(McMark @ Dec 14 2009, 01:28 PM) Andys, when did you get your kit? Mark B (Engman) has revised the fitment throughout the production life. The newest set to arrive is the one mentioned in this thread and fits much much better than the one I got 3 or 4 years ago. Geez, has it really been that long? I did the install mid 2008, so I'm guessing I took delivery not long before that. Andys |
|
|
|
| r_towle |
Dec 14 2009, 08:23 PM
Post
#27
|
|
Custom Member Group: Members Posts: 24,705 Joined: 9-January 03 From: Taxachusetts Member No.: 124 Region Association: North East States |
QUOTE(McMark @ Dec 13 2009, 08:14 PM) QUOTE(Spoke @ Dec 13 2009, 03:46 PM) I was hoping this thread would give some tips of what to do or what not to do but it seems to be more concerned with the wording of the title. So what are the do's and don'ts of this kit? I have a kit waiting for me to finish some long repair then install the kit. I know to keep the metal cool. Do I do a couple of welds at one end, then let it cool then do some welds on the other end? See my post above. I wrote quite a bit about exactly how I did it. If you have any specific questions, I'll be happy to elaborate. Its funny. I work the same way Mark. I plan my work so I have to stop and let it cool down while I prepare for the next setup. I also take my time...I did one major long over two days....just to keep welding slowly. There was plenty of other work to do.... Just funny that I am not the only one to plan busy work so I am not tempted to weld everything at once...(IMG:style_emoticons/default/laugh.gif) Rich |
|
|
|
| ChrisFoley |
Dec 14 2009, 10:30 PM
Post
#28
|
|
I am Tangerine Racing Group: Members Posts: 7,990 Joined: 29-January 03 From: Bolton, CT Member No.: 209 Region Association: None |
QUOTE(andys @ Dec 14 2009, 01:48 PM) I used a TIG welder which is favorable to minimizing the heat input... I disagree with that Andy. TIG typically causes more heat buildup because of the slowness of the process. MIG creates less heat in a given area. With MIG you can be finished with a weld more quickly and start cooling it sooner. Consequently the heat is not given an opportunity to spread out to a wider area. QUOTE('ConeDodger') Again, my purpose in starting this thread is to illuminate the method McMark is using because as he said, he used absolutely no bracing, welded with the wheels on the ground etc... Our procedure is considerably different than McMark's and we have no trouble with warpage either. We don't screw the panels in place temporarily, we don't work in linear fashion from one end to another, and we don't avoid pre-cleaning the weld locations. I'm not suggesting that there is something wrong with Mark's method, but that it is only one of several successful procedures. Key elements our methods share are careful prep & fitment, and progress slowly to avoid excess heat build up. |
|
|
|
| McMark |
Dec 15 2009, 01:12 PM
Post
#29
|
|
914 Freak! Group: Retired Admin Posts: 20,180 Joined: 13-March 03 From: Grand Rapids, MI Member No.: 419 Region Association: None |
(IMG:style_emoticons/default/agree.gif) My way, is by no means the only way to achieve success. And TIG puts WAY too much heat into the long. MIG is quick. 1-2 seconds per weld.
Here's a few more details, with the promised picture. The drill bit on the left is a 3/8" which has had the tip blunted off and a step ground into it. The center locates the bit in the hole and the step cleans the metal around the hole. I'm left with a 3/8" circular clean spot. The drill bit on the right is an H drill bit which has had the tip blunted off almost completely. This bit is used to clean the metal on the sides of the hole as well as pass through the long kit and clean the metal on the chassis. I used this technique because I feel it leaves the maximum amount of original paint on the chassis to protect the long from future rust as much as possible. The paint still burns off in the HAZ, though. Attached image(s) 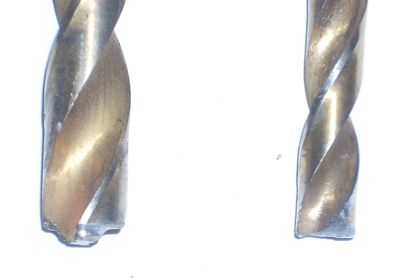
|
|
|
|
| atsealevel914 |
Dec 15 2009, 01:34 PM
Post
#30
|
|
Member Group: Members Posts: 103 Joined: 31-January 04 From: Miami,FL Member No.: 1,618 |
QUOTE(McMark @ Dec 15 2009, 11:12 AM) I used this technique because I feel it leaves the maximum amount of original paint on the chassis to protect the long from future rust as much as possible. The paint still burns off in the HAZ, though. Have you heard of weld thru coatings? do they really do what they say? Who has found a solution for controlling rust in these circumstances? |
|
|
|
| shoguneagle |
Dec 15 2009, 01:46 PM
Post
#31
|
|
shoguneagle Group: Members Posts: 1,180 Joined: 3-January 03 From: CA, OR, AZ (CAZOR); New Mexico Member No.: 84 Region Association: Northern California |
I found the continuation of this thread very informative although the title is a little miss leading. I have used Engman Kit along with the Brad Mayeur kit on my 914-6 conversion. I also have used Racer Chris kits to stress the rear suspension points. I also used Rich Johnson mount and conversion kits for the engine. Other kits have been used from our different suppliers (always prefer to purchase from our member suppliers).
I have always found our 914 member suppliers make a quality product which meets our needs and shows detailed knowledge of our car needs. Rember "gap measurements" are just general indicators and indicate problems such as sagging, door alignment, etc. Further investigation and measure are needed to correct possible problems. I welded using a mig. I did spot and stitch welding on all my sheetmetal including the rear suspension attachments. I welded one to two inches and then went to another cold spot to weld. This is the method I applied and seemed to work. I liked the comments on the difference between mig and tig. After all these are our professional people we depend on getting our cars modified and repaired. I have the hight respect for all our suppliers. These are my thoughts. Steve Hurt |
|
|
|
| McMark |
Dec 15 2009, 02:17 PM
Post
#32
|
|
914 Freak! Group: Retired Admin Posts: 20,180 Joined: 13-March 03 From: Grand Rapids, MI Member No.: 419 Region Association: None |
I haven't found a weld thru coating that didn't contaminate the weld.
|
|
|
|
| charliew |
Dec 15 2009, 03:35 PM
Post
#33
|
|
Advanced Member Group: Members Posts: 2,363 Joined: 31-July 07 From: Crawford, TX. Member No.: 7,958 |
You guys give lots of good info. I appreciate your input. If a person wanted to really know for his own education, he could use a temperature gun and shoot the weld and the area that is around it after both the mig and tig process. The fact that a tig weld will be so much smaller means that the heat is not in that spot as long as you might think. Remember the material is not very thick. Actually you could weld the edge of the hole to the long without any filler but it will not leave a completely filled in hole like you can get from the mig. I really don't know how much the long is heated either way but I will find out. The tig is much more awkard as I need to be a lot closer to the work than with mig and the mig is a lot more forgiving of contamination. I am pretty sure I would burn less paint off with the tig just from my experience on welding sheetmetal butted panels. The fact that I can start the tig with a higher amp then feather it back helps lower the heat a lot. Also though I only use .023 wire on my mig so it isn't as hot as .030 or .035. You can see both sides of most panels and get a good idea of how far the heat traveled. If the surfaces are not exactly flush the mig will fill that easily where the tig at that point will need filler rod and that would require stopping and starting which would extend the heat time if you wanted to keep going. I'm not sure as I haven't tried to weld the kit yet but I will try to use clamps to hold the stiffeners in place instead of screws. If I can't there is nothing wrong with welding the screw holes up when doing that hole. I know I will not be stitch welding the kit although if a edge is high I will tap it down and tack it with a weld about .750 inch long. It will get epoxy primered and seam sealed afterward. I will probably try to put a wax in the long when I'm through with all the welding on the long. One thing I do like about tig is there is so much less grinding because you only add filler when it is needed where thats the contact for the mig and also the wire shoots through the molten puddle and usually makes a blob on the back side. It's hard for me to not put too much metal down on sheetmetal with a wire feed. I do think the tig is three times slower than a mig if I'm adding filler but that doesn't mean I am holding the same heat on that spot as the mig for three times longer.
|
|
|
|
| McMark |
Dec 15 2009, 03:51 PM
Post
#34
|
|
914 Freak! Group: Retired Admin Posts: 20,180 Joined: 13-March 03 From: Grand Rapids, MI Member No.: 419 Region Association: None |
I don't claim to be a TIG guru, but rosette welding tiny holes doesn't seem like an appropriate use for TIG. IF you made the holes bigger and IF you could get the pieces perfectly flush, then maybe you could do it with less heat than MIG. But why go through all that extra work and PITA when MIG works?
|
|
|
|
| charliew |
Dec 15 2009, 04:00 PM
Post
#35
|
|
Advanced Member Group: Members Posts: 2,363 Joined: 31-July 07 From: Crawford, TX. Member No.: 7,958 |
The first time I had a mild steel exhaust pipe tube rust out at the weld or up against it impressed on me what really happened to steel when it is heated for welding. I agree a lot of really nice cars have been built with only a mig welder but also some really nice cars were built with the torch too.
|
|
|
|
| r_towle |
Dec 15 2009, 06:27 PM
Post
#36
|
|
Custom Member Group: Members Posts: 24,705 Joined: 9-January 03 From: Taxachusetts Member No.: 124 Region Association: North East States |
QUOTE(McMark @ Dec 15 2009, 02:12 PM) (IMG:style_emoticons/default/agree.gif) My way, is by no means the only way to achieve success. And TIG puts WAY too much heat into the long. MIG is quick. 1-2 seconds per weld. Here's a few more details, with the promised picture. The drill bit on the left is a 3/8" which has had the tip blunted off and a step ground into it. The center locates the bit in the hole and the step cleans the metal around the hole. I'm left with a 3/8" circular clean spot. The drill bit on the right is an H drill bit which has had the tip blunted off almost completely. This bit is used to clean the metal on the sides of the hole as well as pass through the long kit and clean the metal on the chassis. I used this technique because I feel it leaves the maximum amount of original paint on the chassis to protect the long from future rust as much as possible. The paint still burns off in the HAZ, though. (IMG:style_emoticons/default/laugh.gif) I have thrown out alot of drill bits that look like that... Rich |
|
|
|
|
1 User(s) are reading this topic (1 Guests and 0 Anonymous Users)
0 Members:

|
Lo-Fi Version | Time is now: 31st July 2025 - 10:04 AM |
Invision Power Board
v9.1.4 © 2025 IPS, Inc.