|
|
|
Porsche, and the Porsche crest are registered trademarks of Dr. Ing. h.c. F. Porsche AG.
This site is not affiliated with Porsche in any way. Its only purpose is to provide an online forum for car enthusiasts. All other trademarks are property of their respective owners. |
|
|

  |

| PeeGreen 914 |
 Apr 20 2010, 11:16 AM Apr 20 2010, 11:16 AM
Post
#61
|
|
Just when you think you're done...wait, there is more..lol  Group: Members Posts: 10,219 Joined: 21-September 06 From: Seattle, WA... actually Everett Member No.: 6,884 Region Association: Pacific Northwest |
|
   |

 
|
| Root_Werks |
Apr 20 2010, 01:48 PM
Post
#62
|
|
Village Idiot Group: Members Posts: 8,987 Joined: 25-May 04 From: About 15NM from Canada Member No.: 2,105 Region Association: Pacific Northwest |
QUOTE(Andyrew @ Apr 20 2010, 10:15 AM)  What are the 912 air cleaners made out of? Could you cut off the canister and weld it to the top? or put a 90 on the top and have them lay on parrallel to the engine lid? Thats what I would try.. If they are made of weldable metal. That or just cut off the canisters, put hoses on each of the holes and direct the air to a home made square box (or pick n pull your favorite) and put a flat paper filter on it.. Yup, they are metal and I could/might modify them. I like them because they are sort of a one year only deal that have HUGE filter elements. So restriction isn't an issue and they would certainly eliminate carb noise. |
|
|
|
| Andyrew |
Apr 20 2010, 02:00 PM
Post
#63
|
|
Spooling.... Please wait Group: Members Posts: 13,380 Joined: 20-January 03 From: Riverbank, Ca Member No.: 172 Region Association: Northern California |
Another Idea I just had was to cut off the canisters, relocate them, and put a hose to connect them back again!!! That might be the easiest.
In fact if you were uber cool, you could attach the canisters to the engine lid and have the hose have enough slack so that you can open and close the engine lid w/ the canisters attached!!!! (IMG:style_emoticons/default/biggrin.gif) |
|
|
|
| Root_Werks |
Apr 20 2010, 02:31 PM
Post
#64
|
|
Village Idiot Group: Members Posts: 8,987 Joined: 25-May 04 From: About 15NM from Canada Member No.: 2,105 Region Association: Pacific Northwest |
QUOTE(Andyrew @ Apr 20 2010, 01:00 PM) Another Idea I just had was to cut off the canisters, relocate them, and put a hose to connect them back again!!! That might be the easiest. In fact if you were uber cool, you could attach the canisters to the engine lid and have the hose have enough slack so that you can open and close the engine lid w/ the canisters attached!!!! (IMG:style_emoticons/default/biggrin.gif) (IMG:style_emoticons/default/laugh.gif) Probably not. It's only the drivers side that gave me issues. If I can take a pie piece out of the round tunnel and angle the can down more, I think it would work? Want to just get everything back together this week and start driving again. I'll fiddle more with the air cleaners next week most likely. There is another idea I had I've seen others do. Take a 70-74 or so Type1 air cleaner, modify the bottom and presto! The regular K&N filter fits perfect in them I guess. Might be too tall for the rain tray though? I'd have to test fit one. 912 air cleaners are cooler since they are from another Porsche. (IMG:style_emoticons/default/rolleyes.gif) |
|
|
|
| Root_Werks |
Apr 27 2010, 08:43 AM
Post
#65
|
|
Village Idiot Group: Members Posts: 8,987 Joined: 25-May 04 From: About 15NM from Canada Member No.: 2,105 Region Association: Pacific Northwest |
Progress seems slow, but thanks to local guy (Rich), I sourced all my needed tin pieces to repair the damaged ones from the dealer AC install. It surprised me how much a 914 gets hacked up. Holes everywhere, big holes! Tin-snipped sheet metal and engine shelf even. UGH! (IMG:style_emoticons/default/headbang.gif)
Getting back to stock though. (IMG:style_emoticons/default/smile.gif) Attached thumbnail(s) 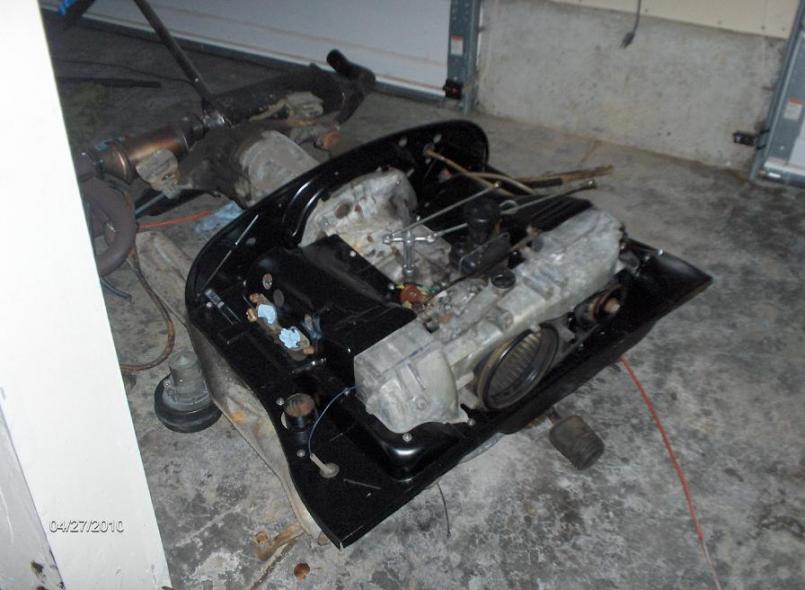
|
|
|
|
| Root_Werks |
Apr 27 2010, 08:47 AM
Post
#66
|
|
Village Idiot Group: Members Posts: 8,987 Joined: 25-May 04 From: About 15NM from Canada Member No.: 2,105 Region Association: Pacific Northwest |
Since everything over on this side was so solid and only a section was hacked out of the shelf for the AC, I opted to graft in just the part that was cut out. I sourced the weatherstrip rail from Rich and built my own little metal shelf section. Welded, painted, done. That took hours to do.
I didn't weld up the two holes for the AC lines, just found some metal "plugs" at a local hardware store and they snapped into place. Why bother with anything else right now. It'll keep the road grime out of the engine bay. Attached thumbnail(s) 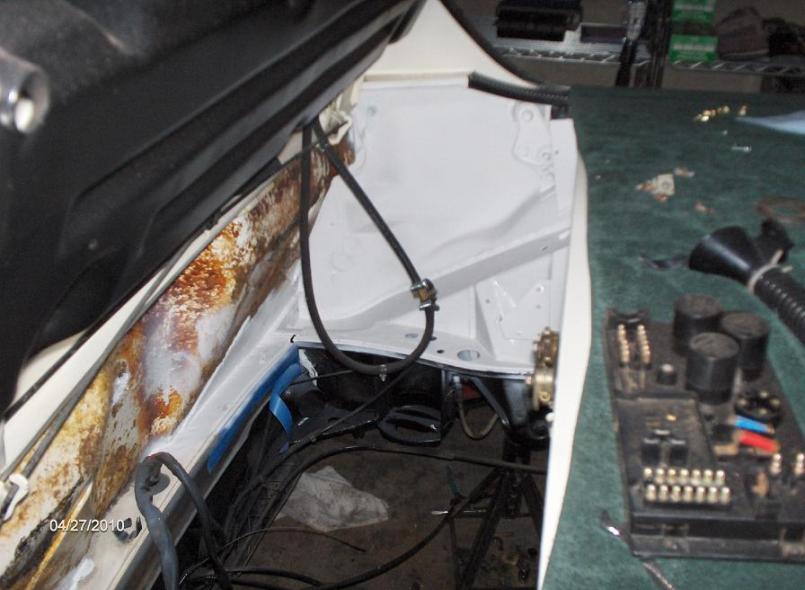
|
|
|
|
| Root_Werks |
Apr 27 2010, 08:52 AM
Post
#67
|
|
Village Idiot Group: Members Posts: 8,987 Joined: 25-May 04 From: About 15NM from Canada Member No.: 2,105 Region Association: Pacific Northwest |
Also cleaned up both longs, door jams and all weatherstrip chanels. Everything was cleaned and touched up with white paint.
You can see I need to get the rear fender painted. Looks like a really old repair job that has kinda gone yellow-ish. Most of the rest of the 914 seems to be factory paint. Goal is back on the ground this friday so I can drive it with other 914-ers to a local car show. (IMG:style_emoticons/default/driving.gif) I might see if I can solicit help putting the engine back in. My luck, I'll bend up all that nice tin. (IMG:style_emoticons/default/rolleyes.gif) Attached thumbnail(s) 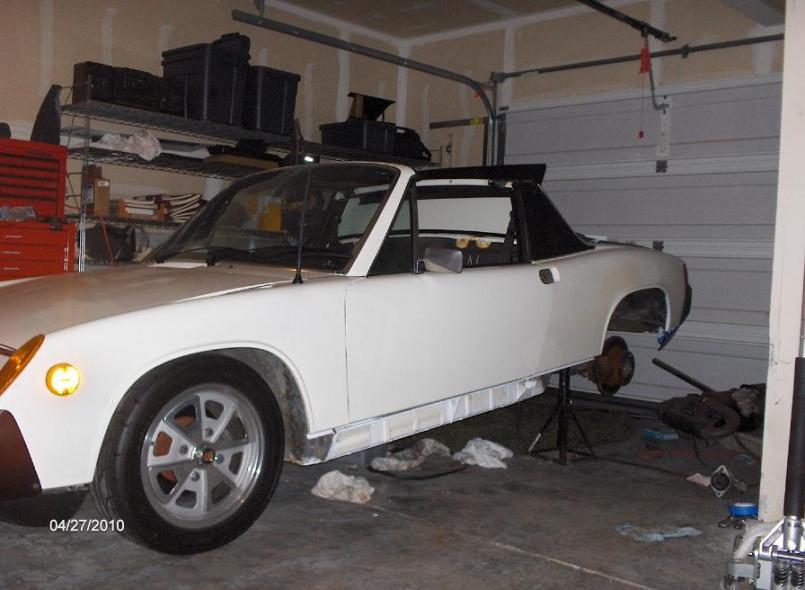
|
|
|
|
| Root_Werks |
Apr 27 2010, 08:57 AM
Post
#68
|
|
Village Idiot Group: Members Posts: 8,987 Joined: 25-May 04 From: About 15NM from Canada Member No.: 2,105 Region Association: Pacific Northwest |
I also picked up one of these for it:
Attached image(s) 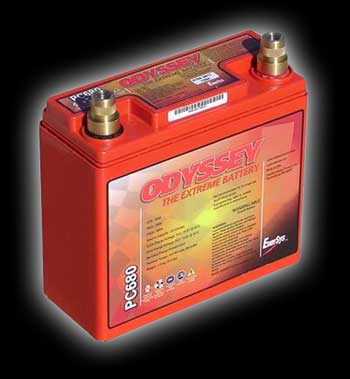
|
|
|
|
| Root_Werks |
Apr 27 2010, 09:02 AM
Post
#69
|
|
Village Idiot Group: Members Posts: 8,987 Joined: 25-May 04 From: About 15NM from Canada Member No.: 2,105 Region Association: Pacific Northwest |
And still have to deal with this:
Nice self-tapping sheet metal screws tearing huge holes in an otherwise almost perfect trunk. (IMG:style_emoticons/default/headbang.gif) Attached thumbnail(s) 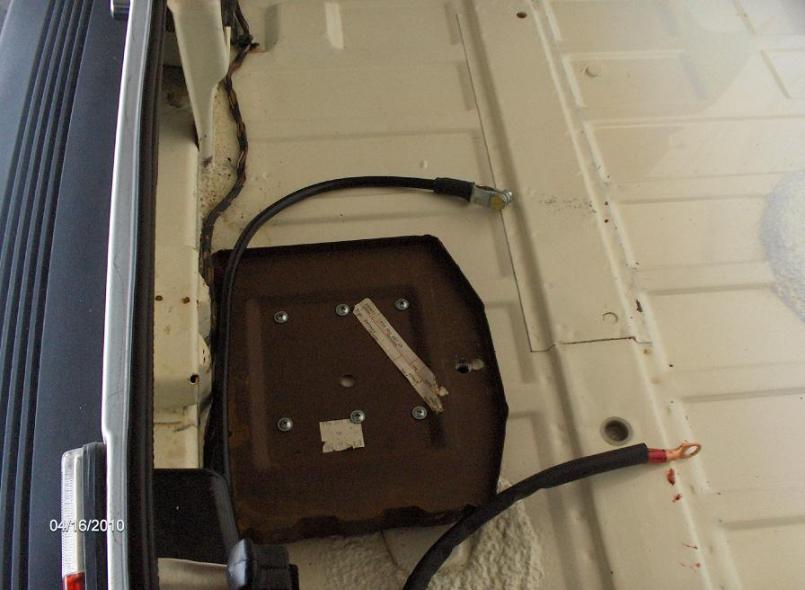
|
|
|
|
| effutuo101 |
Apr 28 2010, 11:05 PM
Post
#70
|
|
Advanced Member Group: Members Posts: 2,738 Joined: 10-April 05 From: Lemon Grove Member No.: 3,914 Region Association: Southern California |
Nice ride Dan! Thanks for letting us come up and wrench with you. See you Sunday!
|
|
|
|
| pete-stevers |
Apr 29 2010, 01:28 PM
Post
#71
|
|
Shinee Side Up Group: Members Posts: 2,674 Joined: 10-October 04 From: Abbotsford,BC, Canada Member No.: 2,914 Region Association: Pacific Northwest |
good to see you are back in the game dan
i hope to get out to a teener tues one day this summer but we will see |
|
|
|
| Root_Werks |
Apr 29 2010, 01:35 PM
Post
#72
|
|
Village Idiot Group: Members Posts: 8,987 Joined: 25-May 04 From: About 15NM from Canada Member No.: 2,105 Region Association: Pacific Northwest |
(IMG:style_emoticons/default/bye1.gif)
Hey Steve! No, no, thank you guys for coming up and hanging out! That was fun and a lot got put back together. I replaced all the cables as well just before you guys showed up. No more jerky speedo needle and smoother clutch operation would be nice. The old cable was binding up a little. I noticed the pedal cluster has the metal bushings and is all nice and clean. That's a plus! Hopefully I'll be driving it around Saturday shaking out anything I forgot about. before Sunday. (IMG:style_emoticons/default/driving.gif) |
|
|
|
| effutuo101 |
Apr 29 2010, 02:03 PM
Post
#73
|
|
Advanced Member Group: Members Posts: 2,738 Joined: 10-April 05 From: Lemon Grove Member No.: 3,914 Region Association: Southern California |
Hey pete-stevers you going to join us for the car show this sunday?
Sorry for the hijack Dan! |
|
|
|
| Root_Werks |
Apr 30 2010, 09:04 AM
Post
#74
|
|
Village Idiot Group: Members Posts: 8,987 Joined: 25-May 04 From: About 15NM from Canada Member No.: 2,105 Region Association: Pacific Northwest |
Got tired last night, still on jackstands. (IMG:style_emoticons/default/rolleyes.gif)
My goal is still driving tomorrow. Really close, all engine stuff is 100%, replaced the taco plate seal even. It looked to be the only thing leaking other than the speedo drive off the tranny. But I'll catch that one later. I must have set that battery in a dozen different places. No matter where I put it, I'm gonna have to drill holes in virgin 914 sheet metal. I'm even thinking about behind the pass seat as Jon sugested or possibly under the pass foot rest? It fits, this thing is so small! Rear window back in with new seal. Ahhhhhh, no more smack! smack! over bumps. That and I found 2 more AC line holes. (IMG:style_emoticons/default/headbang.gif) I'll get some pics up when it's back on the ground. |
|
|
|
| Root_Werks |
May 16 2010, 08:44 PM
Post
#75
|
|
Village Idiot Group: Members Posts: 8,987 Joined: 25-May 04 From: About 15NM from Canada Member No.: 2,105 Region Association: Pacific Northwest |
Decided to install the LE spoiler this weekend and wound up fixing the front trunk hole from the AC.
Got my trunk floor from GPR. Attached thumbnail(s) 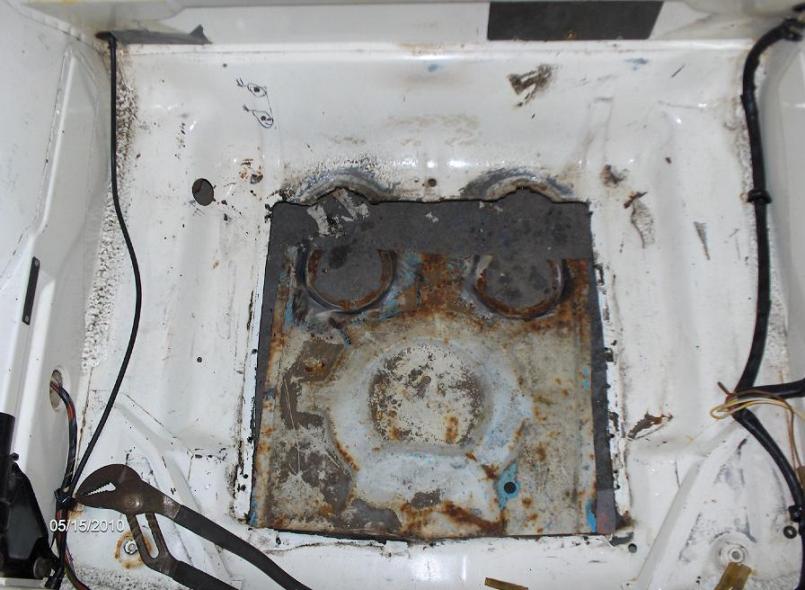
|
|
|
|
| Root_Werks |
May 16 2010, 08:46 PM
Post
#76
|
|
Village Idiot Group: Members Posts: 8,987 Joined: 25-May 04 From: About 15NM from Canada Member No.: 2,105 Region Association: Pacific Northwest |
I actually had two most excellent looking somewhat rectangular looking holes which required the removal of what was left of the original trunk floor.
Attached thumbnail(s) 
|
|
|
|
| Root_Werks |
May 16 2010, 08:48 PM
Post
#77
|
|
Village Idiot Group: Members Posts: 8,987 Joined: 25-May 04 From: About 15NM from Canada Member No.: 2,105 Region Association: Pacific Northwest |
Trying to do this right, so I removed the body plugs and of course cleaned them up later.
Attached thumbnail(s) 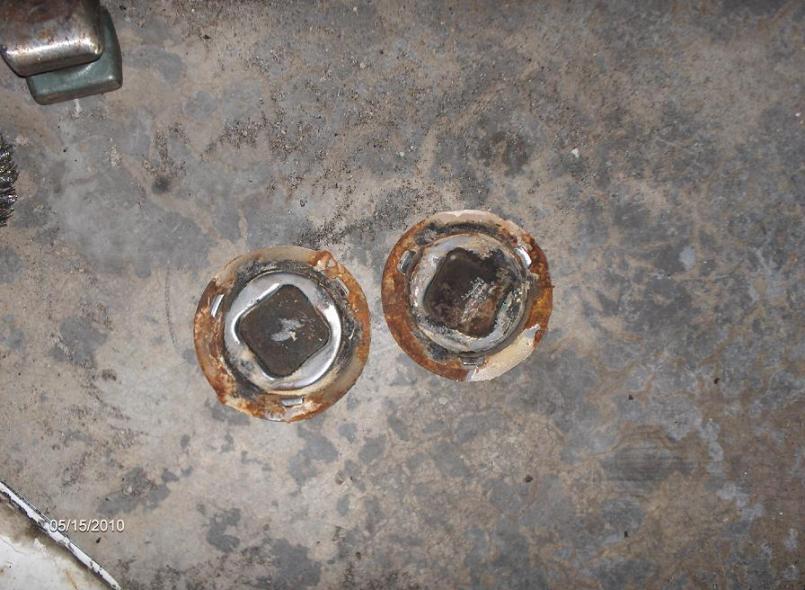
|
|
|
|
| Root_Werks |
May 16 2010, 08:50 PM
Post
#78
|
|
Village Idiot Group: Members Posts: 8,987 Joined: 25-May 04 From: About 15NM from Canada Member No.: 2,105 Region Association: Pacific Northwest |
New section getting tac'd into place... (IMG:style_emoticons/default/welder.gif)
Attached thumbnail(s) 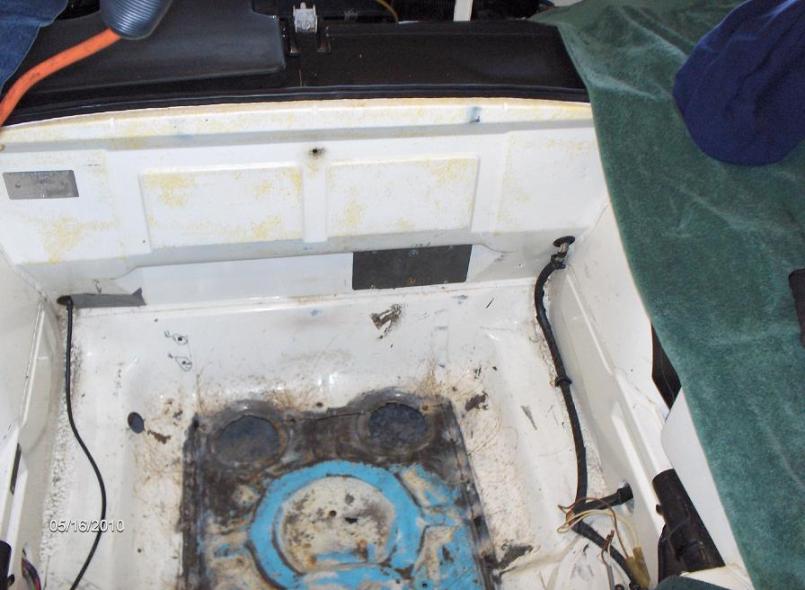
|
|
|
|
| Root_Werks |
May 16 2010, 08:53 PM
Post
#79
|
|
Village Idiot Group: Members Posts: 8,987 Joined: 25-May 04 From: About 15NM from Canada Member No.: 2,105 Region Association: Pacific Northwest |
It may not look like it, but the whole floor is correctly butt-welded. I didn't bother cleaning up the welds (grindind flat) because.....well it's the floor of the trunk. So you just don't see it very often. Pretty close match on the light ivory from local parts store. Still not dry in this picture, but really turned out nice.
Attached thumbnail(s) 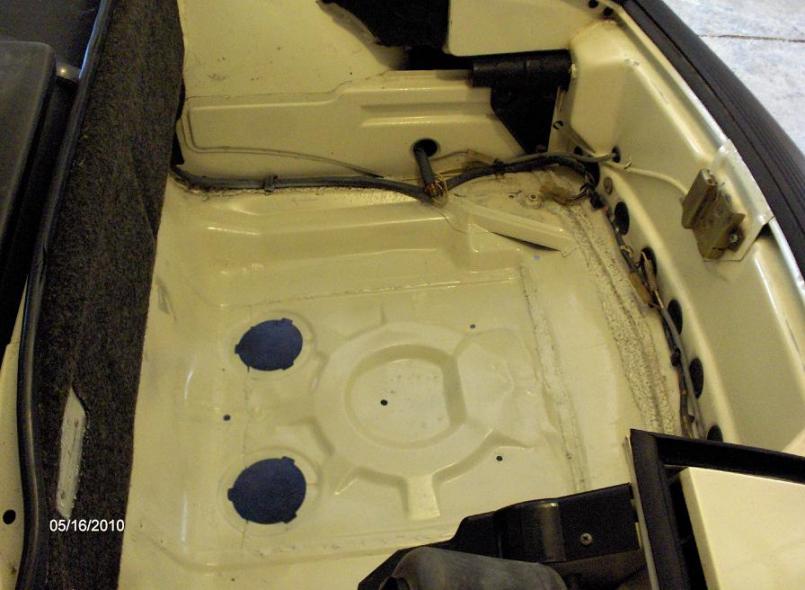
|
|
|
|
| Root_Werks |
May 16 2010, 08:55 PM
Post
#80
|
|
Village Idiot Group: Members Posts: 8,987 Joined: 25-May 04 From: About 15NM from Canada Member No.: 2,105 Region Association: Pacific Northwest |
I'll wait until tomorrow to install the plugs. Bottom side got many coats of black paint, this is the first coat of light ivory. So pretty much 95% done reversing the evil AC install. (IMG:style_emoticons/default/biggrin.gif)
Attached thumbnail(s) 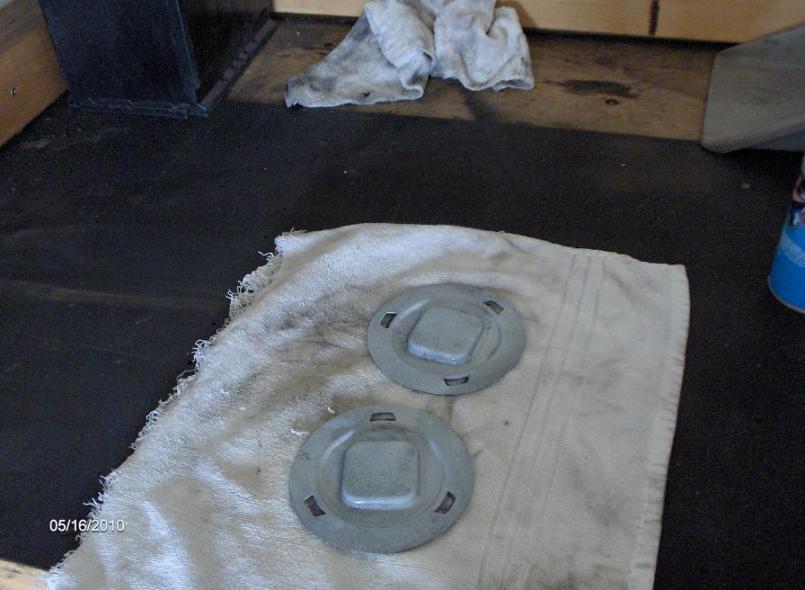
|
|
|
|
|
1 User(s) are reading this topic (1 Guests and 0 Anonymous Users)
0 Members:

|
Lo-Fi Version | Time is now: 26th May 2026 - 01:48 AM |
Invision Power Board
v9.1.4 © 2026 IPS, Inc.