|
|

|
Porsche, and the Porsche crest are registered trademarks of Dr. Ing. h.c. F. Porsche AG.
This site is not affiliated with Porsche in any way. Its only purpose is to provide an online forum for car enthusiasts. All other trademarks are property of their respective owners. |
|
|
| Mike Bellis |
 Apr 25 2010, 11:50 AM Apr 25 2010, 11:50 AM
Post
#21
|
|
Resident Electrician      Group: Members Posts: 8,347 Joined: 22-June 09 From: Midlothian TX Member No.: 10,496 Region Association: None 

|
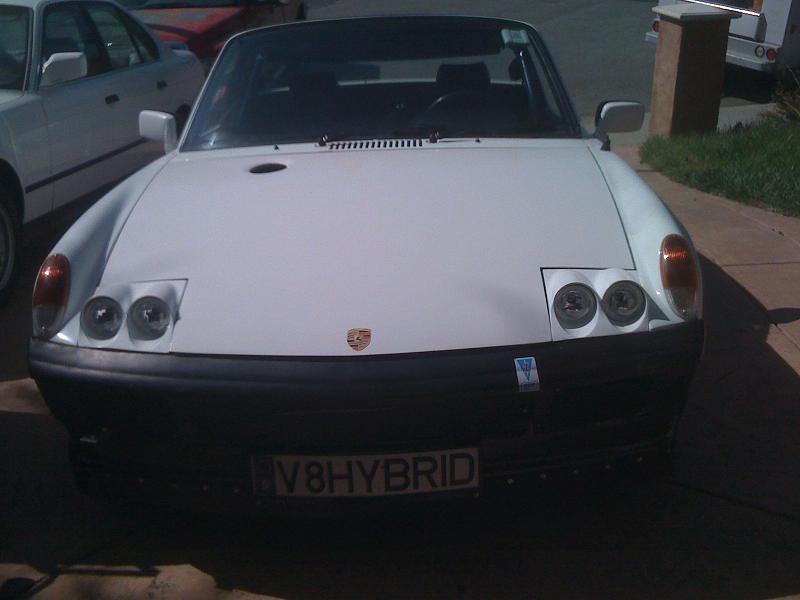
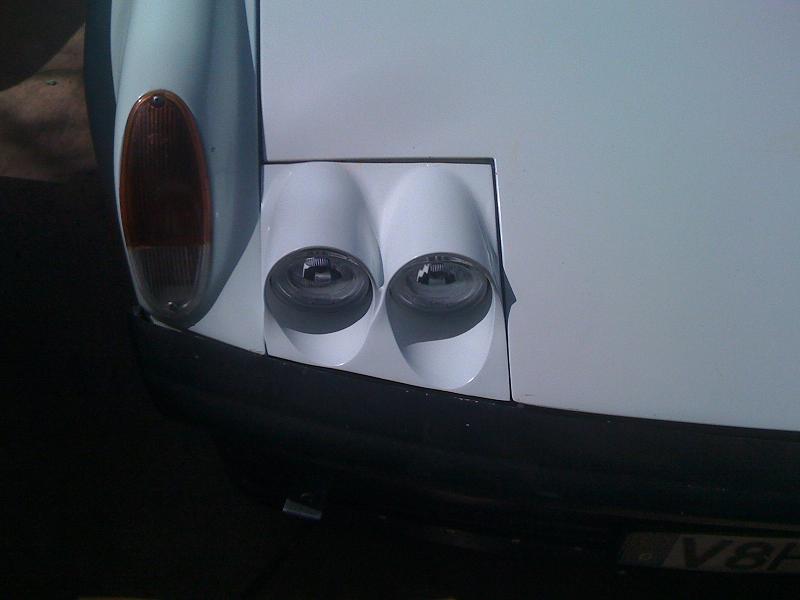
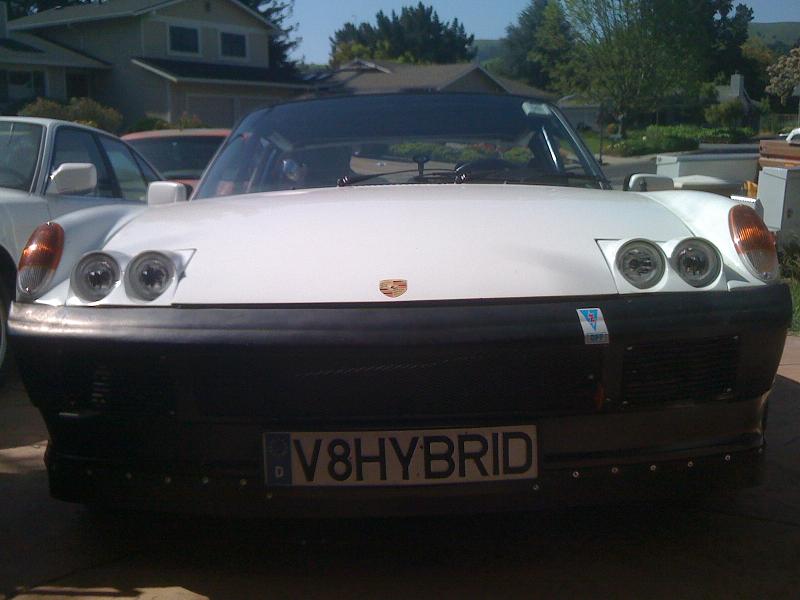
I saw a member from Purto Rico use these. I thought I would give it a try. They are for a Nissan 240SX. After 40 hours of cutting and fiberglass, (IMG:style_emoticons/default/sawzall-smiley.gif) they fit pretty well. I will fix the gaps and do some clean up after I strip the body for paint. Fender lines are not straight due to bondo. The slant angle is extreemly close to the 914. (IMG:style_emoticons/default/smilie_pokal.gif) Each lamp can be adjusted up/down and side to side.
Specs: H7 lamps, LED halo (white/blue color) comes with wire harness with relay for high beam (high beams illuminate all 4 lamps) If you want to do this too, I recommend a cardboard template of the stock lamp covers. There are no right angles on the 914 headlamps. the template will be smaller than the overall size of the 240sx assembly. find a good fit and cut larger than your marks. Trip and shape slowly. once you have your shape, reinforce the bottom with fiberglass (Kitty Hair and gel). I then mounted some L brackets to the factory mounting holes. I set some wet glass to the brackets and "glued" the assembly in place. Rivet nuts on the brackets make removing easy. Use large washers and open up the factory holes to make final adjustment easy.    |
Posts in this topic
 kg6dxn After market headlights Apr 25 2010, 11:50 AM
 vsg914 Someones gotta ask. Why? :confused: Apr 25 2010, 12:02 PM

 kg6dxn
Someones gotta ask. Why? :confused:
Just becaus... Apr 25 2010, 12:03 PM
 RJMII I kind of like it. This was (could still be) on my... Apr 25 2010, 12:12 PM

 kg6dxn
I kind of like it. This was (could still be) on m... Apr 25 2010, 12:57 PM
 JRust I'd kind of like to have those where the fogli... Apr 25 2010, 12:20 PM

 kg6dxn
I'd kind of like to have those where the fogl... Apr 25 2010, 12:59 PM
 Loser_Cruiser I like it :trophy: I was wondering if maybe some... Apr 25 2010, 12:28 PM

 kg6dxn
I like it :trophy: I was wondering if maybe som... Apr 25 2010, 01:08 PM
 effutuo101 Well done! now the question is, can you make a... Apr 25 2010, 12:29 PM

 kg6dxn
Well done! now the question is, can you make ... Apr 25 2010, 01:05 PM
 rsrguy3 I was wondering...... How about stuffing them into... Apr 25 2010, 12:40 PM
 70_914 I have been wanting to do this myself... thanks f... Apr 25 2010, 01:01 PM
 Sleepin Pretty cool and unique! I would put them on my... Apr 25 2010, 01:08 PM

 kg6dxn
Pretty cool and unique! I would put them on m... Apr 25 2010, 01:18 PM

 Cap'n Krusty
Pretty cool and unique! I would put them on ... Jul 28 2010, 05:43 PM
 computers4kids Another way you could approach a mod like this wou... Apr 25 2010, 01:33 PM
 Sleepin The quad lights definetly make it look more 914/8i... Apr 25 2010, 02:00 PM
 matthepcat I pulled the trigger and am becoming a copy cat.
... Jul 28 2010, 03:32 PM

 TurboWalt
I pulled the trigger and am becoming a copy cat.
... Aug 20 2010, 07:52 PM

 matthepcat Hey Walt,
Yea I got them in there as in the photo... Aug 21 2010, 11:24 AM
 kg6dxn I am doing another set too. TurboWalt has commisio... Jul 28 2010, 04:03 PM

 budman5201
I am doing another set too. TurboWalt has commisi... Jul 28 2010, 04:11 PM


 kg6dxn
[quote name='kg6dxn' post='1349203' date='Jul 28 ... Jul 28 2010, 04:19 PM

 matthepcat
I am doing another set too. TurboWalt has commisi... Jul 28 2010, 05:42 PM

 kg6dxn
[quote name='kg6dxn' post='1349203' date='Jul 28 ... Jul 28 2010, 06:56 PM
 Ferg I want to see somebody integrate these into a 914 ... Jul 28 2010, 04:22 PM

 kg6dxn
I want to see somebody integrate these into a 914... Jul 28 2010, 04:29 PM
 rickthejetman what h7/halo kit did you use? i dont seam to be ab... Jul 28 2010, 07:22 PM

 kg6dxn
what h7/halo kit did you use? i dont seam to be a... Jul 28 2010, 08:26 PM

 rickthejetman
what h7/halo kit did you use? i dont seam to be ... Jul 28 2010, 10:15 PM
 matthepcat Ok....so this job is not easy. Took about 4 hours ... Jul 29 2010, 01:01 PM
 kg6dxn Very nice. The only thing I did different is the t... Jul 29 2010, 02:02 PM

 matthepcat Yea that would have been a better method. I mostly... Jul 29 2010, 02:17 PM

 kg6dxn
Yea that would have been a better method. I mostl... Jul 29 2010, 02:32 PM
 matthepcat Here is a little update.
Currently I have the HI... Aug 20 2010, 07:13 PM
 charliew Is this kit the one you guys started with? It come... Aug 22 2010, 10:03 PM

 kg6dxn
Is this kit the one you guys started with? It com... Aug 22 2010, 10:25 PM
 charliew I get the jist of it to be two extra hid bulbs and... Aug 22 2010, 10:29 PM

 kg6dxn
I get the jist of it to be two extra hid bulbs an... Aug 22 2010, 10:42 PM
 charliew Great info thanks, you saved me lots of time study... Aug 22 2010, 10:46 PM
 kg6dxn :bump: I'm getting ready to start work on Turb... Jan 20 2011, 09:47 PM
 Series9 Thank you. Jan 20 2011, 10:14 PM
 charliew I finally decided to get some of these I hope the ... Jan 21 2011, 09:28 AM

 kg6dxn
I finally decided to get some of these I hope the... Jan 21 2011, 09:40 AM
 charliew It will be interesting to see if I can cut them an... Jan 21 2011, 09:51 AM

 kg6dxn
It will be interesting to see if I can cut them a... Jan 21 2011, 09:57 AM
 charliew Thanks for all your input Mike it has really been ... Jan 21 2011, 03:56 PM

 kg6dxn
Thanks for all you input Mike it has really been ... Jan 21 2011, 05:07 PM

 chuckc
The gel is an Evercoat product. I get it at Krage... Jan 26 2012, 04:19 PM
 charliew I like the idea of holding it's shape before y... Jan 21 2011, 07:00 PM
 914Timo Saw them first time and I have to say that they lo... Jan 22 2011, 04:19 PM
 kg6dxn
Saw them first time and I have to say that they l... Jan 22 2011, 04:21 PM
  |
1 User(s) are reading this topic (1 Guests and 0 Anonymous Users)
0 Members:

|
Lo-Fi Version | Time is now: 6th February 2026 - 11:36 AM |
Invision Power Board
v9.1.4 © 2026 IPS, Inc.


