Mike Bellis
Apr 25 2010, 11:50 AM
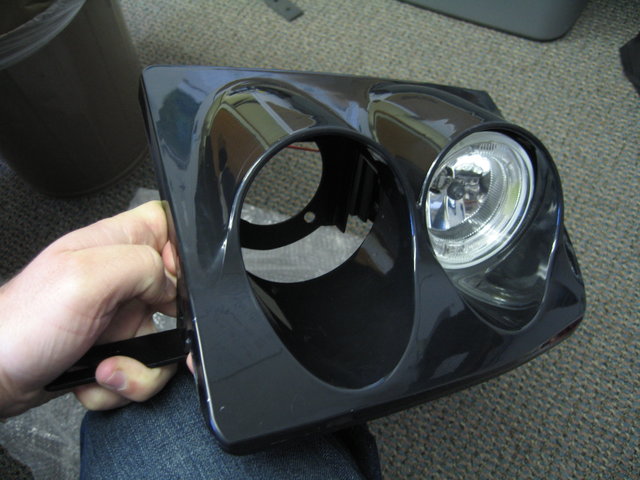
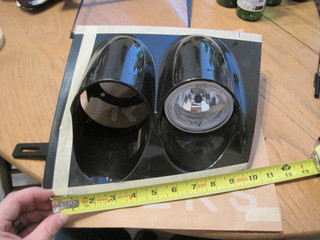
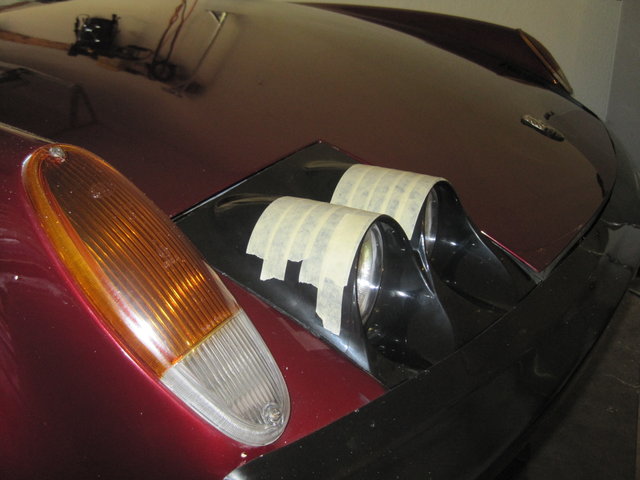
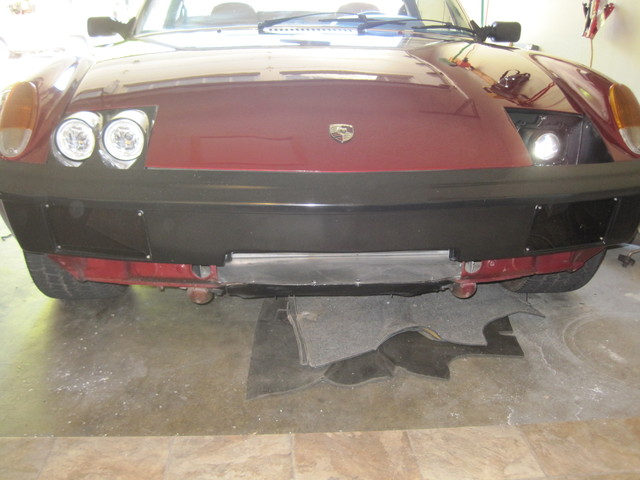
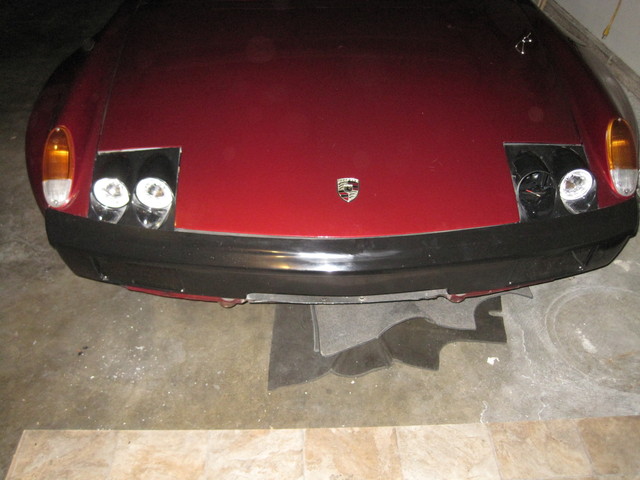
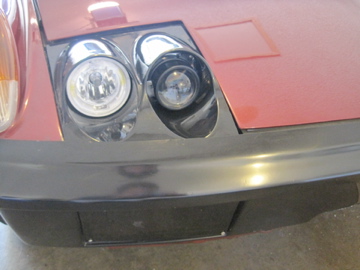
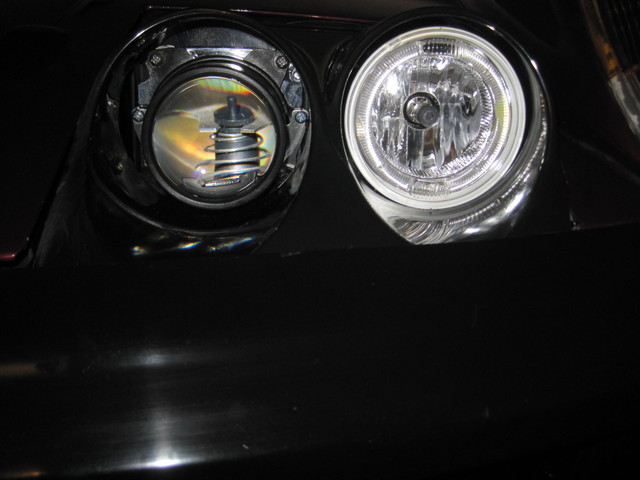
I saw a member from Purto Rico use these. I thought I would give it a try. They are for a Nissan 240SX. After 40 hours of cutting and fiberglass,

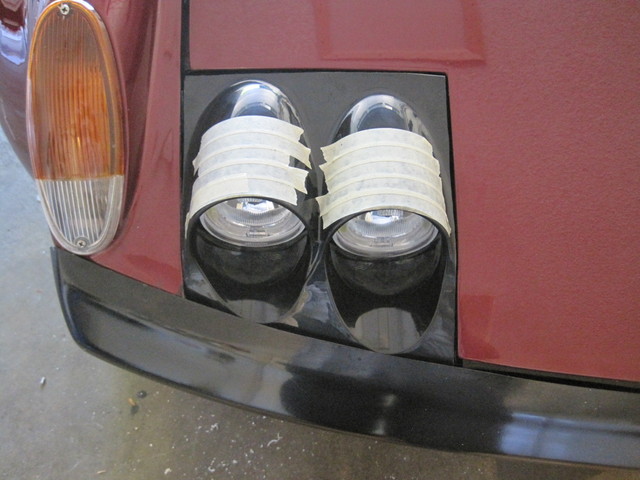
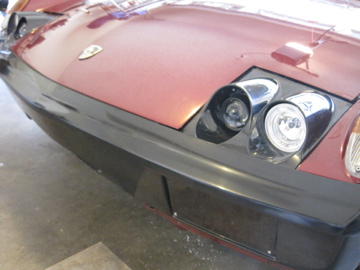
they fit pretty well. I will fix the gaps and do some clean up after I strip the body for paint. Fender lines are not straight due to bondo. The slant angle is extreemly close to the 914.

Each lamp can be adjusted up/down and side to side.
Specs: H7 lamps, LED halo (white/blue color) comes with wire harness with relay for high beam (high beams illuminate all 4 lamps)
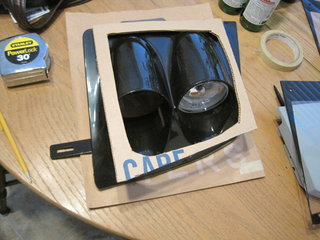
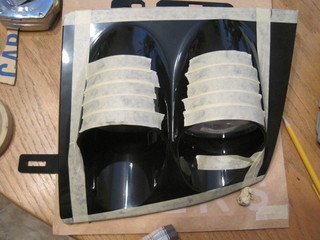
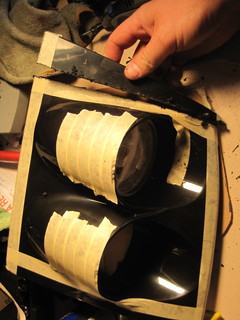
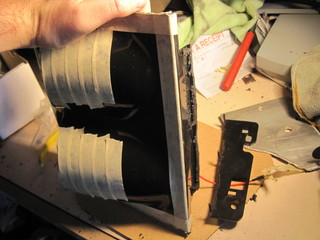
If you want to do this too, I recommend a cardboard template of the stock lamp covers. There are no right angles on the 914 headlamps. the template will be smaller than the overall size of the 240sx assembly. find a good fit and cut larger than your marks. Trip and shape slowly. once you have your shape, reinforce the bottom with fiberglass (Kitty Hair and gel). I then mounted some L brackets to the factory mounting holes. I set some wet glass to the brackets and "glued" the assembly in place. Rivet nuts on the brackets make removing easy. Use large washers and open up the factory holes to make final adjustment easy.
Click to view attachmentClick to view attachmentClick to view attachment
TheCabinetmaker
Apr 25 2010, 12:02 PM
Someones gotta ask. Why?

Mike Bellis
Apr 25 2010, 12:03 PM
QUOTE(vsg914 @ Apr 25 2010, 11:02 AM)

Someones gotta ask. Why?
Just because I can... I saved all the stock light parts to return to stock if needed.
RJMII
Apr 25 2010, 12:12 PM
I kind of like it. This was (could still be) on my to-do list.
Looks good, Mike! How well does it light compared to stock?
JRust
Apr 25 2010, 12:20 PM
I'd kind of like to have those where the foglights go. Seems liks someone said there were issues with moving them lower with a law or something
. I think they would be great where the foglight grills go. Then you could cut out the area fro the old lights. That would really open the front trunk up for crap

. Then of course a solid fiberglass or carbon fiber hood

Loser_Cruiser
Apr 25 2010, 12:28 PM
I like it
I was wondering if maybe some thing like
these would work and follow the lines better.
effutuo101
Apr 25 2010, 12:29 PM
Well done! now the question is, can you make a mold?
rsrguy3
Apr 25 2010, 12:40 PM
I was wondering...... How about stuffing them into the pop up? And then put a couple in the lower valance, and angle them slightly out for the twisties at night. To on-comming traffic you'd look like a wall of light.
Mike Bellis
Apr 25 2010, 12:57 PM
QUOTE(RJMII @ Apr 25 2010, 11:12 AM)
I kind of like it. This was (could still be) on my to-do list.
Looks good, Mike! How well does it light compared to stock?
It's much brighter but I haven't had it driving at night yet. Tonight maybe. I have an HID kit I'm thinking of stuffing in there. The headlight bucket is empty for the ballast (or two). I may still have to do some adjustments to the pattern. I measured a 1-2 inch drop in beam pattern over 3 feet from center of the lamp in my garage. With an HID, I'll have to drop it even lower.
Mike Bellis
Apr 25 2010, 12:59 PM
QUOTE(JRust @ Apr 25 2010, 11:20 AM)
I'd kind of like to have those where the foglights go. Seems liks someone said there were issues with moving them lower with a law or something
. I think they would be great where the foglight grills go. Then you could cut out the area fro the old lights. That would really open the front trunk up for crap
. Then of course a solid fiberglass or carbon fiber hood
In California, headlights must be a minimum of 22 inches off the ground. Mine are 24 inches to center of lamp. Years ago when my headlight motor went out, I drove for weeks with just my driving lights on and never got pulled over.
70_914
Apr 25 2010, 01:01 PM
I have been wanting to do this myself... thanks for letting me know which kit to start with.
Mike Bellis
Apr 25 2010, 01:05 PM
QUOTE(effutuo101 @ Apr 25 2010, 11:29 AM)
Well done! now the question is, can you make a mold?
If I decide to keep it this way, I'll let you know. May buy another set and fit them even better. I cut 4 inch strips of cardboard for my template. I taped the 4 pieces together in the shape. I flipped it over for the other side. If I do it again, I'll pull the bumper off to make a better edge. Kitty hair mixed with gel to make it flow better worked well for the uderside. The next step would be to fit the sides better and cover the top with carbon fiber. I bet I dropped 40 pounds off the car by removing the old lights and motors.
Sleepin
Apr 25 2010, 01:08 PM
Pretty cool and unique! I would put them on my car in a heartbeat! They would look awesome as a pop-up or a roller light ala Corvette.
Mike Bellis
Apr 25 2010, 01:08 PM
QUOTE(Loser_Cruiser @ Apr 25 2010, 11:28 AM)
I like it
I was wondering if maybe some thing like
these would work and follow the lines better.
By the looks of that one, you will need to narrow the front wedge. I cut at leats 1 inch from all sides on mine. None of the 240sx angles match up the the 914. I had to twist my template around the donor to find the best fit.
Mike Bellis
Apr 25 2010, 01:18 PM
QUOTE(Sleepin @ Apr 25 2010, 12:08 PM)
Pretty cool and unique! I would put them on my car in a heartbeat! They would look awesome as a pop-up or a roller light ala Corvette.
It would be easy to recess these under plexyglass with a custom bucket. Smoked plexy so you don't see anything. You could simply cut 2 holes in the rear of the bucket and 4 small holes for the adjustment studs.
Flip over would take much more fab time.
You could change the geometry of the pivot to open less, and have these pop up under factory lids. Custom trim around so it looks factory
computers4kids
Apr 25 2010, 01:33 PM
Another way you could approach a mod like this would be to extend the hood to fill in the entire corner where the headlight lids go. Then take cut the recesses out of the aftermarket assemblies and cut the hood for them to recess. Some molding where the two come together to finish it off.
Sleepin
Apr 25 2010, 02:00 PM
The quad lights definetly make it look more 914/8ish!
matthepcat
Jul 28 2010, 03:32 PM
I pulled the trigger and am becoming a copy cat.
Accept I am going to try to retrofit a Bi-Xenon projector into one of the halogen housings. That part may be tough


Wish me luck.
Mike Bellis
Jul 28 2010, 04:03 PM
I am doing another set too. TurboWalt has commisioned my services to build him a set. We should start a new combined thread specifically on this conversion. Oh wait, this is the thread. Just make sure your car is ready for the Dog Days Drive!
budman5201
Jul 28 2010, 04:11 PM
QUOTE(kg6dxn @ Jul 28 2010, 03:03 PM)
I am doing another set too. TurboWalt has commisioned my services to build him a set. We should start a new combined thread specifically on this conversion. Oh wait, this is the thread. Just make sure your car is ready for the Dog Days Drive!
You want to make me a set too? Pm me with price and how they will fit...I like this idea a lot!
Mike Bellis
Jul 28 2010, 04:19 PM
QUOTE(budman5201 @ Jul 28 2010, 03:11 PM)
QUOTE(kg6dxn @ Jul 28 2010, 03:03 PM)
I am doing another set too. TurboWalt has commisioned my services to build him a set. We should start a new combined thread specifically on this conversion. Oh wait, this is the thread. Just make sure your car is ready for the Dog Days Drive!
You want to make me a set too? Pm me with price and how they will fit...I like this idea a lot!
You are looking at about $300 in materials including HID lamp kit and fiberglass + misc. If you want parabolic lenses, add more $. Labor is undetermined. I have at least 16 hours into mine but I'm hoping to cut the time down with the next set. TurboWalt is in Iraq right now and not hounding me to be done. I should have his set done in about a month, since I still have a day job and kids.
Ferg
Jul 28 2010, 04:22 PM
I want to see somebody integrate these into a 914 hood
http://www.youtube.com/watch?v=6oVFRe2kkXE 
Mike Bellis
Jul 28 2010, 04:29 PM
QUOTE(Ferg @ Jul 28 2010, 03:22 PM)
I want to see somebody integrate these into a 914 hood
http://www.youtube.com/watch?v=6oVFRe2kkXE If they wern't so ugly...

matthepcat
Jul 28 2010, 05:42 PM
QUOTE(kg6dxn @ Jul 28 2010, 03:03 PM)
I am doing another set too. TurboWalt has commisioned my services to build him a set. We should start a new combined thread specifically on this conversion. Oh wait, this is the thread. Just make sure your car is ready for the Dog Days Drive!
I know! I want to go on that drive. It's quite far though, and I am not that confident in my car yet.
Just doing my first tape off of the housing....measure...double measure....second guess...remeasure. Eventually I have to cut

Cap'n Krusty
Jul 28 2010, 05:43 PM
QUOTE(kg6dxn @ Apr 25 2010, 12:18 PM)
QUOTE(Sleepin @ Apr 25 2010, 12:08 PM)
Pretty cool and unique! I would put them on my car in a heartbeat! They would look awesome as a pop-up or a roller light ala Corvette.
It would be easy to recess these under plexyglass with a custom bucket. Smoked plexy so you don't see anything. You could simply cut 2 holes in the rear of the bucket and 4 small holes for the adjustment studs.
Flip over would take much more fab time.
You could change the geometry of the pivot to open less, and have these pop up under factory lids. Custom trim around so it looks factory
Smoked plexi, or ANY plexy, covering the lights is also illegal in CA. (Just like plexi over your license plates.) The new cars with plexi light housings are designed that way, and carry DOT approval as such. Yours won't have that approval, and the wrong cop could make your day miserable.
The Cap'n
Mike Bellis
Jul 28 2010, 06:56 PM
QUOTE(matthepcat @ Jul 28 2010, 04:42 PM)
QUOTE(kg6dxn @ Jul 28 2010, 03:03 PM)
I am doing another set too. TurboWalt has commisioned my services to build him a set. We should start a new combined thread specifically on this conversion. Oh wait, this is the thread. Just make sure your car is ready for the Dog Days Drive!
I know! I want to go on that drive. It's quite far though, and I am not that confident in my car yet.
Just doing my first tape off of the housing....measure...double measure....second guess...remeasure. Eventually I have to cut
Cut them 1/4 inch bigger on the sides and back. Cut 1/2 inch bigger in the front. Once you have the rough cut, slowly cut to size. Cut the front to size after the other 3 are done.
rickthejetman
Jul 28 2010, 07:22 PM
what h7/halo kit did you use? i dont seam to be able to find any meant for headlights only fog lights. i really like what you did but i think im going to go with the stock lids and change the pop up geometry so they only come up enough to reveal the projector.
Mike Bellis
Jul 28 2010, 08:26 PM
QUOTE(rickthejetman @ Jul 28 2010, 06:22 PM)
what h7/halo kit did you use? i dont seam to be able to find any meant for headlights only fog lights. i really like what you did but i think im going to go with the stock lids and change the pop up geometry so they only come up enough to reveal the projector.
Search ebay for Nissan 240sx halo and you will find them. They mount to the housing with 3-4 studs and could be used in a custom bracket for your project.
rickthejetman
Jul 28 2010, 10:15 PM
QUOTE(kg6dxn @ Jul 28 2010, 07:26 PM)
QUOTE(rickthejetman @ Jul 28 2010, 06:22 PM)
what h7/halo kit did you use? i dont seam to be able to find any meant for headlights only fog lights. i really like what you did but i think im going to go with the stock lids and change the pop up geometry so they only come up enough to reveal the projector.
Search ebay for Nissan 240sx halo and you will find them. They mount to the housing with 3-4 studs and could be used in a custom bracket for your project.
thank you very much for the info i didnt even think to look an evilbay.
matthepcat
Jul 29 2010, 01:01 PM
Ok....so this job is not easy. Took about 4 hours to tape off and cut last night.
Here are some photos of the process:
Carboard cut-out
Use to mark cut location.
Tape it out
Measure
The hard part.....cutting.
Cut off nissan mounting plastic
Lots of trimming and marking and sanding and trimming (time consuming)
Not bad for a first cut & fit
Old headlight vs new
Now it's time to go to bed, perfecting fit & painting & retrofit HID projector after sleep:
Mike Bellis
Jul 29 2010, 02:02 PM
Very nice. The only thing I did different is the template. Mine was larger and sliped over the new light. I used 4 pieces of cardboard to make the outside template.
matthepcat
Jul 29 2010, 02:17 PM
Yea that would have been a better method. I mostly depended on measurements off the template and used a strait edge.
Your are correct that there are NO perfect angles on this car, especially taking into account any bodywork in the headlight area & how the hood is mounted.
If your hood is very slightly mounted off center, one headlight area will be modified much differently from the other side.
Mike,
Did you glue the housing to the L-brackets?
Matt
QUOTE(kg6dxn @ Jul 29 2010, 01:02 PM)
Very nice. The only thing I did different is the template. Mine was larger and sliped over the new light. I used 4 pieces of cardboard to make the outside template.
Mike Bellis
Jul 29 2010, 02:32 PM
QUOTE(matthepcat @ Jul 29 2010, 01:17 PM)
Yea that would have been a better method. I mostly depended on measurements off the template and used a strait edge.
Your are correct that there are NO perfect angles on this car, especially taking into account any bodywork in the headlight area & how the hood is mounted.
If your hood is very slightly mounted off center, one headlight area will be modified much differently from the other side.
Mike,
Did you glue the housing to the L-brackets?
Matt
QUOTE(kg6dxn @ Jul 29 2010, 01:02 PM)
Very nice. The only thing I did different is the template. Mine was larger and sliped over the new light. I used 4 pieces of cardboard to make the outside template.
I build up the bottom surface with "Kitty Hair" Fiberglass. about 0.5-.75 inch. Bolt the L brackets to the car first. You should be able to set the lights loose on to the brackets. If everything lines up good, place some wet kitty hair on the top of the brackets. lower the light on to them. Wait until it dries and un bolt the L brakets. Remove the lights with attached L brackets and re-enforce the bottom area with more kitty hair. I also add 10-25% gel in my kitty hair to make it flow better. Rough up the bottom ABS before attaching kitty hair. this will help it adhere. Then sand and fill, sand and fill. when you get close to perfect, spot putty will be your friend. You may find the need to slightly twist the fixture to get it in and out wth the brackets installed. I used Rivet nuts on the L brackets and bolts in the factory pivot holes. Only 1 bolt inside the fender and 2 under the hood holds it perfect.
matthepcat
Aug 20 2010, 07:13 PM
Here is a little update.
Currently I have the HID projectors into the housings. They barely fit!
Originally I cut open the stock housing to make both lights look the same, but found there was not enough room for them to look right.
I am currently in the process of making shrouds for the projectors, finding the easiest mounting solution( I am using a ghetto zip-tie method), painting and finally aiming.
Here is what they look like now:
TurboWalt
Aug 20 2010, 07:52 PM
QUOTE(matthepcat @ Jul 29 2010, 12:32 AM)
I pulled the trigger and am becoming a copy cat.
Accept I am going to try to retrofit a Bi-Xenon projector into one of the halogen housings. That part may be tough
Wish me luck.
Matt,
Any luck with fitting the Bi-Xenon's?
Walt
matthepcat
Aug 21 2010, 11:24 AM
Hey Walt,
Yea I got them in there as in the photos above. I had to make some custom adjustment screws.
Once I get the shroud fabricated it will look nice.
The lights are wired up and functional. (high & low beam bi-xenon)
I am using one of the smallest bi-xenon projectors called : Morimoto Mini
The best place to get them is www.theretrofitsource.com

QUOTE(TurboWalt @ Aug 20 2010, 06:52 PM)
QUOTE(matthepcat @ Jul 29 2010, 12:32 AM)
I pulled the trigger and am becoming a copy cat.
Accept I am going to try to retrofit a Bi-Xenon projector into one of the halogen housings. That part may be tough
Wish me luck.
Matt,
Any luck with fitting the Bi-Xenon's?
Walt
charliew
Aug 22 2010, 10:03 PM
Is this kit the one you guys started with? It comes with a hid upgrade I think and think it says it's only hid in low beam so only two lights in low beam and two in high beam? I'm not up to speed on the new lights very well. I was understanding the lights you are using were all four on high and low beam and that should be brighter it seems especially if one were to fail.
http://cgi.ebay.com/ebaymotors/89-94-NISSA...rts_Accessories
Mike Bellis
Aug 22 2010, 10:25 PM
QUOTE(charliew @ Aug 22 2010, 09:03 PM)
Is this kit the one you guys started with? It comes with a hid upgrade I think and think it says it's only hid in low beam so only two lights in low beam and two in high beam? I'm not up to speed on the new lights very well. I was understanding the lights you are using were all four on high and low beam and that should be brighter it seems especially if one were to fail.
http://cgi.ebay.com/ebaymotors/89-94-NISSA...rts_AccessoriesBasically yes. I buy the HID kits separate from the lamp housing. That is a good price if it includes 4 bulbs and balasts too. I prefer the 4300K (Kelvin) lamps. It it the brightest in Lumens and is yellow/white in color.
charliew
Aug 22 2010, 10:29 PM
I get the jist of it to be two extra hid bulbs and ballasts with the regular four halogens and instructions on changing two halogens out with the two hid's, with a choice of four different colors, 6000,8000,10,000 and 12,000.
Mike Bellis
Aug 22 2010, 10:42 PM
QUOTE(charliew @ Aug 22 2010, 09:29 PM)
I get the jist of it to be two extra hid bulbs and ballasts with the regular four halogens and instructions on changing two halogens out with the two hid's, with a choice of four different colors, 6000,8000,10,000 and 12,000.
With a 6000 and higher color you will get about the same Lumens as the Halogens. 6000K is actually blue not white. 5000K is the highest you should go. There is a guy on Ebay in San Jose that sells HID kits for $40 per pair. I use him often. He has 4300K and 5000K in stock.
Ricer guys like the looks of blue/purple lights but they do not reflect well. The night vision will be worse than you have with stock sealed beam lamps at 12000K. All the reflected light will be dark purple.
charliew
Aug 22 2010, 10:46 PM
Great info thanks, you saved me lots of time studying up on this. To me lights are boring until I need them, then they are never bright enough.
Mike Bellis
Jan 20 2011, 09:47 PM

I'm getting ready to start work on TurboWalts headlights. I thought I would give this thread a bump. Plus I got a PM asking about these...
Click to view attachment
Series9
Jan 20 2011, 10:14 PM
Thank you.
charliew
Jan 21 2011, 09:28 AM
I finally decided to get some of these I hope the lights are the right ones.
http://cgi.ebay.com/ebaymotors/ws/eBayISAP...6&viewitem=
Mike Bellis
Jan 21 2011, 09:40 AM
QUOTE(charliew @ Jan 21 2011, 07:28 AM)
I finally decided to get some of these I hope the lights are the right ones.
http://cgi.ebay.com/ebaymotors/ws/eBayISAP...6&viewitem=Those are the ones. Cut them larger than you think you will need and slowly trim to fit.
charliew
Jan 21 2011, 09:51 AM
It will be interesting to see if I can cut them and still keep the faux cf edges pristene. If not they will get painted. I also have some water transfer tools to re-cover the cf if I have to but thats a lot of work. With those curves It will take more than one try to get it right I'm sure with water transfer.
Mike Bellis
Jan 21 2011, 09:57 AM
QUOTE(charliew @ Jan 21 2011, 07:51 AM)
It will be interesting to see if I can cut them and still keep the faux cf edges pristene. If not they will get painted. I also have some water transfer tools to re-cover the cf if I have to but thats a lot of work. With those curves It will take more than one try to get it right I'm sure with water transfer.
You will end up cutting 1 inch from all 4 sides. None of the side angles match the 914 at all. Make an outside template of the factory hole and place over the Nissan housing. You will find the sweet spot to mark it. The outer edge of the eyelids will need to be trimmed to fit just right. Plan on painting. I used Kitty Hair and Gel fiberglas to build up the under side before I cut anything. Leave the front edge long until the other 3 sides are trimmed correctly.
charliew
Jan 21 2011, 03:56 PM
Thanks for all your input Mike it has really been helpful. I work with kitty hair often but I don't know what gel you are talking about. Is this a Evercoat Product? I know about short strand and long strand filler but the gel is a new item for me. When I get the housing I may go with the two part adhesive first used on bumpers if it is the same material as bumpers that should give a better base to adhear to the kitty hair. I also have worked with pvc sheet and could glue that to the housing if it would be a cleaner or stronger construction. Kitty hair is simpler though but pretty porous to work with but it is waterproof. I always need a skim coat of regular rage to fill in the voids in the kitty hair and to cover the later bleed through of the strands in the kitty hair.
Mike Bellis
Jan 21 2011, 05:07 PM
QUOTE(charliew @ Jan 21 2011, 01:56 PM)
Thanks for all you input Mike it has really been helpful. I work with kitty hair often but I don't know what gel you are talking about. Is this a Evercoat Product? I know about short strand and long strand filler but the gel is a new item for me. When I get the housing I may go with the two part adhesive first used on bumpers if it is the same material as bumpers that should give a better base to adhear to the kitty hair. I also have worked with pvc sheet and could glue that to the housing if it would be a cleaner or stronger construction. Kitty hair is simpler though but pretty porous to work with but it is waterproof. I always need a skim coat of regular rage to fill in the voids in the kitty hair and to cover the later bleed through of the strands in the kitty hair.
The gel is an Evercoat product. I get it at Kragen with my kitty hair. I mix the two to get the kitty hair to flow better and be less porous. The ABS housing is thin and has no structure once cut to fit. I build up 1/2 to 3/4 with kitty/gel. This makes it a solid piece to work with. The mix I use is 50/50 kitty/gel. This take most of the porosity out of the kitty hair and is eay to spread. I build it up before I cut anything. It really make the piece easier to work with. Dust mask needed! Keep away from where the lamp bolts into the fixture. I use L brackets with rivet nuts in them, bolted to the stock headlight mounting holes. Dry fit the brackets, then put a wad of kitty hair on the top of the brackes and place the fixture on the car. Let dry and unbolt. Brackets should be attached. Trim and re-apply kitty as needed to make nice.
charliew
Jan 21 2011, 07:00 PM
I like the idea of holding it's shape before you start cutting it that would keep it from distorting. It sounds like you have a good process and it doesn't need any improvements to work good.
This is a "lo-fi" version of our main content. To view the full version with more information, formatting and images, please
click here.