|
|
|
Porsche, and the Porsche crest are registered trademarks of Dr. Ing. h.c. F. Porsche AG.
This site is not affiliated with Porsche in any way. Its only purpose is to provide an online forum for car enthusiasts. All other trademarks are property of their respective owners. |
|
|

  |

| ahdoman |
 Apr 28 2010, 09:52 PM Apr 28 2010, 09:52 PM
Post
#1
|
|
It's phonetic...Ah-D-O-Man (Audioman)  Group: Members Posts: 667 Joined: 7-November 05 From: Santa Clarita, Ca. Member No.: 5,084 Region Association: Southern California |
I'm going to be installing the inner long stiffening kit over the next couple of weeks. But, what I need to know is what did you do with the two faces that sandwich each other (the long and the back side of the brace) to help prevent rust between them? Is it OK to leave them bare metal? I was thinking about using a weld thru primer but the tack holes are so close I don't think there will be much primer left after welding.
|
   |

 
|
| charliew |
Apr 28 2010, 10:59 PM
Post
#2
|
|
Advanced Member Group: Members Posts: 2,363 Joined: 31-July 07 From: Crawford, TX. Member No.: 7,958 |
I've been thinking that if the longs are rust free, that if I can find the right adhesive, I will glue and rivet the ones on my 75. If I decided the longs have rust in them then welding won't be a problem. To glue them I will probably remove all the old paint and repaint the longs and the backside of the stiffeners with epoxy primer then glue after drilling the rivet holes. I really think the weld spots will cause the inside of the longs to rust.
|
|
|
|
| maddog |
Apr 29 2010, 05:17 AM
Post
#3
|
|
Member Group: Members Posts: 200 Joined: 19-May 03 From: Grand Rapids Michigan Member No.: 710 Region Association: None |
I would say any paint/primer would be better than bare metal, I would suggest a weldable primer, you can pic it up at Sherwin-Williams for like $9 a can.
Dave |
|
|
|
| Krieger |
Apr 29 2010, 08:03 AM
Post
#4
|
|
Advanced Member Group: Members Posts: 4,721 Joined: 24-May 04 From: Santa Rosa CA Member No.: 2,104 Region Association: None |
I used weld thru. I don't know of any thing else.
|
|
|
|
| Root_Werks |
Apr 29 2010, 08:42 AM
Post
#5
|
|
Village Idiot Group: Members Posts: 8,326 Joined: 25-May 04 From: About 5NM from Canada Member No.: 2,105 Region Association: Pacific Northwest |
Weld through primer is the best option.
When you fit the pieces, use a sharpe to mark each hole. Use a little grinder or wire-wheel to clean just that little spot. Doesn't even have to be any bigger than the hole on the long kit because you start there, pool and fill to the kit metal. If you have your Mig set properly and move quickly to finish each hole, you'll find there is very little paint loss. It's the great thing about mig welders. Don't weld the edges, just the holes. I'm going to do another one pretty soon myself. Done.....4 I think now? You'll love the results when it's all done. Makes a huge difference. (IMG:style_emoticons/default/welder.gif) |
|
|
|
| andys |
Apr 29 2010, 09:35 AM
Post
#6
|
|
Advanced Member Group: Members Posts: 2,165 Joined: 21-May 03 From: Valencia, CA Member No.: 721 Region Association: None |
QUOTE(Root_Werks @ Apr 29 2010, 07:42 AM)  When you fit the pieces, use a sharpe to mark each hole. Use a little grinder or wire-wheel to clean just that little spot. Doesn't even have to be any bigger than the hole on the long kit because you start there, pool and fill to the kit metal. (IMG:style_emoticons/default/welder.gif) Steve, I did mine this way. Also make sure the kit lays as flush as possible against the longs to minimize any gap; bigger the gap, the more the shrinkage. Pre-fitting is important. I'm not a fan of scab plates (moisture entrapment potential), but that's what is available. Andys |
|
|
|
| Root_Werks |
Apr 29 2010, 09:44 AM
Post
#7
|
|
Village Idiot Group: Members Posts: 8,326 Joined: 25-May 04 From: About 5NM from Canada Member No.: 2,105 Region Association: Pacific Northwest |
Andys makes another really good point.
Fit, re-fit and then fit the pieces again before starting to weld. There isn't much clean up or removle of "stuff" needed. Some seem sealer along the bottom and up around the front wheel wells I think is the hardest. Oh, and make 100% absolute so positively sure, without any doubt at all that you have your car supported rigidly! Set door gaps if your 914 is flexing, put it up on 4 jackstands at the corners, 2 more in the center that are the screw type so you can adjust. get the door gaps perfect. Once the kits pieces are welded in, your door gap will be what it is pretty much forever, so make sure to get it set correctly. |
|
|
|
| Brando |
Apr 29 2010, 09:50 AM
Post
#8
|
|
BUY MY SPARE KIDNEY!!! Group: Members Posts: 3,935 Joined: 29-August 04 From: Santa Ana, CA Member No.: 2,648 Region Association: Southern California |
Weld-through primer for sure.
That's how skline did his and Joe Buckle's. Cover them up with a coat of POR-15 when done and you're set. Charlie, don't glue and rivet the long stiffening kits in. Do it right and weld them in. |
|
|
|
| Elliot Cannon |
Apr 29 2010, 10:13 AM
Post
#9
|
|
914 Guru Group: Retired Members Posts: 8,487 Joined: 29-December 06 From: Paso Robles Ca. (Central coast) Member No.: 7,407 Region Association: None |
I also inlarged the holes on mine. It makes for more welded area and a stronger weld.
Attached thumbnail(s) 
|
|
|
|
| sean_v8_914 |
Apr 29 2010, 10:36 AM
Post
#10
|
|
Chingon 601 Group: Members Posts: 4,011 Joined: 1-February 05 From: San Diego Member No.: 3,541 |
I have see and repaired poor installations done by world mebers. prep work is everything! good advise above so far.
it is difficult for a novice to get a good penetration on teh base matal thru those little holes. enlarging them ensures you dont just close up the hole without melting into the base metal longitudinal. dont concentrate too much heat to one area, move around as you fill in spot welds. left to right, front to back... FITMENT PRIOR TO WELDING snug fit to the long interferences are ussually in teh corners and up by the heater tube exit dont go cheap on teh weld thru primer, it pops and spits. I use 3m or Wurth only |
|
|
|
| xperu |
Apr 29 2010, 10:42 AM
Post
#11
|
|
TEXAS Group: Members Posts: 597 Joined: 13-June 06 From: League City Texas Member No.: 6,213 Region Association: None |
I have been thinking of installing a kit on my car, but I have a concern that doing so might put more load on my suspension ears. Should I be conered? Thanks Mike
|
|
|
|
| sean_v8_914 |
Apr 29 2010, 10:52 AM
Post
#12
|
|
Chingon 601 Group: Members Posts: 4,011 Joined: 1-February 05 From: San Diego Member No.: 3,541 |
harbor freight sells the big clamps. I also use sheet metal scews to draw the panel in tight to the under laying panel
I made locator marks to drill the holes for teh back pad lower attachment screws notice teh sheet metal screws used to draw the skins tight. they get removed and welded in the holes good opportunity to straighten this guys door gaps Attached image(s) 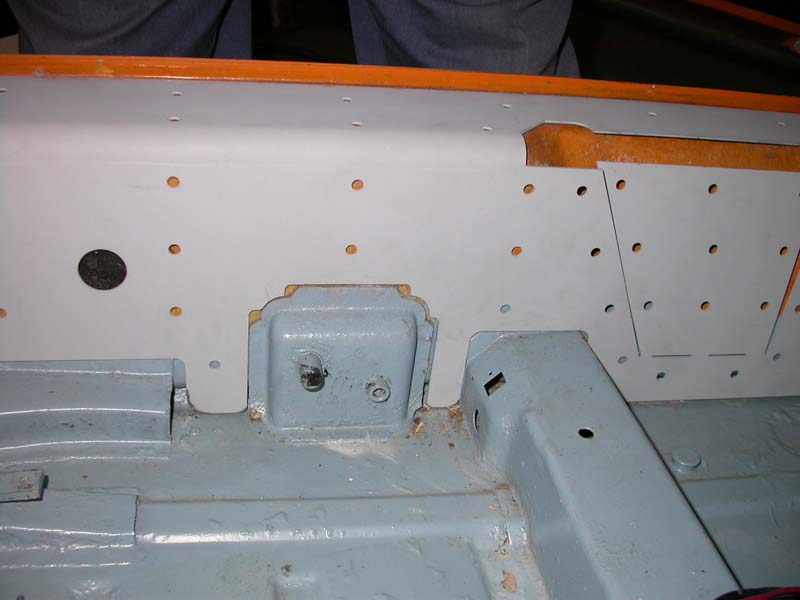 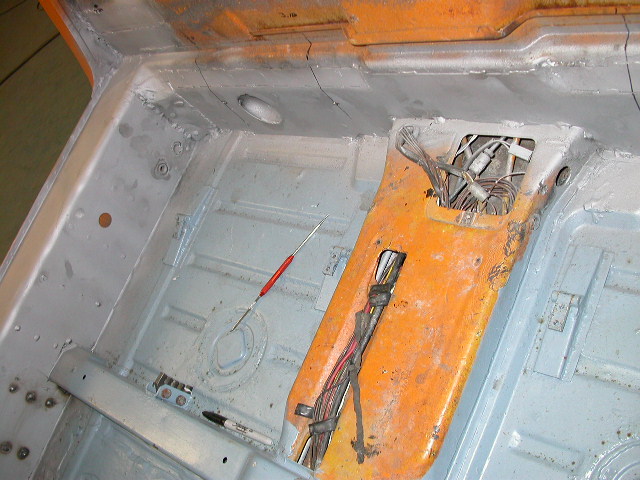 
|
|
|
|
| Root_Werks |
Apr 29 2010, 10:59 AM
Post
#13
|
|
Village Idiot Group: Members Posts: 8,326 Joined: 25-May 04 From: About 5NM from Canada Member No.: 2,105 Region Association: Pacific Northwest |
Those are good pictures Sean, thanks!
I haven't ever felt the need to make the holes larger, but having welded for 30+ years, can't believe I haven't thought of that one on the previous kits I've installed. Good thread, lots of really good information here. (IMG:style_emoticons/default/welder.gif) |
|
|
|
| McMark |
Apr 29 2010, 11:25 AM
Post
#14
|
|
914 Freak! Group: Retired Admin Posts: 20,179 Joined: 13-March 03 From: Grand Rapids, MI Member No.: 419 Region Association: None |
I use a couple of modified drill bits to clean the weld area while the panel is in place. This works really well and gives you something to do to keep from welding too fast and warping the car.
|
|
|
|
| andys |
Apr 29 2010, 11:47 AM
Post
#15
|
|
Advanced Member Group: Members Posts: 2,165 Joined: 21-May 03 From: Valencia, CA Member No.: 721 Region Association: None |
QUOTE(sean_v8_914 @ Apr 29 2010, 09:52 AM) notice teh sheet metal screws used to draw the skins tight. they get removed and welded in the holes good opportunity to straighten this guys door gaps +1 on the sheet metal screws. I used Tek screws and they really helped set the kit in place. Andys |
|
|
|
| sean_v8_914 |
Apr 29 2010, 11:53 AM
Post
#16
|
|
Chingon 601 Group: Members Posts: 4,011 Joined: 1-February 05 From: San Diego Member No.: 3,541 |
Ill post "the bad pics" after work tonight
30 years of welding is an unfair advantage. you do things automatically that most of us have to be told to remember. you also have mastered puddle control by now. the primary mistake I have found has been the spots dont grab the metal inside, they are just topical blobs I like the modified drill bit idea: tell us more. ...like a hole bottom cleaner? |
|
|
|
| Root_Werks |
Apr 29 2010, 12:49 PM
Post
#17
|
|
Village Idiot Group: Members Posts: 8,326 Joined: 25-May 04 From: About 5NM from Canada Member No.: 2,105 Region Association: Pacific Northwest |
I've seen the same thing Sean, welded holes that didn't bite into the long metal.
Yeah, some sort of cleaning bit would be cool! |
|
|
|
| charliew |
Apr 29 2010, 01:00 PM
Post
#18
|
|
Advanced Member Group: Members Posts: 2,363 Joined: 31-July 07 From: Crawford, TX. Member No.: 7,958 |
We have a local end mill sharpener guy that will make a end mill flat on the end. If you have a tool bit sharpener you probably could make a drill bit flat on the end.
|
|
|
|
| Andyrew |
Apr 29 2010, 05:11 PM
Post
#19
|
|
Spooling.... Please wait Group: Members Posts: 13,376 Joined: 20-January 03 From: Riverbank, Ca Member No.: 172 Region Association: Northern California |
To be perfectly honest, I think I left the paint as is, then scratched the paint so I could get to the metal, started my weld there and use a hot weld to burn through the paint. I used to do it all the time welding door frames so I knew how to control the weld. Welds came out super strong and i dont worry about rust..
|
|
|
|
| McMark |
Apr 30 2010, 12:19 AM
Post
#20
|
|
914 Freak! Group: Retired Admin Posts: 20,179 Joined: 13-March 03 From: Grand Rapids, MI Member No.: 419 Region Association: None |
QUOTE like the modified drill bit idea: tell us more. ...like a hole bottom cleaner? This thread has details and more discussion about Long kit installation. |
|
|
|
|
1 User(s) are reading this topic (1 Guests and 0 Anonymous Users)
0 Members:

|
Lo-Fi Version | Time is now: 28th May 2024 - 12:01 AM |
Invision Power Board
v9.1.4 © 2024 IPS, Inc.