|
|
|
Porsche, and the Porsche crest are registered trademarks of Dr. Ing. h.c. F. Porsche AG.
This site is not affiliated with Porsche in any way. Its only purpose is to provide an online forum for car enthusiasts. All other trademarks are property of their respective owners. |
|
|

 Model Specific Information
914/4: 70 71 72 73 74 75 76 914/6: 70 71 72
  |

| Pat Garvey |
 Jun 2 2010, 07:38 PM Jun 2 2010, 07:38 PM
Post
#21
|
|
Do I or don't I...........?  Group: Members Posts: 5,900 Joined: 24-March 06 From: SE PA, near Philly Member No.: 5,765 Region Association: North East States |
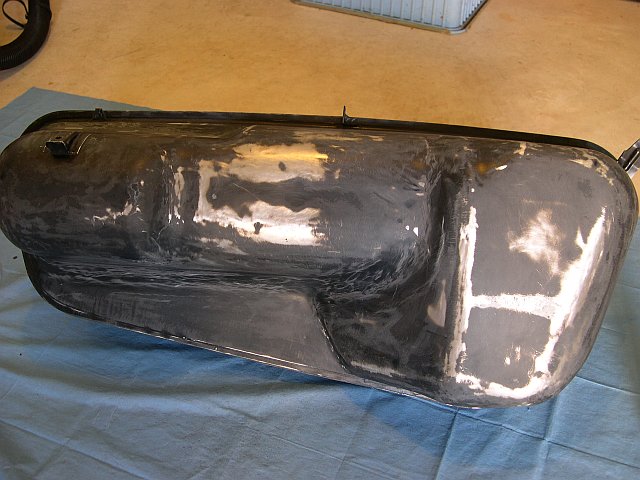 Update(and I know most of you think I'm freakish about this). Update(and I know most of you think I'm freakish about this).The back half is ready to prime. I've sanded with about every grade there is, sometimes having to go to bare metal. All PO runs are gone, as we;; as some minor spots of exterior corrosion. The dehumidifier has the level down to the low 50's. Just to be different, I've rubbed everything down with 96% Isoprop, not Prepsolv. The latter lingers so long that I'm afraid of a spark. Finish is ready to spray. Will try to do it in the AM, but am against time restraints. May have to wipe it down again & spray Friday. This is what the backside looks like now. Pat |
   |

 
|
| avidfanjpl |
Jun 2 2010, 11:59 PM
Post
#22
|
|
914 Hemophiliac Group: Members Posts: 720 Joined: 6-April 10 From: Bear, Delaware Member No.: 11,566 Region Association: MidAtlantic Region |
Hey Pat,
I knew I should have put up info on my tank redo last month, but you are way out in front on this. Here is one really direct secret I wish I had thought of in advance when it comes to the threads on the neck and the sensor. But first: I used POR 15 products totally on the inside. Marine Clean - followed directions Metal Ready - Pretty amazing stuff POR15 - REALLY AMAZING STUFF! But, the one thing I regretted was NOT putting all 13 bolts back in before ANY WORK ON THE TANK! Took me a week to get the parts to chase out the threads and get the tank back together in the car. BUY NEW ZINC PLATED BOLTS AND WASHERS AND USE THE OLD ONES THREADED INTO THE TANK THREADS. If you have a better method than this simple one, use it, but believe me, you won't like it when you can't get the bolts started due to RUST AND PAINT that fill up the threads while you are working so hard. Maybe I am wrong, but it is what I experienced. Best of luck! John avidfanjpl |
|
|
|
| Pat Garvey |
Jun 3 2010, 08:45 PM
Post
#23
|
|
Do I or don't I...........? Group: Members Posts: 5,900 Joined: 24-March 06 From: SE PA, near Philly Member No.: 5,765 Region Association: North East States |
QUOTE(avidfanjpl @ Jun 2 2010, 11:59 PM)  Hey Pat, I knew I should have put up info on my tank redo last month, but you are way out in front on this. Here is one really direct secret I wish I had thought of in advance when it comes to the threads on the neck and the sensor. But first: I used POR 15 products totally on the inside. Marine Clean - followed directions Metal Ready - Pretty amazing stuff POR15 - REALLY AMAZING STUFF! But, the one thing I regretted was NOT putting all 13 bolts back in before ANY WORK ON THE TANK! Took me a week to get the parts to chase out the threads and get the tank back together in the car. BUY NEW ZINC PLATED BOLTS AND WASHERS AND USE THE OLD ONES THREADED INTO THE TANK THREADS. If you have a better method than this simple one, use it, but believe me, you won't like it when you can't get the bolts started due to RUST AND PAINT that fill up the threads while you are working so hard. Maybe I am wrong, but it is what I experienced. Best of luck! John avidfanjpl John, Good thoughts & great stuff for others who undertake this humbling task! I DID replace all old fasteners before using Metal Ready. Chose not to use POR15, for personal reasons. Couldn't start priming today because of heavy rain & dead de-humidifier. Plan on using all new fasteners, sock & seals from AA after all paintwork is finished. Wish me luck! These things are serious to me. Pat |
|
|
|
| tod914 |
Jun 4 2010, 12:05 AM
Post
#24
|
|
Advanced Member Group: Members Posts: 3,755 Joined: 19-January 03 From: Lincoln Park, NJ Member No.: 170 |
John, I like some of the POR products too. After I strip the part to metal, I'll use their Marine clean then Metal ready prior to paint. A little zinc coating for some added insurance. Bust'n a move on that tank Pat. Can't wait to see it finished.
|
|
|
|
| avidfanjpl |
Jun 4 2010, 12:31 AM
Post
#25
|
|
914 Hemophiliac Group: Members Posts: 720 Joined: 6-April 10 From: Bear, Delaware Member No.: 11,566 Region Association: MidAtlantic Region |
Hey Pat and Tod,
You guys are WAY ahead on things than me. I am just one of those that brainfart more wrong than right on this car. Then I get rescued by someone smart that takes folding money. And to see Lincoln Park as a home reminds me of days messing with 914's in Lake Mohawk with Steve Gaglione. Yes, he routinely ruined my day by showing up with the cleanest car in the world. And yes, my old friend and I are reunited again over 914's! And he calls his passion for teeners a disease. Last night he had me wetting my old drawers hearing him talk. Those cars you work on are like him. I have only half the disease. I still like oily stuff. Tom T calls it Halfheimers. I remember only half the stuff I once knew. J |
|
|
|
| tod914 |
Jun 6 2010, 10:22 AM
Post
#26
|
|
Advanced Member Group: Members Posts: 3,755 Joined: 19-January 03 From: Lincoln Park, NJ Member No.: 170 |
Cool deal John. When did you move out of NJ?
|
|
|
|
| Pat Garvey |
Jun 6 2010, 06:03 PM
Post
#27
|
|
Do I or don't I...........? Group: Members Posts: 5,900 Joined: 24-March 06 From: SE PA, near Philly Member No.: 5,765 Region Association: North East States |
QUOTE(tod914 @ Jun 4 2010, 12:05 AM) John, I like some of the POR products too. After I strip the part to metal, I'll use their Marine clean then Metal ready prior to paint. A little zinc coating for some added insurance. Bust'n a move on that tank Pat. Can't wait to see it finished. Tod, like the Metal Ready. Too hot & humid to even prime this weekend. Not going to mess the finish up by being too hurried. Maybe Monday. Damn! Pat PS: I just realized this afternoon that everything I shot was NOT a Rustoleum product. Was, in fact, Krylon. Shame on me! Pat |
|
|
|
| Pat Garvey |
Jun 8 2010, 06:35 PM
Post
#28
|
|
Do I or don't I...........? Group: Members Posts: 5,900 Joined: 24-March 06 From: SE PA, near Philly Member No.: 5,765 Region Association: North East States |
QUOTE(Pat Garvey @ May 16 2010, 06:41 PM) QUOTE(Tom_T @ May 15 2010, 11:18 PM) Pat - what was the red primer you used (name/brand) & where do you get it? Keep up the posts as the project progresses plz! Tom, It's Rustoleum. Yeah, I know that many people thru the years have poo-poo'd it as "non-professional". Fact is this - I've used Rusto products successfully for years. It's all in the preparation, and the tasks between coats. When I first started on this evaporator, I though about just simply taking it down to bare metal with finer & finer grits. I have a Craftsman triple head sander that I use because it moves around corners nicely. But first I used a product called Citrus Strip - you can get it at any FLAPS & comes in brush-on or spray version. I've used the spray version a bunch of times & prefer it because it doesn't leave a mess behind. Spray it on, wait 12-24 hours & the paint amost slides off usually. In this case it didn't get everything, so I brought the sander into play. As you can see, that was the end of the rest of the paint, though I did take the metal down to 800 grit. Next, I wiped everything down with laquer thinner. Opened all doors & ran like hell,even though I wore protection. Didn't smoke my pipe that afternoon! Next came the Rustoleum Rust Tough. It's formulated so that it checks rust, so long as you've scraped any chunks of rust off. I didn't want o take a chance with that, which is why I sanded. Two coats, let dry for 36-48 hrs. Wet sand & let dry. Smooth as a babies bottom & ready to topcoat. Recommend this product. Pat Whoops! Forgot that I changed medium. Not Rustoleun - Krylon! Pat |
|
|
|
| Pat Garvey |
Jun 8 2010, 06:46 PM
Post
#29
|
|
Do I or don't I...........? Group: Members Posts: 5,900 Joined: 24-March 06 From: SE PA, near Philly Member No.: 5,765 Region Association: North East States |
QUOTE(scotty b @ Jun 2 2010, 07:28 PM) No need to go to bare metal unless there is rust showing. As for how far to go ? Just take it to the original paint, you'll know if it is or not as soon as a spot breaks through. Jusat get a decent coat of sealer/primer before topcoating. This will prevent any reactions between the new and old, and will also help to fill the sanding scratches. (IMG:style_emoticons/default/smile.gif) Scotty, On th the front half, I went anal. There were a couple of really minor zits tha I almost grounf through. I started with 60 grit, moved up to 120, the 600, then 1400 - before I put on fresh primer. Figure I wasted at least 6 hours labor. Primed it & moved on. Rear side I got more realistic. Wet sanded the old finish with 120 grit. Will do a followup with 600, but don't really think it's neceassy before priming. Once primed, I'll wet sand with 2000 & start putting on the topcoat. Plan on three, each 2000'd when stable. The, will use light rbbing compound, followed by wax. Pat |
|
|
|
| scotty b |
Jun 13 2010, 02:13 PM
Post
#30
|
|
rust free you say ? Group: Members Posts: 16,375 Joined: 7-January 05 From: richmond, Va. Member No.: 3,419 Region Association: None |
You do realize that the gas tanks were never finished well right ? Almost all I have pulled looked like they had been spray bombed by a retarded sea lion and were covered in runs. What you are doing is in no way original at all (IMG:style_emoticons/default/poke.gif) (IMG:style_emoticons/default/stirthepot.gif)
|
|
|
|
| tod914 |
Jun 13 2010, 02:16 PM
Post
#31
|
|
Advanced Member Group: Members Posts: 3,755 Joined: 19-January 03 From: Lincoln Park, NJ Member No.: 170 |
Scotty, I think Pat was going to add the factory runs in by hand.
|
|
|
|
| Pat Garvey |
Jun 13 2010, 06:43 PM
Post
#32
|
|
Do I or don't I...........? Group: Members Posts: 5,900 Joined: 24-March 06 From: SE PA, near Philly Member No.: 5,765 Region Association: North East States |
QUOTE(scotty b @ Jun 13 2010, 02:13 PM) You do realize that the gas tanks were never finished well right ? Almost all I have pulled looked like they had been spray bombed by a retarded sea lion and were covered in runs. What you are doing is in no way original at all (IMG:style_emoticons/default/poke.gif) (IMG:style_emoticons/default/stirthepot.gif) Scotty, All tanks were not created equally. Yep, some were a bit "knarly". My original tank, as pics will show when it's removed, had a perfect finich - right down to the nipples! I've had this tank out twice. Once, when the car was resprayed (1979), and the when I out the swaybar in (1980). Both times I did nothing but polish. There were NO runs, no drips - just a clean finish. I've seen the bad ones. I've seen the not-so bad ones. And, I've seen terrible origonal finishes. Mine was good from the start. I'm re-creating that finish. When I am finished, I'll show side-by-side pics of my original & the refurbished tank. Maybe then you'll be a believer! Btw - almost zero progress this week. Somesanding & priming, but I threw my back out at work (hurts like a sumbitch). Getting older sucks. More progress (hopefully) in the coming week. Gotta get this done! Pat |
|
|
|
| scotty b |
Jun 13 2010, 07:08 PM
Post
#33
|
|
rust free you say ? Group: Members Posts: 16,375 Joined: 7-January 05 From: richmond, Va. Member No.: 3,419 Region Association: None |
I should have known your nipples were perfect Pat (IMG:style_emoticons/default/av-943.gif)
|
|
|
|
| Pat Garvey |
Jun 14 2010, 06:08 PM
Post
#34
|
|
Do I or don't I...........? Group: Members Posts: 5,900 Joined: 24-March 06 From: SE PA, near Philly Member No.: 5,765 Region Association: North East States |
QUOTE(scotty b @ Jun 13 2010, 07:08 PM) You leave my nipples alone! P |
|
|
|
| Pat Garvey |
Jun 15 2010, 08:03 PM
Post
#35
|
|
Do I or don't I...........? Group: Members Posts: 5,900 Joined: 24-March 06 From: SE PA, near Philly Member No.: 5,765 Region Association: North East States |
OK, now I need some help!
I primed the tank with a zinc-based primer. Seemed like the right thing to do. Prior to priming, everything was wet sanded with 320 grit. Nice "baby's butt" finish. Yhen I primed (after wiping down with 96% Isoprop). But.....now I have this "nubby" finish that needs to be way cut before final coats. Tried wet sanding with 600 - little effect. Don't want to cut through the primer. Any thoughts on steel wool? Just want to take the nubs off, without cutting through 2 coats of primer. I know that most of think I'm whacko, but I want my 914 preservedexactly as I got it in 1972. Pat |
|
|
|
| tod914 |
Jun 15 2010, 08:38 PM
Post
#36
|
|
Advanced Member Group: Members Posts: 3,755 Joined: 19-January 03 From: Lincoln Park, NJ Member No.: 170 |
That's too funny Scotty. Do you think Pat waxes his nipples too?
|
|
|
|
| jonferns |
Jun 15 2010, 08:53 PM
Post
#37
|
|
Advanced Member Group: Members Posts: 2,081 Joined: 29-March 07 From: New Jersey Member No.: 7,631 Region Association: North East States |
Pat, steel wool may leave scratches in the primer. I would keep at the wetsanding, wetsanding with 600 seems to be the right grit for a final primer sanding before paint.
|
|
|
|
| Tom_T |
Jun 15 2010, 11:12 PM
Post
#38
|
|
TMI.... Group: Members Posts: 8,321 Joined: 19-March 09 From: Orange, CA Member No.: 10,181 Region Association: Southern California |
QUOTE(Pat Garvey @ Jun 15 2010, 07:03 PM) OK, now I need some help! I primed the tank with a zinc-based primer. Seemed like the right thing to do. Prior to priming, everything was wet sanded with 320 grit. Nice "baby's butt" finish. Yhen I primed (after wiping down with 96% Isoprop). But.....now I have this "nubby" finish that needs to be way cut before final coats. Tried wet sanding with 600 - little effect. Don't want to cut through the primer. Any thoughts on steel wool? Just want to take the nubs off, without cutting through 2 coats of primer. I know that most of think I'm whacko, but I want my 914 preservedexactly as I got it in 1972. Pat Pat, if it was smooth before paint, then you either got some grit on the surface (dust, lint, steel wool "hairs", etc.), or else the spray droplets dried before hitting the surface & creating the rough surface. Either way you'll need to re-smooth it with stepped grits (320, 400, 600), then shoot it again. Then when you reshoot it, take it in several light coats (I tend to be "the king of runs" & have to watch myself - you may be the opposite erring too far & getting dry paint "dust" by the time it reaches the surface) & be careful with your spray distance to surface, technique, etc. - as the way it lays down can vary with temp., humidity, distance (too far creates a paint dust), how much the rattle can nozzle is putting out & how fine/dense the mist is, how well mixed the paint it, if it's old (sitting in a warehouse or your garage), and other factors. It might help to have a test surface handy each time to try out what works best at particular times of day/night that you shoot coats. The dehumidifier can have localized effects too, if you're close to it, causing the paint mist to dry too much before it reaches the surface. |
|
|
|
| Jasfsmith |
Jun 16 2010, 07:51 AM
Post
#39
|
|
Senior Member Group: Members Posts: 556 Joined: 4-October 04 From: Bangor, ME Member No.: 2,882 Region Association: North East States |
QUOTE(Pat Garvey @ Jun 15 2010, 10:03 PM) I know that most of think I'm whacko, but I want my 914 preservedexactly as I got it in 1972. Pat To late. You've already overdone it. And yes you're a whacko..... |
|
|
|
| Pat Garvey |
Jun 16 2010, 07:51 PM
Post
#40
|
|
Do I or don't I...........? Group: Members Posts: 5,900 Joined: 24-March 06 From: SE PA, near Philly Member No.: 5,765 Region Association: North East States |
QUOTE(Jasfsmith @ Jun 16 2010, 07:51 AM) QUOTE(Pat Garvey @ Jun 15 2010, 10:03 PM) I know that most of think I'm whacko, but I want my 914 preservedexactly as I got it in 1972. Pat To late. You've already overdone it. And yes you're a whacko..... I represent that comment! If you weren't a friend, I'd take offense. Hell, I take offense anyway! E-mail me - want to lnow how you are. Pat |
|
|
|
|
1 User(s) are reading this topic (1 Guests and 0 Anonymous Users)
0 Members:

|
Lo-Fi Version | Time is now: 9th June 2026 - 12:06 AM |
Invision Power Board
v9.1.4 © 2026 IPS, Inc.