|
|
|
Porsche, and the Porsche crest are registered trademarks of Dr. Ing. h.c. F. Porsche AG.
This site is not affiliated with Porsche in any way. Its only purpose is to provide an online forum for car enthusiasts. All other trademarks are property of their respective owners. |
|
|

  |

| poorsche914 |
 May 16 2010, 08:06 PM May 16 2010, 08:06 PM
Post
#1
|
|
9fourteen  Group: Members Posts: 3,151 Joined: 28-May 09 From: Smoky Mountains Member No.: 10,419 Region Association: South East States |
Question for you gurus out there...
My recently purchased LE has the "lip" running across the front edge that I thought was only on the '75-'76 to help hold the big bumpers. Also, as you can see in one of the pics, the hole for the late model bumper shocks is there but so are the early bumper mount holes (of course, since that is the bumper that is on it) Did they set up the front for both style of bumpers as a transition or ??? The bumper top was not covering the "lip"... should I remove that piece? Thanks. (IMG:http://www.914world.com/bbs2/uploads_offsite/www.volksbraggin.com-10419-1274062011.1.jpg) (IMG:http://www.914world.com/bbs2/uploads_offsite/www.volksbraggin.com-10419-1274062012.2.jpg) |
   |

 
|
| jmill |
May 16 2010, 08:20 PM
Post
#2
|
|
Green Hornet Group: Members Posts: 2,449 Joined: 9-May 08 From: Racine, Wisconsin Member No.: 9,038 Region Association: Upper MidWest |
Leave the lip. You need it to hold in the hood seal. The later lip lets water drain easier. Your car might have had front end damage and the front panel replaced. Rick Ollah gave me a factory replacement front panel that looked just like that. The replacement panels were made to fit all years.
Look for signs of front end damage to be sure. |
|
|
|
| 70_914 |
May 16 2010, 09:47 PM
Post
#3
|
|
Member Group: Members Posts: 395 Joined: 4-December 09 From: Roy, WA Member No.: 11,096 Region Association: Pacific Northwest |
That foglight mounting system is interesting. (IMG:style_emoticons/default/confused24.gif) I just checked my 2 sets of foglights and they are all the same, but different from yours. Mine mounts with the bracket vertically, and not to the horn mounting bolt. There appears to be a small extension welded to the end of your bracket..... (IMG:style_emoticons/default/WTF.gif)
(IMG:http://www.914world.com/bbs2/uploads_offsite/img.photobucket.com-11096-1274068683.1.jpg) (IMG:http://www.914world.com/bbs2/uploads_offsite/img.photobucket.com-11096-1274068683.2.jpg) |
|
|
|
| Dave_Darling |
May 16 2010, 10:31 PM
Post
#4
|
|
914 Idiot Group: Members Posts: 15,334 Joined: 9-January 03 From: Silicon Valley / Kailua-Kona Member No.: 121 Region Association: Northern California |
I'm guessing the car was hit in the front, and a panel from a 75-76 914 was used as a repair part. Check carefully for signs of repair.
--DD |
|
|
|
| poorsche914 |
May 16 2010, 10:32 PM
Post
#5
|
|
9fourteen Group: Members Posts: 3,151 Joined: 28-May 09 From: Smoky Mountains Member No.: 10,419 Region Association: South East States |
Yes, I noticed that too but the rains came and I didn't have a chance to really investigate. Looks like there is no mounting hole to the bottom of the fog. I wondered why the fog light flutes were running horizontally instead of vertically.
The PO mentioned the passenger side front fender had been dented and repaired but nothing about the front end having had any repairs. Could have been done before he owned it? I will check tomorrow to see if I can tell if the front section was replaced. |
|
|
|
| Tom_T |
May 17 2010, 01:26 AM
Post
#6
|
|
TMI.... Group: Members Posts: 8,321 Joined: 19-March 09 From: Orange, CA Member No.: 10,181 Region Association: Southern California |
QUOTE(poorsche914 @ May 16 2010, 07:06 PM)  (IMG:http://www.914world.com/bbs2/uploads_offsite/www.volksbraggin.com-10419-1274062011.1.jpg) (IMG:http://www.914world.com/bbs2/uploads_offsite/www.volksbraggin.com-10419-1274062012.2.jpg) (IMG:style_emoticons/default/rolleyes.gif) Depending upon how bad & extensive that rust damage is on the front panel, you may want to find a rust-free & proper 70-74 front wall & replace that, since it does appear to be a 75-76 face used for a half-fast repair at some point. (IMG:style_emoticons/default/blink.gif) It also makes me want to turn my laptop sideways to look at those funky fog light mounts! (IMG:style_emoticons/default/lol-2.gif) |
|
|
|
| dr914@autoatlanta.com |
May 17 2010, 08:43 AM
Post
#7
|
|
914 Guru Group: Members Posts: 8,232 Joined: 3-January 07 From: atlanta georgia Member No.: 7,418 Region Association: None |
The front panel HAS been replaced before. You MUST cut off that extra lip for the bumper top seal to fit properly. Also holes must be drilled and nut cages installed to properly mount the horns and driving lights.
For concours perfection and value, you MUST replace this front panel with the earlier style one cut from another car as the early front panel has long been discontinued. LEs are so valuable these days that one should NEVER go the wrong way when restoring. QUOTE(poorsche914 @ May 16 2010, 07:06 PM) Question for you gurus out there... My recently purchased LE has the "lip" running across the front edge that I thought was only on the '75-'76 to help hold the big bumpers. Also, as you can see in one of the pics, the hole for the late model bumper shocks is there but so are the early bumper mount holes (of course, since that is the bumper that is on it) Did they set up the front for both style of bumpers as a transition or ??? The bumper top was not covering the "lip"... should I remove that piece? Thanks. (IMG:http://www.914world.com/bbs2/uploads_offsite/www.volksbraggin.com-10419-1274062011.1.jpg) (IMG:http://www.914world.com/bbs2/uploads_offsite/www.volksbraggin.com-10419-1274062012.2.jpg) |
|
|
|
| r_towle |
May 17 2010, 08:50 AM
Post
#8
|
|
Custom Member Group: Members Posts: 24,705 Joined: 9-January 03 From: Taxachusetts Member No.: 124 Region Association: North East States |
Show a top and bottom pic of the serial number on the inner fender.
Rich |
|
|
|
| poorsche914 |
May 17 2010, 08:59 AM
Post
#9
|
|
9fourteen Group: Members Posts: 3,151 Joined: 28-May 09 From: Smoky Mountains Member No.: 10,419 Region Association: South East States |
QUOTE(dr914@autoatlanta.com @ May 17 2010, 10:43 AM) The front panel HAS been replaced before. You MUST cut off that extra lip for the bumper top seal to fit properly. Also holes must be drilled and nut cages installed to properly mount the horns and driving lights. For concours perfection and value, you MUST replace this front panel with the earlier style one cut from another car as the early front panel has long been discontinued. LEs are so valuable these days that one should NEVER go the wrong way when restoring. Thank you for your input, George. I thought the lip would have to be removed for proper fitment of the early style bumper. That is what I will do for the short term and in the future replace the entire front panel. I haven't had a chance to look closely to see if I can spot repair work. It sure isn't obvious, though. |
|
|
|
| poorsche914 |
May 17 2010, 09:00 AM
Post
#10
|
|
9fourteen Group: Members Posts: 3,151 Joined: 28-May 09 From: Smoky Mountains Member No.: 10,419 Region Association: South East States |
QUOTE(r_towle @ May 17 2010, 10:50 AM) Show a top and bottom pic of the serial number on the inner fender. Rich Here is the VIN on the front fender well. Will have to go shoot the underside shortly. (IMG:http://www.914world.com/bbs2/uploads_offsite/www.volksbraggin.com-10419-1274108450.1.jpg) |
|
|
|
| r_towle |
May 17 2010, 09:03 AM
Post
#11
|
|
Custom Member Group: Members Posts: 24,705 Joined: 9-January 03 From: Taxachusetts Member No.: 124 Region Association: North East States |
looks stock.
If you look behind the headlights, inside and underneath you might see the LACK of seam sealer in there from the repair... Look at a stock car for comparison... That would most likely be a place they made an error. It looks like a clean, spot welded replacement panel. RIch |
|
|
|
| poorsche914 |
May 17 2010, 09:40 AM
Post
#12
|
|
9fourteen Group: Members Posts: 3,151 Joined: 28-May 09 From: Smoky Mountains Member No.: 10,419 Region Association: South East States |
QUOTE(r_towle @ May 17 2010, 11:03 AM) looks stock. If you look behind the headlights, inside and underneath you might see the LACK of seam sealer in there from the repair... Look at a stock car for comparison... That would most likely be a place they made an error. It looks like a clean, spot welded replacement panel. RIch I just HAD to know so I ran out and took some pictures. The front panel has been replaced but to the untrained eye (mine) it is not very obvious. Looks like a relatively easy repair for someone who knows how to weld (not me) (IMG:http://www.914world.com/bbs2/uploads_offsite/www.volksbraggin.com-10419-1274110808.1.jpg) (IMG:http://www.914world.com/bbs2/uploads_offsite/www.volksbraggin.com-10419-1274110808.2.jpg) (IMG:http://www.914world.com/bbs2/uploads_offsite/www.volksbraggin.com-10419-1274110809.3.jpg) |
|
|
|
| jmill |
May 17 2010, 05:56 PM
Post
#13
|
|
Green Hornet Group: Members Posts: 2,449 Joined: 9-May 08 From: Racine, Wisconsin Member No.: 9,038 Region Association: Upper MidWest |
That's been hit and repaired. Here's pictures of a factory replacement panel. You'll note that the spot weld holes aren't cut and you can mount both bumpers. So George, if you cut the lip off what holds in the hood seal?
Attached thumbnail(s) 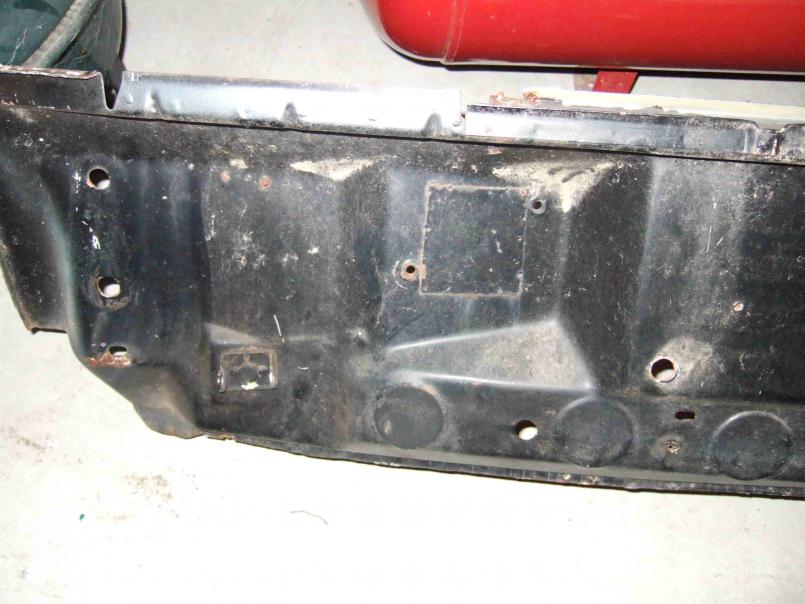
|
|
|
|
| jmill |
May 17 2010, 06:02 PM
Post
#14
|
|
Green Hornet Group: Members Posts: 2,449 Joined: 9-May 08 From: Racine, Wisconsin Member No.: 9,038 Region Association: Upper MidWest |
QUOTE(poorsche914 @ May 17 2010, 10:40 AM) Looks like a relatively easy repair for someone who knows how to weld (not me) Welding a new one on is easy. Getting the old one off without causing more damage is difficult. Attached thumbnail(s) 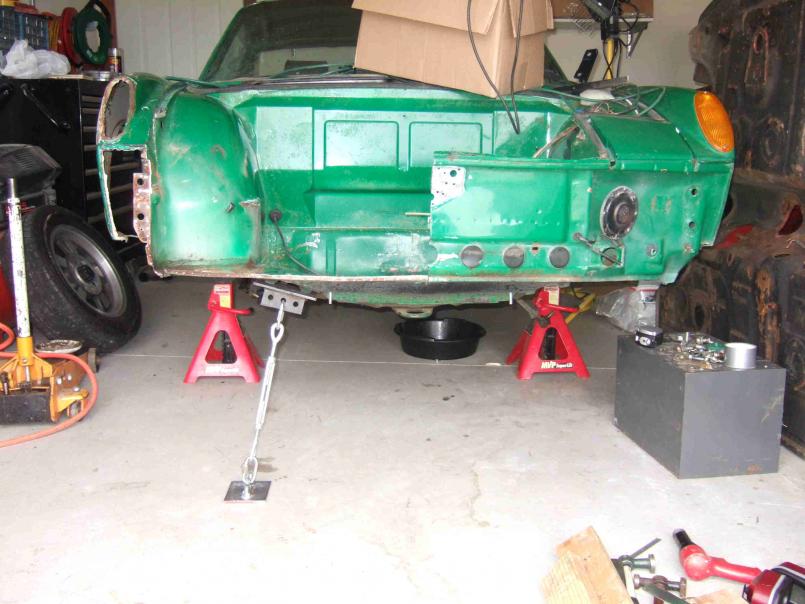 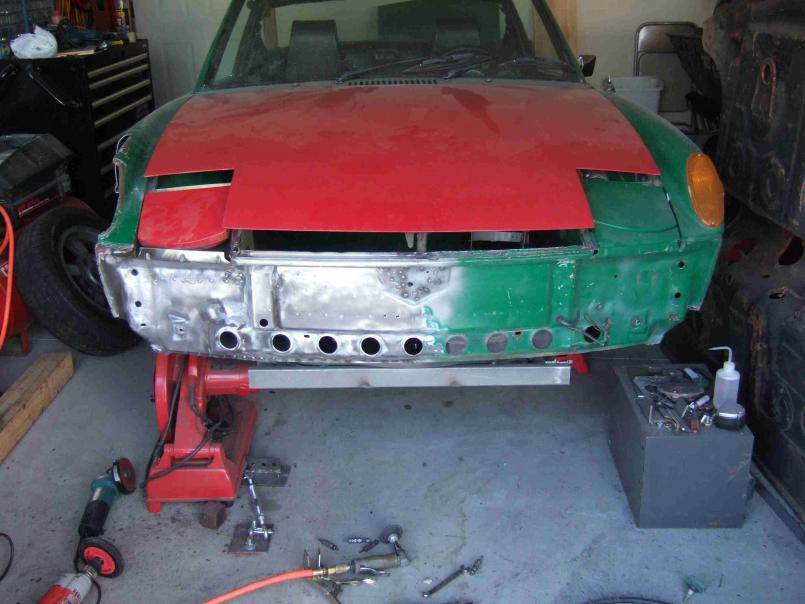
|
|
|
|
| r_towle |
May 17 2010, 06:36 PM
Post
#15
|
|
Custom Member Group: Members Posts: 24,705 Joined: 9-January 03 From: Taxachusetts Member No.: 124 Region Association: North East States |
The seam sealer is the give away...in the first two pics (the white ones) you can see the finger marks on the seam sealer....that is wrong.
When/if you replace the panel, buy the proper spray gun for the seam sealer so you can duplicate the original method and pattern. RIch |
|
|
|
| poorsche914 |
May 17 2010, 06:38 PM
Post
#16
|
|
9fourteen Group: Members Posts: 3,151 Joined: 28-May 09 From: Smoky Mountains Member No.: 10,419 Region Association: South East States |
QUOTE(jmill @ May 17 2010, 07:56 PM) That's been hit and repaired. ... And upon further inspection, the driver quarter panel has been replaced as well. No seam sealer (IMG:style_emoticons/default/dry.gif) |
|
|
|
| jmill |
May 17 2010, 07:57 PM
Post
#17
|
|
Green Hornet Group: Members Posts: 2,449 Joined: 9-May 08 From: Racine, Wisconsin Member No.: 9,038 Region Association: Upper MidWest |
QUOTE(poorsche914 @ May 17 2010, 07:38 PM) And upon further inspection, the driver quarter panel has been replaced as well. No seam sealer (IMG:style_emoticons/default/dry.gif) It might not have. Some areas didn't have it. Where your pics show seam sealer there shouldn't be any. I marked up a picture of mine. No seam sealer there. Mine was hit too though. Note the late headlight bucket and cheesey weld. I didn't know it until I noticed the two buckets were different heights. Attached thumbnail(s) 
|
|
|
|
| poorsche914 |
May 17 2010, 09:40 PM
Post
#18
|
|
9fourteen Group: Members Posts: 3,151 Joined: 28-May 09 From: Smoky Mountains Member No.: 10,419 Region Association: South East States |
I will take pics tomorrow. Passenger fender underneath has seam sealer and appears factory (IMG:style_emoticons/default/confused24.gif) whereas the driver side has NO sealer and the fit is not exact at the leading edge of the door. Didn't look closely at the headlight buckets.
|
|
|
|
| realred914 |
May 18 2010, 09:41 AM
Post
#19
|
|
Senior Member Group: Retired Members Posts: 1,086 Joined: 1-April 10 From: california Member No.: 11,541 Region Association: None |
(IMG:style_emoticons/default/icon8.gif) (IMG:style_emoticons/default/smilie_pokal.gif) (IMG:style_emoticons/default/smash.gif) (IMG:style_emoticons/default/welder.gif)
QUOTE(poorsche914 @ May 17 2010, 08:40 PM) I will take pics tomorrow. Passenger fender underneath has seam sealer and appears factory (IMG:style_emoticons/default/confused24.gif) whereas the driver side has NO sealer and the fit is not exact at the leading edge of the door. Didn't look closely at the headlight buckets. do some research here, the seam sealer looks like it failed, as it is pelling and rusty under it. many repairs may be good metal work, but often they fail with sealing, (hence major rust out at repair spots) when you replace a panel, you should use weld thru primer for all lap joints, then primer with a good epoxy primer, follwed by the correct seam sealer (some is too stiff and will crack, you want a flexable sealer, as a cracked sealer is worse than none at all (water trap) keep in mind that over the years of production, the seam sealer quntity and location, even application method all changed. early cars have much less sealer than later cars. since you have an LE and want to make it right, I'd get some good comparable examples (factory un restored) to look at to make sure you get the seeam seal in the right places with the right textures. little details like this make or break a concours car. do NOT assume that another year 914 will have the same sealer applied. you want an example car as factory sealed, very close to your year style / serial number. this is important. good luck (IMG:style_emoticons/default/chowtime.gif) (IMG:style_emoticons/default/sawzall-smiley.gif) (IMG:style_emoticons/default/santa_smiley.gif) (IMG:style_emoticons/default/cheer.gif) (IMG:style_emoticons/default/driving.gif) (IMG:style_emoticons/default/driving-girl.gif) heck if you wait long enough, I think the rust will take care of that pesky extra metal lip! (IMG:style_emoticons/default/smile.gif) (IMG:style_emoticons/default/smile.gif) (IMG:style_emoticons/default/smile.gif) |
|
|
|
| Root_Werks |
May 18 2010, 10:26 AM
Post
#20
|
|
Village Idiot Group: Members Posts: 8,927 Joined: 25-May 04 From: About 5NM from Canada Member No.: 2,105 Region Association: Pacific Northwest |
QUOTE(jmill @ May 16 2010, 07:20 PM) Leave the lip. You need it to hold in the hood seal. The later lip lets water drain easier. Your car might have had front end damage and the front panel replaced. Rick Ollah gave me a factory replacement front panel that looked just like that. The replacement panels were made to fit all years. Look for signs of front end damage to be sure. (IMG:style_emoticons/default/agree.gif) The 914 I had before this one had the front panel replaced sometime in it's life. But instead of having holes already punched out, it had NO holes punched out. Just the raised areas for them. This included for late bumper shocks. Kinda cool part I remember was none of the holes along the bottom were punched out, so no need for those 8 or so black plastic plugs. |
 |
|
|
1 User(s) are reading this topic (1 Guests and 0 Anonymous Users)
0 Members:

|
Lo-Fi Version | Time is now: 31st March 2026 - 03:46 PM |
Invision Power Board
v9.1.4 © 2026 IPS, Inc.